
1. Einleitung
Thank you for choosing the Conentool 21V Cordless Drill Driver Set. This manual provides essential information for the safe and effective use of your new tool. Please read all instructions carefully before operation to ensure proper handling, maximize performance, and prevent injury. Keep this manual for future reference.
2. Sicherheitshinweise
Beachten Sie beim Umgang mit Elektrowerkzeugen stets grundlegende Sicherheitsvorkehrungen, um das Risiko von Bränden, Stromschlägen und Verletzungen zu verringern.
Allgemeine Sicherheitshinweise für Elektrowerkzeuge
- Sicherheit am Arbeitsplatz: Halten Sie Ihren Arbeitsbereich sauber und gut beleuchtet. Unordnung oder Dunkelheit erhöhen die Unfallgefahr. Betreiben Sie Elektrowerkzeuge nicht in explosionsgefährdeten Bereichen, z. B. in der Nähe von brennbaren Flüssigkeiten, Gasen oder Stäuben.
- Elektrische Sicherheit: Vermeiden Sie Körperkontakt mit geerdeten Oberflächen wie Rohren, Heizkörpern, Herden und Kühlschränken. Setzen Sie Elektrowerkzeuge weder Regen noch Nässe aus.
- Persönliche Sicherheit: Tragen Sie stets eine Schutzbrille. Verwenden Sie bei Bedarf geeignete Schutzausrüstung wie Staubmasken, rutschfeste Sicherheitsschuhe, Schutzhelme oder Gehörschutz. Kleiden Sie sich angemessen; vermeiden Sie weite Kleidung oder Schmuck.
- Werkzeuggebrauch und -pflege: Wenden Sie keine Gewalt an. Verwenden Sie das für Ihren Anwendungszweck geeignete Elektrowerkzeug. Trennen Sie den Netzstecker und/oder entfernen Sie den Akku, bevor Sie Einstellungen vornehmen, Zubehör wechseln oder Elektrowerkzeuge lagern.
- Verwendung und Pflege des Akkus: Laden Sie den Akku nur mit dem vom Hersteller angegebenen Ladegerät auf. Verwenden Sie die Akkus nicht mit anderen Elektrowerkzeugen.
3. Packungsinhalt
Your Conentool 21V Cordless Drill Driver Set includes the following items:
- 1x Akku-Bohrschrauber
- 1x Tragetasche
- 2x 1500mAh Lithium-Ionen-Akkus
- 1x Ladegerät
- 9x Socket Wrenches ( 4-12mm)
- 12x Screwdriver Bits
- Conventional Drill Bits
- Tile Drill Bit
- Long Screwdriver Bit
- 1x flexibler Bohrschaft

Image: Complete Conentool 21V Cordless Drill Driver Set with all accessories laid out.
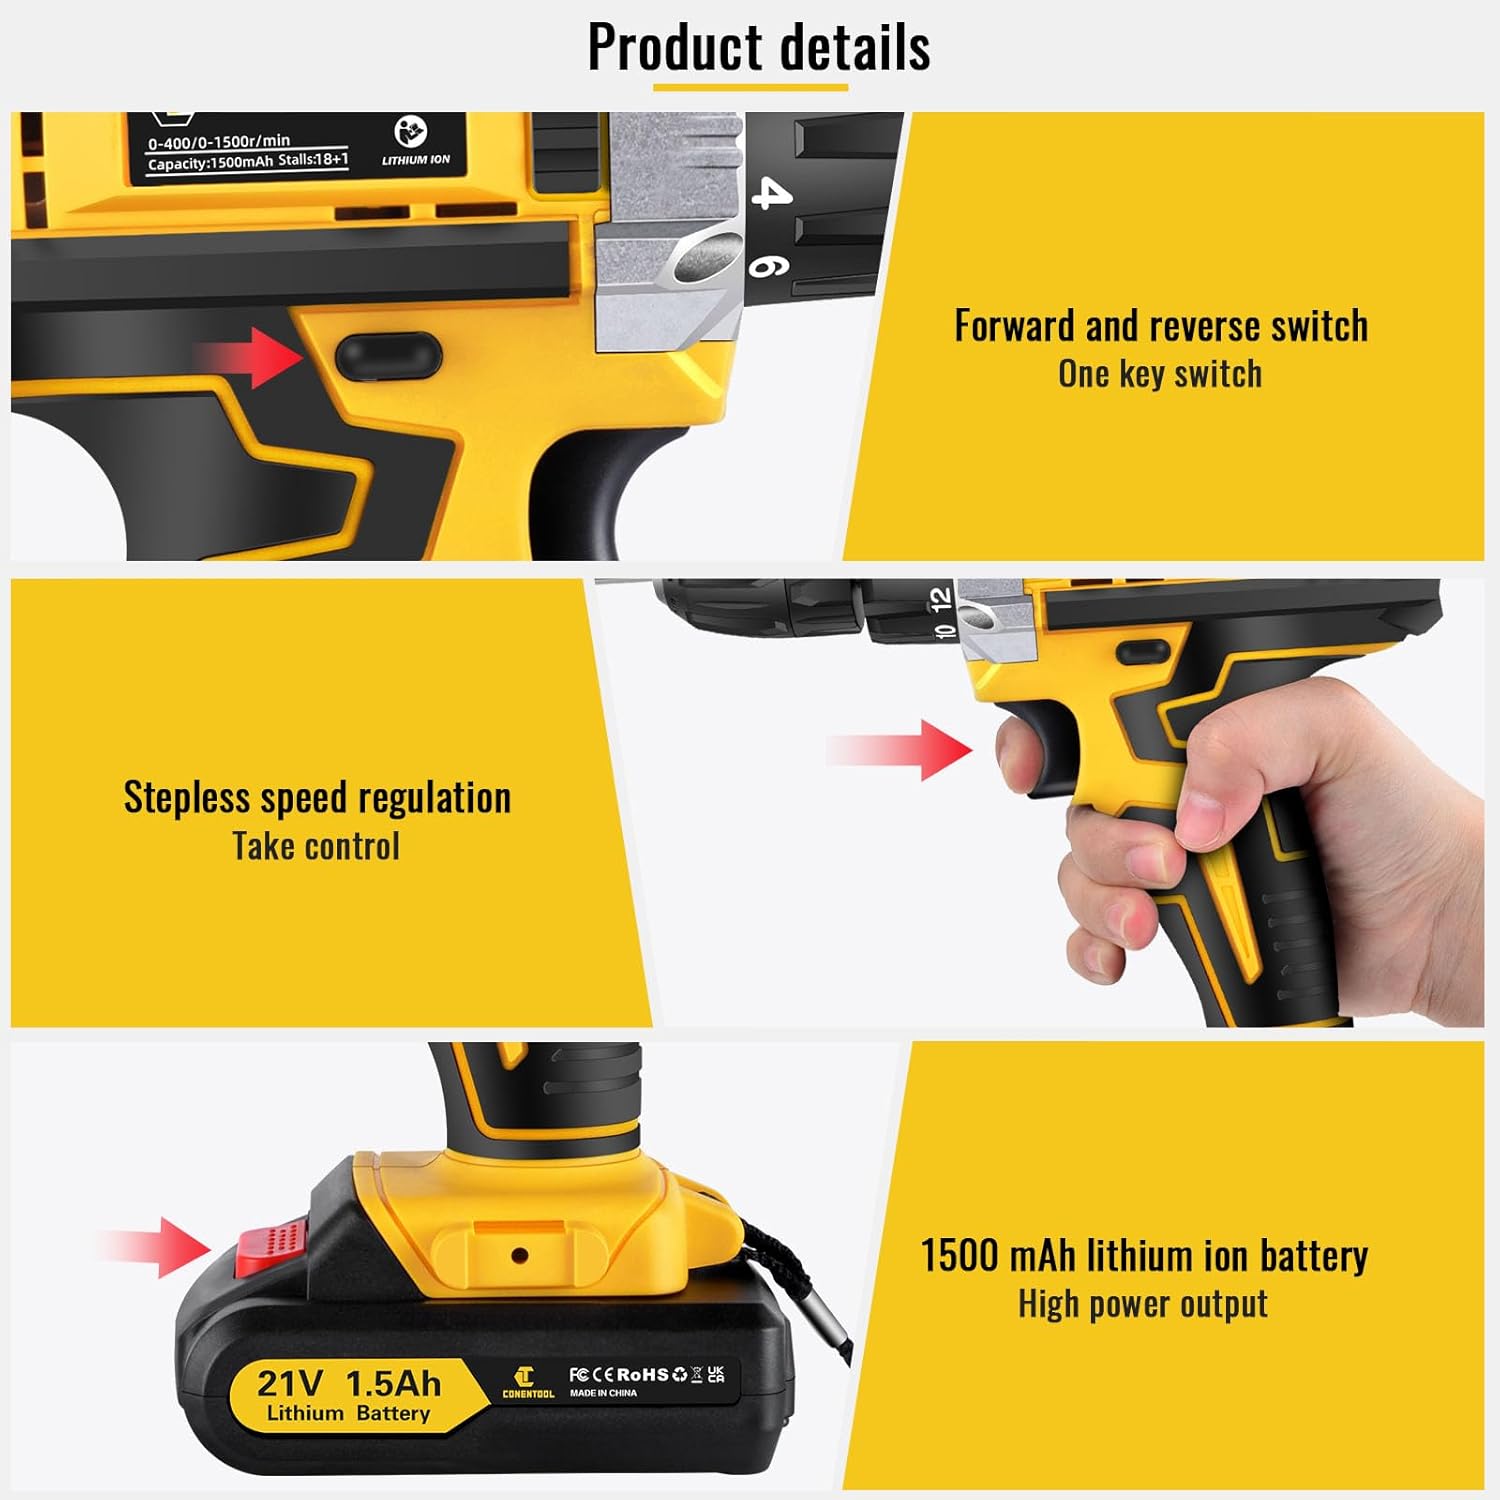
Bild: Nahaufnahme view of the various accessories included in the set, such as the drill, batteries, charger, and different types of bits and wrenches.
4. Produktüberschreitungview
The Conentool 21V Cordless Drill Driver is a versatile and powerful tool designed for various drilling and screwing tasks. It features a robust motor, ergonomic design, and multiple adjustable settings for optimal performance.
Hauptmerkmale:
- 45N.m Max Torque: Bietet ample Power für anspruchsvolle Anwendungen.
- 18+1 Drehmomenteinstellung: Allows precise control for different materials and tasks, from delicate screwing to heavy-duty drilling.
- Two-Speed Setting: Offers flexibility with a low speed (0-400rpm) for high torque applications and a high speed (0-1500rpm) for faster drilling.
- Zwei 1500-mAh-Akkus: Ensures extended operation time with quick charging.
- Kompaktes und leichtes Design: Minimizes user fatigue during prolonged use.
- Eingebautes LED-Licht: Beleuchtet den Arbeitsbereich und sorgt so für bessere Sichtverhältnisse bei schlechten Lichtverhältnissen.
- 3/8" (10mm) Self-Locking Chuck: Enables quick and easy bit changes.
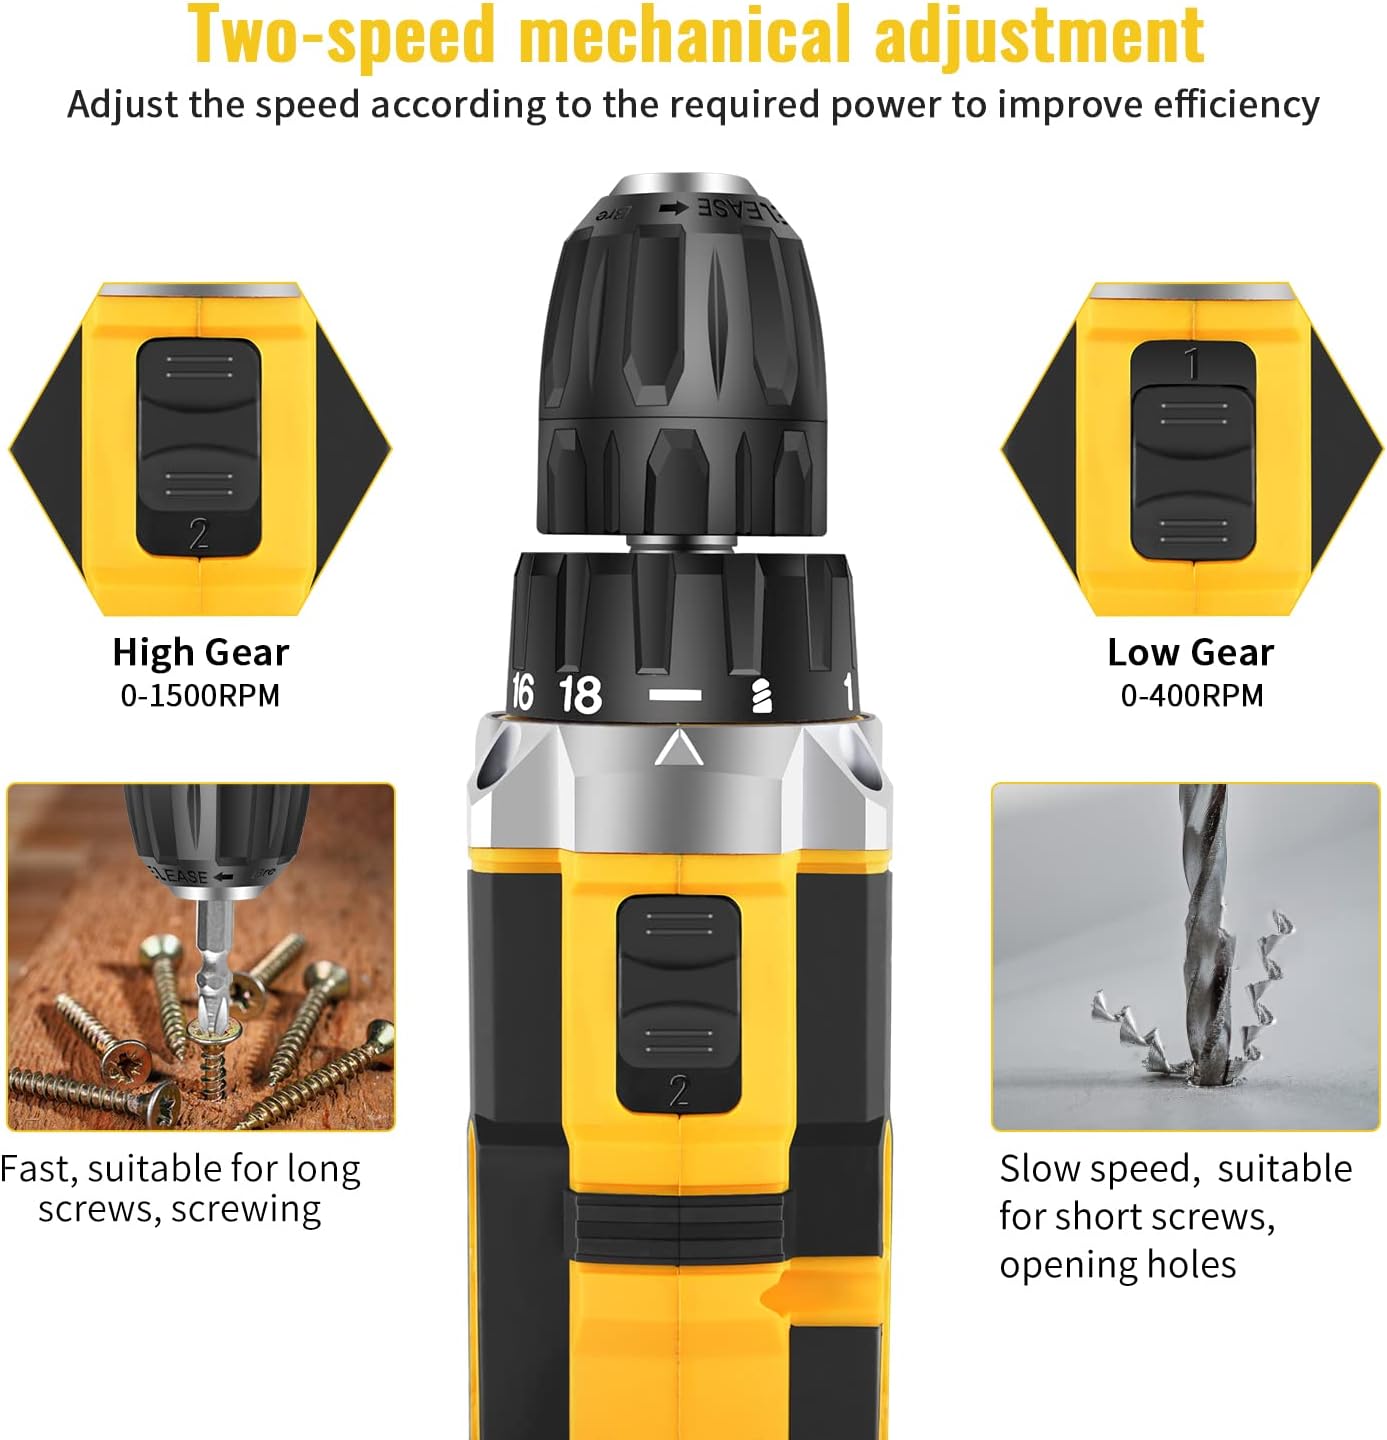
Image: Detailed diagram pointing out various features of the drill, including torque settings, speed selector, ventilation, LED light, and grip.

Image: Visual representation of the drill's internal motor, highlighting its 45N.m maximum torque and efficient heat dissipation.

Image: The drill depicted as lightweight and compact, designed to reduce user fatigue.

Image: Illustration of the drill's motor cooling system, demonstrating effective heat dissipation.

Image: Close-up of the integrated LED light, designed to illuminate the work area.
5. Einrichtung
5.1 Laden des Akkus
The drill comes with two 1500mAh lithium-ion batteries. Before first use, fully charge both batteries. A fast charger is included, and a full charge typically takes about 1 hour.
- Schließen Sie das Ladegerät an eine normale Steckdose an.
- Schieben Sie den Akku auf das Ladegerät, bis er einrastet.
- Die Kontrollleuchte am Ladegerät zeigt den Ladestatus an (genaue Angaben zur Bedeutung der Kontrollleuchte finden Sie in der Bedienungsanleitung des Ladegeräts).
- Sobald der Akku vollständig aufgeladen ist, nehmen Sie ihn aus dem Ladegerät.
5.2 Einsetzen/Entfernen der Batterie
- So installieren Sie: Richten Sie den Akku an der Unterseite des Bohrmaschinengriffs aus und schieben Sie ihn hinein, bis er hörbar einrastet.
- So entfernen Sie: Press the battery release button located on the front of the battery pack and slide the battery out of the drill handle.

Image: Details on battery installation and removal, along with trigger and switch controls.
5.3 Installing Drill Bits/Screwdriver Bits
The drill features a 3/8" (10mm) self-locking chuck for quick and easy bit changes.
- Drehen Sie das Spannfutter gegen den Uhrzeigersinn, um die Backen zu öffnen.
- Insert the desired drill bit or screwdriver bit into the chuck, ensuring it is seated firmly.
- Rotate the chuck clockwise to tighten the jaws securely around the bit. Ensure the bit is centered and tight before operation.

Image: Close-up of the drill chuck, showing how to insert and secure bits.
6. Bedienungsanleitung
6.1 Ein-/Ausschalten und variabler Geschwindigkeitsauslöser
The drill is activated by pressing the variable speed trigger. The speed of rotation increases as you press the trigger further.
- To start the drill, press the trigger.
- To increase speed, press the trigger further.
- Um den Bohrer zu stoppen, lassen Sie den Auslöser los.

Image: Illustration of the variable speed trigger and the forward/reverse button.
6.2 Two-Speed Mechanical Adjustment
The drill has two mechanical speed settings, selected via a switch on top of the drill housing.
- Gear 1 (Low Speed: 0-400rpm): Provides higher torque, ideal for driving screws or drilling into harder materials.
- Gear 2 (High Speed: 0-1500rpm): Provides lower torque but faster rotation, suitable for drilling into softer materials or for quick tasks.

Image: Diagram showing the two-speed selector switch and its corresponding RPM ranges.
6.3 Torque Adjustment (18+1 Settings)
The torque collar allows you to adjust the amount of rotational force the drill applies. This prevents over-tightening screws or damaging materials.
- Rotate the torque collar to select the desired setting from 1 to 18. Lower numbers are for smaller screws and softer materials, higher numbers for larger screws and harder materials.
- The drill icon setting is for drilling applications, providing maximum torque.

Image: The torque adjustment ring with settings for different materials.
6.4 Vorwärts-/Rückwärtsschalter
The forward/reverse switch is located above the trigger and controls the direction of rotation.
- Den Schalter nach links schieben, um die Drehung vorwärts zu steuern (zum Bohren und Festziehen von Schrauben).
- Push the switch to the right for reverse rotation (for loosening screws or removing bits).
- Wenn sich der Schalter in der Mittelstellung befindet, ist der Auslöser verriegelt, wodurch ein versehentliches Einschalten verhindert wird.
6.5 Verwenden des LED-Lichts
Die integrierte LED-Leuchte schaltet sich beim Drücken des Auslösers automatisch ein und sorgt so für gute Sichtverhältnisse in schwach beleuchteten Arbeitsbereichen.

Image: The LED light in action, illuminating the work surface, and the onboard bit holder.
7. Wartung
Regelmäßige Wartung gewährleistet die Langlebigkeit und optimale Leistung Ihrer Bohrmaschine.
- Reinigung: Halten Sie die Lüftungsöffnungen frei und sauber. Verwenden Sie ein weiches, trockenes Tuch.amp Reinigen Sie das Werkzeug mit einem Tuch. Verwenden Sie keine scharfen Chemikalien oder Scheuermittel.
- Batteriepflege: Bewahren Sie Batterien an einem kühlen, trockenen Ort und vor direkter Sonneneinstrahlung geschützt auf. Lagern Sie vollständig entladene Batterien nicht über längere Zeit. Laden Sie sie regelmäßig auf, wenn Sie sie nicht verwenden.
- Lagerung: Store the drill and all accessories in the provided carry case in a dry, secure location, out of reach of children.
8. Fehlerbehebung
If you encounter issues with your Conentool drill, refer to the following common problems and solutions:
| Problem | Mögliche Ursache | Lösung |
|---|---|---|
| Bohrer startet nicht | Battery not charged; Battery not properly inserted; Forward/Reverse switch in center (locked) position. | Charge battery; Re-insert battery securely; Move switch to forward or reverse position. |
| Stromausfall während des Betriebs | Battery low; Overload. | Recharge battery; Reduce pressure on the drill or use a lower speed/higher torque setting. |
| Bit wobbles or falls out | Chuck not tightened sufficiently; Bit shank damaged. | Re-tighten chuck firmly; Replace damaged bit. |
| Überhitzung | Länger andauernde intensive Nutzung; blockierte Belüftung. | Allow tool to cool down; Clear ventilation openings. |
If the problem persists after attempting these solutions, please contact Conentool customer support.
9. Spezifikationen
| Besonderheit | Spezifikation |
|---|---|
| Modellnummer | P000125 |
| Bandtage | 21 V |
| Akku-Typ | Lithium-Ionen |
| Batteriekapazität | 1500 mAh (1.5 Ah) |
| Maximaler Drehmoment | 45 Nm |
| Drehmomenteinstellungen | 18+1 |
| Leerlaufdrehzahl (niedrig) | 0-400 U/min |
| Leerlaufdrehzahl (Hoch) | 0-1500 U/min |
| Chuck Größe | 3/8" (10 mm) |
| Stromquelle | Batteriebetrieben |
| Material | Metall |
| Artikelgewicht | 2.5 kg |
| Technische Daten | 30.5 x 27 x 10.5 cm |
10. Garantie und Support
Conentool is committed to providing high-quality tools. For any product-related inquiries, technical assistance, or warranty claims, please contact Conentool customer support. Refer to your purchase documentation for specific warranty terms and contact information.
You can also visit the official Conentool store on Amazon for more information and support: Conentool Store