1. Einleitung
This manual provides essential information for the safe and effective use of your Murray EQ2-500 2nd Gen self-propelled petrol lawnmower. Please read these instructions carefully before assembly, operation, or maintenance. Keep this manual for future reference.

Figure 1: Murray EQ2-500 2nd Gen Lawnmower. This image shows the complete lawnmower from a side angle, highlighting its overall design and components such as the engine, grass bag, and handle.
2. Sicherheitshinweise
Sicherheit hat beim Betrieb von motorbetriebenen Geräten stets oberste Priorität. Die Nichtbeachtung dieser Sicherheitsrichtlinien kann zu schweren Verletzungen oder Sachschäden führen.
- Lesen Sie das Handbuch: Familiarize yourself with all controls and safety decals before operating the lawnmower.
- Persönliche Schutzausrüstung (PSA): Always wear appropriate eye protection, hearing protection, sturdy footwear, and long trousers. Do not operate barefoot or in open-toed sandals.
- Räumen Sie den Bereich frei: Before starting, clear the mowing area of objects such as rocks, toys, wires, or other debris that could be thrown by the blade.
- Halten Sie Unbeteiligte fern: Stellen Sie sicher, dass sich Kinder, Haustiere und andere Personen in einem sicheren Abstand (mindestens 15 Meter / 50 Fuß) vom Arbeitsbereich befinden.
- Kraftstoffhandhabung: Handle petrol with extreme care. It is highly flammable. Refuel outdoors, away from sparks or open flames, and do not smoke while refueling. Allow the engine to cool before refueling.
- Motorabschaltung: Vor jeglichen Einstell-, Reinigungs- oder Wartungsarbeiten muss der Motor immer abgestellt und das Zündkerzenkabel abgeklemmt werden.
- Hangbetrieb: Beim Mähen an Hängen ist äußerste Vorsicht geboten. Mähen Sie quer zum Hang, niemals bergauf oder bergab. Vermeiden Sie das Mähen extrem steiler Hänge.
- Klingensicherheit: Never place hands or feet near rotating parts. The blade continues to rotate for a short period after the engine is shut off.
- Wartung: Regularly inspect the lawnmower for damage, loose parts, or wear. Replace worn or damaged parts with genuine Murray or Briggs & Stratton components.
3. Produktüberschreitungview und Funktionen
The Murray EQ2-500 2nd Gen is a self-propelled petrol lawnmower designed for small to medium-sized lawns. It features a robust Briggs & Stratton engine and versatile cutting options.
- Motor: Powered by a reliable Briggs & Stratton 500E Series 140cc engine, delivering 6.78 Nm of torque and a nominal power of 2.03 kW at 2900 rpm.
- Schnittbreite: 46 cm (18 inches) for efficient coverage.
- Schnitthöheneinstellung: Centralized 6-level adjustment from 25 mm to 75 mm.
- 4-in-1-Funktionalität: Offers grass collection, mulching, rear discharge, and side discharge options.
- Grasfänger: Large 50-liter grass bag with a dust shield and fill level indicator.
- Langlebige Konstruktion: Features a reinforced steel deck for enhanced protection and longevity.
- Einfache Reinigung: Equipped with an integrated wash port for convenient deck cleaning.

Figure 2: Key specifications of the Murray EQ2-500 lawnmower, including 46 cm cutting width, 140 cc engine capacity, 7.3 Nm max torque, 2.03 kW nominal power, and 50 L grass basket.

Figure 3: Features of the Murray EQ2-500 lawnmower, including 6-step central cutting height adjustment, self-propelled drive, housing cleaning system, reinforced steel casing, and Briggs & Stratton engine.
4. Aufbau und Montage
Your lawnmower requires some assembly and preparation before its first use.
4.1 Auspacken
- Entnehmen Sie vorsichtig alle Komponenten aus der Verpackung.
- Check for any damage during transit. Contact your dealer immediately if any parts are damaged or missing.
- Bewahren Sie die Verpackungsmaterialien auf, bis Sie mit dem Produkt zufrieden sind.
4.2 Lenkermontage
- Unfold the handlebar assembly and secure it in the operating position using the provided knobs or levers. Ensure all cables are routed correctly and not pinched.

Figure 4: Handlebar assembly. This image shows the upper part of the lawnmower handle, illustrating how it connects to the main body and the control levers.
4.3 Motoröl nachfüllen
The engine is shipped without oil. You must add oil before the first start.
- Place the lawnmower on a level surface.
- Suchen Sie den Öleinfülldeckel/Ölmessstab am Motor.
- Remove the cap and slowly pour 0.47 liters of SAE30 4-stroke engine oil into the oil fill opening. Do not overfill.
- Check the oil level using the dipstick. It should be between the "Full" and "Add" marks.
- Den Öleinfülldeckel wieder fest verschließen.
Note: Engine oil is not included with the lawnmower and must be purchased separately.

Figure 5: Briggs & Stratton 500E Series engine. This close-up view highlights the engine, including the oil fill cap and other components, essential for maintenance and setup.
4.4 Kraftstoff nachfüllen
Use fresh, unleaded petrol with an octane rating of 87 or higher. Do not use E85 fuel.
- Stellen Sie sicher, dass der Motor ausgeschaltet und abgekühlt ist.
- Tanken Sie im Freien an einem gut belüfteten Ort.
- Remove the fuel cap and fill the tank, leaving some space for expansion. Do not overfill.
- Den Tankdeckel wieder fest verschließen.
5. Bedienungsanleitung
Befolgen Sie diese Schritte für einen sicheren und effektiven Betrieb Ihres Rasenmähers.
5.1 Einstellen der Schnitthöhe
The cutting height can be adjusted centrally to 6 different positions, from 25 mm to 75 mm.
- Stellen Sie sicher, dass der Motor ausgeschaltet ist.
- Locate the central height adjustment lever, typically near one of the rear wheels.
- Ziehen Sie den Hebel nach außen und stellen Sie die gewünschte Höhe ein. Lassen Sie den Hebel los, um ihn zu arretieren.
- Stellen Sie sicher, dass alle Räder auf die gleiche Höhe eingestellt sind, um einen gleichmäßigen Schnitt zu gewährleisten.
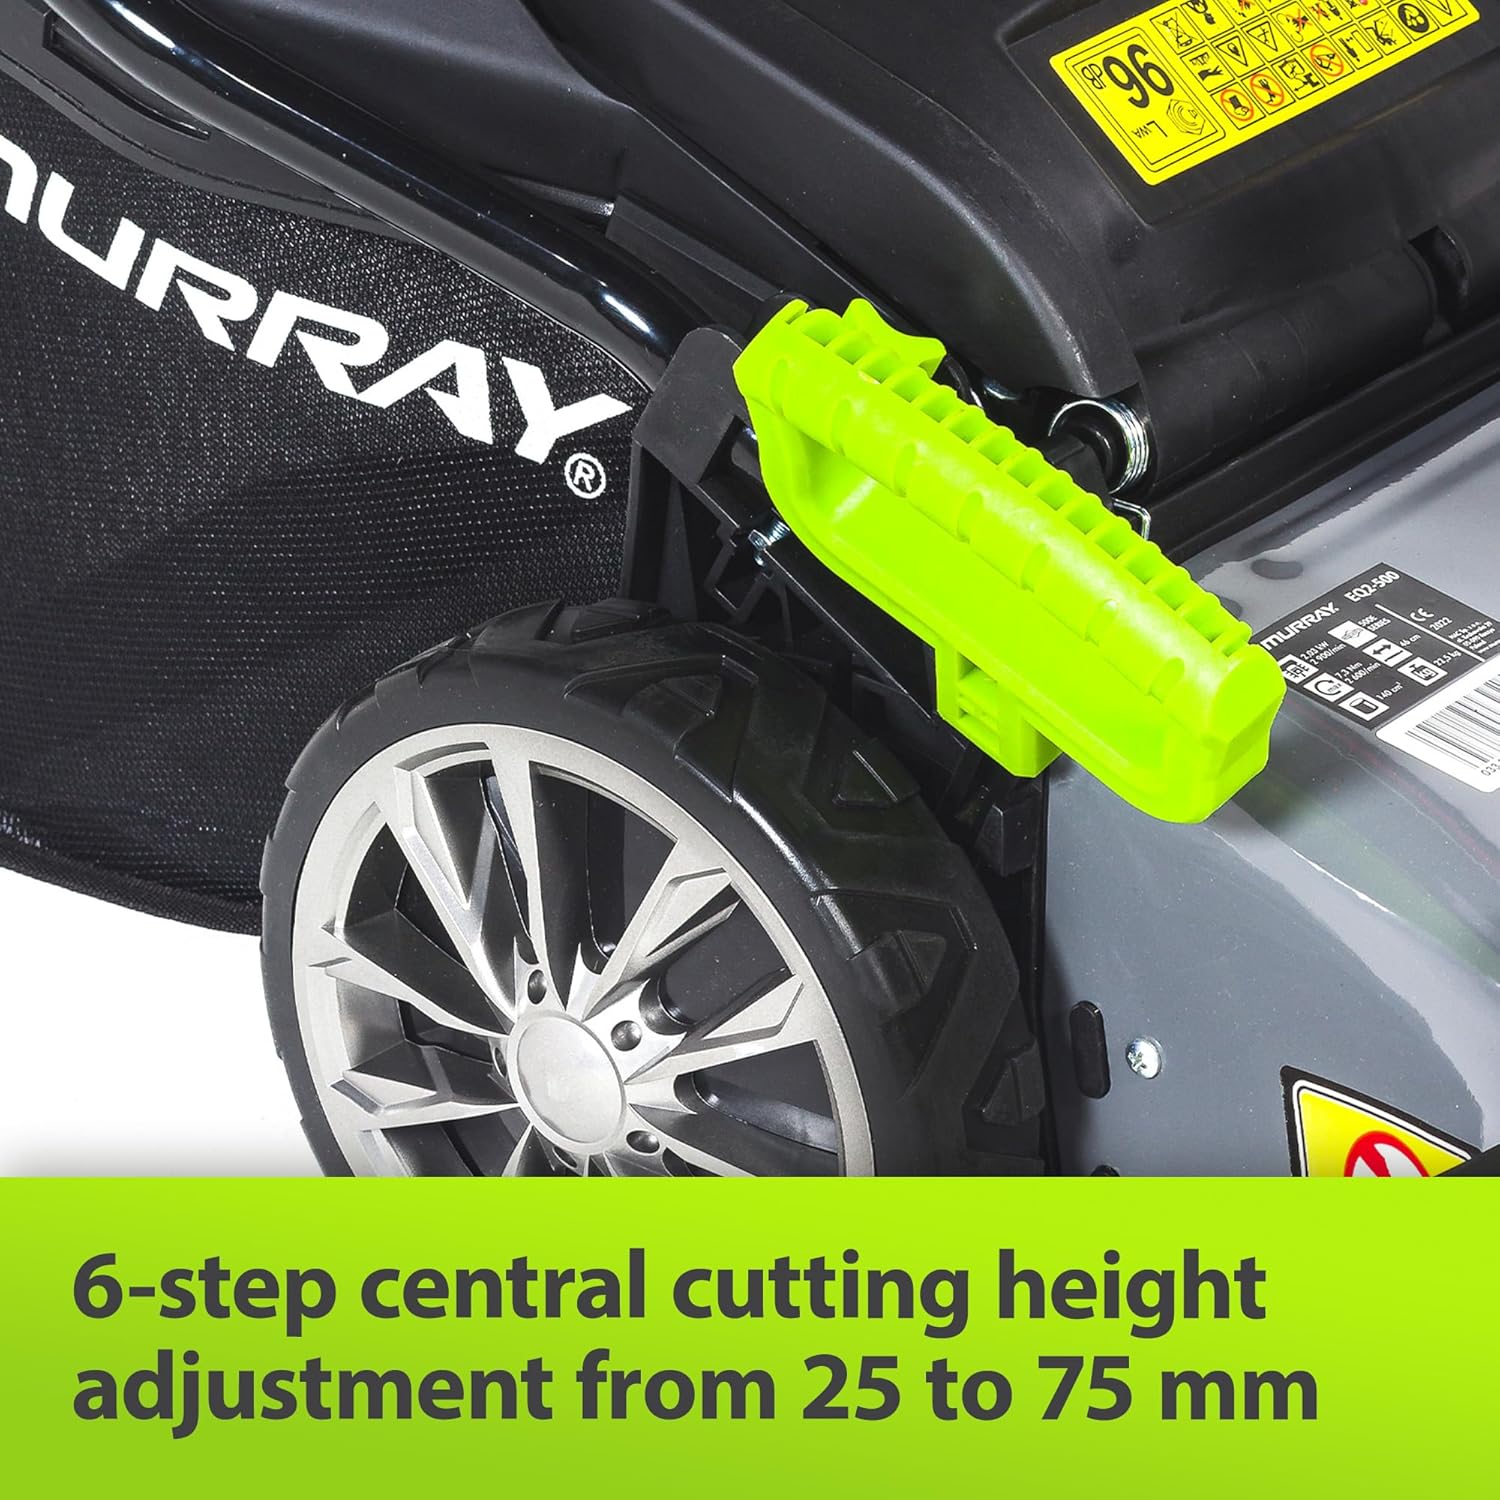
Figure 6: 6-step central cutting height adjustment. This image shows the lever used to adjust the cutting height from 25 mm to 75 mm, located near the rear wheel.
5.2 Motor starten
- Stellen Sie sicher, dass das Zündkerzenkabel fest angeschlossen ist.
- Drücken Sie die Primerpumpe (falls vorhanden) 3-5 Mal, bis Kraftstoff sichtbar ist.
- Hold the operator presence control bar (safety bar) against the handle.
- Ziehen Sie das Starterseil fest und gleichmäßig, bis der Motor anspringt.
- Once the engine is running, release the starter rope.

Figure 7: Handlebar control lever. This image shows the green lever on the handlebar, which is typically the operator presence control bar that must be held to allow the engine to run.
5.3 Engaging Self-Propelled Drive
To engage the self-propelled function, squeeze the drive control lever (usually a second lever on the handlebar) towards the main handle. Release the lever to disengage the drive.
5.4 Using 4-in-1 Functions
The EQ2-500 offers four cutting modes:
- Grassammlung: Attach the 50-liter grass bag to the rear discharge opening. The bag collects clippings for easy disposal. Monitor the fill level indicator.
- Mulchen: Insert the mulching plug into the rear discharge opening. This recycles clippings back into the lawn as natural fertilizer.
- Heckauswurf: Remove the grass bag and mulching plug. Clippings are discharged from the rear of the mower.
- Seitenauswurf: Attach the side discharge chute to the side opening. This directs clippings away from the mower to the side.
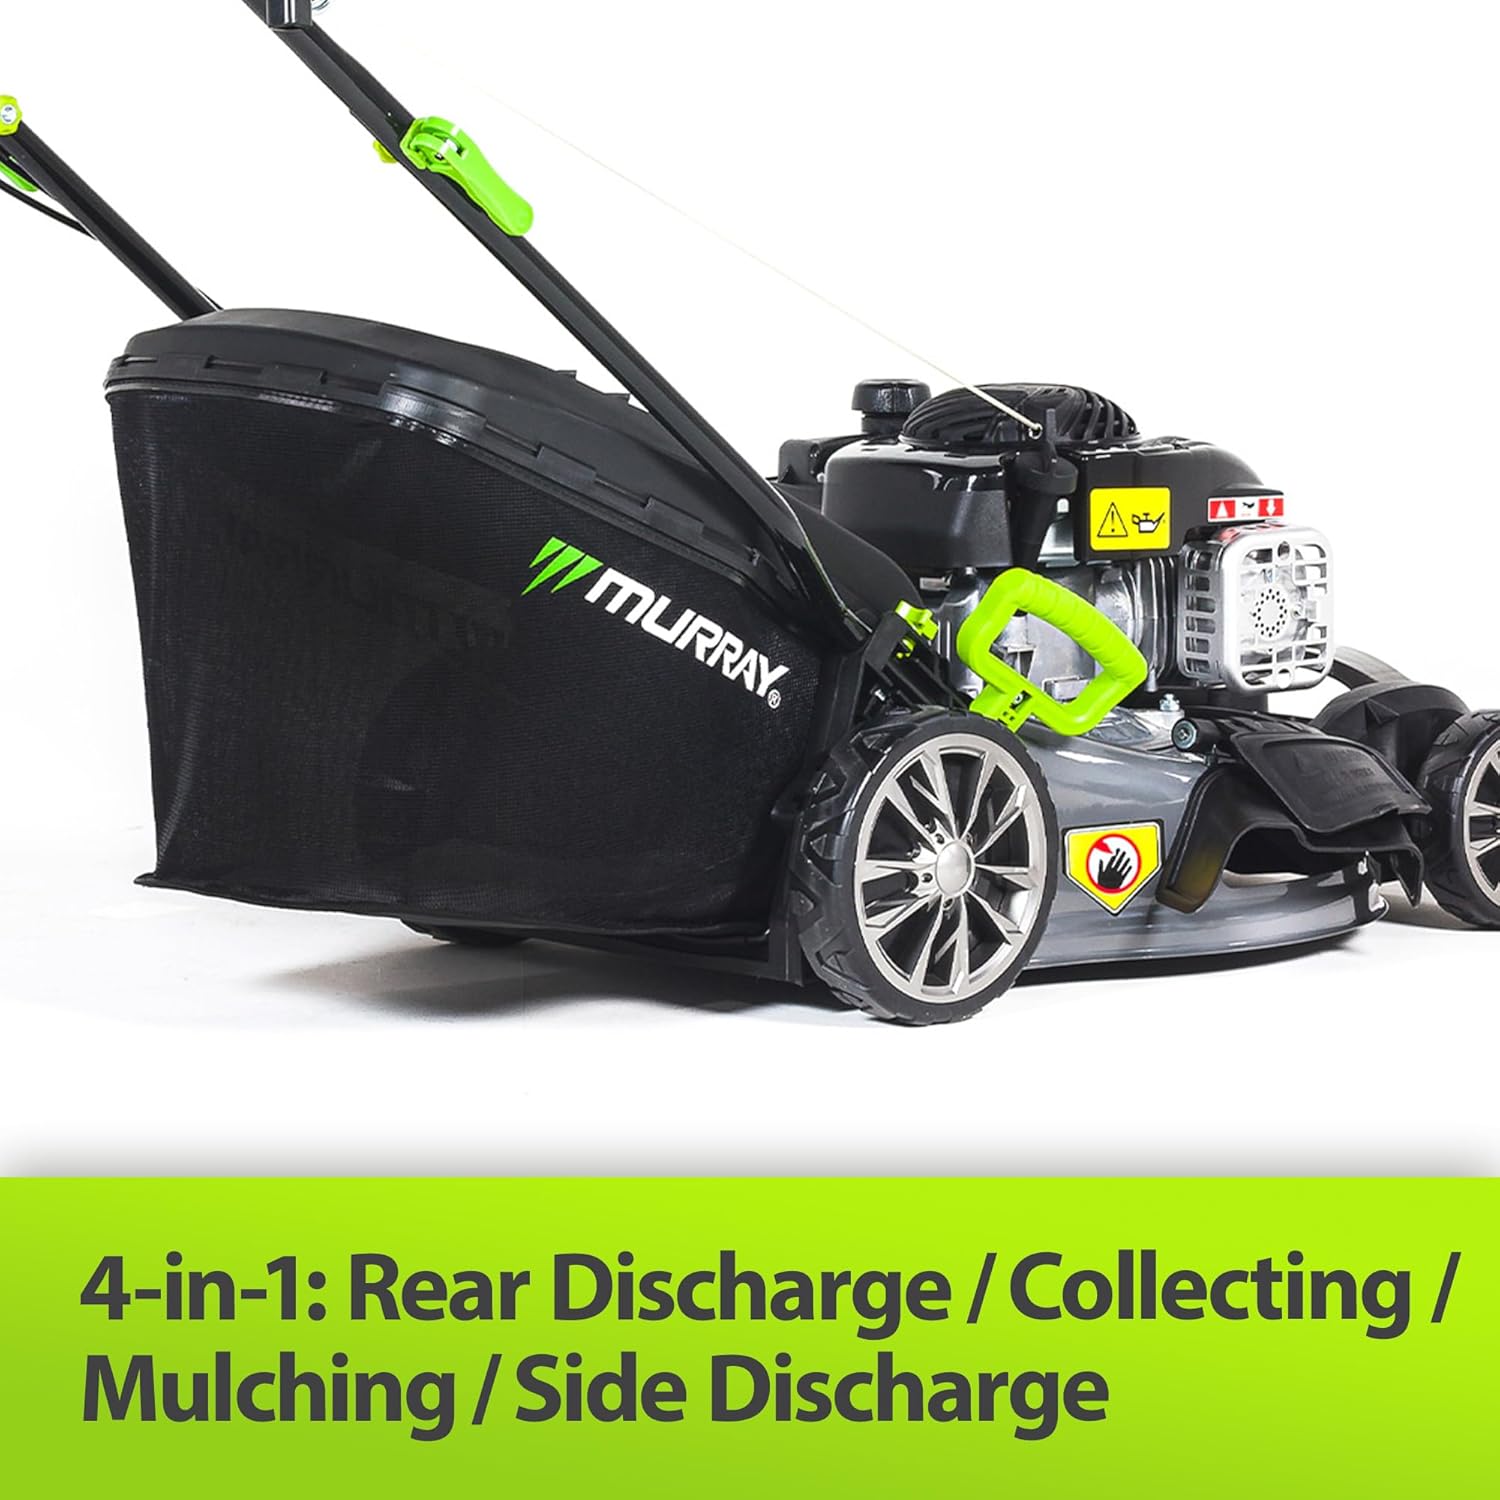
Figure 8: 4-in-1 functionality. This image shows the lawnmower with the grass collection bag attached, demonstrating one of its versatile cutting modes.

Figure 9: Mulching or side discharge setup. This image shows the area where the mulching plug or side discharge chute would be installed, allowing for different grass disposal methods.
6. Wartung
Regular maintenance ensures optimal performance and extends the life of your lawnmower.
6.1 Cleaning the Mower Deck
The integrated wash port makes cleaning the underside of the deck easy.
- After each use, ensure the engine is off and cool, and the spark plug wire is disconnected.
- Connect a garden hose to the integrated wash port.
- Drehen Sie die Wasserzufuhr auf.
- Start the engine and let it run for a few minutes to allow the rotating blade to clean the deck.
- Turn off the engine, disconnect the spark plug wire, and turn off the water supply.
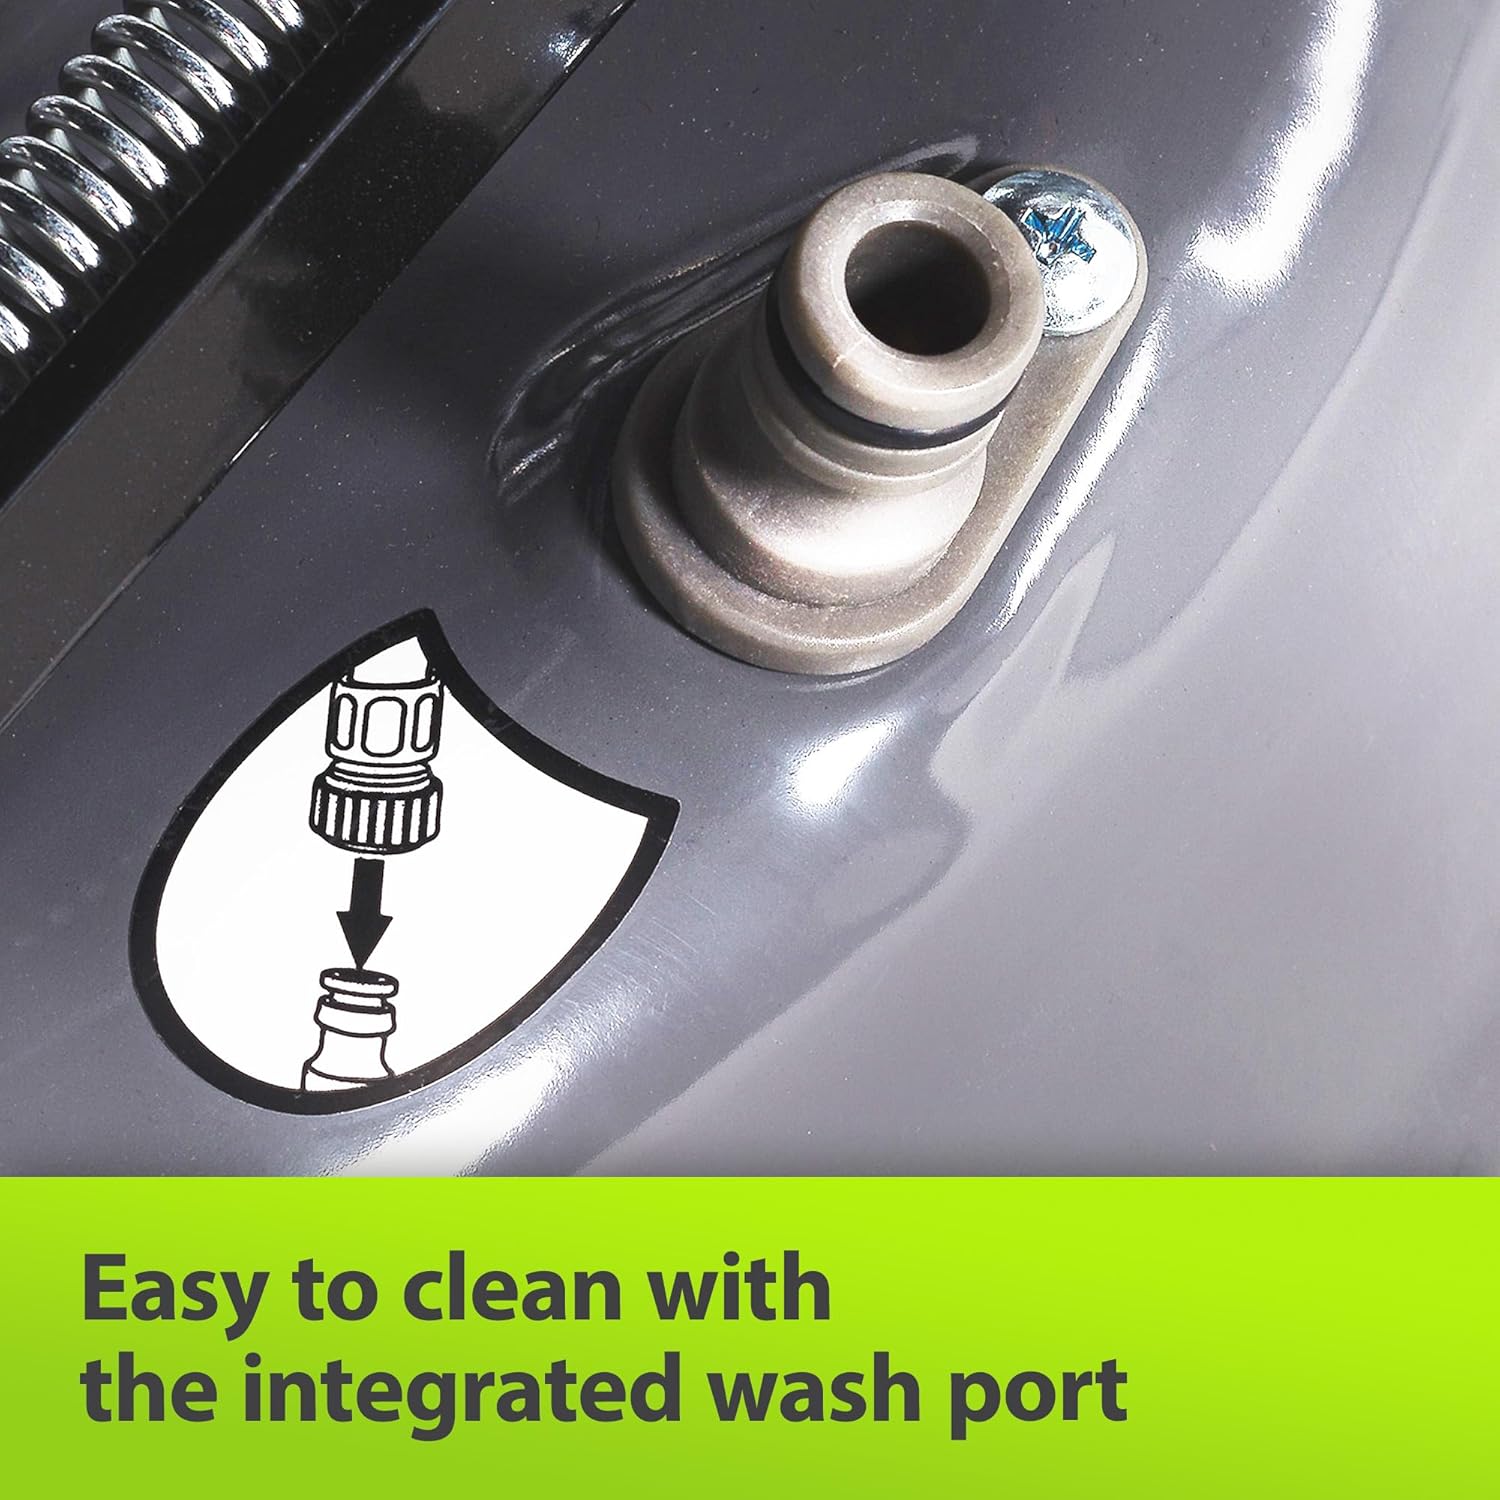
Figure 10: Integrated wash port. This close-up shows the connection point for a garden hose, facilitating easy cleaning of the mower deck.
6.2 Motorwartung
- Ölwechsel: Change the engine oil after the first 5 hours of operation, then every 25 hours or annually, whichever comes first. Refer to the Briggs & Stratton engine manual for detailed instructions.
- Luftfilter: Inspect and clean the air filter regularly, especially in dusty conditions. Replace if damaged or excessively dirty.
- Zündkerze: Die Zündkerze sollte jährlich überprüft werden. Bei Bedarf reinigen oder austauschen.
6.3 Wartung der Klinge
- Inspektion: Überprüfen Sie die Klinge regelmäßig auf Schärfe und Beschädigungen. Eine stumpfe Klinge reißt das Gras ein, was zu einem ungesunden Rasen führt.
- Schärfen/Austausch: Have the blade sharpened or replaced by a qualified service technician. Always use genuine replacement parts.

Figure 11: Underside of the mower. This view shows the cutting blade, which requires regular inspection and maintenance for optimal performance.
6.4 Speicherung
- Für die Langzeitlagerung den Kraftstofftank entleeren oder einen Kraftstoffstabilisator hinzufügen.
- Clean the entire lawnmower thoroughly.
- An einem trockenen, gut belüfteten Ort lagern, vor direkter Sonneneinstrahlung und extremen Temperaturen schützen.
- Der Lenker lässt sich zur kompakten Lagerung zusammenklappen.
7. Fehlerbehebung
In diesem Abschnitt werden häufige Probleme behandelt, die bei Ihrem Rasenmäher auftreten können.
| Problem | Mögliche Ursache | Lösung |
|---|---|---|
| Motor startet nicht | No fuel; old fuel; spark plug disconnected; clogged air filter; low oil level. | Add fresh fuel; connect spark plug wire; clean/replace air filter; check oil level and add if necessary. |
| Der Motor läuft schlecht oder geht aus. | Clogged air filter; old fuel; dirty spark plug; carburetor issues. | Clean/replace air filter; use fresh fuel; clean/replace spark plug; consult a service technician for carburetor issues. |
| Ungleichmäßiger Schnitt | Dull or bent blade; uneven cutting height adjustment; debris under deck. | Sharpen/replace blade; ensure all wheels are set to the same height; clean underside of deck. |
| Übermäßige Vibration | Verbogene oder unausgewogene Klinge; lose Motorbefestigungsschrauben. | Inspect and replace blade if bent; tighten engine mounting bolts; consult a service technician. |
| Self-propelled drive not engaging | Drive cable loose or damaged; belt worn or broken. | Inspect and adjust drive cable; replace worn belt; consult a service technician. |
If you encounter problems not listed here or if solutions do not resolve the issue, contact an authorized service center.
8. Spezifikationen
| Besonderheit | Spezifikation |
|---|---|
| Modell | EQ2-500 |
| Motor | Briggs & Stratton 500E Series, 140cc |
| Maximaler Drehmoment | 6.78 Nm |
| Nennleistung | 2.03 kW bei 2900 U/min |
| Schnittbreite | 46 cm (18 Zoll) |
| Schnitthöheneinstellung | Centralized, 6 positions (25 mm - 75 mm) |
| Grassackkapazität | 50 Liter |
| Funktionen | 4-in-1 (Collection, Mulching, Rear Discharge, Side Discharge) |
| Deck Material | Legierter Stahl |
| Gewicht | 26.56 kg |
| Abmessungen (L x B x H) | 150 x 52 x 103 cm |
| Oil Requirement | 0.47 Liters SAE30 4-stroke engine oil (not included) |
| Montage erforderlich | Ja |
9. Garantie und Support
Your Murray EQ2-500 2nd Gen lawnmower comes with a limited warranty and access to a support network.
- Garantie: A 2-year limited consumer warranty is provided. Please retain your proof of purchase.
- Engine Parts Support: For engine-specific spare parts and service, your Murray petrol lawnmower is supported by the extensive network of authorized Briggs & Stratton dealers.
- Murray Specific Parts: For Murray-specific spare parts, please consult an authorized Murray dealer.
- Kontakt: Beachten Sie Ihre Kaufunterlagen oder die Angaben des Herstellers. website for contact information for authorized service centers.


