1. Einleitung
This manual provides detailed instructions for the safe and effective operation of your Andoer 4K 48MP 60FPS WiFi Camcorder. Please read this manual thoroughly before using the device and retain it for future reference. This camcorder is designed for high-quality video recording and photography, featuring 4K Ultra HD resolution, 48-megapixel photos, a 3-inch IPS touchscreen, and infrared night vision capabilities. It is equipped with WiFi connectivity for easy file transfer and remote control, and comes with essential accessories such as an external microphone and a wide-angle macro lens.

Image 1.1: Andoer 4K Camcorder with included accessories.
2. Packungsinhalt
Bitte prüfen Sie, ob alle unten aufgeführten Artikel in Ihrem Paket enthalten sind. Sollten Artikel fehlen oder beschädigt sein, wenden Sie sich bitte an Ihren Händler.

Abbildung 2.1: Alle im Paket enthaltenen Komponenten.
- Camcorder
- Mikrofon
- Windschutz für Mikrofon
- 3.5-mm-TRS-zu-TRS-Audiokabel
- USB-Kabel
- Handgriff
- Camera Lens (Wide-angle macro lens)
- Objektiv-Adapterring
- 2 x Lithium-polymer Batteries (2000mAh)
- Fernbedienung
- Camcorder Storage Bag
- Objektiv-Aufbewahrungstasche
- Camcorder User Manual
- Mikrofon-Benutzerhandbuch
3. Produktüberschreitungview
Machen Sie sich mit den verschiedenen Teilen und Bedienelementen Ihres Camcorders vertraut.
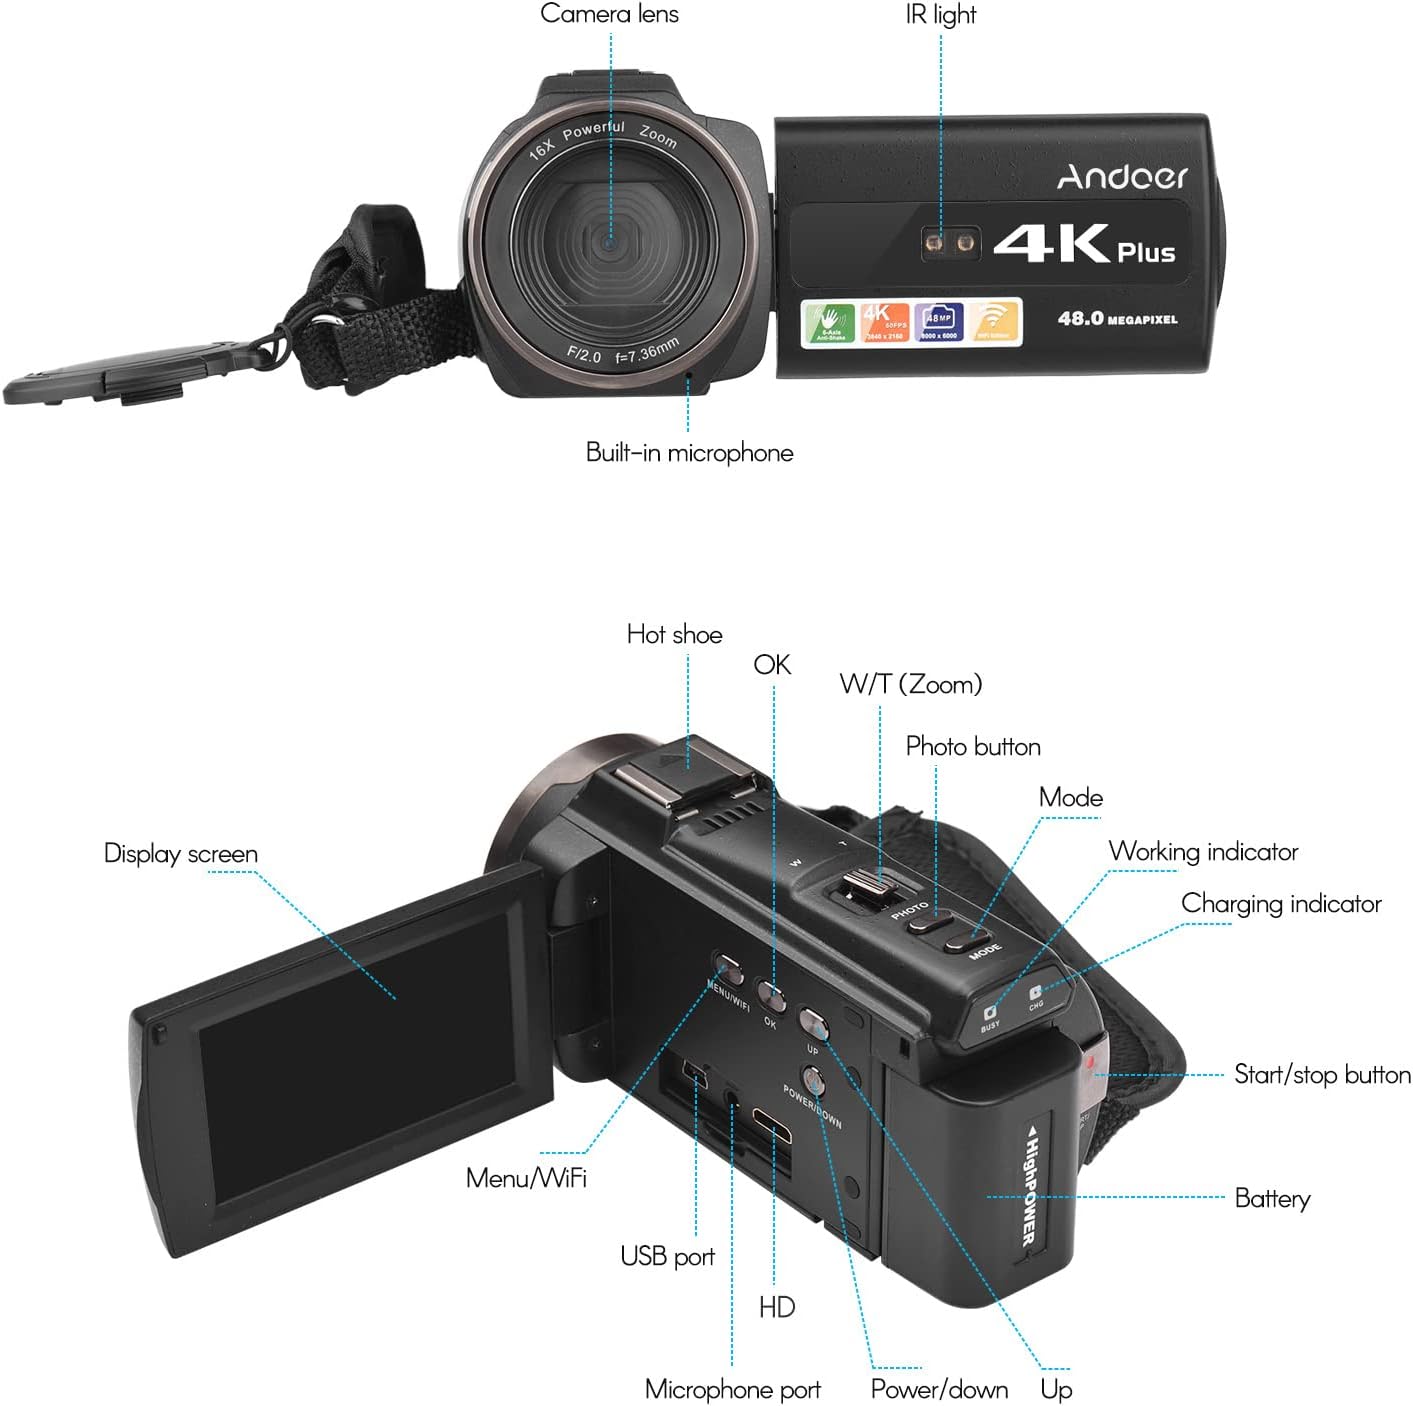
Abbildung 3.1: Vorder- und Rückseite View of the Camcorder with labeled components.
Schlüsselkomponenten:
- Kameraobjektiv: Optische Hauptkomponente zur Aufnahme von Bildern und Videos.
- IR-Licht: Emits infrared light for night vision recording.
- Eingebautes Mikrofon: Captures audio. An external microphone can be connected for enhanced sound quality.
- Hot Shoe: Mount for external accessories like the included microphone or an LED video light.
- Display Screen (3" IPS Touch Screen): Für viewleben footage, playback, and navigating menus.
- Bedientasten: Including Power, Mode, Photo, Zoom (W/T), OK, Menu/WiFi, Up/Down.
- Häfen: USB, HD (HDMI), Microphone port.
- Batteriefach: Beherbergt den wiederaufladbaren Akku.
4. Einrichtung
4.1 Laden des Akkus
Before first use, fully charge the included lithium-polymer batteries. Insert one battery into the camcorder's battery compartment. Connect the camcorder to a power source using the provided USB cable. The charging indicator will illuminate during charging and turn off when fully charged. A full charge typically takes several hours.

Image 4.1: Battery installation and charging indication.
4.2 Einlegen einer Speicherkarte
The camcorder supports TF (MicroSD) cards up to 128GB. Ensure the card is formatted before first use in the camcorder's settings. Insert the memory card into the designated slot until it clicks into place.
- Use a Class 10 or higher speed rating for optimal performance, especially for 4K video recording.
- The camcorder supports V60 video speed class.
4.3 Attaching the External Microphone
For improved audio quality, attach the external stereo microphone to the hot shoe mount on top of the camcorder. Connect the microphone's 3.5mm audio cable to the microphone input port on the camcorder.
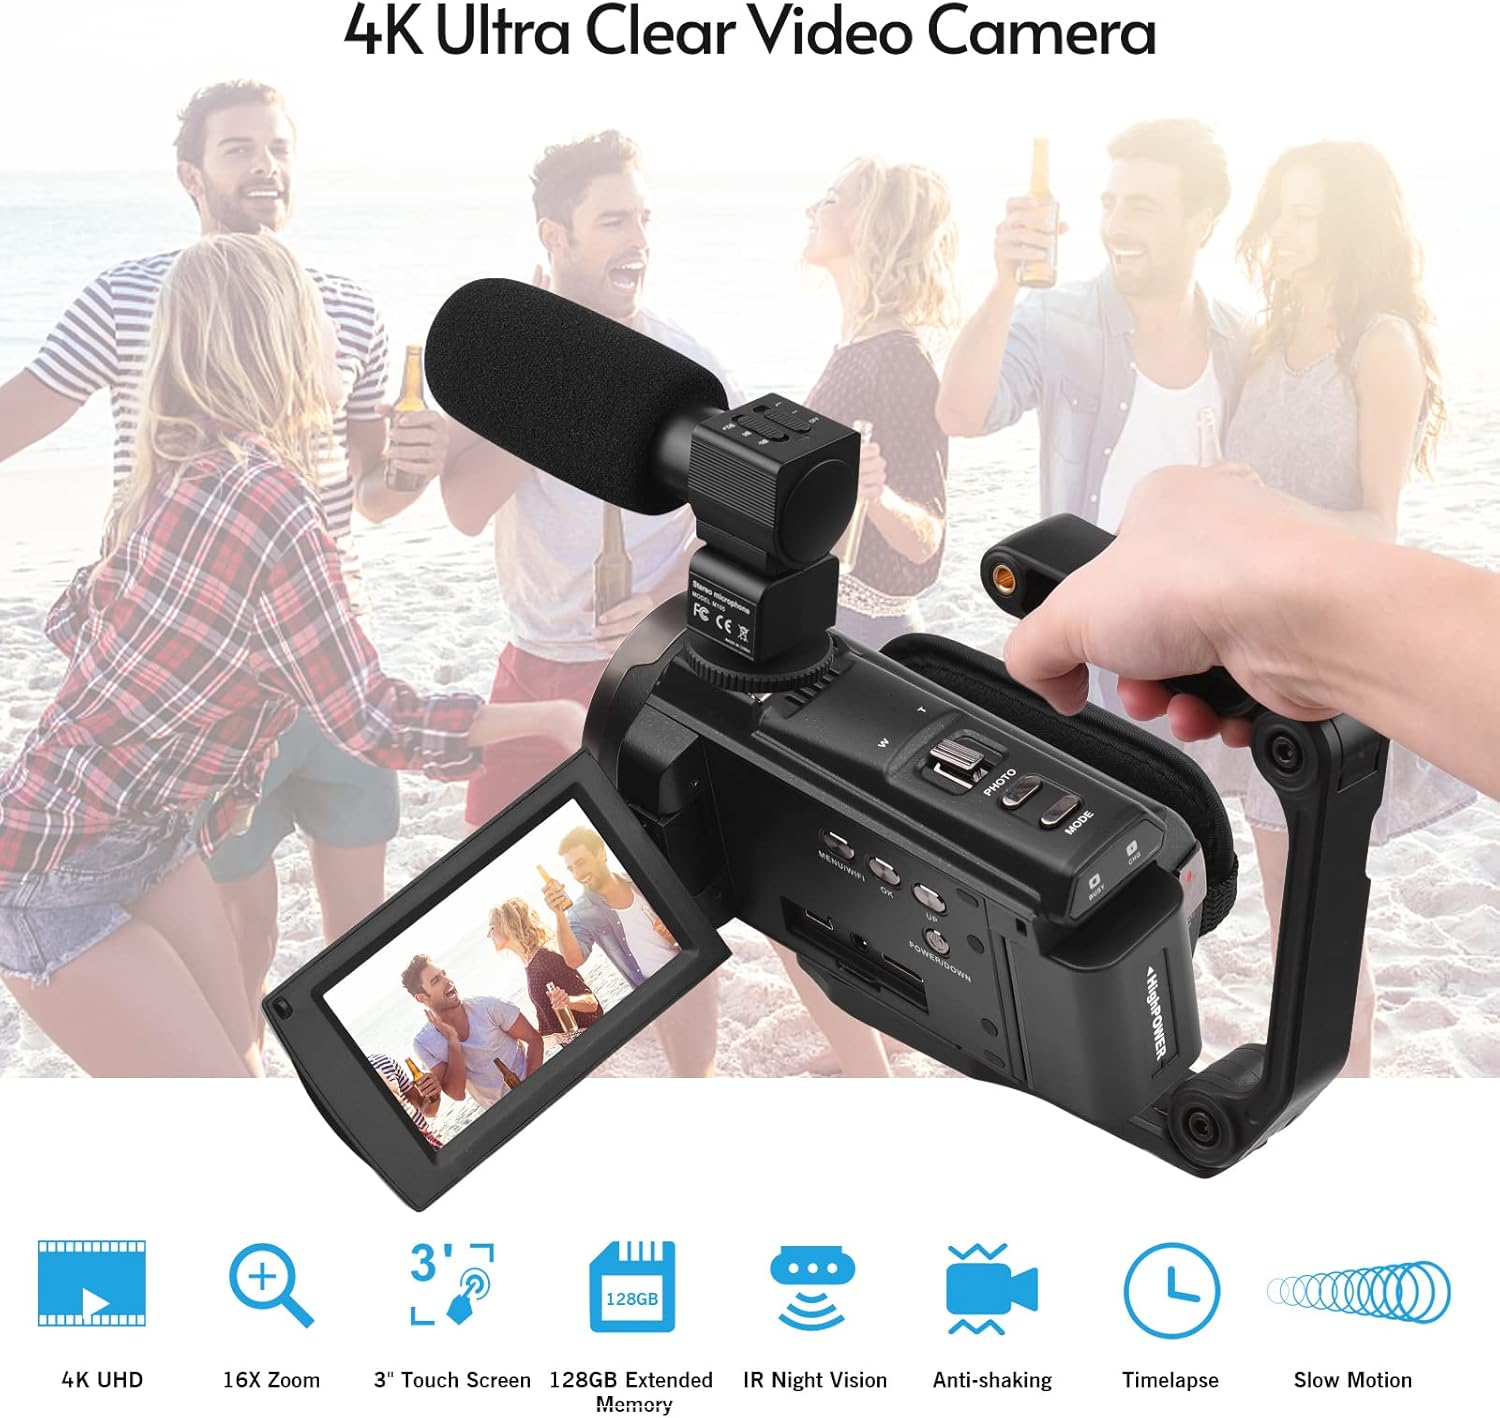
Image 4.2: External microphone attached to the camcorder.
4.4 Attaching the Wide-Angle Macro Lens
To use the wide-angle macro lens, first attach the lens adapter ring to the camcorder's main lens. Then, screw the wide-angle macro lens onto the adapter ring. This lens provides a broader perspective for your shots.

Image 4.3: Wide-angle macro lens for expanded field of view.
4.5 Attaching the Handgrip
The included handgrip can be attached to the bottom of the camcorder via the 1/4" screw hole for more stable handheld recording.
5. Bedienungsanleitung
5.1 Ein-/Ausschalten
To power on the camcorder, open the display screen and press the Power button. To power off, press and hold the Power button, or close the display screen.
5.2 Video aufnehmen
- Schalten Sie den Camcorder ein.
- Drücken Sie die Modus button to select video recording mode.
- Drücken Sie die Start/Stop button to begin recording. The recording indicator will flash.
- Drücken Sie die Start/Stop erneut, um die Aufnahme zu stoppen.
The camcorder supports 4K/60FPS video resolution for clear and smooth footage.
5.3 Fotos aufnehmen
- Schalten Sie den Camcorder ein.
- Drücken Sie die Modus button to select photo mode.
- Verwenden Sie den Bildschirm, um den Bildausschnitt festzulegen.
- Drücken Sie die Foto button to capture a 48-megapixel image.
5.4 Using the 3" IPS Touch Screen
The capacitive touchscreen allows for intuitive navigation of menus and settings. Tap to select options, swipe to scroll, and pinch to zoom (if supported in specific modes).
5.5 WLAN-Funktion
The built-in WiFi allows for wireless transmission of files to a compatible smartphone or tablet via a dedicated app. It also enables remote control of the camcorder from your mobile device.
- Activate WiFi on the camcorder via the menu.
- Download and install the specified app on your mobile device.
- Verbinden Sie Ihr Mobilgerät mit dem WLAN-Netzwerk des Camcorders.
- Use the app to control recording, view lebe footage und Transfer files.
5.6-Zoll-Infrarot-Nachtsichtgerät
For recording in low-light or dark conditions, activate the IR Night Vision feature. This utilizes infrared light to capture clear black and white footage.

Bild 5.1: Infrarot-Nachtsichtgerät im Einsatz.
5.7 Digitalzoom
Use the W/T (Wide/Telephoto) button to adjust the 16x digital zoom. Note that digital zoom can reduce image quality compared to optical zoom.
5.8 Bildstabilisierung
The camcorder features 6-axis image stabilization to reduce blur and shakiness in your recordings, especially during handheld use.
5.9 Sonderfunktionen
- Bewegungserkennung: The camcorder can be set to automatically start recording when motion is detected.
- Face Detection/Recognition: Optimizes focus and exposure for faces in the frame.
- Fernbedienung: Use the included remote control to operate the camcorder from a distance, useful for self-recording or group shots.
- Selbstauslöser: Set a delay before capturing a photo or starting a video recording.

Image 5.2: Tripod mounting for self-timer and stable shots.
5.10 Anschluss externer Geräte
- USB: Verbinden Sie sich mit einem Computer für file Übertragung.
- HD (HDMI): Connect to a TV or monitor to view Ihre Aufnahmen auf einem größeren Bildschirm.
6. Wartung
- Reinigung: Reinigen Sie das Gehäuse des Camcorders mit einem weichen, trockenen Tuch. Verwenden Sie für das Objektiv ein spezielles Objektivreinigungstuch und eine entsprechende Reinigungslösung. Vermeiden Sie aggressive Chemikalien.
- Lagerung: Bewahren Sie den Camcorder an einem kühlen, trockenen Ort, geschützt vor direkter Sonneneinstrahlung und extremen Temperaturen, auf. Entfernen Sie den Akku, wenn Sie den Camcorder längere Zeit lagern.
- Batteriepflege: Do not expose batteries to high temperatures. Recharge regularly even if not in use to maintain battery health.
- Firmware-Updates: Überprüfen Sie die Angaben des Herstellers webBesuchen Sie die Website regelmäßig, um zu prüfen, ob Firmware-Updates verfügbar sind, um eine optimale Leistung und neue Funktionen zu gewährleisten.
7. Fehlerbehebung
| Problem | Mögliche Ursache | Lösung |
|---|---|---|
| Der Camcorder lässt sich nicht einschalten. | Die Batterie ist leer oder nicht richtig eingesetzt. | Ensure battery is fully charged and correctly inserted. Try the second battery. |
| Videoaufnahmen/Fotos können nicht aufgenommen werden. | Memory card is full, not inserted, or corrupted. Incorrect mode selected. | Check memory card status, ensure it's inserted and has free space. Format if necessary (backup data first). Select the correct mode. |
| Schlechte Bild-/Videoqualität. | Lens is dirty. Low light conditions without IR. Digital zoom used excessively. | Clean the lens. Activate IR Night Vision in dark environments. Avoid excessive digital zoom. Ensure sufficient lighting. |
| WLAN-Verbindungsprobleme. | Incorrect WiFi settings. App not installed or updated. | Ensure WiFi is enabled on camcorder and mobile device. Re-establish connection. Update or reinstall the mobile app. |
| Das Mikrofon nimmt keinen Ton auf. | Das Mikrofon ist nicht richtig angeschlossen oder die Einstellungen sind falsch. | Check microphone cable connection. Verify audio input settings in the camcorder menu. |
8. Spezifikationen
| Besonderheit | Detail |
|---|---|
| Modellnummer | ZOH0150584179474NZ |
| Videoauflösung | 4K (3840x2160) bei 60 FPS |
| Fotoauflösung | 48 Megapixel (8000x6000) |
| Bildstabilisierung | 6-achsig |
| Anzeigebildschirm | 3-Zoll-IPS-kapazitiver Touchscreen |
| Digital Zoom | 16x |
| Konnektivität | USB, WLAN, HDMI |
| Speicherkartenunterstützung | TF (MicroSD) up to 128GB (Class 10, V60 recommended) |
| Besondere Merkmale | IR Night Vision, Motion Detection, Face Detection, Remote Control |
| Batterie | 2 x 2000mAh Lithium-polymer |
| Blendenöffnung | f/2.0 |
| Minimale Brennweite | 39 mm |
| Kompatible Geräte | Tripod, Microphone, TV, Computer, Smartphone |
| Betriebssystemkompatibilität | Windows |
| Abmessungen (Paket) | 18 x 15 x 11 cm |
| Gewicht (Paket) | 1.01 kg |
9. Garantie und Support
Andoer products are designed for reliability and performance. For any technical assistance, troubleshooting beyond this manual, or warranty inquiries, please contact Andoer customer support through their official webWebsite oder bei Ihrem Händler.
Bitte bewahren Sie Ihren Kaufbeleg für Garantieansprüche auf.