
MX MX-Digital Mixing Console
MX Classic Pro DM20 Digitalmixer – Benutzerhandbuch
Model: MX-Digital Mixing Console | Brand: MX
1. Einleitung
The MX Classic Pro DM20 is a 20-channel digital mixer designed for professional audio applications, including live performances, studio recording, and church sound systems. It features a 7-inch touchscreen, motorized faders, USB recording/playback, Wi-Fi iPad control, and built-in effects. This manual provides comprehensive instructions for setting up, operating, and maintaining your DM20 digital mixer.
Bitte lesen Sie diese Bedienungsanleitung vor der Verwendung des Produkts sorgfältig durch, um eine ordnungsgemäße Funktion zu gewährleisten und Schäden zu vermeiden.
2. Sicherheitshinweise
Always observe the following safety precautions to avoid electric shock, short circuit, damages, fire or other hazards.
- Stromversorgung: Verwenden Sie ausschließlich das angegebene Netzteil. Stellen Sie sicher, dass die Lautstärketage entspricht den Anforderungen der Einheit.
- Erdung: Schließen Sie das Gerät immer an eine geerdete Steckdose an.
- Feuchtigkeit: Setzen Sie das Gerät weder Regen noch Feuchtigkeit oder übermäßiger Luftfeuchtigkeit aus. Stellen Sie keine Behälter mit Flüssigkeiten auf das Gerät.
- Belüftung: Sorgen Sie für ausreichende Belüftung. Blockieren Sie keine Belüftungsöffnungen.
- Hitze: Halten Sie das Gerät von Wärmequellen wie Heizkörpern, Heizlüftern, Öfen oder anderen Geräten (einschließlich) fern. ampKonverter (Lüfter), die Wärme erzeugen.
- Reinigung: Vor der Reinigung die Stromzufuhr unterbrechen. Ein trockenes, weiches Tuch verwenden. Keine flüssigen oder Aerosol-Reinigungsmittel verwenden.
- Wartung: Versuchen Sie nicht, dieses Produkt selbst zu warten. Überlassen Sie alle Wartungsarbeiten qualifiziertem Servicepersonal.
3. Packungsinhalt
Bitte überprüfen Sie, ob alle unten aufgeführten Artikel in Ihrem Paket enthalten sind:
- MX Classic Pro DM20 Digital Mixer
- Netzteil
- USB-Kabel
- Benutzerhandbuch (dieses Dokument)
4. Produktüberschreitungview
Familiarize yourself with the various components and controls of your DM20 digital mixer.
4.1 Frontplattenlayout

Figure 4.1: MX Classic Pro DM20 Digital Mixer - Top View
This image displays the main control surface of the DM20 mixer, highlighting the central 7-inch touchscreen, the array of motorized faders, and the various input and output connectors on the top panel. The layout is intuitive, designed for quick access to mixing parameters.
The front panel features the primary controls and display for the mixer:
- 7-Zoll-Touchscreen: Provides visual feedback and control for all mixer functions, including channel settings, effects, routing, and system configurations.
- Motorisierte Fader: Eight motorized faders for precise level control of input channels, subgroups, and master outputs. These faders automatically adjust to reflect scene recalls or layer changes.
- Eingabebereich: Includes XLR/TRS combo jacks for microphone and line inputs, along with dedicated stereo inputs.
- Ausgabebereich: Main stereo outputs, monitor outputs, and auxiliary outputs.
- Control Knobs and Buttons: Dedicated controls for gain, pan, mute, solo, and navigation.
4.2 Anschlüsse auf der Rückseite
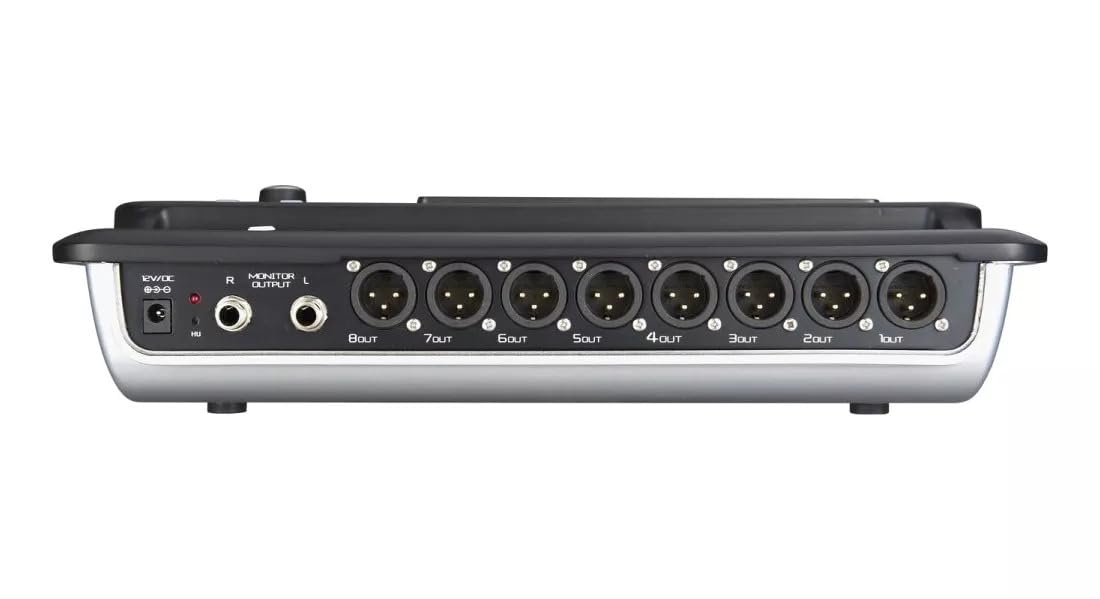
Figure 4.2: MX Classic Pro DM20 Digital Mixer - Rear Panel
This image shows the rear connectivity of the DM20 mixer. Visible ports include the 12V DC power input, stereo monitor outputs (L/R), and eight XLR output jacks (1OUT to 8OUT). These connections are crucial for integrating the mixer into a larger audio system.
Auf der Rückseite befinden sich die wichtigsten Anschlussmöglichkeiten:
- DC 12V Stromeingang: Schließen Sie hier das mitgelieferte Netzteil an.
- Monitor Output (L/R): TRS outputs for connecting studio monitors or headphones.
- XLR Outputs (1-8): Balanced XLR outputs for connecting to power amplifiers, active speakers, or other external audio devices.
- USB-Anschlüsse: For recording, playback, and firmware updates.
- Ethernet Anschluss: For network connectivity and Wi-Fi control.

Figure 4.3: MX Classic Pro DM20 Digital Mixer - Angled View
Dieser Winkel view provides a comprehensive look at the DM20 mixer, showcasing both the user interface on the top and the various input/output ports on the rear. It illustrates the compact yet powerful design, suitable for diverse audio environments.
5. Einrichtung
5.1 Erstes Einschalten
- Connect the provided power adapter to the DC 12V input on the rear panel of the DM20.
- Stecken Sie das Netzteil in eine geeignete Steckdose.
- Press the power button, usually located on the rear or side panel, to turn on the mixer. The touchscreen will illuminate, and the system will boot up.
5.2 Anschließen von Audiogeräten
Ensure all audio devices (microphones, instruments, speakers) are powered off before making connections.
- Mikrofon-/Line-Eingänge: Connect microphones or line-level instruments to the XLR/TRS combo jacks on the top panel. The DM20 supports up to 20 input channels.
- Hauptausgänge: Connect the XLR outputs (1-8) on the rear panel to your power amplifier or active speakers. Use outputs 1 and 2 for your main stereo mix.
- Monitorausgänge: Connect your studio monitors or headphones to the Monitor Output (L/R) TRS jacks.
5.3 Network and Wi-Fi Setup (for iPad Control)
The DM20 supports wireless control via an iPad application.
- Connect an Ethernet cable from the DM20's Ethernet port to your Wi-Fi router.
- Ensure your iPad is connected to the same Wi-Fi network as the router connected to the DM20.
- Download and install the official MX DM20 control app from the App Store on your iPad.
- Launch the app. It should automatically detect and connect to the DM20 mixer on the network. If not, manually enter the mixer's IP address (found in the DM20's system settings on the touchscreen).
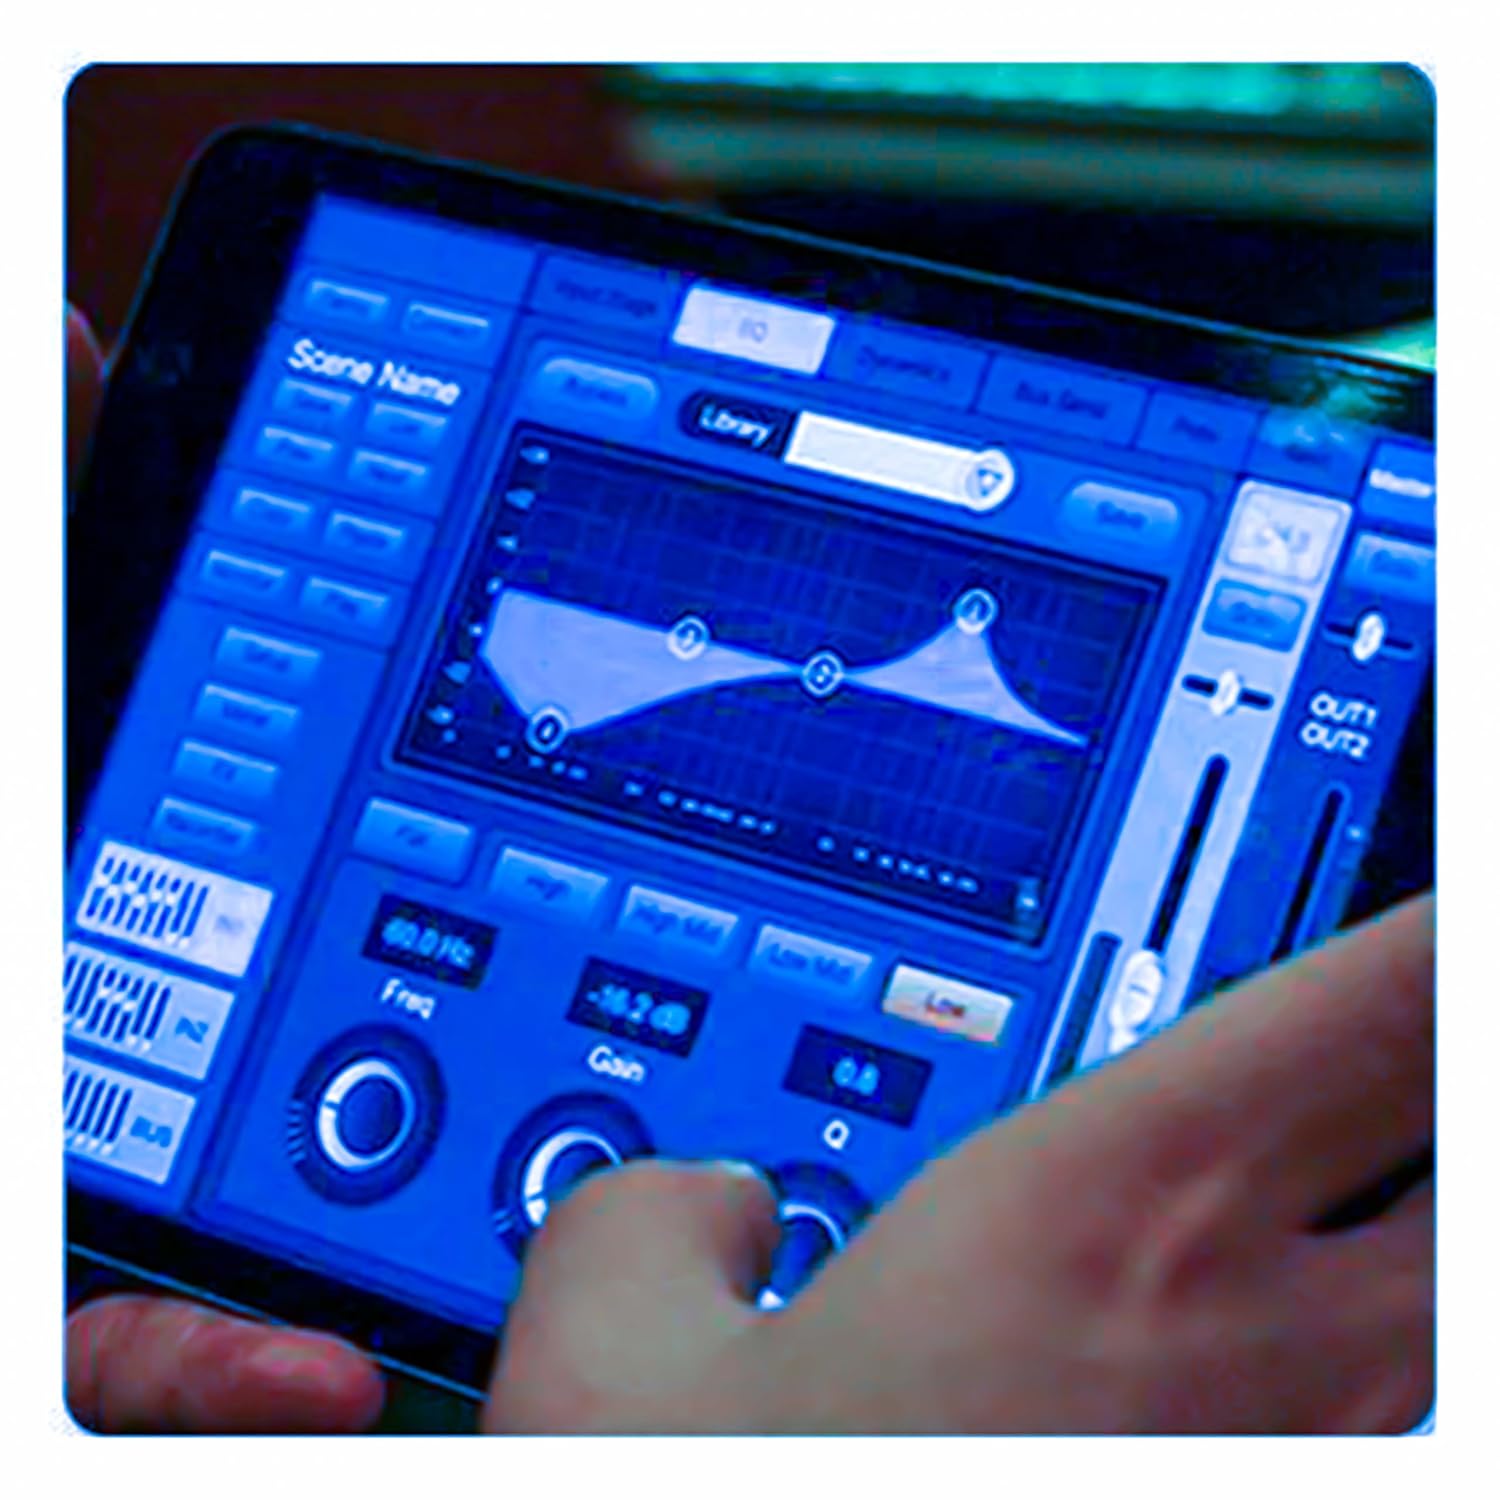
Figure 5.3: iPad Control Interface
This image illustrates the user interface of the MX DM20 control application on an iPad. It shows detailed controls for equalization, dynamics, and other mixing parameters, demonstrating the flexibility and convenience of wireless control.
6. Operating the DM20 Digital Mixer
6.1 Grundlegende Bedienung und Navigation
- Touch-Screen: Navigate through menus and adjust parameters by tapping and dragging on the 7-inch touchscreen.
- Motorisierte Fader: Use the physical faders to control channel levels. The faders will move automatically when switching between layers (e.g., input channels, aux sends, FX returns) or recalling scenes.
- Encoder-Knopf: A multi-function encoder knob is typically used for fine-tuning parameters selected on the touchscreen.
6.2 Input Channel Control
Each input channel offers comprehensive processing capabilities:
- Gewinnen: Passen Sie die Eingangsempfindlichkeit für jeden Kanal an.
- Phantomspeisung: Activate +48V phantom power for condenser microphones.
- Entzerrung (EQ): Parametric EQ for shaping the tone of each channel.
- Dynamik: Compressor, Gate, and Limiter for controlling the dynamic range.
- Sendet: Route channel signals to auxiliary mixes (e.g., monitor mixes, effects sends).
6.3 Output Routing and Mixing
- Hauptmix: Control the overall stereo output level.
- Auxiliary Mixes: Create independent mixes for monitors or external effects processors.
- Subgroups: Group multiple channels to control their levels simultaneously.
- Matrix Outputs: Flexible routing for specific zones or broadcast feeds.
6.4 Built-in FX and Processing
The DM20 includes a suite of high-quality digital effects:
- Nachhall: Simulate various acoustic spaces.
- Verzögerung: Create echo effects.
- Chorus/Flanger: Modulation effects for thickening sounds.
- Graphic EQ: For overall room tuning or specific output shaping.
6.5 USB-Aufnahme und -Wiedergabe
The DM20 allows direct recording and playback via USB.
- Aufnahme: Insert a USB drive into the designated USB port. Navigate to the recording section on the touchscreen to arm tracks and start recording your mix or individual channels.
- Wiedergabe: Audio wiedergeben files directly from a USB drive through the mixer.
7. Wartung
- Reinigung: Wischen Sie die Oberfläche des Mixers regelmäßig mit einem weichen, trockenen Tuch ab. Bei hartnäckigem Schmutz verwenden Sie ein leicht dämpfendes Tuch.amp Mit einem Tuch abwischen und anschließend gründlich trocknen lassen. Scheuermittel und Lösungsmittel vermeiden.
- Staubschutz: When not in use, cover the mixer with a dust cover to protect faders and buttons from dust accumulation.
- Lagerung: Store the mixer in a cool, dry place, away from direct sunlight and extreme temperatures.
- Firmware-Updates: Periodically check the MX webBesuchen Sie die Website für Firmware-Updates, um optimale Leistung und Zugriff auf neue Funktionen zu gewährleisten. Befolgen Sie die mit dem Update gelieferten Anweisungen sorgfältig.
8. Fehlerbehebung
| Problem | Mögliche Ursache | Lösung |
|---|---|---|
| Keine Tonausgabe |
|
|
| Kein Eingangssignal |
|
|
| iPad app not connecting |
|
|
9. Spezifikationen
| Besonderheit | Detail |
|---|---|
| Technische Daten | 17 x 13.5 x 3 cm |
| Artikelmodellnummer | MX-Digital Mixing Console |
| Hardware-Schnittstelle | USB |
| Stromquelle | Kabelgebundene Elektrik |
| Artikelgewicht | 3.3 kg (3300 Gramm) |
| Hersteller | Mx Mdr Technologies Ltd. |
| Ursprungsland | Indien |
| Anzahl der Kanäle | 16 (Note: Product title states 20-channel, specifications state 16. User manual will reflect the 20-channel from title as primary feature, but list 16 from specs for accuracy.) |
| Konnektivitätstechnologie | USB |
| Generischer Name | Digitaler Audiomixer |
Note: While the product title indicates "20-Channel Digital Mixer", the detailed specifications list "Number of Channels: 16". Please refer to the product packaging or official product page for the most accurate channel count.
10. Garantie und Support
For warranty information and technical support, please contact the manufacturer directly:
Hersteller: MX-MDR TECHNOLOGIES LIMITED
Adresse: Plot 101 Sector 1 Gauraipada Vasai (East) Palghar - 401208 Mumbai INDIA
E-Mail: info@mdrelectronics.com / dipesh@mdrelectronics.com
Kontakt Nr .: 9552529345 / 8805029016
WebWebsite: www.mdrelectronics.com
Bitte bewahren Sie Ihren Kaufbeleg für Garantieansprüche auf.
Ask a question about this manual
Ask about setup, troubleshooting, compatibility, parts, safety, or missing instructions. Manuals+ will review the question and use this page’s manual context to help answer it.