1. Einleitung
This manual provides detailed instructions for the installation, operation, and maintenance of your MUSETEX G05-N6 ATX Mid-Tower PC Case. Please read this manual thoroughly before beginning assembly to ensure proper setup and optimal performance.

Figure 1: MUSETEX G05-N6 ATX Mid-Tower PC Case with illuminated ARGB fans and tempered glass side panel.
2. Spezifikationen
| Besonderheit | Detail |
|---|---|
| Marke | MUSETEX |
| Modellname | G05-N6 |
| Gehäusetyp | Mittlerer Turm |
| Motherboard-Kompatibilität | ATX, Mikro-ATX, Mini-ITX |
| Vorinstallierte Lüfter | 6 x 120-mm-ARGB-Lüfter |
| Seitenwände | 2 x 4mm Tempered Glass |
| Maximale GPU-Länge | 380 mm |
| CPU Air Cooling Max Height | 160 mm |
| Maximale Länge des Netzteils | 245mm (with removable HDD holders) |
| E/A-Bedienfeld | 1 x USB 3.0, 2 x USB 2.0, 1 x HD Audio, LED Button, Power/Reset |
| Kühlmethode | Luft |
| Material | Gehärtetes Glas |
| Artikelgewicht | 18 Pfund |
| Verpackungsabmessungen | 20 x 20 x 11 Zoll |
3. Einrichtung und Installation
Follow these steps to install your components into the MUSETEX G05-N6 PC case.
3.1 Zugang zum Innenraum
The case features two 4mm-thick tempered glass full-view side panels. These panels are designed for easy access to the interior. Gently open the side panel to begin installation.
Video 1: Demonstrates opening the tempered glass side panel for component installation.
3.2 Motherboard and GPU Installation
The G05-N6 case supports ATX, Micro-ATX, and Mini-ITX motherboards. Ensure your motherboard is securely mounted using the provided standoffs and screws. The case accommodates GPUs up to 380mm in length.

Figure 2: Internal layout of the PC case, highlighting compatible motherboard sizes and maximum GPU length.
Video 2: Demonstrates GPU installation and securing it with screws.
3.3 Installation des Speicherlaufwerks
Der Fall liefert ample space for storage, including 3 x SSD sockets and support for 2 x HDDs. Use the provided screws and rubber rings for secure installation of your hard drives.
Video 3: Demonstrates SSD and HDD installation using the provided accessory kit.
3.4 Liquid Cooling Radiator Installation
The case supports liquid cooling radiators up to 360mm in length at the front. Ensure proper mounting and connection of your liquid cooling system.
Video 4: Demonstrates liquid cooling radiator installation at the front of the case.
4. Operating ARGB Fans and I/O Panel
Your MUSETEX G05-N6 PC case comes with 6 pre-installed 120mm ARGB fans for optimal airflow and customizable lighting.
4.1 ARGB-Lüftersteuerung
The ARGB fans offer multiple control modes:
- Fernbedienung: Use the included remote to quickly adjust ARGB lighting, speed, and mode. The G05-N6 case features a unique music panel, allowing lighting to change with the rhythm of music.
- Tastensteuerung: The case's top I/O panel includes an LED button with 19 lighting modes.
- Motherboard-Steuerung: Connect the fans to the 5V 3-PIN header on a compatible motherboard for unlimited ARGB fan modes. Note: 12V 4-PIN motherboards are not suitable for motherboard control mode; use button control only.

Figure 3: ARGB fans and remote control for various lighting effects.
Video 5: Demonstrates changing ARGB fan colors and modes via the case button.
4.2 Top I/O Panel Functions
Das obere I/O-Panel bietet bequemen Zugriff auf wichtige Anschlüsse und Bedienelemente:
- 1 x USB 3.0-Anschluss: Für Hochgeschwindigkeits-Datenübertragung.
- 2 x USB 2.0-Anschlüsse: Für Standard-Peripherieanschlüsse.
- 1 x HD Audio: Kopfhörer- und Mikrofonbuchsen.
- LED-Taste: Cycles through ARGB lighting modes.
- Ein-/Ausschalter/Reset-Tasten: For system power and reset functions.
The USB cable is shielded to prevent interference during data transmission.
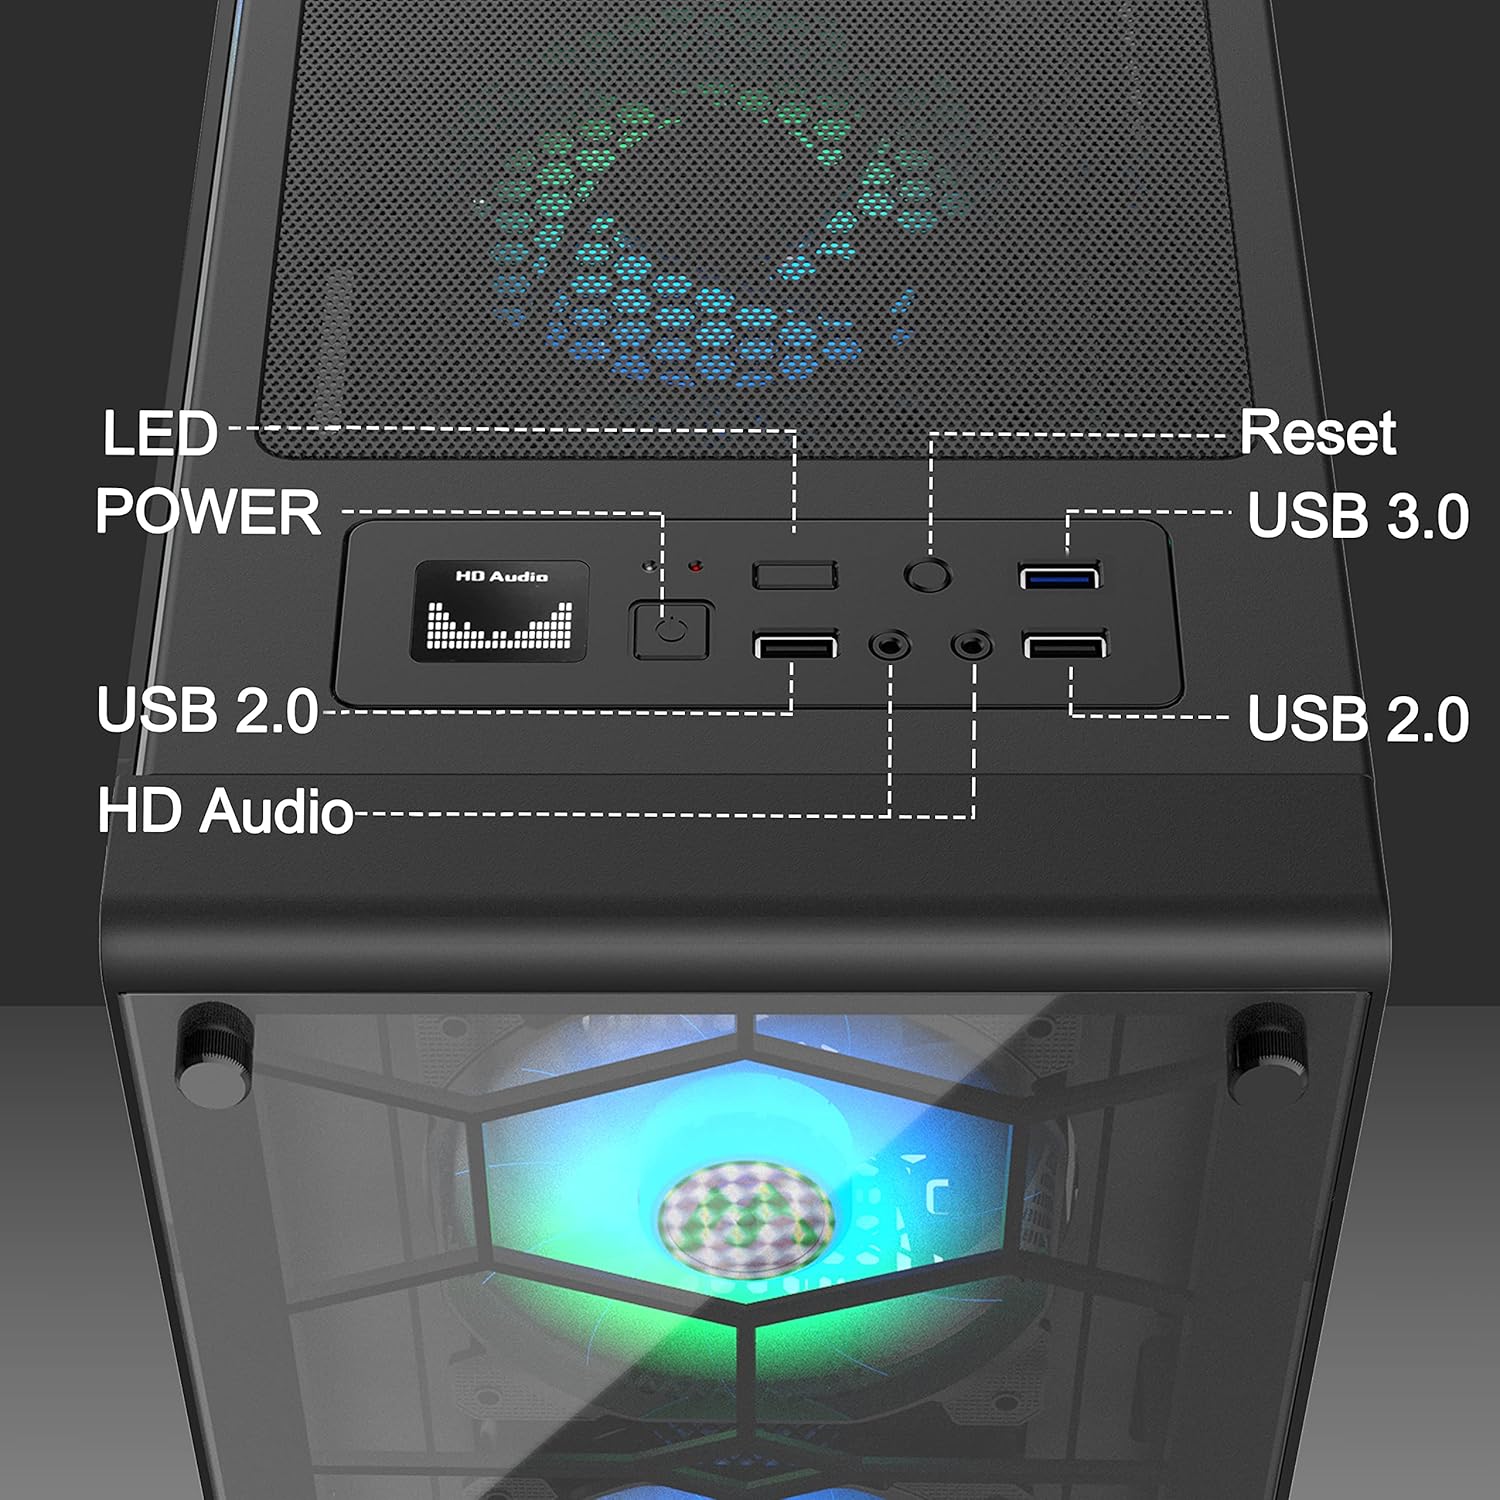
Figure 4: Close-up of the top I/O panel, detailing each port and button.
5. Wartung
Regular maintenance helps prolong the life and performance of your PC case.
5.1 Staubdichtes Design
The G05-N6 case is equipped with two dust filters: a top magnetic strip dust filter and a PSU dust filter at the bottom. These filters protect your components from dust accumulation.
5.2 Reinigung von Staubfiltern
Periodically remove and clean the dust filters to maintain optimal airflow and cooling efficiency. The filters are easy to install and remove for cleaning.
Video 6: Demonstrates how to remove and clean the dust filters for maintenance.
6. Fehlerbehebung
If you encounter any issues with your MUSETEX G05-N6 PC Case, please refer to the following common troubleshooting steps:
- Kein Strom: Stellen Sie sicher, dass alle Stromkabel fest mit dem Netzteil, dem Mainboard und der Steckdose verbunden sind. Prüfen Sie, ob der Netzschalter eingeschaltet ist.
- Lüfter leuchten nicht: Check that the ARGB fan cables are correctly connected to the fan hub and that the hub is receiving power. If using motherboard sync, ensure the 5V 3-PIN header is correctly connected and the motherboard's RGB software is configured.
- Schlechter Luftstrom: Clean the dust filters regularly. Ensure no cables are obstructing fan blades or airflow paths.
- USB-Anschlüsse funktionieren nicht: Verify that the USB headers from the case's I/O panel are correctly connected to the motherboard.
For further assistance, please contact MUSETEX customer support.
7. Garantie und Support
MUSETEX products are designed for quality and reliability. For information regarding warranty coverage, returns, or technical support, please refer to the official MUSETEX webBesuchen Sie unsere Website oder kontaktieren Sie Ihren Händler. Bewahren Sie Ihren Kaufbeleg für Garantieansprüche auf.
Weitere Ressourcen und Produktinformationen finden Sie unter MUSETEX Store on Amazon.