1. Einleitung
Welcome to the user manual for your new Cheerlux C50 Projector. This guide provides essential information on setting up, operating, maintaining, and troubleshooting your device. Please read this manual thoroughly before using the projector to ensure optimal performance and safety. Keep this manual for future reference.
2. Sicherheitshinweise
Um Brände, Stromschläge oder Verletzungen zu vermeiden, beachten Sie bitte die folgenden Sicherheitsvorkehrungen:
- Die Lüftungsöffnungen dürfen nicht blockiert werden. Sorgen Sie für ausreichend Platz um den Projektor herum, um eine ordnungsgemäße Luftzirkulation zu gewährleisten.
- Do not expose the projector to rain or moisture. Avoid placing objects filled with liquids, such as vases, on the projector.
- Öffnen Sie den Projektor nicht.asing. Alle Wartungsarbeiten sind von qualifiziertem Servicepersonal durchführen zu lassen.
- Verwenden Sie ausschließlich das mit dem Projektor gelieferte Netzteil.
- Vermeiden Sie, direkt in die Projektorlinse zu blicken, wenn das lamp ist eingeschaltet, da das helle Licht Ihre Augen schädigen kann.
- Stellen Sie den Projektor auf eine stabile, ebene Fläche, um zu verhindern, dass er herunterfällt.
- Ziehen Sie bei Gewittern oder längerer Nichtbenutzung den Netzstecker des Projektors.
3. Packungsinhalt
Bitte prüfen Sie, ob alle Artikel vorhanden und in gutem Zustand sind:
- Cheerlux C50-Projektor
- Fernbedienung
- Stromkabel
- HDMI-Kabel
- AV-Kabel
- Bedienungsanleitung
4. Produktüberschreitungview
Familiarize yourself with the components and ports of your Cheerlux C50 Projector.

This image displays the Cheerlux C50 Projector from a front-top angle, highlighting its lens, focus ring, and control panel buttons on the top surface. The projector features a white and grey casing.
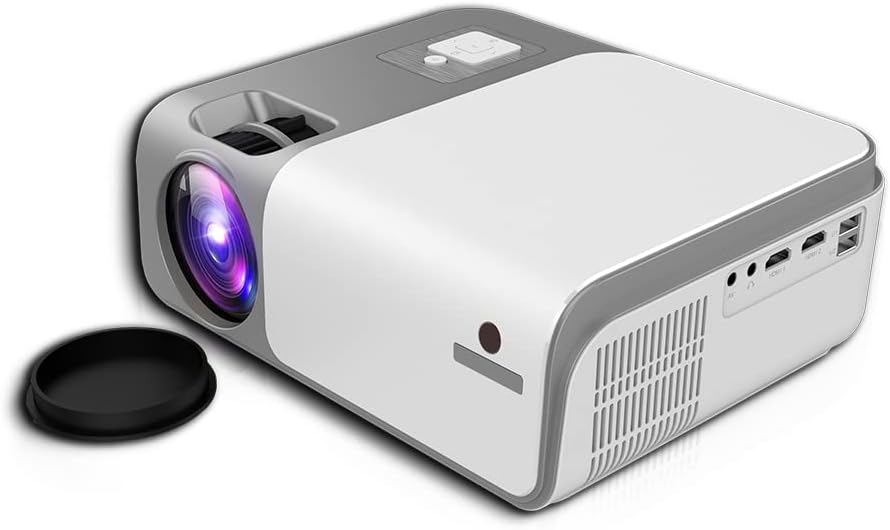
This image shows the rear and side of the Cheerlux C50 Projector, revealing various input/output ports such as HDMI, USB, and AV, along with ventilation grilles. A lens cap is visible next to the lens.
4.1. Vorderseite
- Projektionsobjektiv: Gibt das Bild aus.
- Fokusring: Passt die Bildschärfe an.
4.2. Oberes Bedienfeld
- Bedientasten: Power, Menu, Source, Navigation (Up/Down/Left/Right), OK.
4.3. Rückseite
- Leistungsaufnahme: Wird an das Stromkabel angeschlossen.
- HDMI-Anschlüsse (x2): Connect to HDMI-enabled devices (laptops, gaming consoles, Blu-ray players).
- USB-Anschlüsse (x2): Schließen Sie USB-Laufwerke zur Medienwiedergabe an.
- AV-Anschluss: Verbinden Sie ältere Geräte über ein AV-Kabel.
- Audioausgang (3.5 mm): Schließen Sie externe Lautsprecher oder Kopfhörer an.
- IR Empfänger: Für Fernsteuersignale.
5. Einrichtung
5.1. Stromanschluss
- Schließen Sie das Netzkabel an den Stromeingang des Projektors an.
- Stecken Sie das andere Ende des Stromkabels in eine Wandsteckdose.
- Die Betriebsanzeigeleuchte am Projektor leuchtet auf.
5.2. Platzierung
Position the projector on a stable, flat surface. The ideal projection distance for the Cheerlux C50 is between 1.5 to 6 meters, depending on the desired screen size. Ensure the projector is centered with your projection screen or wall.
5.3. Fokus- und Trapezkorrektur
- Fokuseinstellung: Turn the focus ring on the front of the projector until the projected image appears sharp and clear.
- Keystone Correction (4P): If the projected image appears trapezoidal (wider at the top or bottom), use the 4P keystone correction function. This can typically be accessed via the projector's menu or dedicated buttons on the remote control. Adjust each of the four corners independently to achieve a perfectly rectangular image.
6. Betrieb
6.1. Ein-/Ausschalten
- Einschalten: Drücken Sie den Ein-/Ausschalter am Projektor oder auf der Fernbedienung. Der Projektor startet und das Bild wird angezeigt.amp leuchtet auf.
- Ausschalten: Press the power button again. Confirm shutdown if prompted. Allow the projector to cool down before unplugging it.
6.2. Eingabequellen
Connect your desired device to the projector using the appropriate cable (HDMI, AV, USB). Then, press the 'Source' button on the projector or remote control to select the corresponding input source.
- HDMI: For high-definition video and audio from laptops, game consoles, etc.
- USB: Zum Abspielen von Medien files (photos, videos, music) directly from a USB flash drive.
- EIN V: For standard definition video and audio from older devices like DVD players.
6.3. Drahtlose Konnektivität (WLAN & Bluetooth)
The Cheerlux C50 Projector features built-in WiFi and Bluetooth for enhanced connectivity.
- WiFi Verbindung: Navigate to the 'Settings' menu, select 'Network' or 'WiFi Settings'. Choose your desired WiFi network from the list and enter the password.
- Bluetooth Verbindung: In the 'Settings' menu, select 'Bluetooth'. Turn on Bluetooth and pair with your Bluetooth-enabled speakers or headphones.
6.4. Bildschirmspiegelung
The projector supports wireless screen mirroring from compatible smartphones and tablets.

This image illustrates the Cheerlux C50 Projector wirelessly connected to a smartphone. The phone's screen, displaying a movie scene, is being mirrored to the projector, indicated by a Wi-Fi signal icon between the devices.
- Ensure both your projector and mobile device are connected to the same WiFi network.
- Wählen Sie am Projektor im Hauptmenü die Option „Bildschirmspiegelung“ oder „Drahtlose Anzeige“.
- On your mobile device, activate its screen mirroring feature (e.g., 'Smart View' for Samsung, 'Screen Mirroring' for Android, 'AirPlay' for iOS).
- Wählen Sie den Namen des Projektors aus der Liste der verfügbaren Geräte auf Ihrem Telefon aus.
- The mobile device's screen content will now be projected.
6.5. Menünavigation
Use the navigation buttons (Up, Down, Left, Right) and 'OK' button on the projector or remote control to browse through the on-screen menu. The 'Menu' button typically opens the main settings, and the 'Return' or 'Exit' button closes menus.
7. Wartung
7.1. Reinigung
- Linse: Verwenden Sie ein weiches, fusselfreies Tuch, das speziell für optische Linsen entwickelt wurde. Verwenden Sie keine Scheuermittel.
- Casing: Wischen Sie das Gehäuse des Projektors mit einem weichen, trockenen Tuch ab. Bei hartnäckigem Schmutz leicht andrücken.ampspülen Sie das Tuch mit Wasser aus.
- Lüftungsöffnungen: Periodically clean the vents with a soft brush or compressed air to prevent dust buildup, which can affect cooling.
7.2. Speicherung
Bei längerer Nichtbenutzung sollte der Projektor an einem kühlen, trockenen Ort, geschützt vor direkter Sonneneinstrahlung und extremen Temperaturen, aufbewahrt werden. Die Linse sollte mit der Schutzkappe abgedeckt werden, um sie vor Staub und Kratzern zu schützen.
8. Fehlerbehebung
Sollten Sie Probleme mit Ihrem Projektor haben, beachten Sie bitte die folgenden häufig auftretenden Probleme und Lösungen:
| Problem | Mögliche Ursache | Lösung |
|---|---|---|
| Kein Bild projiziert | Power cable loose, incorrect input source, device not connected. | Check power connection, select correct input source, ensure source device is on and connected. |
| Bild ist verschwommen | Fokus nicht eingestellt, Projektor zu nah/zu weit entfernt. | Adjust the focus ring. Reposition the projector within the recommended distance. |
| Das Bild ist trapezförmig | Projektor nicht senkrecht zur Leinwand. | Use the 4P keystone correction function in the menu. |
| Kein Ton | Volume too low, external speakers not connected, source device muted. | Increase projector volume, check external speaker connection, unmute source device. |
| Fernbedienung funktioniert nicht | Batteries dead, obstruction, not pointing at IR receiver. | Batterien austauschen, Hindernisse entfernen, Fernbedienung direkt auf den Infrarotempfänger des Projektors richten. |
9. Spezifikationen
Technical specifications for the Cheerlux C50 Projector:
| Besonderheit | Spezifikation |
|---|---|
| Markenname | Generic (Cheerlux C50) |
| Konnektivitätstechnologie | WLAN, Bluetooth |
| Native Auflösung | 1920 x 1080 |
| Helligkeit | 4000 Lumen |
| Formfaktor | Tragbar |
| Montagetyp | Tischhalterung |
| Controllertyp | Fernbedienung |
| Maximale Projektionsentfernung | 6 Meter |
| Wastage | 3 Watt |
| Besondere Merkmale | Built In Wi Fi, Portable, Wireless, 4P Keystone Correction |
10. Garantie und Support
The Cheerlux C50 Projector comes with a standard manufacturer's warranty. Please refer to the warranty card included in your package for specific terms and conditions, including warranty period and coverage details. For technical support, service, or further inquiries, please contact your retailer or the manufacturer's customer service department.
Bewahren Sie Ihren Kaufbeleg als Kaufnachweis für Garantieansprüche auf.