1. Einleitung
This manual provides essential information for the safe and efficient operation of your TechniSat DIGITRADIO 370 IR. Please read these instructions carefully before using the device and retain them for future reference.
2. Sicherheitshinweise
- Um Brände oder Stromschläge zu vermeiden, setzen Sie das Gerät weder Regen noch Feuchtigkeit aus.
- Die Lüftungsöffnungen dürfen nicht blockiert werden. Sorgen Sie für ausreichend Platz um das Gerät herum, um eine ordnungsgemäße Luftzirkulation zu gewährleisten.
- Verwenden Sie ausschließlich das mit dem Gerät gelieferte Netzteil.
- Vermeiden Sie es, das Gerät in der Nähe von Wärmequellen wie Heizkörpern, Heizlüftern, Öfen oder anderen Geräten (einschließlich) aufzustellen. ampKonverter (Lüfter), die Wärme erzeugen.
- Schützen Sie das Netzkabel vor Beschädigungen oder Beschädigungen durch Fußgänger, insbesondere an den Steckern, Steckdosen und an der Stelle, an der es aus dem Gerät austritt.
- Trennen Sie das Gerät bei Gewitter oder längerer Nichtbenutzung vom Stromnetz.
- Überlassen Sie alle Wartungsarbeiten qualifiziertem Servicepersonal. Eine Wartung ist erforderlich, wenn das Gerät auf irgendeine Weise beschädigt wurde, z. B. wenn das Netzkabel oder der Stecker beschädigt sind, Flüssigkeit in das Gerät verschüttet wurde oder Gegenstände hineingefallen sind, das Gerät Regen oder Feuchtigkeit ausgesetzt war, nicht normal funktioniert oder fallengelassen wurde.
3. Packungsinhalt
Überprüfen Sie, ob alle Artikel im Paket vorhanden sind:
- TechniSat DIGITRADIO 370 IR (Black)
- Fernbedienung
- Netzteil
- Benutzerhandbuch (dieses Dokument)
4. Bedienelemente und Anschlüsse

Abbildung 4.1: Vorderseiteview
The image above displays the front panel of the DIGITRADIO 370 IR, featuring the central display, volume and tuning/OK rotary knobs, and various control buttons such as Power, Mode, Preset, Scan, and Back.
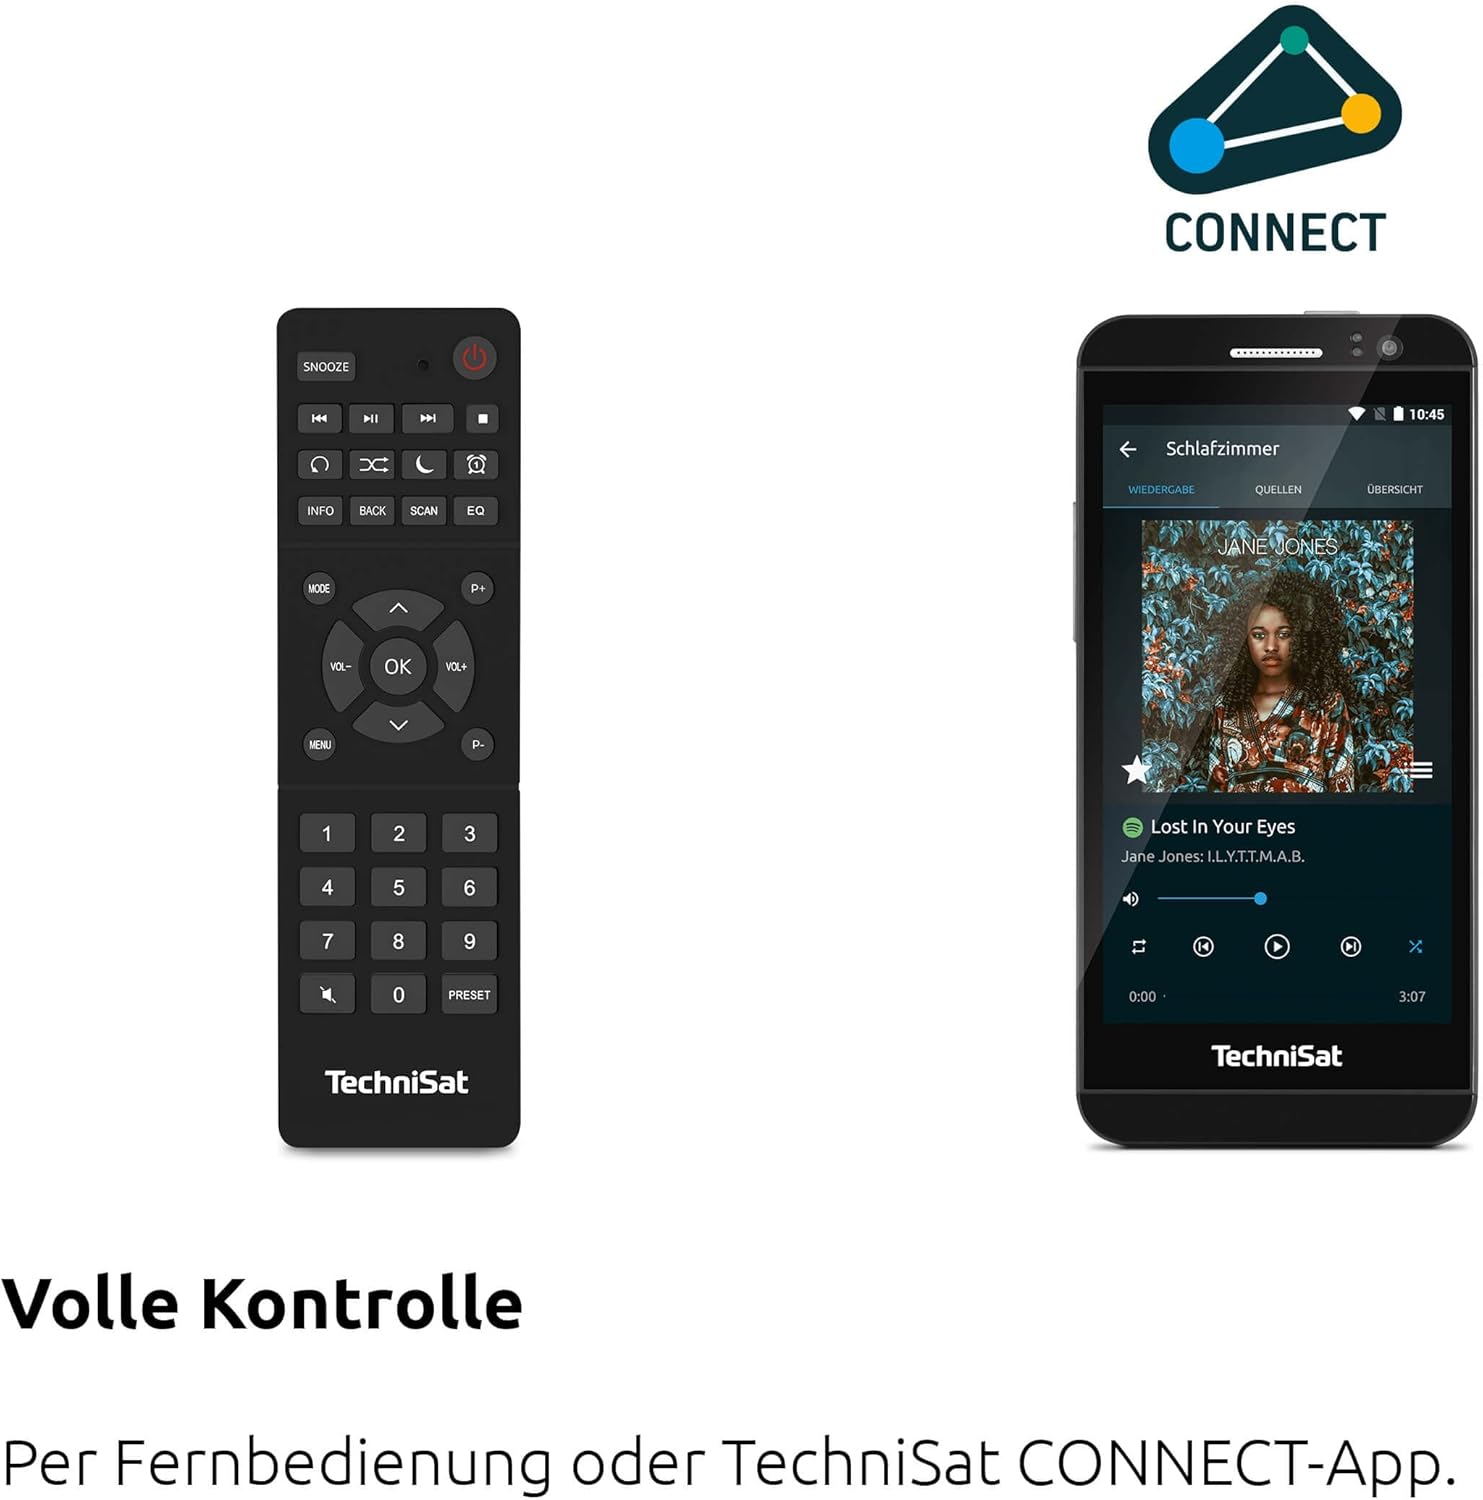
Figure 4.2: Remote Control and App Interface
This image shows the included remote control with buttons for power, snooze, mode, info, scan, EQ, preset numbers, volume, and navigation. It also illustrates the TechniSat CONNECT app interface on a smartphone, providing an alternative control method.
Bedienelemente auf der Vorderseite:
- Netzschalter: Schaltet das Gerät ein/aus.
- Modus-Taste: Switches between DAB+, FM, Internet Radio, Bluetooth, AUX, and USB modes.
- Preset-Taste: Greift auf gespeicherte Radiosender-Voreinstellungen zu.
- Lautstärkeregler: Passt den Audioausgabepegel an.
- Tuning/OK Knob: Navigiert durch Menüs und bestätigt Auswahlen.
- Scan-Taste: Startet den Sendersuchlauf in den Funkmodi.
- Zurück-Schaltfläche: Kehrt zum vorherigen Menü oder Bildschirm zurück.
- Anzeige: 2.4-inch TFT color display for information and menu navigation.
Anschlüsse an der Rückseite:
- Leistungsaufnahme: Schließen Sie das mitgelieferte Netzteil an.
- AUX-IN: 3.5-mm-Klinkenbuchse zum Anschluss externer Audiogeräte.
- Kopfhöreranschluss: 3.5-mm-Klinkenanschluss für ungestörtes Hören.
- USB-Anschluss: For MP3 playback from USB drives and charging external devices.
5. Einrichtung
5.1 Erstes Einschalten
- Place the DIGITRADIO 370 IR on a stable, flat surface.
- Extend the telescopic antenna for optimal DAB+ and FM reception.
- Connect the power adapter to the DC IN port on the rear of the radio and then to a wall outlet.
- Press the Power button on the front panel or remote control to turn on the device.
- Folgen Sie den Anweisungen auf dem Bildschirm für die Ersteinrichtung, einschließlich Sprachauswahl und Netzwerkkonfiguration.
5.2 Netzwerkkonfiguration (WLAN)
To access Internet Radio and app control, the device must be connected to a Wi-Fi network.
- Navigate to the 'Settings' menu using the Tuning/OK knob.
- Wählen Sie „Netzwerk“ und dann „WLAN-Einrichtung“.
- The radio will scan for available networks. Select your desired network from the list.
- Enter the Wi-Fi password using the on-screen keyboard and the Tuning/OK knob.
- Confirm the connection. Once connected, the Wi-Fi icon will appear on the display.
6. Bedienungsanleitung

Figure 6.1: Radio Diversity
This image highlights the multiple radio reception options available: DAB+ Digital Radio, Internet Radio via WLAN, and UKW/FM analog radio.
6.1 DAB+ Radio
- Press the 'Mode' button until 'DAB+' is selected.
- The radio will automatically scan for available DAB+ stations during the first use. To initiate a scan manually, press the 'Scan' button.
- Use the Tuning/OK knob to scroll through the list of available stations. Press the knob to select a station.
- To save a station as a preset, press and hold the 'Preset' button, then select a preset number and confirm.
6.2 UKW-Radio
- Press the 'Mode' button until 'FM' is selected.
- Press the 'Scan' button to automatically search for and store FM stations.
- Alternatively, use the Tuning/OK knob to manually tune to a frequency.
- To save a station as a preset, press and hold the 'Preset' button, then select a preset number and confirm.
6.3 Internetradio
Ensure the radio is connected to a Wi-Fi network (see Section 5.2).
- Drücken Sie die Taste „Modus“, bis „Internetradio“ ausgewählt ist.
- Sie können die Sender nach Standort oder Genre durchsuchen oder gezielt nach bestimmten Sendern suchen.
- Use the Tuning/OK knob to navigate and select stations.
- To save a station as a preset, press and hold the 'Preset' button, then select a preset number and confirm.
6.4 Bluetooth-Audiostreaming

Abbildung 6.2: Bluetooth-Audiostreaming
This image demonstrates a smartphone wirelessly streaming music to the radio via Bluetooth, indicating the device's capability for wireless music enjoyment.
- Press the 'Mode' button until 'Bluetooth' is selected. The radio will enter pairing mode.
- Aktivieren Sie Bluetooth auf Ihrem Smartphone oder einem anderen Bluetooth-fähigen Gerät und suchen Sie nach verfügbaren Geräten.
- Select 'DIGITRADIO 370 IR' from the list to pair.
- Sobald die Kopplung hergestellt ist, können Sie Audio von Ihrem Gerät über das Radio abspielen.
6.5 USB-Wiedergabe und -Ladefunktion

Figure 6.3: USB Playback and Charging Function
This image illustrates the dual functionality of the USB port: connecting USB storage devices for MP3 playback and using the port to charge compatible devices like smartphones.
- Stecken Sie einen USB-Stick mit MP3 ein files into the USB port on the rear of the radio.
- Drücken Sie die Taste „Modus“, bis „USB“ ausgewählt ist.
- Use the Tuning/OK knob to navigate through folders and select tracks for playback.
- The USB port can also be used to charge compatible smartphones and other devices. Connect your device's charging cable to the USB port.
6.6 Kabelloses Laden

Figure 6.4: Wireless Charging Function
This image shows a hand placing a smartphone on the top surface of the radio, demonstrating the wireless charging capability for compatible smartphones.
The DIGITRADIO 370 IR features a wireless charging surface on its top panel.
- Ensure your smartphone or device supports Qi wireless charging.
- Place your compatible device centrally on the designated wireless charging area on top of the radio.
- The device should indicate that charging has begun.
6.7 Wecker, Schlaftimer und Schlummerfunktion
The radio includes an alarm clock, sleep timer, and snooze function.
- Wecker: Set up to two independent alarms with customizable sources (buzzer, DAB+, FM, Internet Radio) and volume. Access via the 'Settings' menu.
- Schlaf-Timer: Allows the radio to turn off automatically after a set period (e.g., 15, 30, 60 minutes). Access via the 'Settings' menu.
- Schlummern: When an alarm sounds, press the 'Snooze' button on the remote control to temporarily pause the alarm.
6.8 App Control (UNDOK App)
The DIGITRADIO 370 IR can be controlled via the UNDOK app on your smartphone or tablet.
- Laden Sie die App „UNDOK“ aus dem App Store Ihres Geräts herunter.
- Stellen Sie sicher, dass Ihr Smartphone/Tablet und das Radio mit demselben WLAN-Netzwerk verbunden sind.
- Open the UNDOK app; it should automatically detect your DIGITRADIO 370 IR.
- You can now control all major functions of the radio, including mode selection, station tuning, volume, and presets, directly from the app.
7. Wartung
7.1 Reinigung
- Ziehen Sie vor der Reinigung immer den Stecker aus der Steckdose.
- Verwenden Sie ein weiches, trockenes Tuch, um die Außenflächen abzuwischen.
- Do not use liquid cleaners, aerosol cleaners, or strong chemical solvents, as these may damage the finish.
7.2 Speicherung
Wenn Sie das Gerät über einen längeren Zeitraum lagern, trennen Sie es von der Stromversorgung und bewahren Sie es an einem kühlen, trockenen Ort, fern von direkter Sonneneinstrahlung und extremen Temperaturen auf.
8. Fehlerbehebung
| Problem | Mögliche Ursache | Lösung |
|---|---|---|
| Kein Strom | Stromkabel nicht angeschlossen; Steckdose defekt | Überprüfen Sie den Anschluss des Stromkabels; versuchen Sie es mit einer anderen Steckdose. |
| Kein Ton | Lautstärke zu niedrig; Stummschaltung aktiviert; Falsche Quelle ausgewählt | Increase volume; Check if mute is active; Select the correct input source (DAB+, FM, Internet, Bluetooth, USB, AUX). |
| Schlechter Radioempfang (DAB+/FM) | Antenna not extended; Weak signal; Interference | Fully extend the telescopic antenna; Reposition the radio; Avoid placing near other electronic devices. |
| Internetradio funktioniert nicht | No Wi-Fi connection; Incorrect Wi-Fi password; Router issue | Check Wi-Fi connection in settings; Re-enter Wi-Fi password; Restart your Wi-Fi router. |
| Bluetooth-Kopplung fehlgeschlagen | Radio not in pairing mode; Device too far; Bluetooth off on source device | Ensure radio is in Bluetooth mode; Move devices closer; Enable Bluetooth on your source device. |
| Kabelloses Laden funktioniert nicht | Device not Qi-compatible; Device not placed correctly; Phone case too thick | Verify device supports Qi charging; Adjust device position on charging pad; Remove thick phone cases. |
9. Spezifikationen
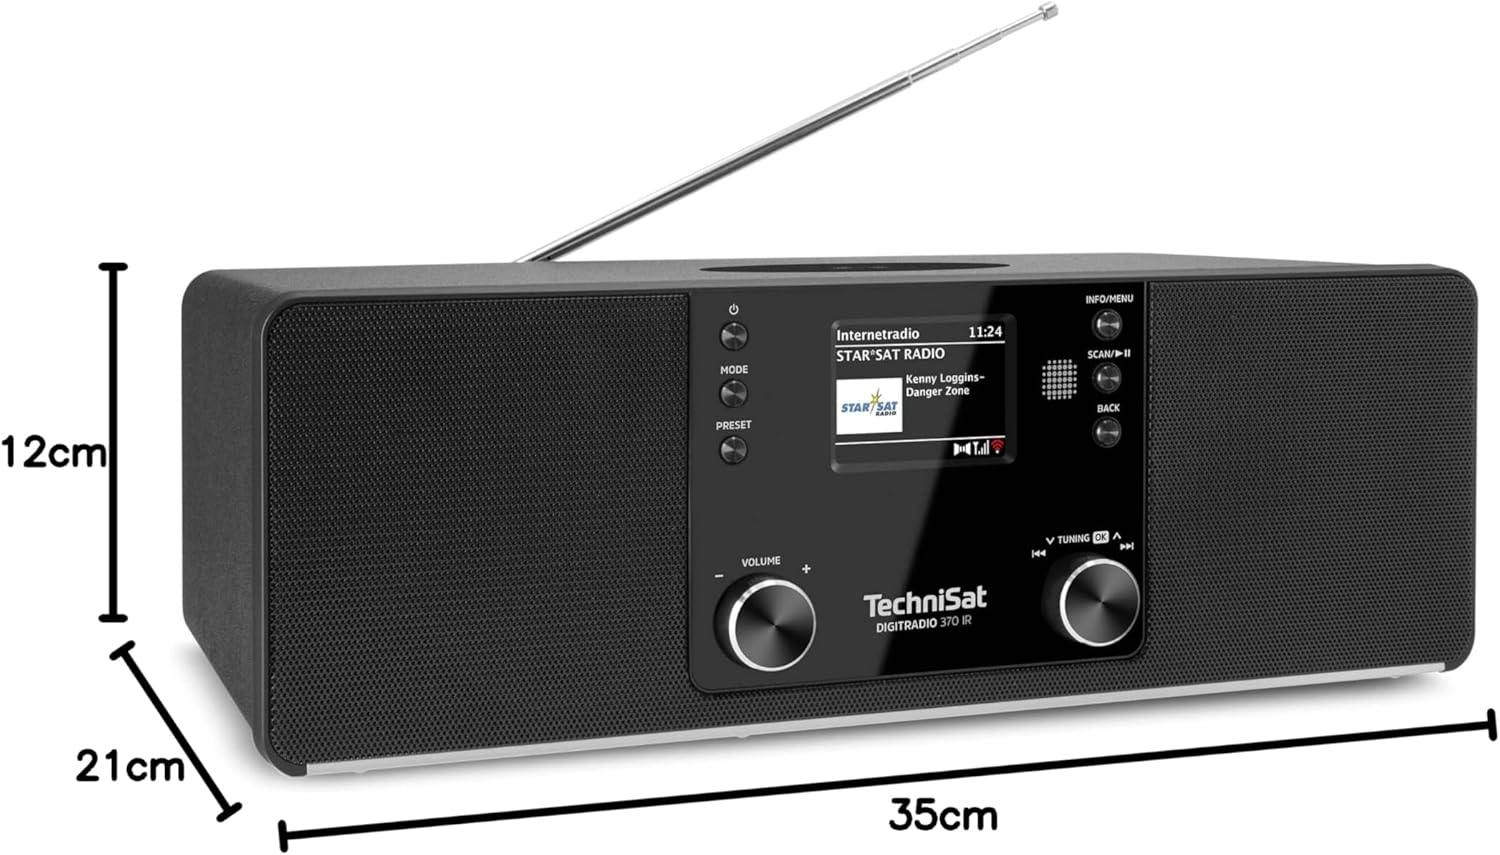
Abbildung 9.1: Produktabmessungen
This image provides a visual representation of the radio's dimensions: 35 cm (length), 12 cm (height), and 21 cm (depth).
| Besonderheit | Detail |
|---|---|
| Modellnummer | 0000/3971 |
| Marke | TechniSat |
| Unterstützte Funkbänder | DAB+, FM, Internetradio |
| Konnektivitätstechnologie | Bluetooth, USB, Wireless-Charging, WLAN (2.4 GHz & 5 GHz) |
| Besondere Merkmale | Wireless Charging, Bluetooth Audio Streaming, USB Playback & Charging, Alarm Clock, Sleep Timer, Snooze, App Control (UNDOK) |
| Audioausgabemodus | Stereo |
| Lautsprecherausgangsleistung | 2 x 5 Watts RMS (10 Watts total) |
| Anzeigetyp | 2.4-Zoll-TFT-Farb-LCD |
| Stromquelle | Electric Cord (230 Volts, 60 Hz) |
| Abmessungen (L x B x H) | 35 x 21 x 12 cm |
| Gewicht | 2.7 Kilogramm |
| Gehäusematerial | Holz |
| Kompatible Geräte | Smartphone, MP3 player, tablet, laptop, headphones |
| Schnittstellen | 3.5 mm Audio (AUX-IN), USB 2.0, 3.5 mm Headphone |
10. Garantie und Support
10.1 Garantieinformationen
This product comes with a 2-year warranty (Gewährleistung) from the date of purchase. Please retain your proof of purchase for any warranty claims. The warranty covers manufacturing defects and malfunctions under normal use. It does not cover damage caused by misuse, accidents, unauthorized modifications, or normal wear and tear.
10.2 Kundendienst
For technical assistance, troubleshooting beyond this manual, or warranty inquiries, please contact TechniSat customer support. Refer to the TechniSat official webWebsite finden Sie Kontaktinformationen für Ihre Region.
Online-Ressourcen: Besuchen Sie die offizielle TechniSat-Website. website for updated manuals, FAQs, and support information.