Einführung
This manual provides detailed instructions for the setup, operation, and maintenance of your Amazon Basics Projection Alarm Clock. Please read this manual thoroughly before using the product to ensure proper function and to prevent damage.

Image: The Amazon Basics Projection Alarm Clock, showing its digital display and projection lens.
Sicherheitshinweise
- Setzen Sie das Gerät keinen extremen Temperaturen, direkter Sonneneinstrahlung, Staub oder Feuchtigkeit aus.
- Stellen Sie sicher, dass das Netzteil mit Ihrem örtlichen Stromnetz kompatibel ist.
- Halten Sie das Gerät von Wasser und anderen Flüssigkeiten fern.
- Versuchen Sie nicht, das Gerät zu zerlegen oder zu verändern. Dadurch erlischt die Garantie.
- Reinigen Sie das Gerät nur mit einem weichen, trockenen Tuch. Verwenden Sie keine flüssigen Reinigungsmittel.
- Entsorgen Sie Batterien ordnungsgemäß entsprechend den örtlichen Vorschriften.
Packungsinhalt
- Amazon Basics Projection Alarm Clock
- Netzteil
- Bedienungsanleitung
Produkteigenschaften
- Projection of time onto a wall or ceiling.
- FM Radio with automatic/manual scan and up to 15 preset stations.
- USB port for charging mobile phones or tablets.
- 7-inch high-definition LED display with adjustable brightness.
- Dual alarms for separate wake-up times.
- Snooze function with adjustable duration (2 to 60 minutes).
- Sleep timer for automatic radio shut-off (5 to 90 minutes).
- DST button for Daylight Saving Time adjustment.
- Battery backup (requires 2 AAA batteries, not included) to maintain time settings during power outages.

Bild: Überview of key features including sleep timer, radio presets, and snooze function.
Bedienelemente und Anzeige
Familiarize yourself with the buttons and ports on your alarm clock for optimal use.

Abbildung: Seite view illustrating the location of controls, USB charging port, and projection lens.
- Zeiteinstellungstaste: Zum Einstellen der aktuellen Uhrzeit.
- Alarm 1/2 Tasten: Used to set and activate Alarm 1 and Alarm 2.
- Schlummer-/Dimmtaste: Activates snooze during an alarm; adjusts display brightness when not alarming.
- Radio/Sleep Button: Turns FM radio on/off; sets sleep timer.
- Volume/Tune Dial: Adjusts radio volume and tunes FM frequencies.
- Projection On/Off/Flip Button: Controls the projection feature and flips the projected time.
- Projection Focus Wheel: Adjusts the clarity of the projected time.
- Projection Angle Adjuster: Changes the angle of the projected time.
- USB Ladeanschluss: Zum Laden externer Geräte.
- Sommerzeit-Taste: Schaltet die Sommerzeit ein und aus.
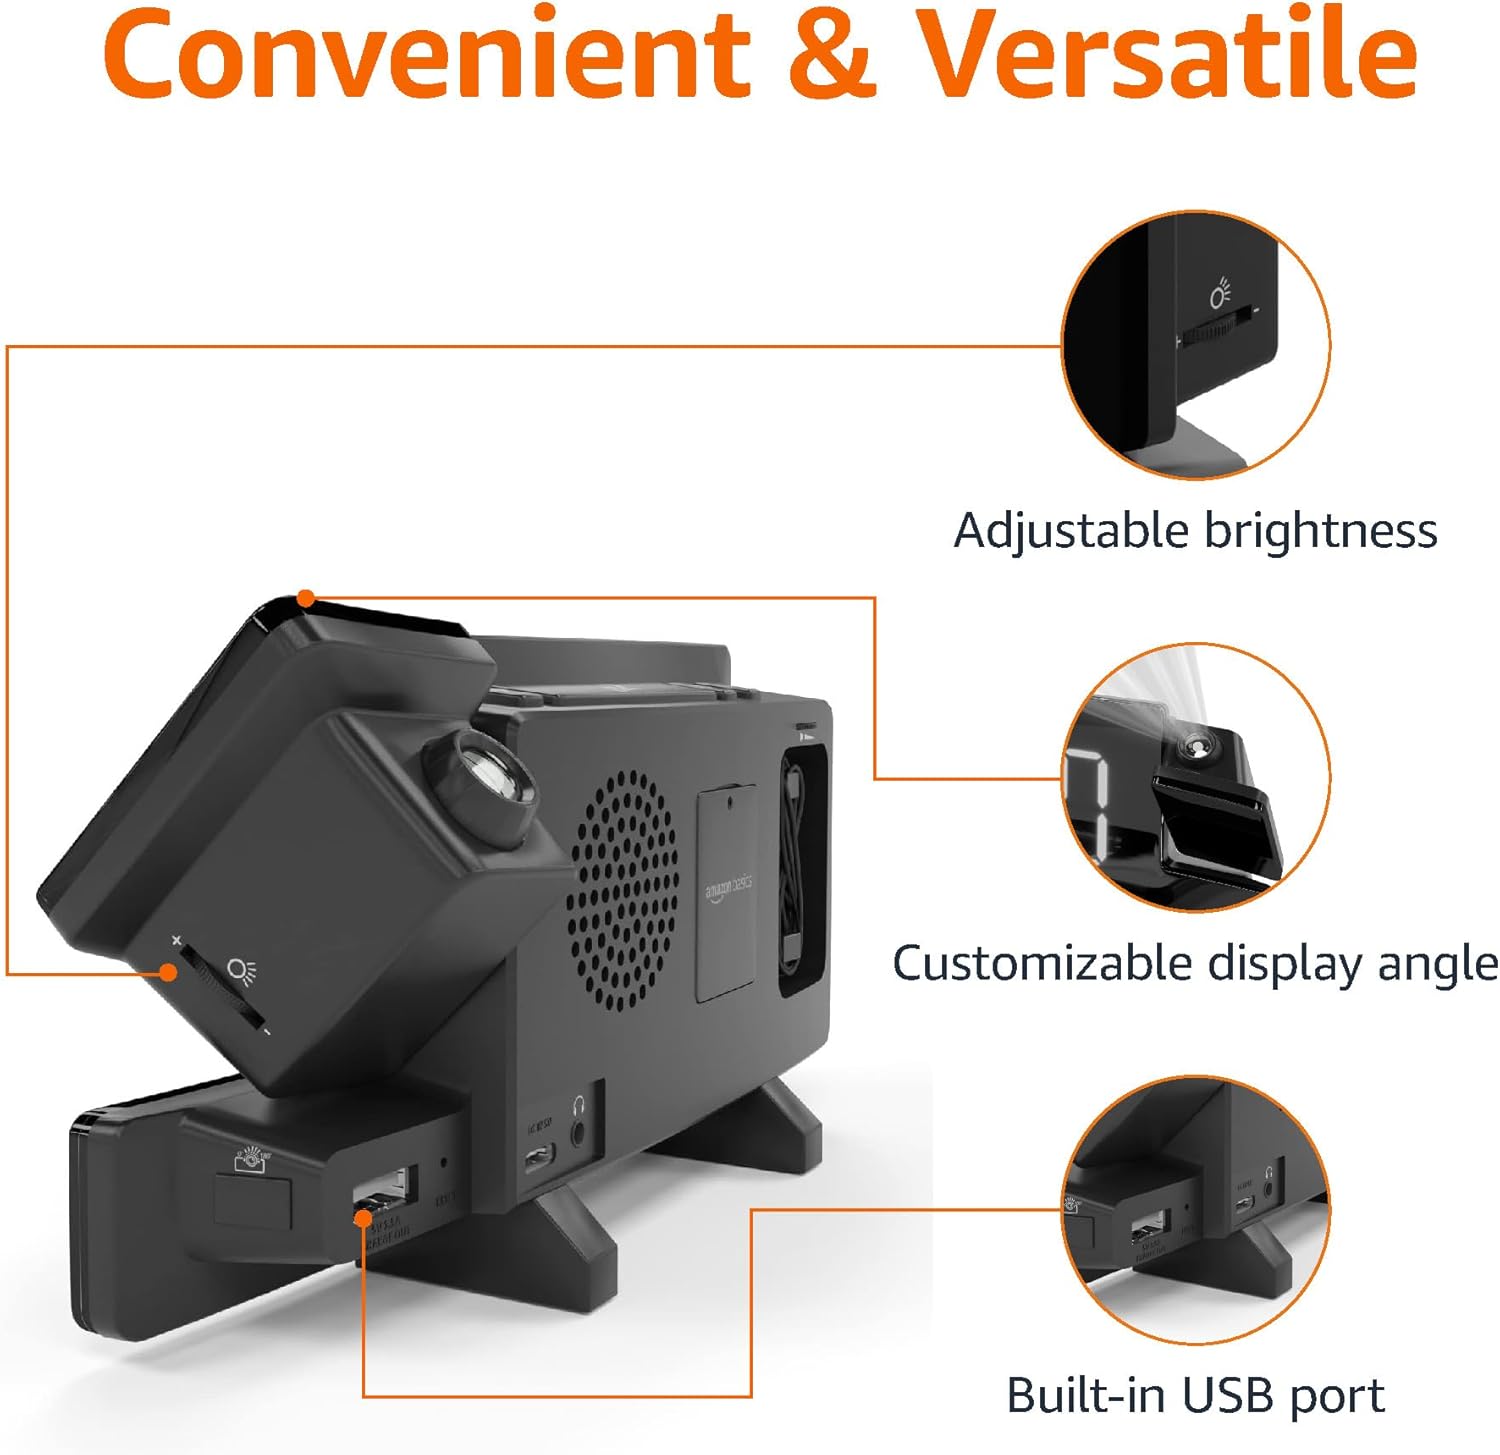
Image: Diagram highlighting the adjustable brightness, customizable projection angle, and USB charging port.
Aufstellen
1. Stromanschluss
Connect the AC power adapter to the DC IN port on the back of the alarm clock and plug it into a standard wall outlet. The display will light up.
2. Batterie-Backup-Installation
For battery backup, open the battery compartment on the bottom of the unit. Insert 2 AAA batteries (not included), ensuring correct polarity (+/-). Close the compartment. The battery backup maintains time settings during power outages but does not power the display or alarm functions.
3. Erstzeiteinstellung
- Halten Sie die Zeiteinstellung Taste. Die Stundenziffern blinken.
- Verwenden Sie die Volume/Tune Dial um die Stunde einzustellen. Drücken Sie Zeiteinstellung zur Bestätigung erneut.
- Die Minutenziffern blinken. Verwenden Sie die Volume/Tune Dial um die Minuten einzustellen. Drücken Sie Zeiteinstellung zur Bestätigung erneut.
- The time format (12H/24H) will flash. Use the Volume/Tune Dial to select your preferred format. Press Zeiteinstellung Zeiteinstellungsmodus bestätigen und verlassen.
4. Sommerzeit (DST)
Drücken Sie die Sommerzeit button to toggle Daylight Saving Time on or off. The DST indicator will appear or disappear on the display.
Bedienungsanleitung
1. Alarme einstellen (Alarm 1 und Alarm 2)
- Halten Sie die 1-Alarm or 2-Alarm Drücken Sie den Knopf. Die Ziffern der Weckzeit blinken.
- Verwenden Sie die Volume/Tune Dial to adjust the alarm hour. Press the respective Alarm Drücken Sie zur Bestätigung die Taste erneut.
- The alarm minute digits will flash. Use the Volume/Tune Dial to adjust the alarm minutes. Press the respective Alarm Drücken Sie zur Bestätigung die Taste erneut.
- The alarm source (FM radio or buzzer) will flash. Use the Volume/Tune Dial to select your preference. Press the respective Alarm Zum Bestätigen und Aktivieren des Alarms drücken Sie diese Taste. Ein Alarmsymbol erscheint auf dem Display.
- To deactivate an alarm, press the respective Alarm button once. The alarm icon will disappear.
2. Using Snooze
Wenn ein Alarm ertönt, drücken Sie die Taste Schlummer/Dimmer button to temporarily silence the alarm. The alarm will sound again after the set snooze duration. The default snooze duration is 9 minutes. To adjust the snooze duration, press and hold the Schlummer/Dimmer Taste, dann verwenden Sie die Volume/Tune Dial to select a duration between 2 and 60 minutes. Press Schlummer/Dimmer zur Bestätigung erneut.
3. FM-Radiobetrieb
- Ein-/Ausschalten: Drücken Sie die Radio/Sleep Taste zum Ein- und Ausschalten des FM-Radios.
- Tune-Sender: Verwenden Sie die Volume/Tune Dial to manually tune to a desired FM frequency.
- Automatischer Scan: Halten Sie die Radio/Sleep Taste zum automatischen Scannen und Speichern verfügbarer FM-Sender als Voreinstellungen.
- Voreinstellungen auswählen: Once stations are saved, short press the Radio/Sleep button to cycle through the preset stations.
- Lautstärke anpassen: Drehen Sie den Volume/Tune Dial um die Lautstärke des Radios einzustellen.
4. Sleep-Timer
Während das FM-Radio läuft, drücken Sie die Taste Radio/Sleep button repeatedly to set the sleep timer. Options typically range from 5 to 90 minutes. The radio will automatically turn off after the selected duration.
5. Projektionsfunktion

Image: The alarm clock projecting the time onto a bedroom ceiling.
- Aktivieren/Deaktivieren: Drücken Sie die Projection On/Off/Flip button to turn the time projection on or off.
- Winkel anpassen: Manually adjust the projection arm to direct the time onto your desired surface (wall or ceiling).
- Fokus: Drehen Sie den Projection Focus Wheel to achieve a clear image.
- Klappdisplay: Drücken Sie die Projection On/Off/Flip button repeatedly to rotate the projected time 180 degrees, ensuring correct orientation.

Image: The alarm clock on a nightstand, projecting the time onto a wall, demonstrating its use in a bedroom setting.
6. USB aufladen
Connect your mobile phone or tablet's USB charging cable to the USB-Ladeanschluss on the back of the alarm clock. The device will begin charging. This port is for charging only and does not support data transfer.
7. Anpassung der Anzeigehelligkeit
Drücken Sie die Schlummer/Dimmer button (when no alarm is sounding) to cycle through different brightness levels for the main LED display.
Wartung
1. Reinigung
Wipe the unit with a soft, dry, lint-free cloth. Do not use abrasive cleaners, waxes, or solvents as they may damage the surface.
2. Batteriewechsel
If the battery backup is not functioning correctly (e.g., time resets after a power outage), replace the 2 AAA batteries in the battery compartment, ensuring correct polarity.
Fehlerbehebung
| Problem | Mögliche Ursache | Lösung |
|---|---|---|
| Anzeige ist leer. | Kein Stromanschluss. | Stellen Sie sicher, dass der Netzadapter fest mit dem Gerät und einer funktionierenden Steckdose verbunden ist. |
| Der Alarm ertönt nicht. | Der Alarm ist nicht aktiviert oder die Lautstärke ist zu niedrig. | Check if the alarm icon is visible on the display. Re-set the alarm if necessary. Increase radio volume if FM is selected as alarm source. |
| Die prognostizierte Zeit ist ungenau. | Projection focus is not adjusted. | Drehen Sie den Projection Focus Wheel bis das Bild klar ist. |
| Projected time is not visible. | Projection is off or room is too bright. | Drücken Sie die Projection On/Off/Flip button to activate. The projection is best viewed in a dark room. |
| Der Radioempfang ist schlecht. | Antennenposition oder Störungen. | Adjust the position of the FM antenna wire. Move the unit away from other electronic devices that may cause interference. |
| Das Laden über USB funktioniert nicht. | Kabelproblem oder Geräteinkompatibilität. | Ensure the USB cable is functional and properly connected. Try a different cable or device. |
Technische Daten
- Modell: MET8831-US
- Leistungsaufnahme: Netzteil (im Lieferumfang enthalten)
- Batterie-Backup: 2 x AAA-Batterien (nicht im Lieferumfang enthalten)
- Anzeige: 7-Zoll-LED
- Radiofrequenz: FM
- USB-Ausgang: 5V, 1A (for charging)
- Abmessungen (L x B x H): 7.1 x 1.6 x 3.7 Zoll (18.03 x 4.06 x 9.4 cm)
- Gewicht: Ungefähr 0.59 g

Image: Product dimensions for the Amazon Basics Projection Alarm Clock.
Garantieinformationen
This product is covered by the Amazon Basics warranty. For detailed information regarding warranty terms and conditions, please refer to the official Amazon Basics webWebsite oder wenden Sie sich an den Kundendienst.
Kundenservice
For further assistance, troubleshooting, or product inquiries, please contact Amazon Basics customer support through the Amazon website or your purchase platform. Have your product model number (MET8831-US) and purchase details ready.


