1. Einleitung
Thank you for choosing the Karlsson LED Mirror Alarm Clock. This digital alarm clock features a modern design with a clear LED display integrated into a silver mirror surface, showing time and temperature. This manual provides essential information for the safe and efficient use of your device.
Was ist in der Box:
- Karlsson LED Mirror Alarm Clock
- USB-Stromkabel

Abbildung 1: Front view of the Karlsson LED Mirror Alarm Clock, showing the time (15:08) and temperature (19°C) on its reflective display.
2. Sicherheitshinweise
- Setzen Sie das Gerät nicht Wasser oder übermäßiger Feuchtigkeit aus.
- Vermeiden Sie extreme Temperaturen, direkte Sonneneinstrahlung und staubige Umgebungen.
- Außerhalb der Reichweite von Kindern aufbewahren.
- Use only the provided USB cable or a compatible power adapter.
- When inserting batteries, ensure correct polarity (+/-).
- Mischen Sie keine alten und neuen Batterien oder verschiedene Batterietypen.
- Wenn das Gerät längere Zeit nicht verwendet wird, nehmen Sie die Batterien heraus.
3. Produktüberschreitungview
Machen Sie sich mit den Komponenten und Bedienelementen Ihres Weckers vertraut.
Frontdisplay:
- Zeitanzeige: Zeigt die aktuelle Uhrzeit im 12- oder 24-Stunden-Format an.
- Temperaturanzeige: Zeigt die Umgebungstemperatur in Celsius oder Fahrenheit an.
Hecksteuerung:
- Set-Taste: Used to enter setting modes (time, alarm).
- AUF-Taste: Wird verwendet, um Werte zu erhöhen oder in Menüs zu navigieren.
- AB-Taste: Wird verwendet, um Werte zu verringern oder in Menüs zu navigieren.
- MODE/V Button: Used to switch display modes or activate voice control (if available).
- Reset-Knopf: Setzt das Gerät auf Werkseinstellungen zurück.
- DC-5-V-Eingang: Zum Anschließen des USB-Stromkabels.
- Batteriefach: Holds 3 x AAA batteries for backup power.
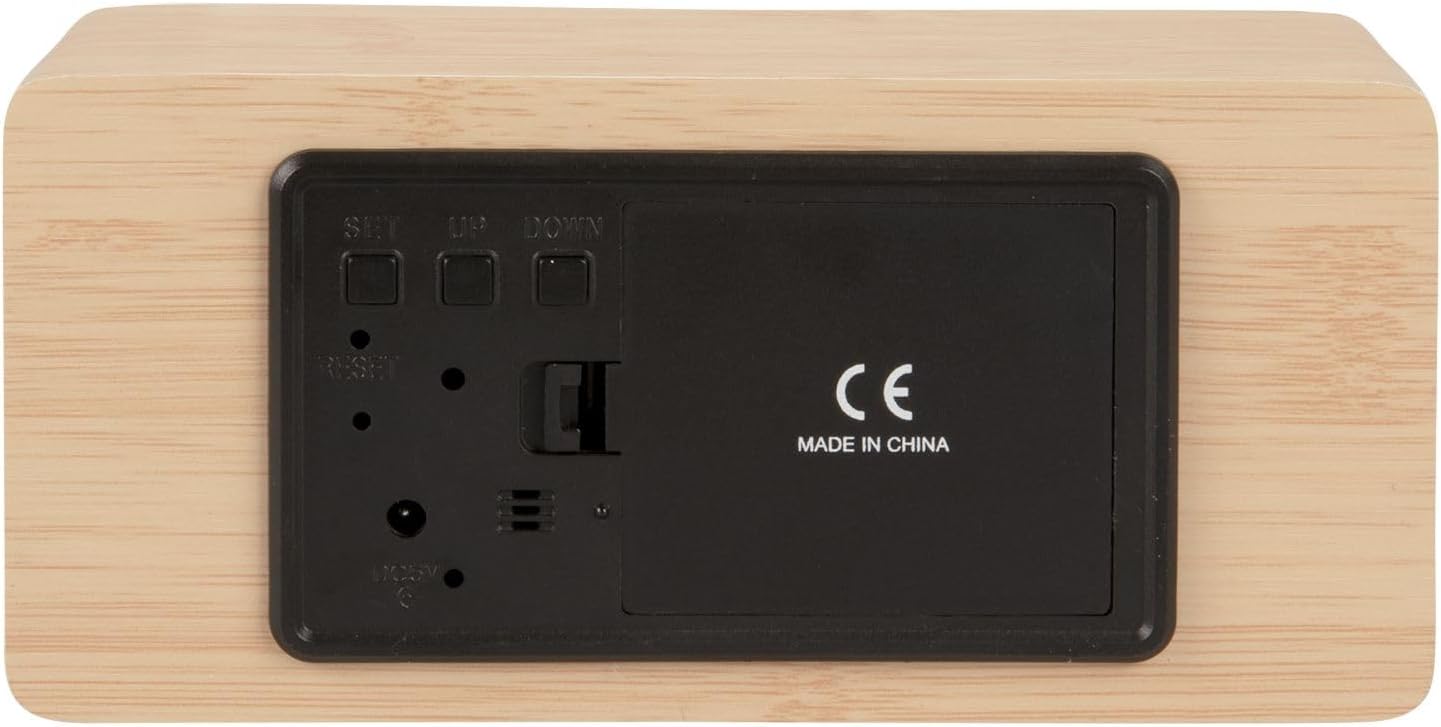
Abbildung 2: Hinteren view of the alarm clock, highlighting the SET, UP, DOWN buttons, power input, and battery compartment.
4. Einrichtung
Einschalten des Geräts:
The alarm clock can be powered via the included USB cable or by 3 x AAA batteries (not included) for backup.
- USB-Stromversorgung: Connect the small end of the USB cable to the DC 5V input port on the back of the alarm clock. Connect the other end to a USB power adapter (not included) or a powered USB port.
- Batterie-Backup: Open the battery compartment cover on the back of the clock. Insert 3 x AAA batteries, ensuring correct polarity. Close the cover securely. Batteries are primarily for backup and may not power the display continuously.

Abbildung 3: The USB power cable provided for connecting the alarm clock to a power source.
5. Bedienungsanleitung
Einstellen der Uhrzeit:
- Halten Sie die SATZ Drücken Sie die Taste, bis die Stundenziffern zu blinken beginnen.
- Verwenden Sie die UP or RUNTER Tasten zum Einstellen der Stunde.
- Drücken SATZ Um die Stunde erneut zu bestätigen, wechseln Sie zur Minuteneinstellung.
- Verwenden Sie die UP or RUNTER Tasten zum Einstellen der Minuten.
- Drücken SATZ to confirm the minutes and exit time setting mode.
Einstellen des Alarms:
- Drücken Sie die SATZ button once (do not hold) to cycle through display modes until 'AL' or an alarm icon appears.
- Halten Sie die SATZ button again until the alarm hour digits flash.
- Verwenden Sie die UP or RUNTER Tasten zum Einstellen der gewünschten Weckzeit.
- Drücken SATZ to confirm the alarm hour and move to alarm minute setting.
- Verwenden Sie die UP or RUNTER Tasten zum Einstellen der gewünschten Alarmminuten.
- Drücken SATZ Zum Bestätigen und Verlassen des Alarmeinstellungsmodus.
- Zum Aktivieren/Deaktivieren des Alarms drücken Sie die Taste UP Drücken Sie die Taste im normalen Zeitanzeigemodus. Ein Alarmsymbol erscheint/verschwindet auf dem Display.
Switching Display Modes (12/24 Hour, Temperature Unit):
- Drücken Sie im normalen Zeitanzeigemodus die Taste UP Taste zum Umschalten zwischen 12-Stunden- und 24-Stunden-Format.
- Drücken Sie die RUNTER Taste zum Umschalten zwischen Celsius (°C) und Fahrenheit (°F) Temperatureinheiten.
6. Wartung
- Clean the alarm clock with a soft, dry cloth.
- Do not use abrasive cleaners, solvents, or harsh chemicals, as these may damage the mirror surface or casing.
- Ensure the device is unplugged and batteries are removed before cleaning.
7. Fehlerbehebung
- Anzeige ist leer: Check if the USB cable is securely connected to a power source. If using batteries, ensure they are inserted correctly and are not depleted.
- Der Alarm ertönt nicht: Verify that the alarm is set and activated (alarm icon visible on display). Check the alarm volume if adjustable (this model may not have adjustable volume).
- Incorrect time/settings: Drücken Sie die ZURÜCKSETZEN button on the back of the unit using a thin object (e.g., a paperclip) to restore factory settings, then re-set the time and alarm.
- Die Temperaturanzeige scheint ungenau zu sein: Ensure the clock is placed in a location away from direct heat sources or drafts that could affect ambient temperature readings.
8. Spezifikationen
| Modellnummer | PTG-KA5879WD |
| Material | Holzfurnier |
| Abmessungen (L x B x H) | 15 cm x 7 cm x 4.5 cm (ca. 5.9 x 2.76 x 1.77 Zoll) |
| Gewicht | 245 g (ca. 0.54 Pfund) |
| Farbe | Light wood casing, silver mirror display |
| Anzeigetyp | Digitale LED |
| Besonderheit | Alarm |
| Stromquelle | USB powered (cable included), 3 x AAA batteries (not included) for backup |
9. Garantie und Support
This product is manufactured by Karlsson. For any support inquiries, warranty information, or service requests, please refer to the retailer where the product was purchased or visit the official Karlsson webDie Kontaktdaten finden Sie auf der Website. Bitte bewahren Sie Ihren Kaufbeleg für Garantieansprüche auf.