1. Einleitung
This manual provides detailed instructions for the installation, operation, and maintenance of your SOGTICPS BL912-40A-WIFI MPPT Solar Charge Controller. This advanced charge controller is designed for off-grid solar applications, compatible with 12V/24V battery systems, including Gel, Flooded, and Lithium types. It features efficient MPPT tracking, an LCD display, dual USB outputs, and WiFi connectivity for remote monitoring.
Hauptmerkmale:
- Innovative MPPT (Maximum Power Point Tracking) technology for up to 99% tracking efficiency.
- Automatisches 12V/24V-System voltage Erkennung.
- Integrated LCD display for real-time monitoring of temperature, charge current, discharge current, and power generation.
- Comprehensive system protection: over-temperature, over-current, short-circuit, open-circuit, and reverse polarity.
- Compatibility with Gel, Flooded, and Lithium battery types.
- Dual 5V 2A USB outputs for charging mobile devices.
- WiFi communication for remote parameter adjustment and monitoring via a dedicated application.
- Industrial-grade main control chip with 16AD sampling Präzision.
- Two-way MOS tube anti-reverse circuit for high-power charging and low heat generation.
2. Sicherheitshinweise
Bitte lesen Sie vor der Installation und Inbetriebnahme alle Anweisungen sorgfältig durch. Die Nichtbeachtung dieser Anweisungen kann zu Schäden am Gerät, Verletzungen oder Sachschäden führen.
- Ensure all connections are tight and correct to avoid excessive voltage drop and potential hazards.
- Installieren Sie den Controller in Innenräumen, fern von direkter Sonneneinstrahlung, hohen Temperaturen und Feuchtigkeit.
- The controller generates heat during operation; ensure adequate ventilation.
- Connect the battery first, then the solar panel, and finally the load. Disconnect in the reverse order: load, solar panel, then battery.
- Do not connect any inverter directly to the load terminals of the controller.
- Ensure the solar panel's open-circuit voltage (Voc) überschreitet nicht die maximale Eingangsspannung des Reglers vol.tage.
- Use appropriate circuit breakers or fuses for the battery and solar panel circuits.
- Halten Sie Kinder vom Solarkraftwerk fern.
- Versuchen Sie nicht, den Controller selbst zu zerlegen oder zu reparieren. Wenden Sie sich zur Reparatur an qualifiziertes Fachpersonal.
3. Produktüberschreitungview
The SOGTICPS BL912-40A-WIFI solar charge controller features a robust design with an intuitive LCD display and multiple connection points.

Bild: Front view of the SOGTICPS BL912-40A-WIFI Solar Charge Controller, highlighting its security protection features such as short-circuit, overload, overcharge, under-voltage und über-voltage Schutz.
Komponenten:
- LCD Anzeige: Shows real-time system status and parameters.
- Bedientasten: Zum Navigieren in Menüs und Einstellen von Parametern.
- Solar Panel Input Terminals: Connect to solar panels.
- Batterieklemmen: An die Batteriebank anschließen.
- Ausgangsklemmen laden: Anschluss an Gleichstromverbraucher.
- Zwei USB-Anschlüsse (5 V 2 A): Zum Laden externer Geräte.
- WLAN-Antenne: Für drahtlose Kommunikation.
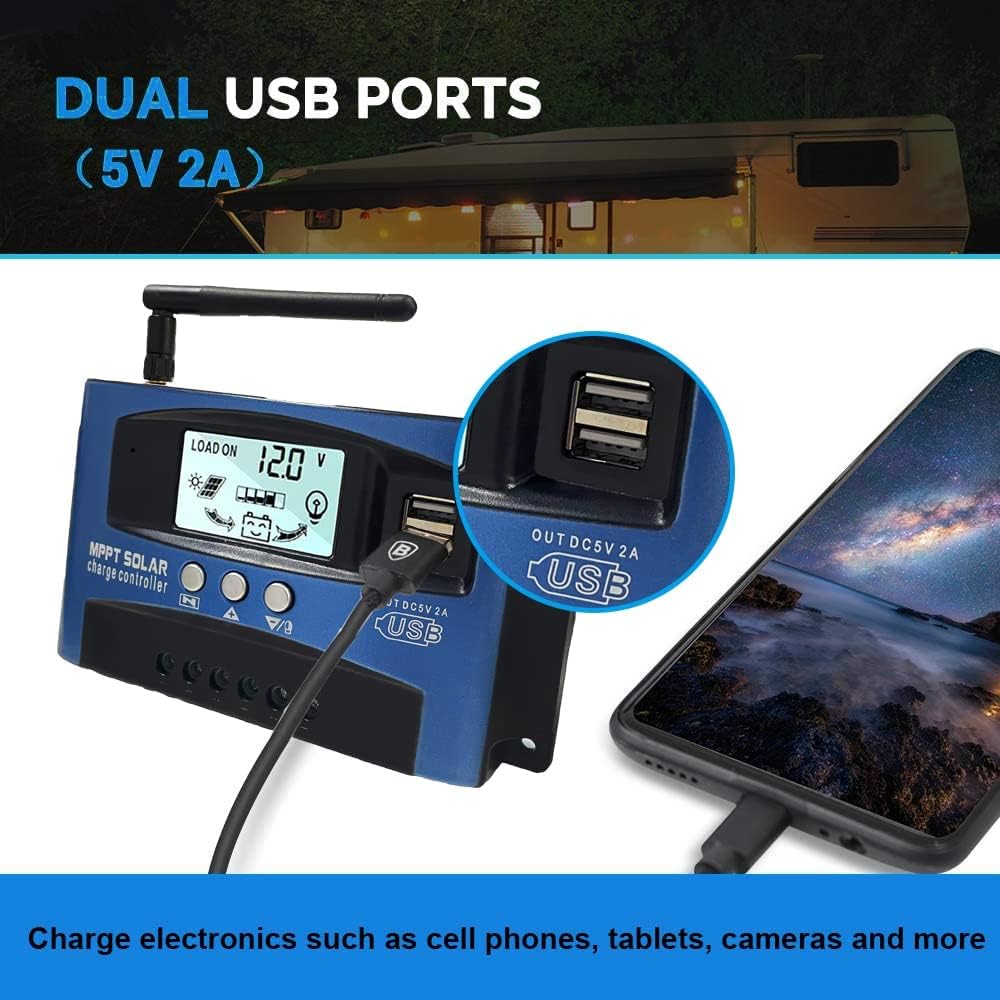
Bild: Nahaufnahme view of the SOGTICPS BL912-40A-WIFI Solar Charge Controller, showing the dual 5V 2A USB ports in use, charging a smartphone.
4. Einrichtung und Installation
Proper installation is critical for the safe and efficient operation of your solar charge controller. Follow the connection order precisely.
Verbindungsreihenfolge:
- Connect the Battery First: Connect the battery to the charge controller's battery terminals. Ensure correct polarity (+ to + and - to -). The controller will automatically detect 12V or 24V system voltage.
- Solarpaneele anschließen: Connect the solar panels to the charge controller's solar input terminals. Again, observe correct polarity.
- Gleichstromlast anschließen (optional): Connect your DC loads to the load output terminals.
Wichtig: When disconnecting, reverse the order: first disconnect the load, then the solar panels, and finally the battery. Failure to follow this order may damage the controller or other components.
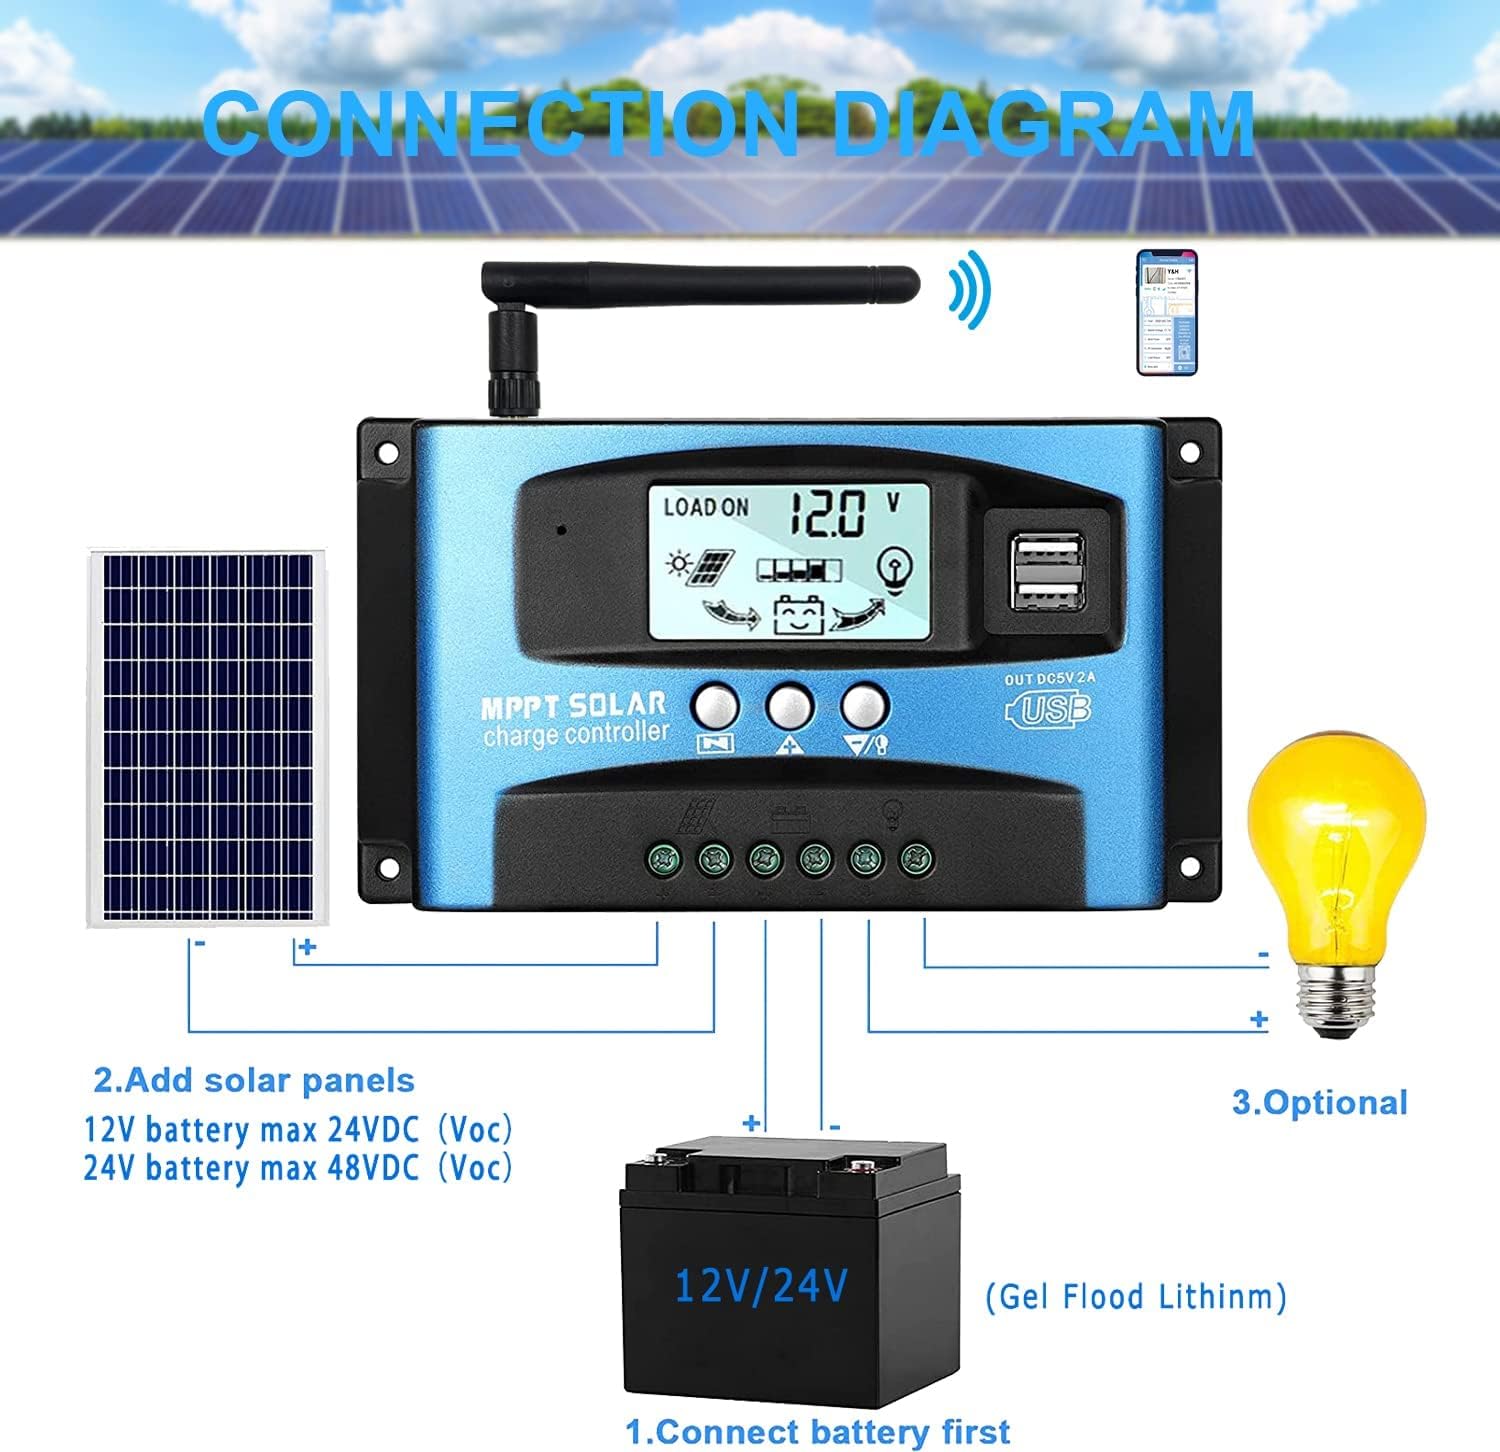
Bild: A clear connection diagram illustrating the proper wiring sequence for the solar charge controller, connecting to a battery, solar panels, and an optional DC load. It emphasizes connecting the battery first.
Batteriekompatibilität:
The controller is compatible with various battery types, including Gel, Flooded (Lead-Acid), and Lithium batteries. Ensure the correct battery type is selected in the controller settings for optimal charging.

Bild: Visual representation showing the SOGTICPS BL912-40A-WIFI Solar Charge Controller's compatibility with Gel, Flooded, and Lithium battery types, indicated by arrows pointing between battery icons and the controller.
5. Bedienungsanleitung
LCD-Display und Navigation:
The LCD provides real-time information about your solar system. Use the control buttons to navigate through the display interfaces and adjust parameters.

Bild: A series of LCD screen captures demonstrating the browsing interface and parameter setting process for the SOGTICPS BL912-40A-WIFI Solar Charge Controller. It shows main display, float voltage, discharge reconnect, discharge stop, load work mode, battery type, and work parameter display.
- Benutzeroberfläche zum Browsen: Drücken Sie die SPEISEKARTE button to cycle through different display interfaces, showing information such as main display, float voltage, discharge reconnect voltage, discharge stop voltage, load work mode, battery type, and other work parameters.
- Einstellparameter: In interfaces 2-8, press the SPEISEKARTE Taste zum Aufrufen des Einstellungsmodus. Verwenden Sie die UP Und RUNTER buttons to adjust the values. Press SPEISEKARTE Um den Einstellungsmodus erneut zu bestätigen und zu verlassen, gehen Sie wie folgt vor:
WLAN-Überwachung:
The controller supports WiFi connectivity, allowing you to monitor and control your solar system remotely via a smartphone application.

Bild: The SOGTICPS BL912-40A-WIFI Solar Charge Controller shown alongside a smartphone displaying its monitoring application interface. This illustrates the wireless monitoring capability of the PV system.
- App-Installation: Download the dedicated application for your smartphone (Android). Refer to the QR code or instructions provided with the product for app download.
- Verbindung: Follow the in-app instructions to connect your controller to your local WiFi network.
- Fernüberwachung: Einmal verbunden, können Sie view real-time data such as temperature, charge current, discharge current, accumulated power generation, battery voltage, and adjust charging modes from anywhere.
6. Wartung
Regelmäßige Wartung gewährleistet die Langlebigkeit und optimale Leistung Ihres Solarladereglers.
- Verbindungen prüfen: Überprüfen Sie regelmäßig alle Drahtverbindungen, um sicherzustellen, dass sie fest sitzen und frei von Korrosion sind.
- Controller reinigen: Halten Sie den Controller sauber und frei von Staub und Schmutz. Verwenden Sie zum Reinigen ein trockenes Tuch.
- Belüftung: Stellen Sie sicher, dass der Installationsbereich über ausreichende Belüftung verfügt, um eine Überhitzung zu vermeiden.
- Batterieinspektion: Regularly check battery terminals for corrosion and ensure battery fluid levels (for flooded batteries) are correct.
- Systemüberwachung: Use the LCD display or the WiFi app to monitor system performance and identify any anomalies early.
7. Fehlerbehebung
Sollten Sie Probleme mit Ihrem Solarladeregler haben, beachten Sie bitte die folgenden häufig auftretenden Probleme und Lösungen:
| Problem | Mögliche Ursache | Lösung |
|---|---|---|
| Keine Anzeige auf dem LCD | Batterie nicht angeschlossen oder niedrige Spannungtage; umgekehrte Polarität. | Batterieanschlüsse und Lautstärke prüfentage. Achten Sie auf die richtige Polarität. |
| Akku wird nicht geladen | Solar panels not connected; insufficient sunlight; faulty solar panel; incorrect battery type setting. | Check solar panel connections and ensure adequate sunlight. Verify solar panel functionality. Confirm battery type setting. |
| Laden funktioniert nicht | Load disconnected; battery low voltage protection; overload protection. | Verbraucheranschlüsse prüfen. Batterie laden. Last reduzieren oder auf Kurzschlüsse prüfen. |
| WiFi app issues (connection/language) | Incorrect WiFi setup; app region/language settings; firmware issues. | Ensure correct WiFi network and password. Check app settings for language. Contact support if issues persist. |
8. Spezifikationen
| Parameter | Wert |
|---|---|
| Modell | BL912-40A-WIFI |
| Nennladestrom | 40 A |
| Systemlautstärketage | 12V/24V automatische Erkennung |
| Max PV Input Power (12V) | 480 Watt |
| Max PV Input Power (24V) | 960 Watt |
| Empfohlene Solarmodul-Voltage | 18V for 12V battery; 36V for 24V battery |
| Eigenverbrauch | <10 mA |
| Betriebstemperatur | -14 °C bis 140 °C (-10 °F bis 60 °F) |
| Anzeigetyp | LCD |
| USB-Ausgang | Dual 5V 2A |
| Kommunikation | W-lan |
| Abmessungen (Paket) | 18 x 11 x 5 cm |
| Gewicht (Paket) | 330 Gramm |
| Herstellerreferenz | 2-BL912-40A-WIFI-DE |
| UPC | 732246237116 |
9. Garantie und Support
For warranty information and technical support, please refer to the documentation included with your purchase or contact SOGTICPS customer service. Keep your purchase receipt as proof of purchase.