1. Einleitung
This manual provides essential information and instructions for the safe and efficient use of your Blackview BV7200 Rugged Smartphone. The BV7200 is designed for durability and performance in challenging environments, featuring advanced water and dust resistance, a powerful processor, and a high-capacity battery.
Zu den Hauptmerkmalen gehören:
- IP68- und IP69K-Zertifizierung: Advanced water and dust resistance for outdoor and demanding conditions.
- MediaTek Helio G85 Processor: Ensures smooth performance for gaming, multitasking, and general use.
- 50MP Dual Camera: Capture high-quality photos, even in low-light conditions.
- 5180mAh Akku: Long-lasting power with 18W fast charging support.
- 6.1-Zoll-HD+-Display: Durable screen with Corning Gorilla Glass 3, optimized for comfortable viewing.
- Handschuhmodus: Allows screen operation even when wearing gloves.

Bild: Überview des Schwarzenview BV7200 Rugged Smartphone, highlighting its MediaTek Helio G85 processor, 50MP camera, IP68/IP69K ratings, 5180mAh battery, 6.1-inch display, and Glove Mode.
2. Einrichtung
2.1. Installation der SIM-Karte und der microSD-Karte
So installieren Sie Ihre SIM-Karte(n) und/oder MicroSD-Karte:
- Suchen Sie den SIM-Karten-Einschub an der Seite des Geräts.
- Verwenden Sie das mitgelieferte SIM-Auswurfwerkzeug, um das Fach zu öffnen.
- Carefully place your Nano-SIM card(s) and/or MicroSD card into the designated slots, ensuring correct orientation.
- Schieben Sie das Fach vorsichtig zurück in das Gerät, bis es einrastet.
2.2. Erstes Laden und Einschalten
Es wird empfohlen, Ihr Gerät vor der ersten Verwendung vollständig aufzuladen.
- Connect the USB Type-C cable to the charging port at the bottom of the phone. Ensure the port cap is securely opened before inserting the cable and closed after charging to maintain water resistance.
- Verbinden Sie das andere Ende des Kabels mit einem kompatiblen Netzteil und stecken Sie dieses in eine Steckdose.
- Once sufficiently charged, press and hold the Power button (usually on the right side) for a few seconds until the Blackview Das Logo erscheint.
- Folgen Sie den Anweisungen auf dem Bildschirm, um die Ersteinrichtung abzuschließen, einschließlich Sprachauswahl, WLAN-Verbindung und Einrichtung des Google-Kontos.
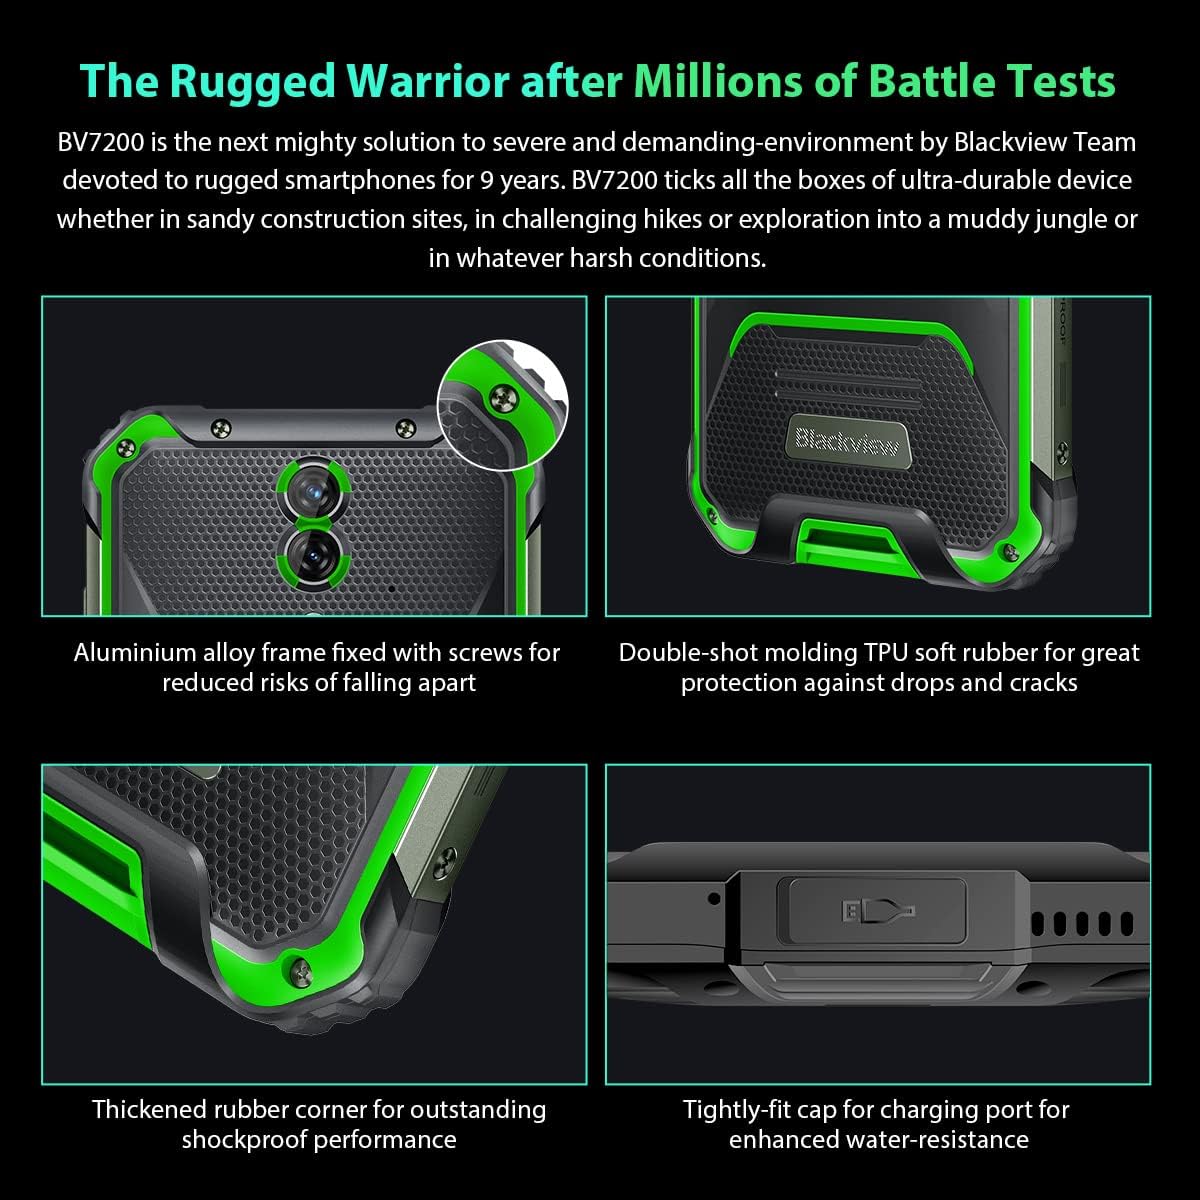
Bild: Nahaufnahme views der Schwarzenview BV7200's rugged construction, including aluminum alloy frame, double-shot molding TPU rubber, thickened rubber corners, and the tightly-fit cap for the charging port, emphasizing its durability and water resistance.
3. Bedienungsanleitung
3.1. Grundlegende Navigation
Das Schwarzeview BV7200 operates on Doke OS 3.0, based on Android 12. Use touch gestures for navigation:
- Klopfen: Wählen Sie ein Element aus oder öffnen Sie eine App.
- Wischen: Durch Bildschirme oder Listen scrollen.
- Prise: Bilder vergrößern oder verkleinern und web Seiten.
- Lange drücken: Kontextmenüs aufrufen oder App-Symbole verschieben.
3.2. Kameranutzung
The BV7200 features a 50MP main rear camera and an 8MP ultra-wide/macro rear camera.
- Öffnen Sie die Kamera-App von Ihrem Startbildschirm oder aus der App-Übersicht.
- Wählen Sie den gewünschten Modus (Foto, Video, Porträt, Pro usw.).
- Tippe auf den Bildschirm, um einen bestimmten Bereich zu fokussieren.
- Drücken Sie den Auslöser, um ein Foto aufzunehmen oder die Videoaufnahme zu starten/stoppen.

Image: Diagram illustrating the Blackview BV7200's 50MP Samsung ISOCELL JN1 main rear camera, 8MP ultra-wide and ultra-macro rear camera, and rear flash, highlighting its photographic capabilities.
3.3. Handschuhmodus
The BV7200 supports Glove Mode, allowing you to operate the touchscreen while wearing gloves.
- To activate/deactivate Glove Mode, navigate to Settings > Smart Assistant > Glove Mode.
- Ensure this mode is enabled when using gloves for optimal touch responsiveness.

Image: Collage demonstrating the Blackview BV7200's Glove Mode in various scenarios, showing users operating the phone while wearing different types of gloves, emphasizing its utility in cold or industrial environments.
3.4. Water and Dust Resistance (IP68 & IP69K)
The BV7200 is certified IP68 and IP69K, making it resistant to water immersion and high-pressure water jets. This allows for use in aquatic sports or dusty environments.
- Always ensure all port caps (charging port, SIM tray) are securely closed before exposing the device to water or dust.
- Rinse the phone with clean water after exposure to saltwater or chemicals.
- Do not charge the phone if the charging port is wet. Allow it to dry completely.
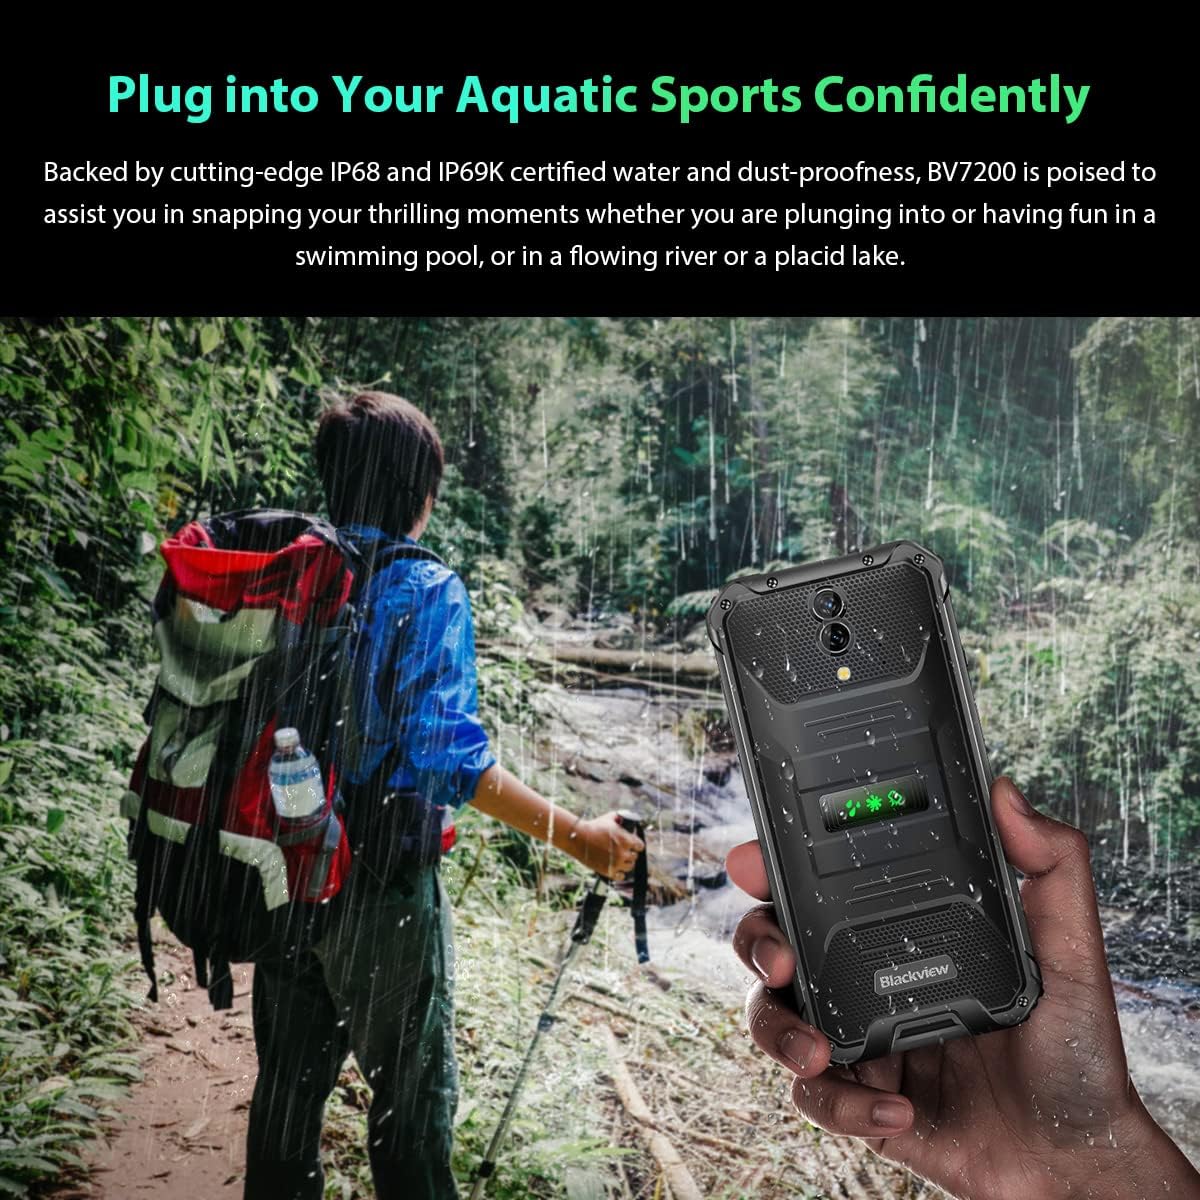
Image: A person holding the Blackview BV7200 near a stream or waterfall, illustrating its water resistance and suitability for outdoor and aquatic activities.
3.5. Batteriemanagement
The 5180mAh battery provides extended usage. The device supports 18W fast charging.
- Verwenden Sie das Original-Ladegerät und -Kabel, um eine optimale Ladegeschwindigkeit und Sicherheit zu gewährleisten.
- The battery is designed to withstand temperatures down to -10°C.
- To prolong battery life, avoid extreme temperatures and fully discharging the battery regularly.
3.6. Speichererweiterung
The BV7200 features 6GB of RAM with an additional 4GB virtual memory expansion, totaling 10GB, for enhanced multitasking and performance.

Image: Graphic illustrating the memory expansion feature of the Blackview BV7200, showing 6GB of physical RAM and an additional 4GB of virtual RAM, combining for a total of 10GB for improved performance.
4. Wartung
4.1. Reinigen Ihres Geräts
Um Ihren schwarzenview BV7200:
- Wischen Sie Bildschirm und Gehäuse mit einem weichen, fusselfreien Tuch ab.
- Bei hartnäckigem Schmutz verwenden Sie ein leichtamp Mit einem milden Seifentuch abwischen und anschließend trockenreiben.
- Verwenden Sie keine scharfen Chemikalien, Lösungsmittel oder Scheuermittel.
- Ensure all port caps are closed before cleaning with liquids.
4.2. Software-Updates
Prüfen Sie regelmäßig, ob Software-Updates verfügbar sind, und installieren Sie diese, um optimale Leistung, Sicherheit und Zugriff auf neue Funktionen zu gewährleisten.
- Gehe zu Einstellungen > System > Systemupdate um nach verfügbaren Updates zu suchen.
- Stellen Sie vor dem Start eines Updates sicher, dass Ihr Gerät über ausreichend Akku und eine stabile WLAN-Verbindung verfügt.
5. Fehlerbehebung
5.1. Häufige Probleme und Lösungen
- Gerät lässt sich nicht einschalten: Stellen Sie sicher, dass der Akku geladen ist. Schließen Sie das Gerät mindestens 15 Minuten lang an ein Ladegerät an und versuchen Sie dann erneut, es einzuschalten.
- Bildschirm reagiert nicht: Restart the device by holding the Power button for about 10-15 seconds. If the issue persists, try a factory reset (data will be lost).
- Verbindungsprobleme (WLAN/Bluetooth/Mobile Daten):
- Schalten Sie WLAN/Bluetooth/Mobile Daten aus und wieder ein.
- Starten Sie das Gerät neu.
- Check router/network settings.
- For mobile data, ensure SIM card is correctly inserted and activated.
- Apps stürzen ab: Löschen Sie den Cache und die Daten der App (Einstellungen > Apps > [App-Name] > Speicher > Cache leeren/Daten löschenSollte das Problem weiterhin bestehen, deinstallieren Sie die App und installieren Sie sie anschließend neu.
5.2. Werksreset
Durch das Zurücksetzen auf Werkseinstellungen werden alle Daten auf Ihrem Telefon gelöscht und es wird in den ursprünglichen Zustand zurückversetzt. Sichern Sie daher wichtige Daten, bevor Sie fortfahren.
- Gehe zu Einstellungen > System > Reset-Optionen > Alle Daten löschen (Werksreset).
- Confirm your decision. The device will restart and perform the reset.
6. Spezifikationen
Below are the technical specifications for the Blackview BV7200:
| Besonderheit | Spezifikation |
|---|---|
| Marke | Schwarzview |
| RAM-Größe | 6 GB (expandable to 10GB with virtual RAM) |
| CPU Modell | MediaTek Helio G85 |
| Speicherkapazität | 128 GB (erweiterbar auf bis zu 1 TB mit TF-Karte) |
| Bildschirmgröße | 6.1 Zoll |
| Auflösung | 720 x 1560 HD+ |
| Zellulartechnologie | 4G |
| Drahtlose Netzwerktechnologie | GSM, LTE, Wi-Fi |
| Batteriekapazität | 5180 mAh |
| Betriebssystem | Android 12 (Doke OS 3.0) |
| Wasser-/Staubbeständigkeit | IP68, IP69K |

Bild: Detailliert view of the MediaTek Helio G85 processor, highlighting its specifications including RAM, ROM, GPU, and expandable storage, emphasizing its strong performance capabilities.

Image: Graphic detailing the Blackview BV7200's 6.1-inch HD+ display specifications, including resolution (720x1560), screen-to-body ratio (83%), brightness (380cd/cm2), and PPI (283), emphasizing its visual quality and durability with Corning Gorilla Glass 3.
7. Garantie und Support
For warranty information and technical support, please refer to the warranty card included with your product or visit the official Blackview webBewahren Sie Ihren Kaufbeleg für Garantieansprüche auf.
Für weitere Unterstützung können Sie sich an Black wenden.view Kundendienst über die offiziellen Kanäle.