RHYTHM 8RZ234SR04
RHYTHM D234 8RZ234SR04 Radio Alarm Clock User Manual
Model: 8RZ234SR04
1. Einleitung
Vielen Dank für Ihren Einkauf.asing the RHYTHM D234 8RZ234SR04 Radio Alarm Clock. This digital alarm clock features a radio-controlled timekeeping function, an electronic sound alarm with snooze, a thermometer, a hygrometer, and a calendar display. Its compact design and clear LCD make it suitable for various indoor environments. Please read this manual thoroughly before use to ensure proper operation and to maximize the clock's features.
2. Sicherheitshinweise
- Setzen Sie das Gerät keinen extremen Temperaturen, direkter Sonneneinstrahlung oder hoher Luftfeuchtigkeit aus.
- Vermeiden Sie es, das Gerät fallen zu lassen oder starken Stößen auszusetzen.
- Versuchen Sie nicht, das Gerät zu zerlegen oder zu verändern. Dadurch erlischt die Garantie.
- Bewahren Sie Batterien außerhalb der Reichweite von Kindern auf. Bei Verschlucken sofort einen Arzt aufsuchen.
- Entsorgen Sie gebrauchte Batterien gemäß den örtlichen Vorschriften.
- Use only the specified battery type (AA batteries).
3. Packungsinhalt
Stellen Sie sicher, dass alle Artikel im Paket vorhanden sind:
- RHYTHM D234 8RZ234SR04 Radio Alarm Clock
- Benutzerhandbuch (dieses Dokument)
4. Produktüberschreitungview
The RHYTHM D234 8RZ234SR04 features a clear LCD display and easily accessible front-facing control buttons for intuitive operation.
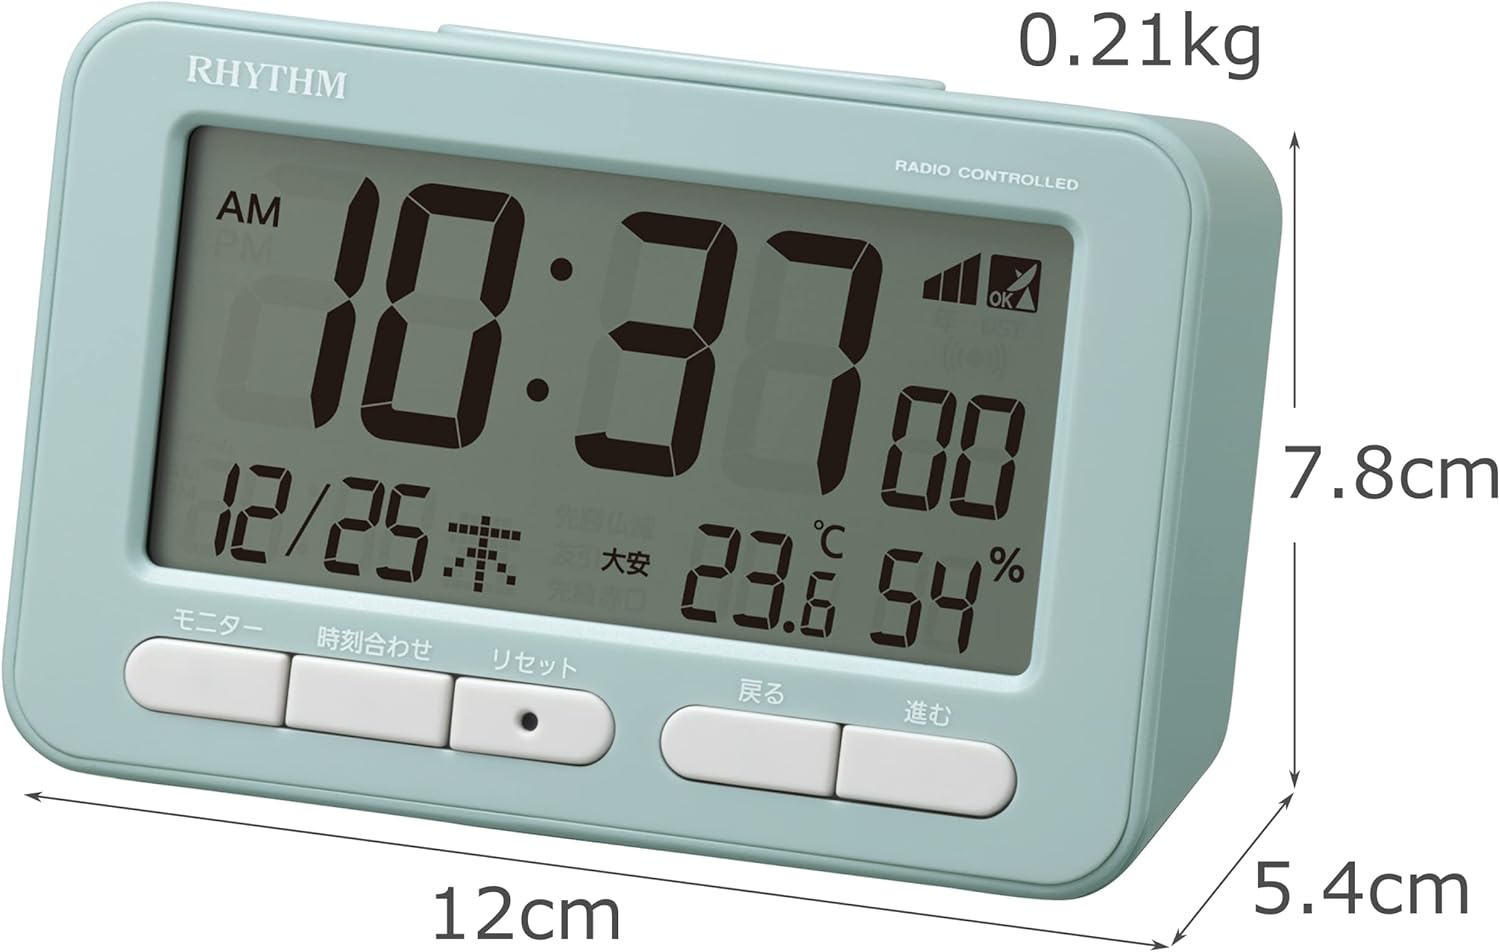
Abbildung 4.1: Front view of the RHYTHM D234 8RZ234SR04 Radio Alarm Clock, showing its dimensions (7.8cm H x 12cm W x 5.4cm D) and weight (0.21kg).

Abbildung 4.2: Detaillierte view of the clock's large LCD display and the front control buttons, including 'Monitor', 'Time Set', 'Reset', 'Back', and 'Forward'.
Anzeigeinformationen:
- Zeit: Displays current time in AM/PM or 24-hour format.
- Datum: Shows month, day, and day of the week.
- Temperatur: Displays current ambient temperature in Celsius.
- Luftfeuchtigkeit: Zeigt die aktuelle relative Luftfeuchtigkeit in Prozent an.tage.
- Radio Wave Reception Indicator: Zeigt die Signalstärke an.
- Alarm ON/OFF Indicator: Zeigt an, ob der Alarm aktiv ist.
Bedientasten:
- MONITOR: Activates backlight or cycles display modes.
- ZEITEINSTELLUNG: Enters time/date setting mode.
- ZURÜCKSETZEN: Resets the clock to factory defaults.
- BACK (<): Adjusts settings backward.
- FORWARD (>): Adjusts settings forward.
- SCHLAFEN/LICHT: Activates snooze during alarm or backlight when pressed.
5. Einrichtung
5.1 Einlegen der Batterie
- Öffnen Sie die Abdeckung des Batteriefachs auf der Rückseite der Uhr.
- Insert two (2) AA batteries (not included) according to the polarity indicators (+ and -) inside the compartment.
- Schließen Sie den Batteriefachdeckel fest.
5.2 Initial Power On and Radio Wave Reception
Upon battery installation, the clock will automatically attempt to receive radio time signals to set the correct time and date. This process may take several minutes.

Abbildung 5.1: Illustration of radio wave time signal reception from two transmission stations, ensuring accurate timekeeping.
- Place the clock near a window for optimal signal reception.
- Vermeiden Sie es, es in der Nähe von elektronischen Geräten aufzustellen, die Störungen verursachen könnten (z. B. Fernseher, Computer, Mobiltelefone).
- A signal strength indicator will appear on the display during reception. Once synchronized, the indicator will show a stable signal.
6. Bedienungsanleitung
6.1 Manuelle Zeit- und Datumseinstellung
If radio signal reception is poor or unavailable, you can set the time and date manually:
- Halten Sie die ZEITEINSTELLUNG Drücken Sie die Taste, bis die Zeitanzeige zu blinken beginnt.
- Verwenden Sie die BACK (<) Und FORWARD (>) Tasten zum Einstellen der Stunde. Drücken ZEITEINSTELLUNG Zur Bestätigung und zum Minutenprotokoll wechseln.
- Wiederholen Sie den Vorgang für Minuten, Jahr, Monat und Tag.
- Drücken ZEITEINSTELLUNG Ein letztes Mal, um den Einstellungsmodus zu verlassen.
6.2 Wecker stellen
- Drücken Sie die WECKER GESTELLT button (usually located on the side or back, if not on front, refer to product diagram). The alarm time will flash.
- Verwenden Sie die BACK (<) Und FORWARD (>) Tasten zum Einstellen der gewünschten Weckzeit. Drücken WECKER GESTELLT zur Bestätigung.
- Adjust the minutes using the BACK (<) Und FORWARD (>) Tasten. Drücken Sie WECKER GESTELLT zur Bestätigung und zum Beenden.
- Zum Aktivieren/Deaktivieren des Alarms drücken Sie die Taste ALARM EIN / AUS switch or button. An alarm icon will appear/disappear on the display.
6.3 Die Schlummerfunktion verwenden
Wenn der Alarm ertönt, drücken Sie die große Taste. SNOOZE / LICHT button on the top of the clock. The alarm will pause for approximately 5 minutes and then sound again. This can be repeated multiple times.
6.4 Display Modes and Backlight
The clock continuously displays time, date, temperature, and humidity. To temporarily illuminate the display, press the SNOOZE / LICHT button. The backlight will activate for a few seconds.

Abbildung 6.1: The clock's display illuminated by its backlight, showing time, date, temperature, and humidity clearly in low light conditions.
6.5 12/24-Stunden-Format
To switch between 12-hour (AM/PM) and 24-hour formats, locate the 12/24 Uhr button (often on the back or side) and press it. The display will change accordingly.
7. Wartung
7.1 Reinigung
Wipe the clock with a soft, dry cloth. Do not use abrasive cleaners, solvents, or spray directly onto the unit, as this may damage the finish or internal components.
7.2 Batteriewechsel
When the display becomes dim or the clock functions irregularly, it is time to replace the batteries. Follow the battery installation steps in Section 5.1. Replace both batteries simultaneously with new ones of the same type.
8. Fehlerbehebung
| Problem | Mögliche Ursache | Lösung |
|---|---|---|
| Keine oder nur schwache Anzeige | Tote oder falsch eingelegte Batterien. | Ersetzen Sie die Batterien durch neue AA-Batterien und achten Sie dabei auf die richtige Polarität. |
| Falsche Uhrzeit/Datum | Poor radio signal reception or manual setting error. | Move the clock to a location with better signal. Perform manual time setting if necessary. |
| Alarm ertönt nicht | Der Alarm ist nicht aktiviert oder falsch eingestellt. | Stellen Sie sicher, dass der Alarm eingeschaltet und die Alarmzeit richtig eingestellt ist. |
| Die Temperatur-/Luftfeuchtigkeitsanzeigen scheinen ungenau zu sein. | Unit placed near heat/cold sources or in extreme conditions. | Relocate the clock to a stable indoor environment away from direct heat, cold, or moisture. Allow time for readings to stabilize. |
9. Spezifikationen
- Modellnummer: 8RZ234SR04
- Abmessungen: 7.8 cm (H) x 12 cm (W) x 5.4 cm (D)
- Gewicht: Ungefähr 0.21 kg (7.5 oz)
- Energiequelle: 2 x AA-Batterien (separat erhältlich)
- Bewegung: Radio-controlled (Automatic time synchronization)
- Anzeigetyp: LCD
- Alarm: Electronic sound, 4-level volume change, with Snooze function
- Thermometerbereich: -9.9°C bis 50°C
- Hygrometer Range: 20 % bis 95 %
- Kalender: Programs until December 31, 2099
- Material: Plastik
- Montageart: Tischplatte
- Besondere Merkmale: Backlight, 12/24-hour display option
10. Garantie und Support
For warranty information and customer support, please refer to the documentation provided at the time of purchase or contact your local RHYTHM distributor. Keep your purchase receipt as proof of purchase for any warranty claims.
Ask a question about this manual
Ask about setup, troubleshooting, compatibility, parts, safety, or missing instructions. Manuals+ will review the question and use this page’s manual context to help answer it.