
1. Wichtige Sicherheitshinweise
Always follow basic safety precautions when using electric tools to reduce the risk of fire, electric shock, and personal injury. Read all instructions carefully before operating this random sander.
- Sicherheit am Arbeitsplatz: Halten Sie Ihren Arbeitsbereich sauber und gut beleuchtet. Unordnung oder Dunkelheit erhöhen die Unfallgefahr. Betreiben Sie Elektrowerkzeuge nicht in explosionsgefährdeten Bereichen, z. B. in der Nähe von brennbaren Flüssigkeiten, Gasen oder Stäuben.
- Elektrische Sicherheit: Der Stecker des Elektrowerkzeugs muss zur Steckdose passen. Verändern Sie den Stecker niemals. Gehen Sie sorgsam mit dem Kabel um. Verwenden Sie das Kabel niemals zum Tragen, Ziehen oder Ausstecken des Elektrowerkzeugs. Halten Sie das Kabel von Hitze, Öl, scharfen Kanten und beweglichen Teilen fern.
- Persönliche Sicherheit: Always wear eye protection. Use dust mask, non-skid safety shoes, hard hat, or hearing protection when appropriate. Dress properly. Do not wear loose clothing or jewelry. Keep hair and clothing away from moving parts.
- Werkzeuggebrauch und -pflege: Wenden Sie keine Gewalt an. Verwenden Sie das für Ihren Anwendungszweck geeignete Elektrowerkzeug. Trennen Sie den Netzstecker, bevor Sie Einstellungen vornehmen, Zubehör wechseln oder Elektrowerkzeuge lagern.
- Staubsammlung: This sander is equipped with a dust collection system. Ensure it is properly attached and emptied regularly to maintain efficiency and reduce dust exposure.
2. Produktüberschreitungview
The DEKO Random Sander is a powerful 300W electric tool designed for various sanding and polishing tasks. It features a 6-speed variable control, efficient dust collection, and an ergonomic design for comfortable use.
Hauptmerkmale:
- Leistungsstarker Motor: 300W motor for efficient grinding.
- Variable Geschwindigkeitsregelung: Adjustable from 7000 RPM to 14000 RPM for coarse to fine sanding.
- Staubsammelsystem: Integrated dust box for a cleaner work environment.
- Easy Sandpaper Attachment: Hook-and-loop system for quick and simple sandpaper changes.
- Vielseitige Anwendungen: Suitable for paint removal, rust removal, wood sanding, and polishing furniture or cars.
Komponenten:
Familiarize yourself with the parts of your random sander:
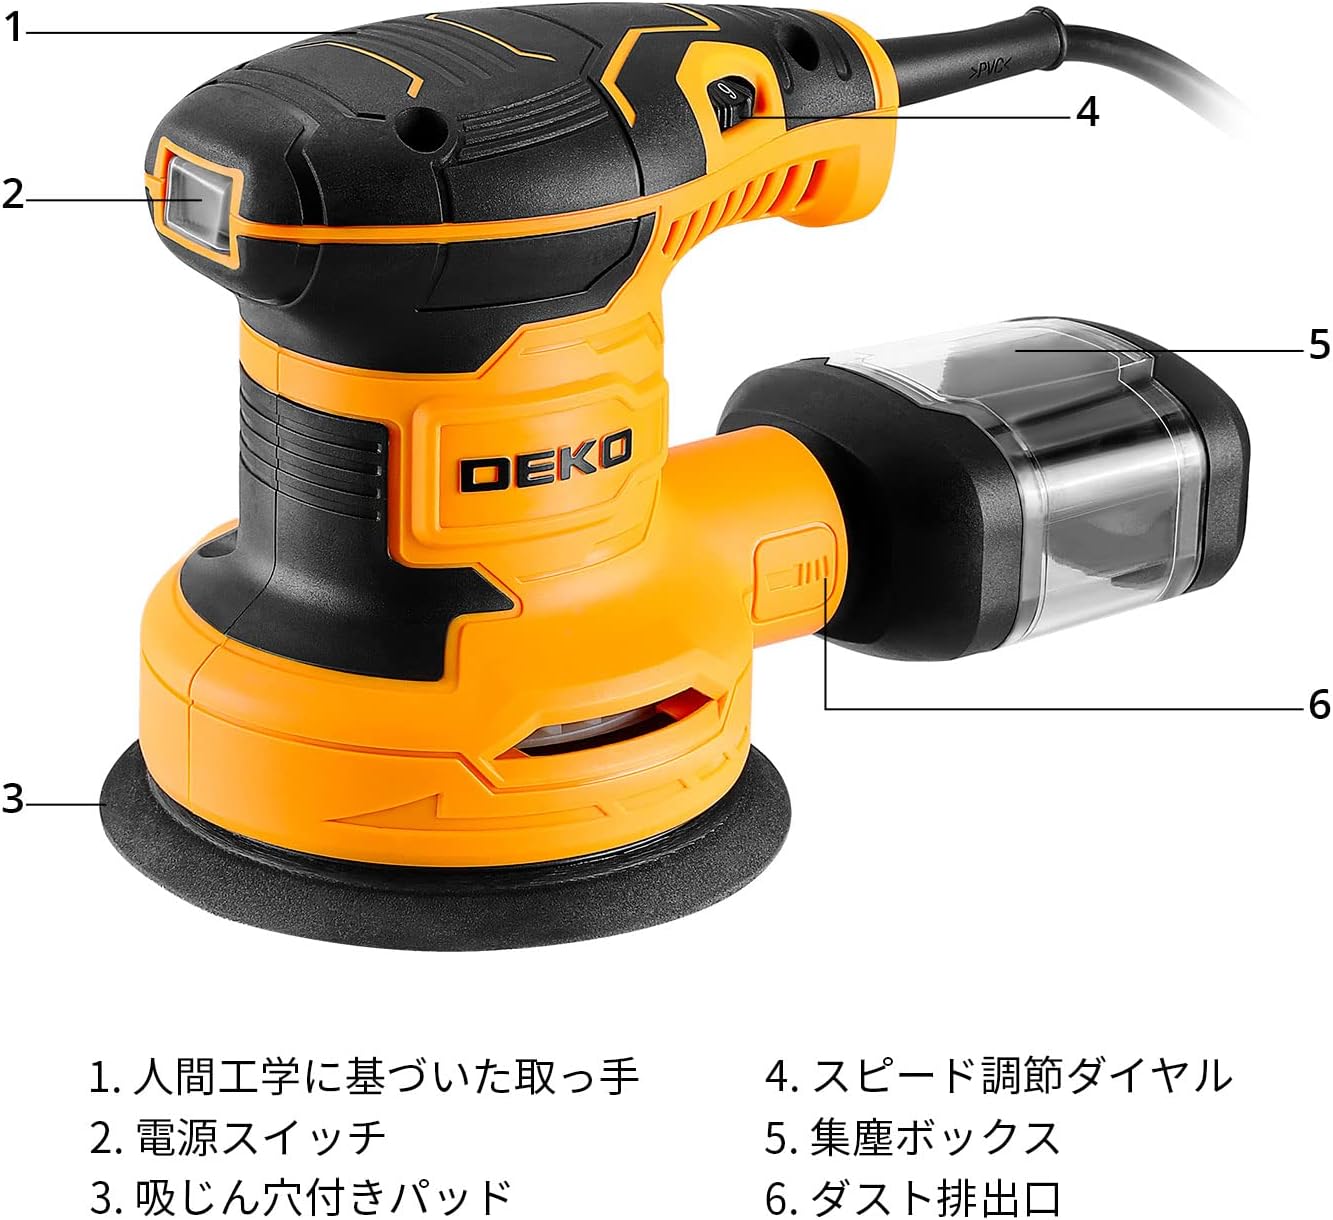
Bild: DEKO Random Sander with numbered components. 1. Ergonomic Handle, 2. Power Switch, 3. Sanding Pad with Dust Holes, 4. Speed Adjustment Dial, 5. Dust Collection Box, 6. Dust Exhaust Port.
3. Einrichtung
3.1 Anbringen von Schleifpapier
The sander uses a hook-and-loop system for quick sandpaper changes. Ensure the sander is unplugged before attaching sandpaper.
- Richten Sie die Löcher im Schleifpapier an den Löchern im Schleifpad aus.
- Press the sandpaper firmly onto the pad until it is securely attached.

Bild: Attaching sandpaper to the sanding pad, aligning the dust collection holes.
3.2 Anbringen des Staubabsaugkastens
The dust collection box helps keep your work area clean by capturing sanding dust.
- Locate the dust exhaust port on the side of the sander.
- Slide the dust collection box onto the exhaust port until it clicks securely into place.

Bild: Illustration of the dust collection system, showing airflow from the sanding pad into the dust box.
4. Bedienungsanleitung
4.1 Ein-/Ausschalten
Um den Schleifer einzuschalten, schieben Sie den Netzschalter in die Position „EIN“. Um ihn auszuschalten, schieben Sie den Schalter in die Position „AUS“.
4.2 Geschwindigkeit anpassen
The sander features a 6-speed adjustment dial, allowing you to select the optimal speed for different materials and tasks.
- Rotate the speed adjustment dial (located on the top of the sander) to your desired setting.
- Lower settings (1-2) are suitable for fine finishing or delicate materials.
- Higher settings (5-6) are for rapid material removal or rough sanding.

Bild: Adjusting the 6-speed dial on the sander.
4.3 Schleiftechniken
For best results and to prevent damage to the workpiece or the tool:
- Apply light, even pressure. Excessive pressure can stop the sanding pad's rotation and cause wear to internal components.
- Bewegen Sie den Schleifer in gleichmäßigen, sich überlappenden kreisenden Bewegungen über die Oberfläche.
- Avoid tilting the sander, as this can create uneven surfaces.
4.4 Anwendungen
The DEKO Random Sander is suitable for a wide range of tasks, including:
- Removing old paint or varnish.
- Removing rust from metal surfaces.
- Sanding wood for furniture, DIY projects, or general woodworking.
- Polishing various surfaces to achieve a smooth finish.
5. Wartung
Regular maintenance ensures the longevity and optimal performance of your sander. Always unplug the tool before performing any maintenance.
5.1 Reinigung des Staubauffangbehälters
Empty the dust collection box frequently to maintain effective dust extraction.
- Detach the dust collection box from the sander.
- Schütten Sie den gesammelten Staub in einen Abfallbehälter.
- Bringen Sie den Staubbehälter wieder sicher an.

Bild: Emptying the dust collection box.
5.2 Replacing Sandpaper
Replace sandpaper when it becomes worn or loses its abrasive quality.
- Peel off the old sandpaper from the hook-and-loop pad.
- Attach a new sandpaper disc, ensuring proper alignment of the holes.
5.3 Allgemeine Reinigung
Wischen Sie die Außenseite des Schleifers mit einem sauberen, trockenen Tuch ab.amp Mit einem Tuch abwischen. Keine scharfen Chemikalien oder Scheuermittel verwenden. Lüftungsöffnungen frei von Staub und Schmutz halten.
6. Fehlerbehebung
If you encounter issues with your DEKO Random Sander, refer to the following common problems and solutions:
- Sander does not start: Prüfen Sie, ob das Netzkabel fest in einer funktionierenden Steckdose steckt. Stellen Sie sicher, dass der Netzschalter auf „EIN“ steht.
- Sanding pad stops rotating under pressure: This can occur if excessive pressure is applied. Reduce the pressure on the sander. Ensure the sandpaper is not excessively worn.
- Schlechte Staubabsaugung: Check if the dust collection box is properly attached and not full. Empty the dust box if necessary. Ensure the sandpaper holes align with the pad holes.
- Übermäßige Vibrationen oder Geräusche: Ensure the sandpaper is correctly attached and not damaged. Check for any loose parts. If the problem persists, discontinue use and contact customer support.
7. Spezifikationen
| Marke | Deko |
| Modellnummer | DKOS30G125-v |
| Stromquelle | Kabelgebundene Elektrik |
| Bandtage | 100 Volt (Wechselstrom) |
| AC-Adapterstrom | 4.5 Amperes |
| Maximale Drehzahl | 14000 U/min |
| Scheibendurchmesser | 5 Zoll |
| Grit-Typ | Coarse, Medium, Fine |
| Inklusive Schleifpapier | 16 Stück |
| Artikelgewicht | 1.61 Kilogramm |
| Verpackungsabmessungen | 20 x 16.2 x 13.4 cm |
8. Garantie und Support
DEKO provides a einjährige Qualitätsgarantie from the manufacturer for this electric sander. If you encounter any issues within the warranty period, please contact our customer support for assistance. We are committed to providing a satisfactory solution.
For further support, please refer to the contact information provided with your purchase or visit the official DEKO webWebsite.