1. Wichtige Sicherheitshinweise
Lesen und verstehen Sie stets alle Sicherheitshinweise, Anweisungen, Abbildungen und technischen Daten, die diesem Elektrowerkzeug beiliegen. Die Nichtbeachtung der unten aufgeführten Anweisungen kann zu Stromschlag, Brand und/oder schweren Verletzungen führen.
- Sicherheit am Arbeitsplatz: Halten Sie Ihren Arbeitsbereich sauber und gut beleuchtet. Unordnung oder Dunkelheit erhöhen die Unfallgefahr. Betreiben Sie Elektrowerkzeuge nicht in explosionsgefährdeten Bereichen, z. B. in der Nähe von brennbaren Flüssigkeiten, Gasen oder Stäuben. Elektrowerkzeuge erzeugen Funken, die Staub oder Dämpfe entzünden können.
- Elektrische Sicherheit: Der Stecker des Elektrowerkzeugs muss zur Steckdose passen. Verändern Sie den Stecker niemals. Gehen Sie sorgsam mit dem Kabel um. Verwenden Sie das Kabel niemals zum Tragen, Ziehen oder Ausstecken des Elektrowerkzeugs. Halten Sie das Kabel von Hitze, Öl, scharfen Kanten und beweglichen Teilen fern.
- Persönliche Sicherheit: Stay alert, watch what you are doing, and use common sense when operating a power tool. Do not use a power tool while you are tired or under the influence of drugs, alcohol, or medication. Always wear eye protection. Use safety glasses, goggles, or a face shield.
- Werkzeuggebrauch und -pflege: Wenden Sie beim Elektrowerkzeug keine Gewalt an. Verwenden Sie das für Ihre Anwendung geeignete Elektrowerkzeug. Das richtige Elektrowerkzeug erledigt die Arbeit besser und sicherer mit der dafür vorgesehenen Leistung. Trennen Sie den Netzstecker von der Stromquelle und/oder entfernen Sie den Akku (falls abnehmbar), bevor Sie Einstellungen vornehmen, Zubehör wechseln oder Elektrowerkzeuge lagern.
- Verwendung und Pflege des Akkus: Nur mit dem vom Hersteller vorgeschriebenen Ladegerät aufladen. Ein Ladegerät, das für einen Akkutyp geeignet ist, kann ein Brandrisiko darstellen, wenn es mit einem anderen Akkupack verwendet wird. Verwenden Sie Elektrowerkzeuge nur mit speziell dafür vorgesehenen Akkus.
2. Packungsinhalt
Packen Sie alle Artikel sorgfältig aus und vergewissern Sie sich, dass Sie Folgendes erhalten haben:
- BATAVIA Cordless Drill (BT-CTD001)
- 20V MAX 2.0Ah Lithium-Ionen-Akku
- 2.4A Ladegerät
- Bedienungsanleitung

Image: The BATAVIA Cordless Drill, including the main unit, a 20V MAX 2.0Ah Lithium-Ion battery, and a 2.4A battery charger.
3. Produktüberschreitungview
Familiarize yourself with the components of your BATAVIA Cordless Drill:
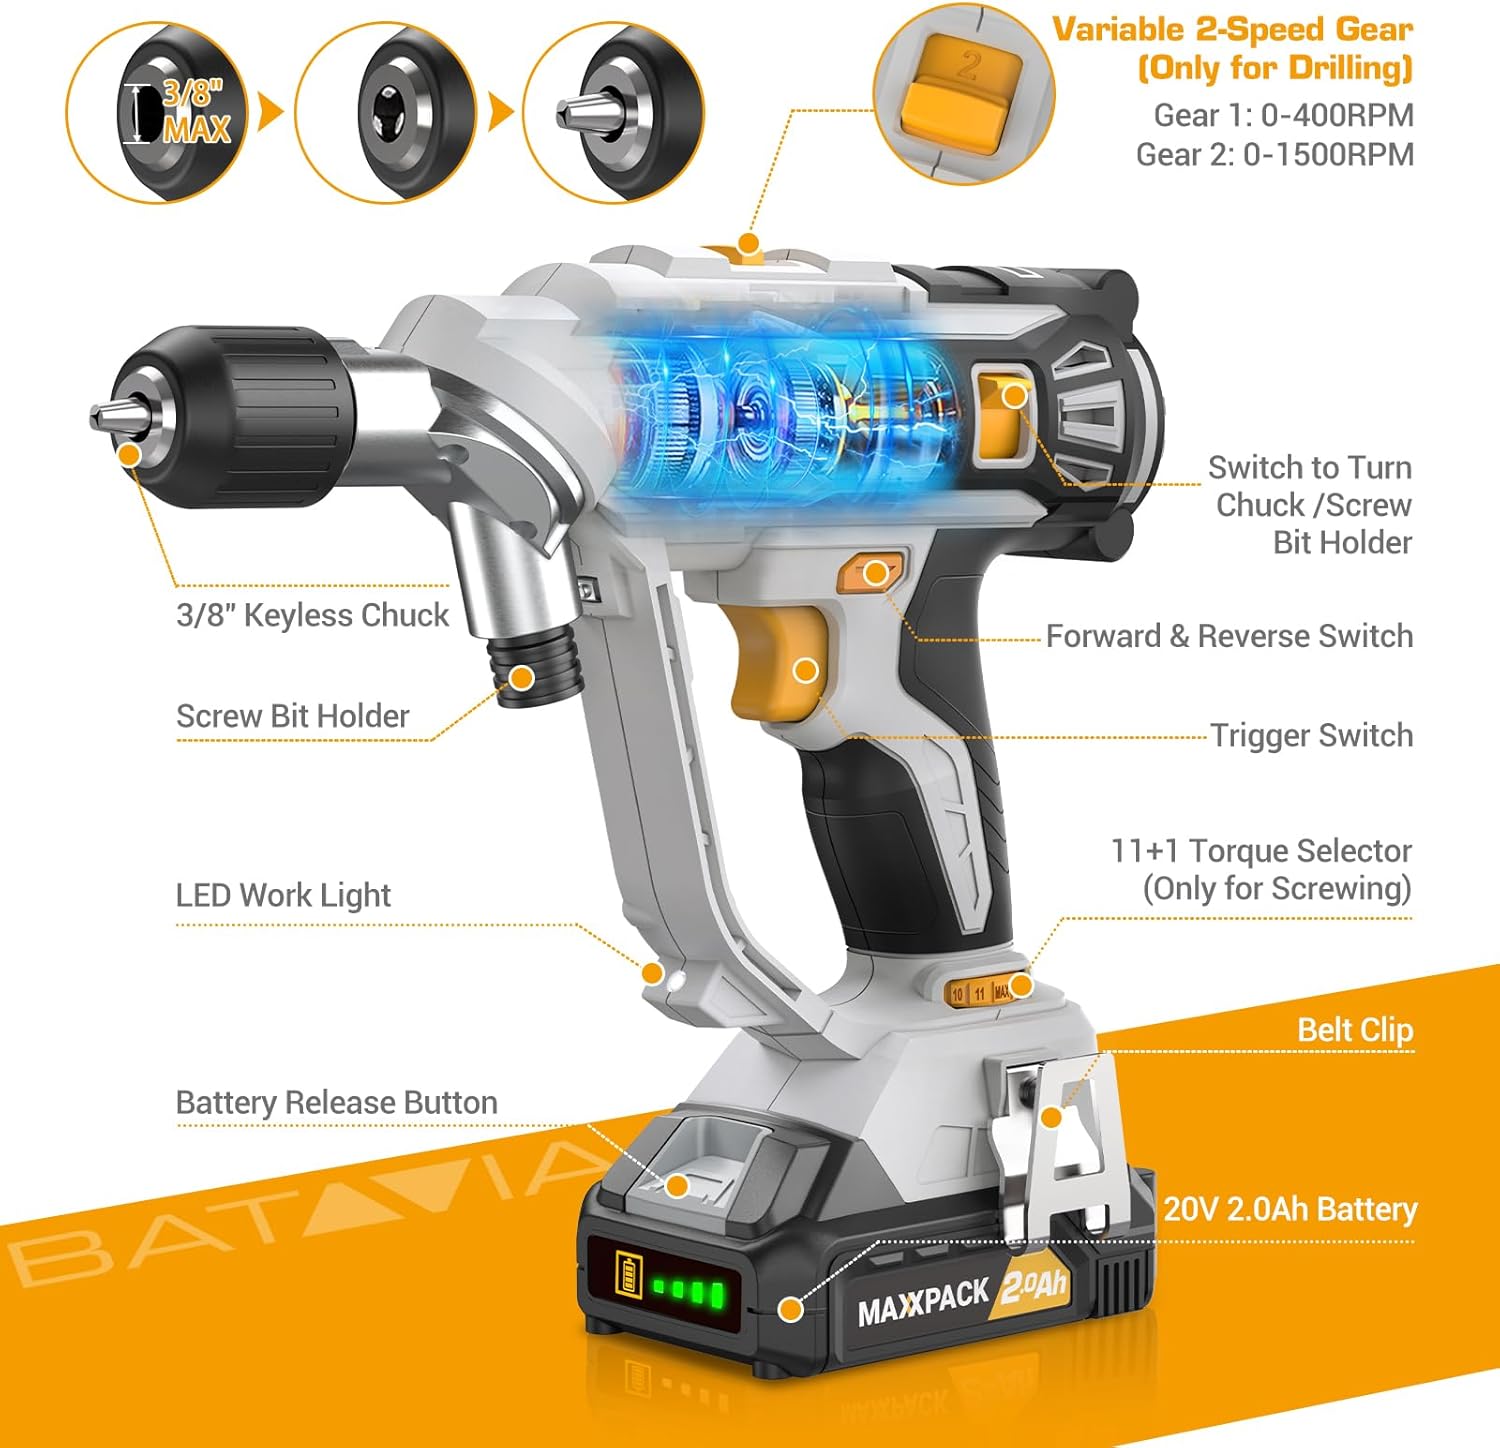
Image: A detailed diagram highlighting key components of the BATAVIA Cordless Drill, including the 3/8" Keyless Chuck, Screw Bit Holder, LED Work Light, Battery Release Button, 20V 2.0Ah Battery, Belt Clip, 11+1 Torque Selector, Trigger Switch, Forward & Reverse Switch, and Variable 2-Speed Gear switch.
- Dual Rotating Chucks: Features both a 3/8" keyless chuck for drilling and a 1/4" hex chuck for driving, allowing quick transitions between tasks.
- 11+1 Drehmomenteinstellungen: Provides precise control for various applications and materials.
- 2 variable Geschwindigkeiten: Offers two speed ranges (0-400 RPM and 0-1500 RPM) for optimal performance in different drilling and driving scenarios.
- Automatic LED Work Light: Beleuchtet den Arbeitsbereich und sorgt so für bessere Sichtverhältnisse bei schlechten Lichtverhältnissen.
- Gürtelschnalle: Conveniently attaches the drill to your belt for easy access.
4. Einrichtung
4.1 Laden des Akkus
- Ensure the battery is securely inserted into the 2.4A battery charger.
- Stecken Sie das Ladegerät in eine normale 120-V-Wechselstromsteckdose.
- The indicator lights on the charger will show the charging status. A full charge typically takes less time due to the 2.4A charger.
- Once fully charged, disconnect the charger from the outlet and remove the battery.
4.2 Einsetzen/Entfernen der Batterie
- To install: Align the battery with the base of the drill handle and slide it in until it clicks securely into place.
- To remove: Press the battery release button located on the front of the battery pack and slide the battery out.
4.3 Using the Dual Rotating Chucks
This drill features a unique dual rotating chuck system for quick changes between drilling and driving tasks.

Image: The BATAVIA Cordless Drill demonstrating its dual rotating chuck feature, allowing users to switch between a drill bit and a screwdriver bit by rotating the chuck assembly.
- For Drilling (3/8" Keyless Chuck): Rotate the front section of the drill head to expose the 3/8" keyless chuck. Insert the drill bit and tighten the chuck by hand until the bit is secure.
- For Driving (1/4" Hex Chuck): Rotate the front section of the drill head to expose the 1/4" hex chuck. Insert the screwdriver bit directly into the hex opening until it locks into place.
5. Bedienungsanleitung
5.1 Setting Torque (11+1 Settings)
The torque selector ring allows you to adjust the amount of rotational force the drill applies. This is crucial for preventing overtightening screws or damaging materials.

Image: The BATAVIA Cordless Drill highlighting its 11+1 torque settings, with recommendations for low settings for small screws/soft materials and high settings for large screws/hard materials.
- Rotate the torque selector ring to choose a setting from 1 to 11. Lower numbers are for smaller screws or softer materials, while higher numbers are for larger screws or harder materials.
- The 'Drill' symbol (often indicated as 'MAX' or a drill icon) bypasses the clutch for maximum torque, suitable for drilling applications.
5.2 Selecting Speed (2 Variable Speeds)
The drill features a 2-speed gearbox to match the speed to the application.

Image: The BATAVIA Cordless Drill showing its adjustable variable 2-speed gear selector. Gear 1 (0-400 RPM) is recommended for large diameter drilling, and Gear 2 (0-1500 RPM) for small diameter drilling.
- Gang 1 (0-400 U/min): Use for high-torque applications, such as driving large screws or drilling large holes in tough materials.
- Gang 2 (0-1500 U/min): Use for high-speed applications, such as drilling small holes or driving small screws quickly.
- The trigger switch provides variable speed control within the selected gear range. Pressing the trigger further increases the speed.
5.3 Vorwärts-/Rückwärtsschalter
The forward/reverse switch is located above the trigger. It controls the direction of rotation.
- Den Schalter nach links schieben für Vorwärtsdrehung (zum Bohren und Eindrehen von Schrauben).
- Den Schalter nach rechts schieben, um die Drehrichtung umzukehren (zum Entfernen von Schrauben oder Herausdrehen von Bohrern).
- When the switch is in the center position, the trigger is locked, preventing accidental starting.
5.4 Automatic LED Work Light
The built-in LED light automatically illuminates when the trigger is pressed, providing visibility in dimly lit work areas.
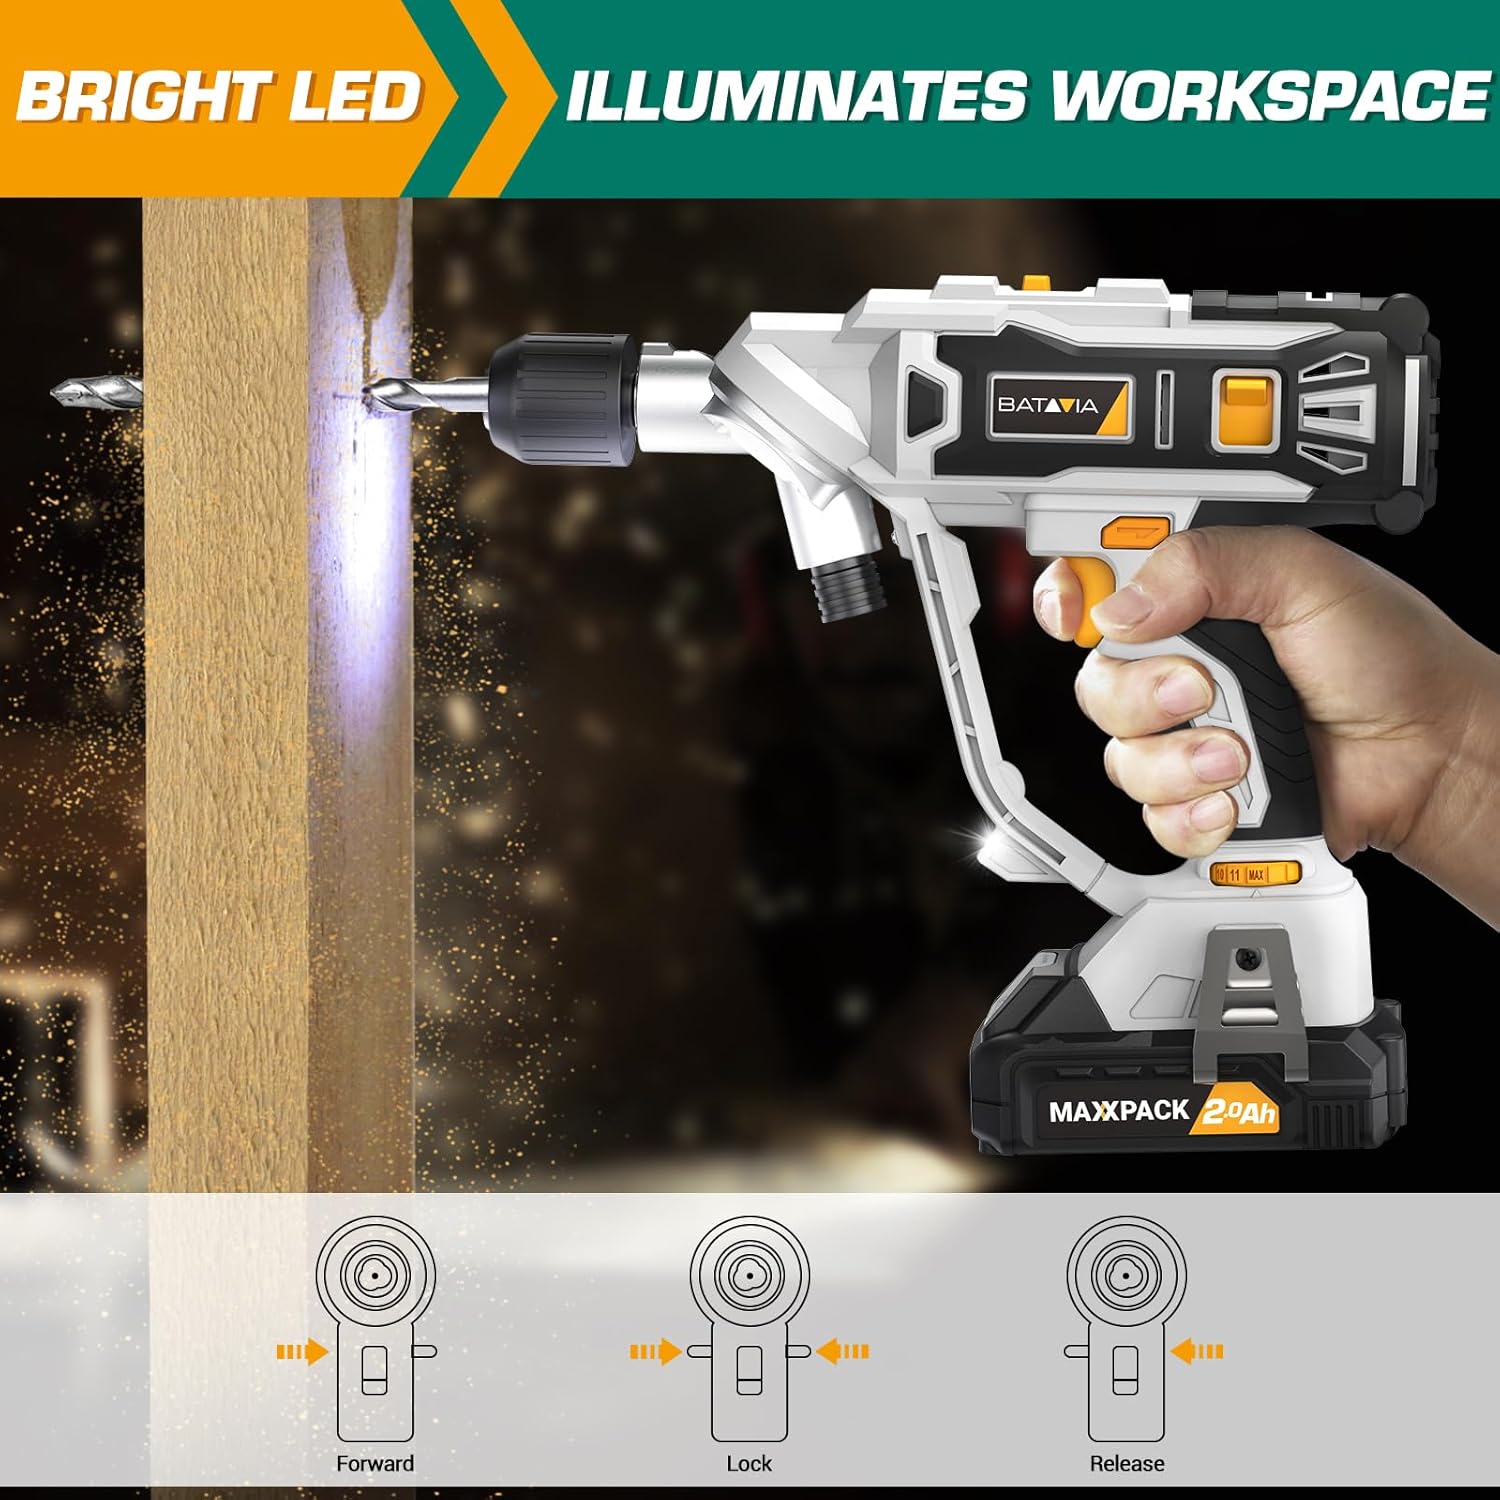
Image: The BATAVIA Cordless Drill in use, with its bright LED light illuminating the work surface, demonstrating its utility in dark or confined spaces.
6. Wartung
Regelmäßige Wartung gewährleistet die Langlebigkeit und optimale Leistung Ihrer Bohrmaschine.
- Reinigung: Nach jedem Gebrauch den Bohrer mit einem sauberen Tuch abwischen.amp Mit einem Tuch abwischen. Keine scharfen Chemikalien oder Scheuermittel verwenden. Lüftungsöffnungen frei von Staub und Schmutz halten.
- Lagerung: Store the drill, battery, and charger in a cool, dry place, away from direct sunlight and extreme temperatures. Ensure the battery is removed from the drill before storage.
- Batteriepflege: Batterien dürfen nicht im entladenen Zustand gelagert werden. Laden Sie sie regelmäßig auf, wenn sie längere Zeit nicht benutzt werden.
7. Fehlerbehebung
If you encounter issues with your BATAVIA Cordless Drill, refer to the following common problems and solutions:
| Problem | Mögliche Ursache | Lösung |
|---|---|---|
| Der Bohrer startet nicht. | Battery not charged or not properly inserted. Forward/Reverse switch in locked (center) position. | Ensure battery is fully charged and securely inserted. Move Forward/Reverse switch to forward or reverse position. |
| Akku lädt nicht. | Das Ladegerät ist nicht angeschlossen. Möglicherweise ist der Akku oder das Ladegerät defekt. | Check power outlet and charger connection. If problem persists, contact customer support. |
| Drill lacks power or stops during use. | Batterie schwach. Überlastungsschutz aktiviert. | Recharge battery. Reduce pressure on the drill or use a lower speed setting for tough materials. |
| Chuck hält das Gebiss nicht richtig fest. | Bit not inserted deep enough. Chuck not tightened properly. | Ensure bit shank is fully inserted into the chuck. Tighten the keyless chuck firmly by hand. |
8. Spezifikationen
| Besonderheit | Spezifikation |
|---|---|
| Modellnummer | BT-CTD001 |
| Marke | Batavia |
| Stromquelle | Batteriebetrieben |
| Akku-Typ | 20V MAX 2.0Ah Lithium-Ion |
| Ladegerät AmpAlter | 2.4 Amps |
| Maximale Drehzahl | 1500 U/min |
| Anzahl der Geschwindigkeiten | 2 (0-400 RPM & 0-1500 RPM) |
| Drehmomenteinstellungen | 11+1 |
| Maximale Futtergröße | 3/8 Inches (Keyless Chuck) |
| Material | PA6-GF30 |
| Produktabmessungen (L x B x H) | 8.07" x 3.34" x 14.5" |
| Artikelgewicht | 5.28 Pfund |
| Besondere Merkmale | Adjustable Torque, Built-In LED Working Light, Compact, Cordless, Variable Speed |
| Zertifizierungen | ETL-zertifiziert |
9. Garantie und Support
BATAVIA products are designed and manufactured to the highest quality standards. This product is ETL certified, ensuring product quality and safety.
For any questions, technical assistance, or warranty claims, please contact BATAVIA customer service:
- Telefon: (+1) 866-272-5789
- Operating Hours (EDT): 10am - 7pm
- Operating Hours (PDT): 7am - 4pm
Please have your model number (BT-CTD001) and purchase information ready when contacting support.