1. Produktüberschreitungview
The Phanteks Eclipse G500A DRGB is a high-performance mid-tower chassis designed to accommodate modern PC components with excellent airflow and integrated D-RGB lighting. It features an Ultra-fine Performance Mesh on both the front and top panels, ensuring optimal cooling and dust filtration.

Figure 1: Phanteks Eclipse G500A DRGB Mid Tower Case, Matte White.
Hauptmerkmale:
- Design mit hohem Luftdurchsatz: Ultra-fine Performance Mesh on front and top panels for superior cooling and dust filtration.
- Integrierte D-RGB-Beleuchtung: Built-in D-RGB lighting on the front and side, controllable via manual buttons or motherboard synchronization.
- Vorinstallierte Lüfter: Includes three high-performance M25-140 D-RGB fans.
- Umfangreiche Kühlunterstützung: Supports up to 420mm radiators in the front and 360mm in the top.
- Geräumiger Innenraum: Accommodates full-length GPUs and offers vertical GPU mounting options (with optional bracket).
- Flexible Lagerung: Multiple HDD and SSD locations, including dedicated SSD brackets and stackable HDD bays.
- Moderne Front-I/O-Anschlüsse: Features 10Gbps USB-C, 2x USB 3.0, Microphone/Headphone Combo, Power button, and D-RGB controls.
2. Einrichtung und Installation
This section provides general guidelines for installing components into your Phanteks Eclipse G500A DRGB chassis. Always refer to your component manuals for specific installation instructions.
2.1 Vorbereitung des Chassis
Before installing components, ensure the chassis is placed on a stable, flat surface. Remove the side panels by gently pulling them open (they are hinged) to access the interior.
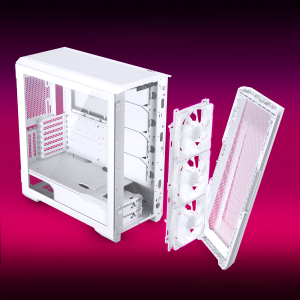
Figure 2: The removable front panel allows for easy installation of fans and radiators.
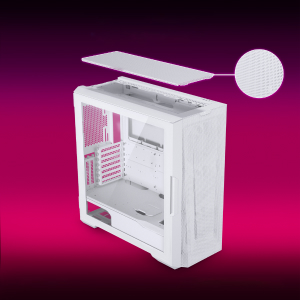
Figure 3: The removable top mesh panel facilitates fan and radiator installation.
2.2 Motherboard-Installation
The G500A supports ATX, micro-ATX, mini-ITX, and E-ATX motherboards (up to 280mm wide). Install the necessary standoffs for your motherboard form factor, then secure the motherboard with screws.
2.3 Installation des Netzteils (PSU)
Install the PSU at the bottom rear of the chassis. The G500A supports PSUs up to 250mm in length (195mm if all 4 bottom HDD positions are used).
2.4 Installation des Speichergeräts
The case offers extensive storage options:
- 2.5"-SSDs: Up to 9 dedicated 2.5" drive bays are included.
- 3.5"-Festplatten: Two stackable 3.5" HDD bays are included, expandable up to a total of 10 HDD bays.

Figure 4: Multiple storage options for 2.5" and 3.5" drives.
2.5 Installation der Grafikkarte (GPU)
The G500A supports graphics cards up to 435mm in length. For vertical GPU mounting, an optional bracket (PH-VGPUKT4.0_03) or riser cable is required.
2.6 Installation des Kühlsystems
The chassis supports various fan and radiator configurations:
- Fan-Unterstützung:
- Front: 3x 120mm or 3x 140mm (3x 140mm pre-installed)
- Oben: 3 x 120 mm oder 3 x 140 mm
- Hinten: 1x 120mm oder 1x 140mm
- Liquid Cooling Radiator Support:
- Front: Up to 360mm (120mm radiator) or 420mm (140mm radiator)
- Top: Up to 360mm (120mm radiator) or 280mm (140mm radiator)
- Hinten: 120mm
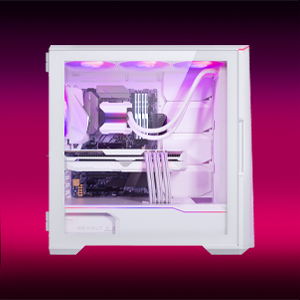
Figure 5: High-end cooling compatibility with various fan and radiator sizes.
2.7 Kabelmanagement
The G500A provides ample space and Velcro ties for efficient cable management, ensuring a clean interior and optimal airflow. Cover doors help to conceal cables on the backside of the motherboard tray.
2.8 Installationsvideos
Video 1: Detailed PC Build Guide in the Phanteks Eclipse G500A (13:33).
Video 2: Another comprehensive PC assembly guide featuring the Phanteks Eclipse G500A (14:01).
3. Bedienungsanleitung
3.1 Front-I/O-Panel
Das vordere I/O-Panel bietet bequemen Zugriff auf wichtige Anschlüsse und Bedienelemente:
- Netzschalter: Zum Ein- und Ausschalten Ihres Systems.
- USB 3.0-Anschlüsse (x2): Zum Anschließen von USB 3.0-Geräten.
- USB-C Gen2 Port (x1): For high-speed USB-C connectivity.
- Kombinierte Mikrofon-/Kopfhörerbuchse: Für Audio-Ein- und Ausgänge.
- D-RGB-Modus-Taste: Cycles through pre-programmed D-RGB lighting effects.
- D-RGB-Farbtaste: Ändert die Farbe der D-RGB-Beleuchtung.

Figure 6: Front I/O panel with USB-C, USB 3.0, audio, and D-RGB controls.
3.2 D-RGB-Beleuchtungssteuerung
The integrated D-RGB lighting can be controlled in two ways:
- Manuelle Kontrolle: Use the D-RGB Mode and Color buttons on the front I/O panel to cycle through effects and colors without software.
- Motherboard-Synchronisierung: Connect the D-RGB controller to a compatible motherboard's D-RGB header to enable software control and synchronization with other D-RGB components.

Figure 7: Integrated D-RGB lighting with included M25-140 D-RGB fans.
4. Wartung
Regelmäßige Wartung trägt dazu bei, die optimale Leistung und Langlebigkeit Ihrer PC-Komponenten zu gewährleisten.
- Staubfiltration: The Ultra-fine Performance Mesh on the front and top panels acts as a dust filter. Periodically remove these panels and clean the mesh to maintain optimal airflow.
- Innenreinigung: Use compressed air to remove dust from inside the chassis, especially from fans, heatsinks, and other components. Ensure the system is powered off and unplugged before cleaning.
- Außenreinigung: Wischen Sie die Außenflächen mit einem weichen, damp Mit einem Tuch abwischen. Vermeiden Sie scheuernde Reiniger oder Lösungsmittel.
5. Fehlerbehebung
In diesem Abschnitt werden häufig auftretende Probleme behandelt, die bei Ihrem PC-Gehäuse auftreten können.
5.1 Stromversorgungsprobleme
- System schaltet sich nicht ein:
- Ensure all power cables (24-pin ATX, 8-pin CPU, GPU power) are securely connected to the motherboard and components.
- Prüfen Sie, ob sich der Netzteilschalter in der Position „EIN“ befindet.
- Prüfen Sie, ob das Kabel des Netzschalters an der Vorderseite korrekt an den F_PANEL-Anschluss des Motherboards angeschlossen ist.
5.2 D-RGB Lighting Issues
- D-RGB not lighting up or incorrect colors:
- Ensure the D-RGB cables from the fans and LED strips are correctly connected to the integrated D-RGB controller.
- If using motherboard synchronization, ensure the D-RGB controller is connected to the motherboard's D-RGB header and that the motherboard's lighting software is configured correctly.
- Verify the D-RGB controller is receiving power (e.g., via SATA power connector).
- Try cycling through modes and colors using the front I/O buttons to rule out software issues.
5.3 Fan Noise or Malfunction
- Übermäßiges Lüftergeräusch:
- Prüfen Sie, ob sich Staub auf den Lüfterflügeln angesammelt hat, und reinigen Sie diese gegebenenfalls.
- Ensure fans are securely mounted and not vibrating against the chassis.
- Verify fan speeds are controlled appropriately by the motherboard or fan controller.
- Lüfter dreht sich nicht:
- Check fan power connections to the motherboard or fan hub.
- Ensure fan headers are enabled in the BIOS/UEFI settings.
6. Spezifikationen
Detailed technical specifications for the Phanteks Eclipse G500A DRGB Mid Tower Case.
| Besonderheit | Spezifikation |
|---|---|
| Modellname | Eclipse G500A DRGB, White |
| Artikelmodellnummer | PH-EC500GA_DMW01A |
| Formfaktor | Mittlerer Turm |
| Abmessungen (LxBxH) | 19.69 x 9.45 x 20.28 Zoll (500 x 240 x 515 mm) |
| Artikelgewicht | 23.2 Pfund |
| Material | Stahlchassis, gehärtetes Glas |
| Motherboard-Unterstützung | ATX, Micro-ATX, Mini-ITX, E-ATX (bis zu 280 mm breit) |
| Erweiterungssteckplätze | 7 |
| Vertikale GPU-Unterstützung | Yes (with optional bracket PH-VGPUKT4.0_03 or riser cable) |
| Interne 3.5"-Laufwerksschächte | 10 (2x included, expandable) |
| Interne 2.5"-Laufwerksschächte | 9 (9x enthalten) |
| E/A an der Vorderseite | 2x USB 3.0, USB-C Gen2, Microphone/Headphone Combo, Power Button, D-RGB Mode, D-RGB Color |
| Vorinstallierte Lüfter | 3x M25-140 D-RGB (Front) |
| Maximale GPU-Länge | 435 mm / 17.2 Zoll |
| Maximale Höhe des CPU-Kühlers | 185 mm |
| Maximale Netzteillänge | 195mm (if all 4 bottom HDD positions used) / 250mm (if 2 bottom HDD used) |
| Kühlmethode | Ventilator, Wasser |
7. Garantie und Support
Phanteks products are manufactured with high-quality standards. For warranty information and technical support, please refer to the official Phanteks webWebsite oder wenden Sie sich an den Kundendienst.
Kontaktinformationen:
- WebWebsite: www.phanteks.com
- Phanteks Taiwan Inc.: 11F., Nr. 150, Jian 1st Rd., Zhonghe Dist. Neu-Taipeh 235
- Importer EU (Axpertec Int B.V.): Sydneystraat 33, 3047 BP Rotterdam, The Netherlands
- Importer US (Axpertec Inc.): 20465 E Walnut Dr. N, City of Industry, California 91789, United States

Figure 8: Phanteks company and importer details, along with compliance markings (CE, UKCA, RoHS).