Deeyaple F-8816
Deeyaple LED Digitalwecker – Benutzerhandbuch
Modell: F-8816
1. Einleitung
Vielen Dank für Ihren Einkauf.asing the Deeyaple LED Digital Alarm Clock. This manual provides detailed instructions for setting up, operating, and maintaining your new alarm clock. Please read this manual thoroughly before use to ensure proper functionality and to maximize your user experience. This clock features adjustable brightness, dual alarms, a snooze function, and a clear LED display showing both time and day.
2. Sicherheitshinweise
- Setzen Sie das Gerät keinen extremen Temperaturen, direkter Sonneneinstrahlung oder hoher Luftfeuchtigkeit aus.
- Halten Sie das Gerät von Wasser und anderen Flüssigkeiten fern.
- Use only the provided USB cable for power. An AC adapter is not included.
- Versuchen Sie nicht, das Gerät selbst zu zerlegen oder zu reparieren. Wenden Sie sich bei Problemen an den Kundendienst.
- Außerhalb der Reichweite von Kindern aufbewahren.
3. Packungsinhalt
- Deeyaple LED Digital Alarm Clock (Model: F-8816)
- USB-Stromkabel (Hinweis: Netzteil nicht im Lieferumfang enthalten)
- Benutzerhandbuch (dieses Dokument)

Figure 3.1: Back panel and side view of the alarm clock, showing control buttons and USB port.
4. Produktüberschreitungview
4.1 Frontdisplay
The front of the clock features a large LED display that shows the time, day of the week, and indicators for Alarm 1 and Alarm 2. The display uses vibrant, multi-colored digits for enhanced readability.

Abbildung 4.1: Vorderseite view of the alarm clock with time and day displayed.
4.2 Obere Knöpfe
- Schlummer-/Lichttaste: Located on the top. Press to activate snooze during an alarm or to adjust display brightness.
4.3 Back Controls
- ZEIT EINSTELLEN-Taste: Dient zum Aufrufen des Zeiteinstellungsmodus.
- ALARM SET-Taste: Dient zum Aufrufen des Alarmeinstellungsmodus.
- UP (+) Button: Increases values during setting or toggles functions.
- DOWN (-) Button: Decreases values during setting or toggles functions.
- DC-5V-Anschluss: USB power input.
- Reset-Knopf: Small button to reset the clock to factory settings.

Abbildung 4.2: Rückseite view of the alarm clock, highlighting the USB power input and control buttons.
5. Einrichtung
5.1 Einschalten des Geräts
- Connect the provided USB power cable to the DC 5V port on the back of the alarm clock.
- Plug the other end of the USB cable into a standard USB power adapter (not included) or a powered USB port (e.g., computer, power bank).
- Das Display leuchtet auf und zeigt damit an, dass die Uhr eingeschaltet ist.

Figure 5.1: The alarm clock is powered via a USB cable, ensuring continuous display.
6. Bedienungsanleitung
6.1 Uhrzeit einstellen
- Drücken Sie die ZEITEINSTELLUNG Drücken Sie den Knopf auf der Rückseite der Uhr. Die Stundenziffern beginnen zu blinken.
- Verwenden Sie die AUF (+) or NIEDER (-) Tasten zum Einstellen der Stunde.
- Drücken ZEITEINSTELLUNG Um die Stunde erneut zu bestätigen, wechseln Sie zur Minuteneinstellung. Die Minutenziffern blinken.
- Verwenden Sie die AUF (+) or NIEDER (-) Tasten zum Einstellen der Minuten.
- Drücken ZEITEINSTELLUNG a third time to confirm the minutes and move to 12/24H format selection.
- Verwenden Sie die AUF (+) or NIEDER (-) buttons to select between 12-hour (with AM/PM indicator) or 24-hour format.
- Drücken ZEITEINSTELLUNG one last time to save the settings and exit time setting mode.
6.2 Alarmeinstellungen (Doppelalarme)
Die Uhr unterstützt zwei unabhängige Alarme (Alarm 1 und Alarm 2).
- Drücken Sie die WECKER GESTELLT button. The Alarm 1 hour digits will start flashing, and the Alarm 1 icon will appear.
- Verwenden Sie die AUF (+) or NIEDER (-) buttons to adjust the Alarm 1 hour.
- Drücken WECKER GESTELLT again to confirm the hour and move to Alarm 1 minute setting. The minute digits will flash.
- Verwenden Sie die AUF (+) or NIEDER (-) buttons to adjust the Alarm 1 minutes.
- Drücken WECKER GESTELLT a third time to confirm minutes and move to Alarm 1 day setting.
- Verwenden Sie die AUF (+) or NIEDER (-) buttons to select the alarm days:
- 1-1: Einzeltagesalarm
- 1-5: Montag bis Freitag
- 1-6: Montag bis Samstag
- 1-7: Monday to Sunday (Every day)
- 6-7: Saturday to Sunday (Weekend)
- Drücken WECKER GESTELLT again to confirm Alarm 1 settings and proceed to Alarm 2 setting. Repeat steps 2-6 for Alarm 2.
- After setting Alarm 2, press WECKER GESTELLT one last time to save all alarm settings and exit.

Figure 6.1: Alarm days setting options for customized wake-up schedules.
6.3 Schlummerfunktion
Wenn ein Alarm ertönt, drücken Sie die große Taste. SNOOZE / LICHT button on the top of the clock. The alarm will pause for 5 minutes and then sound again. You can repeat the snooze cycle multiple times.

Figure 6.2: Activating the snooze function by touching the top button for an additional 5 minutes of rest.
6.4 Einstellen der Displayhelligkeit
The clock has 3 levels of brightness (Bright, Medium, Low) and an option to turn off the display.
- Drücken Sie die SNOOZE / LICHT button on the top of the clock (when no alarm is sounding) to cycle through the brightness levels: Bright > Medium > Low > Off > Bright.
- Select the brightness level that best suits your environment and preference.
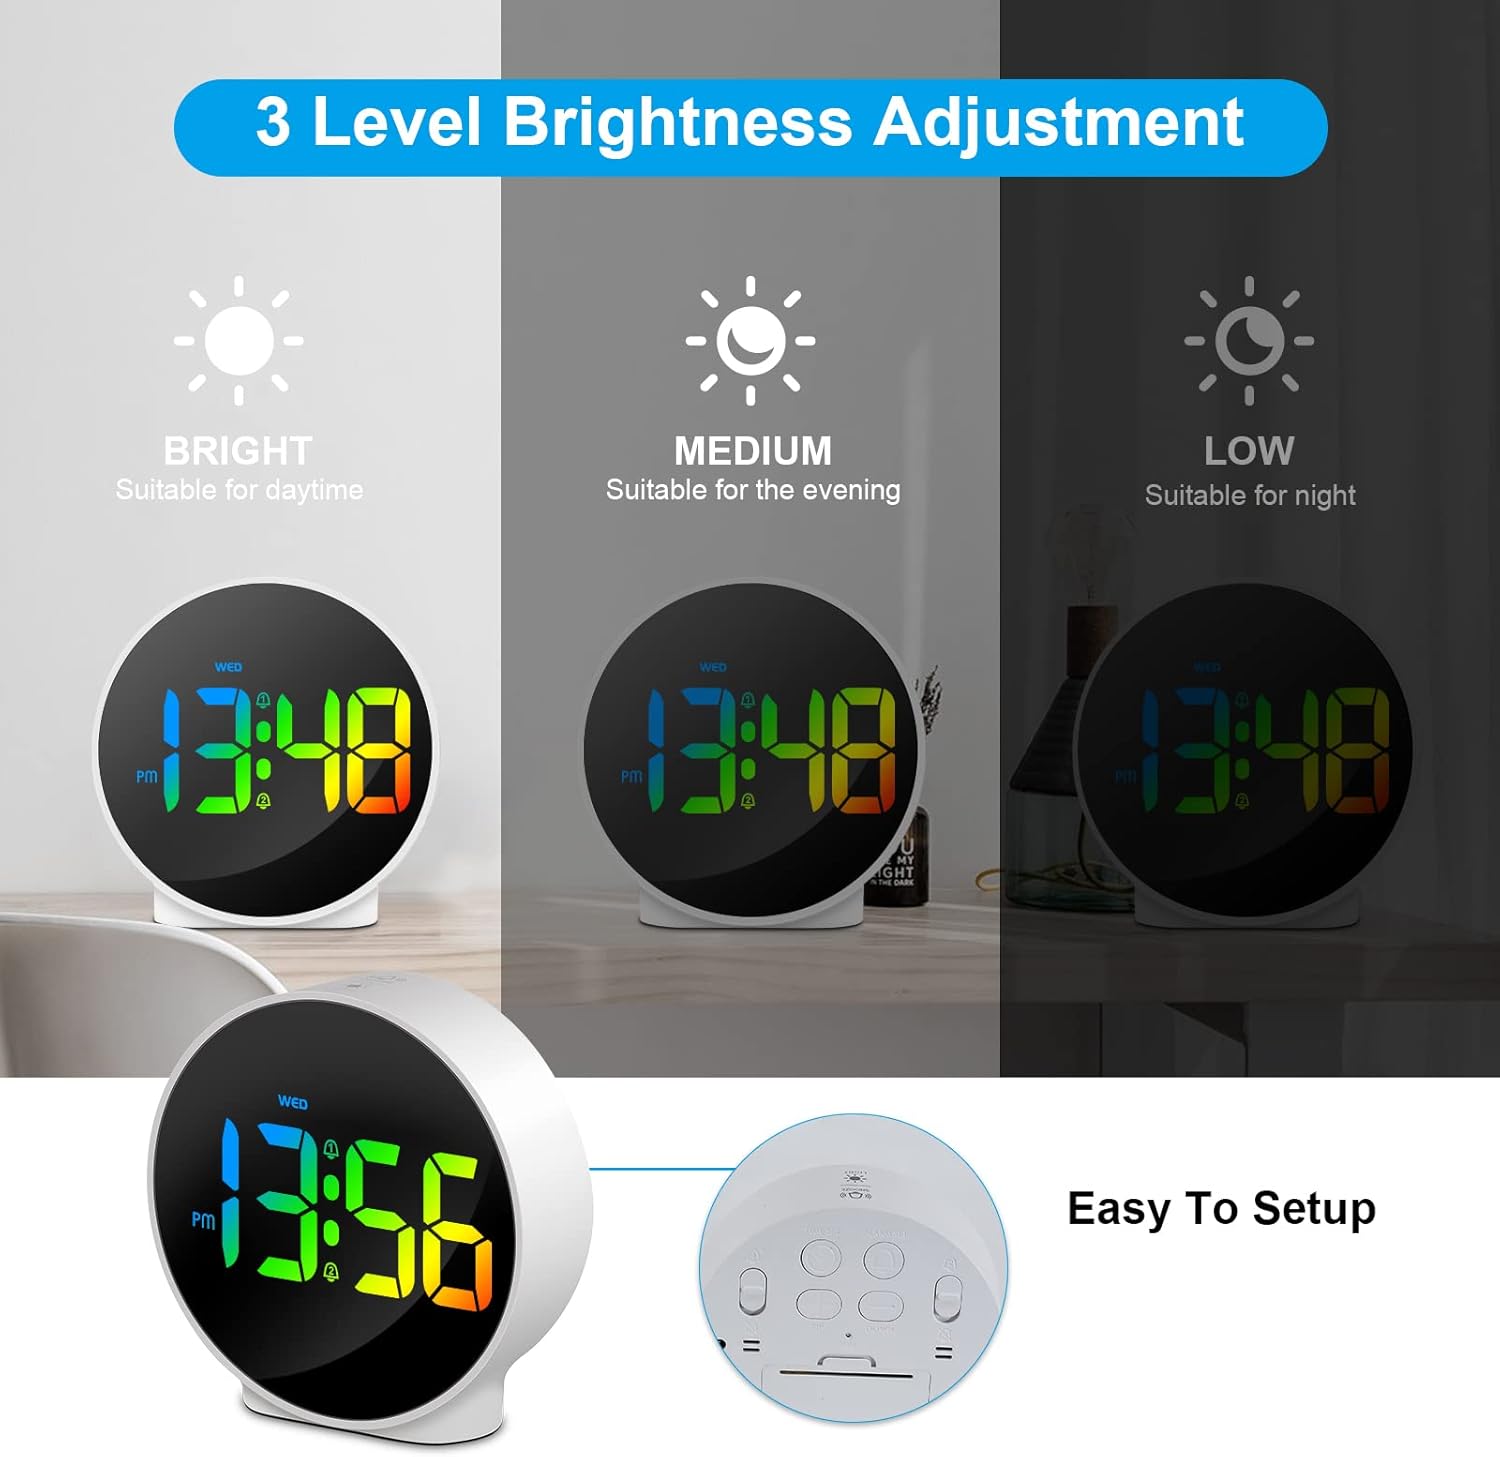
Abbildung 6.3: Drei einstellbare Helligkeitsstufen für optimale viewbei unterschiedlichen Lichtverhältnissen.
6.5 Week and Time Display
The clock simultaneously displays the current time and the day of the week on the same screen, eliminating the need to switch displays.

Figure 6.4: The clock displays both the time and the day of the week on a single screen for convenience.
7. Wartung
- Reinigung: Reinigen Sie die Oberfläche der Uhr mit einem weichen, trockenen Tuch. Verwenden Sie keine Scheuermittel oder Lösungsmittel.
- Lagerung: Wenn Sie die Uhr über einen längeren Zeitraum lagern, trennen Sie sie vom Stromnetz und bewahren Sie sie an einem kühlen, trockenen Ort auf.
8. Fehlerbehebung
| Problem | Mögliche Ursache | Lösung |
|---|---|---|
| Das Display ist ausgeschaltet oder schwach. | Not powered, brightness set to off/low. | Ensure USB cable is securely connected to a power source. Press SNOOZE/LIGHT button to adjust brightness. |
| Der Alarm ertönt nicht. | Alarm not set, alarm volume too low (not applicable for this model), incorrect alarm days. | Verify alarm time and ensure the alarm icon is displayed. Check alarm day settings. |
| Die Uhrzeit ist falsch. | Time not set correctly, power interruption. | Re-set the time following Section 6.1. Ensure continuous power supply. |
| Tasten reagieren nicht. | Vorübergehender Softwarefehler. | Unplug the USB cable, wait 10 seconds, then plug it back in. If issue persists, use the RESET button on the back (requires a thin object like a paperclip). |
9. Spezifikationen
- Marke: Deeyaple
- Modellnummer: F-8816
- Farbe: White shell with multi-color display
- Abmessungen (L x B x H): 10 x 3.81 x 10 cm (3.94 x 1.5 x 3.94 Zoll)
- Gewicht: 180 Gramm (0.4 Pfund)
- Merkmale: Dual Alarm, Snooze, Adjustable Brightness (3 levels + off), 12/24H Display, Week Display, Corded Electric
- Energiequelle: USB Cable (DC 5V)
- Anzeigetyp: Digitale LED
- Material: Acrylnitril-Butadien-Styrol (ABS)

Figure 9.1: Dimensions of the Deeyaple LED Digital Alarm Clock.
10. Garantie und Support
Deeyaple products are designed for quality and reliability. For any questions, technical support, or warranty claims, please contact the seller or manufacturer directly through your purchase platform. Please retain your proof of purchase for warranty purposes.
Ask a question about this manual
Ask about setup, troubleshooting, compatibility, parts, safety, or missing instructions. Manuals+ will review the question and use this page’s manual context to help answer it.