
Tru CM-7301
Bedienungsanleitung für die Tru All-in-One Espressomaschine
Modell: CM-7301
Einführung
Welcome to the world of premium coffee with your new Tru All-in-One Espresso Maker. This comprehensive manual provides detailed instructions for setting up, operating, maintaining, and troubleshooting your espresso machine to ensure you enjoy café-quality beverages at home. Your machine features a built-in precision burr grinder, a 15 bar pressure pump, and versatile brewing options including single and double shots, adjustable steam controls, and a 360° swivel steam wand.
Wichtige Sicherheitshinweise
Please read all instructions carefully before using your Tru Espresso Maker. Failure to follow these instructions may result in injury or damage to the appliance.
- Vor der Reinigung oder wenn das Gerät nicht benutzt wird, ziehen Sie immer den Netzstecker.
- Tauchen Sie das Gerät, das Netzkabel oder den Stecker nicht in Wasser oder andere Flüssigkeiten.
- Keep hands and cords away from hot surfaces and steam. The steam wand and hot water outlet can reach high temperatures.
- Vor der Inbetriebnahme muss sichergestellt werden, dass der Wassertank mit sauberem, kaltem Wasser gefüllt ist.
- Dieses Gerät ist nur für den Hausgebrauch bestimmt. Nicht im Freien verwenden.
- Das Gerät darf nicht in Betrieb genommen werden, wenn das Kabel oder der Stecker beschädigt ist oder wenn das Gerät Fehlfunktionen aufweist oder in irgendeiner Weise beschädigt wurde.
- Beaufsichtigen Sie Kinder sorgfältig, wenn das Gerät in Betrieb ist.
Produkt überview
Your Tru All-in-One Espresso Maker is designed for convenience and quality. Below are the key components and features:
- Integriertes Kegelmahlwerk: Precision conical burr grinder for fresh coffee grounds.
- 15-Bar-Druckpumpe: Gewährleistet eine optimale Extraktion für einen vollmundigen Espresso.
- Brew Settings: Options for single or double espresso shots.
- Dampfdüse: 360° swivel steam wand for frothing milk for lattes and cappuccinos.
- Warmwasserauslass: Dispenses hot water for Americanos or tea.
- Abnehmbarer Wassertank: Leicht zu befüllen und zu reinigen.
- Tassenwärmerplatte: Keeps your cups warm, enhancing coffee flavor.
- Mitgeliefertes Zubehör: Milk frother pitcher and espresso tampäh.

Abbildung 1: Vorderseite view of the Tru All-in-One Espresso Maker, showcasing sein elegantes Edelstahl-Design und Bedienfeld.
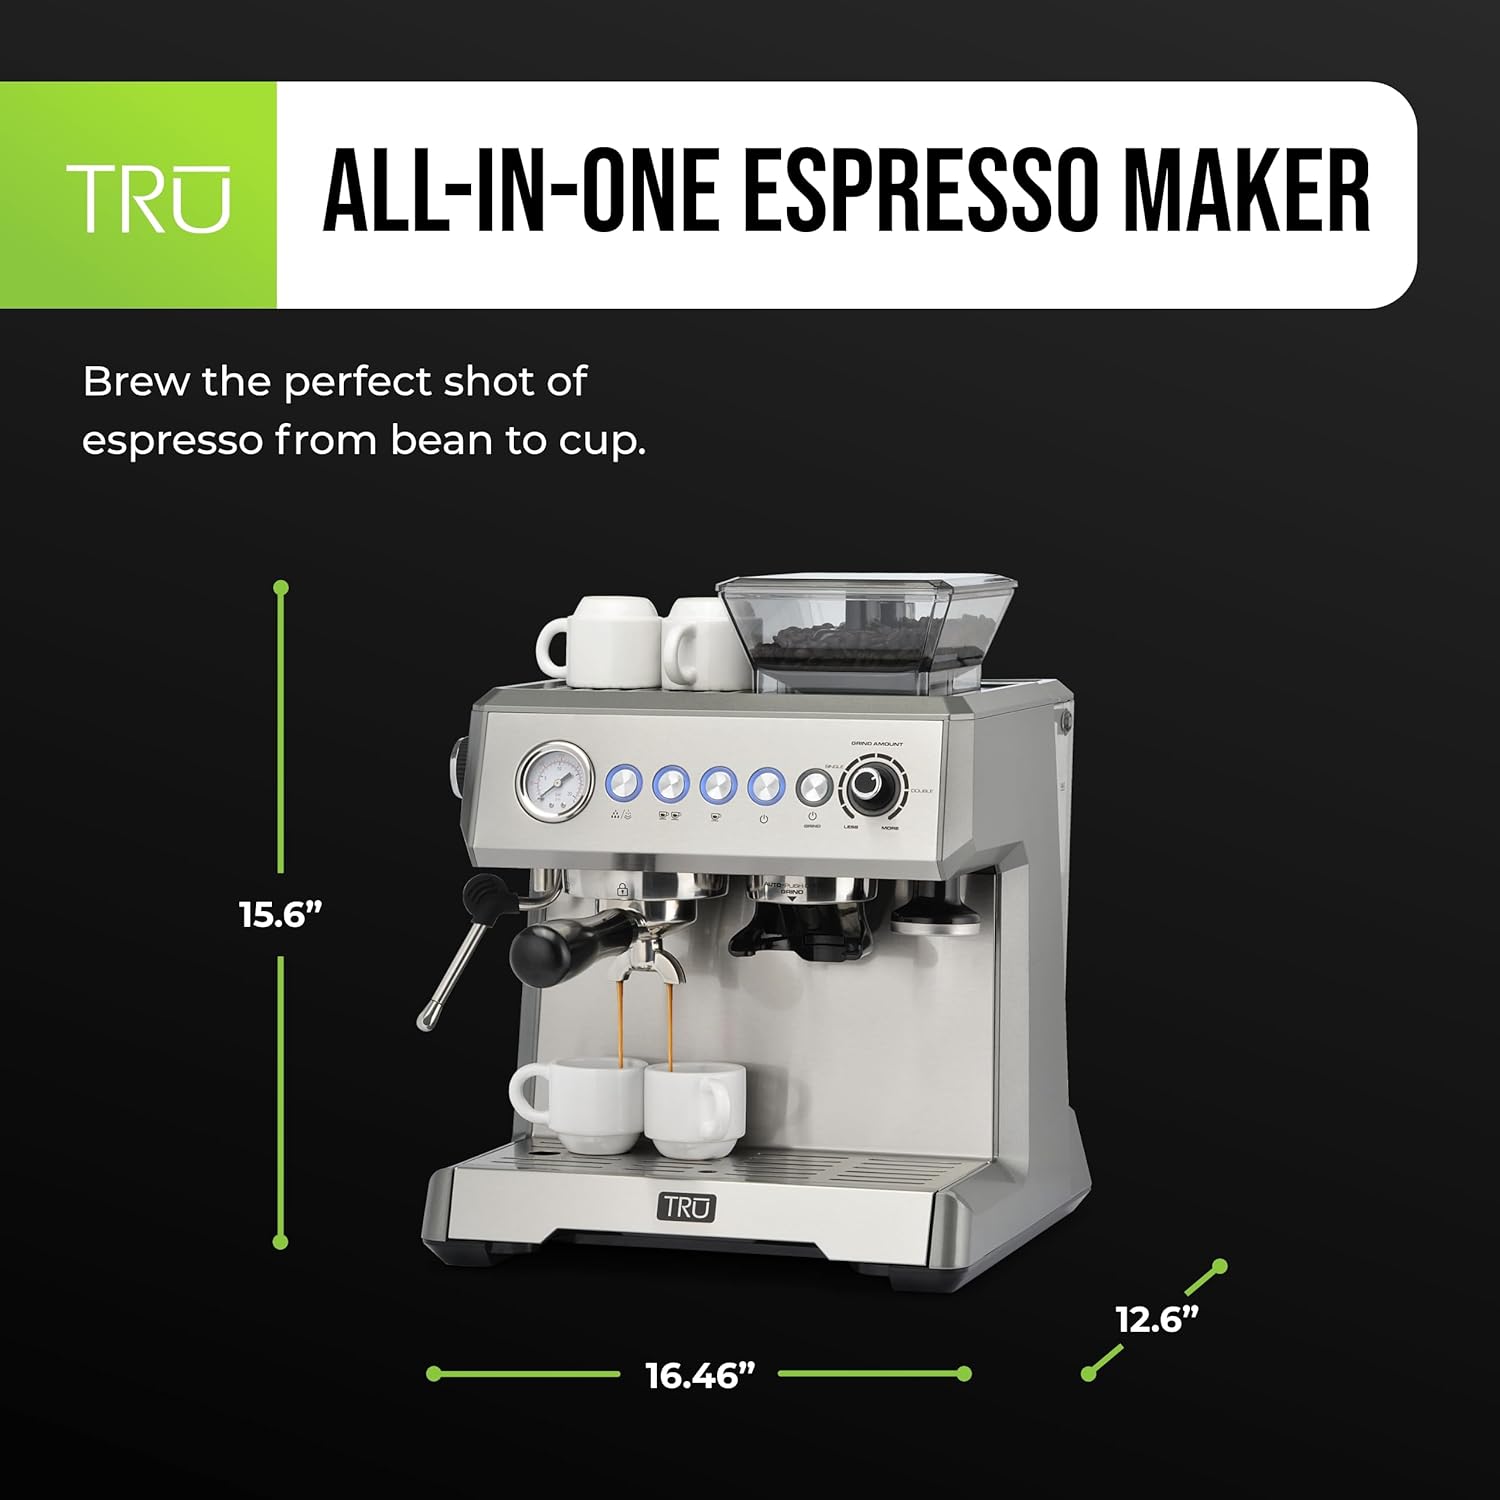
Figure 2: Dimensions of the espresso machine: 15.6 inches high, 16.46 inches wide, and 12.6 inches deep.

Figure 3: Key features highlighted: 15 bars of pressure for optimal extraction, a built-in precision burr grinder, and a powerful steam wand for milk frothing.
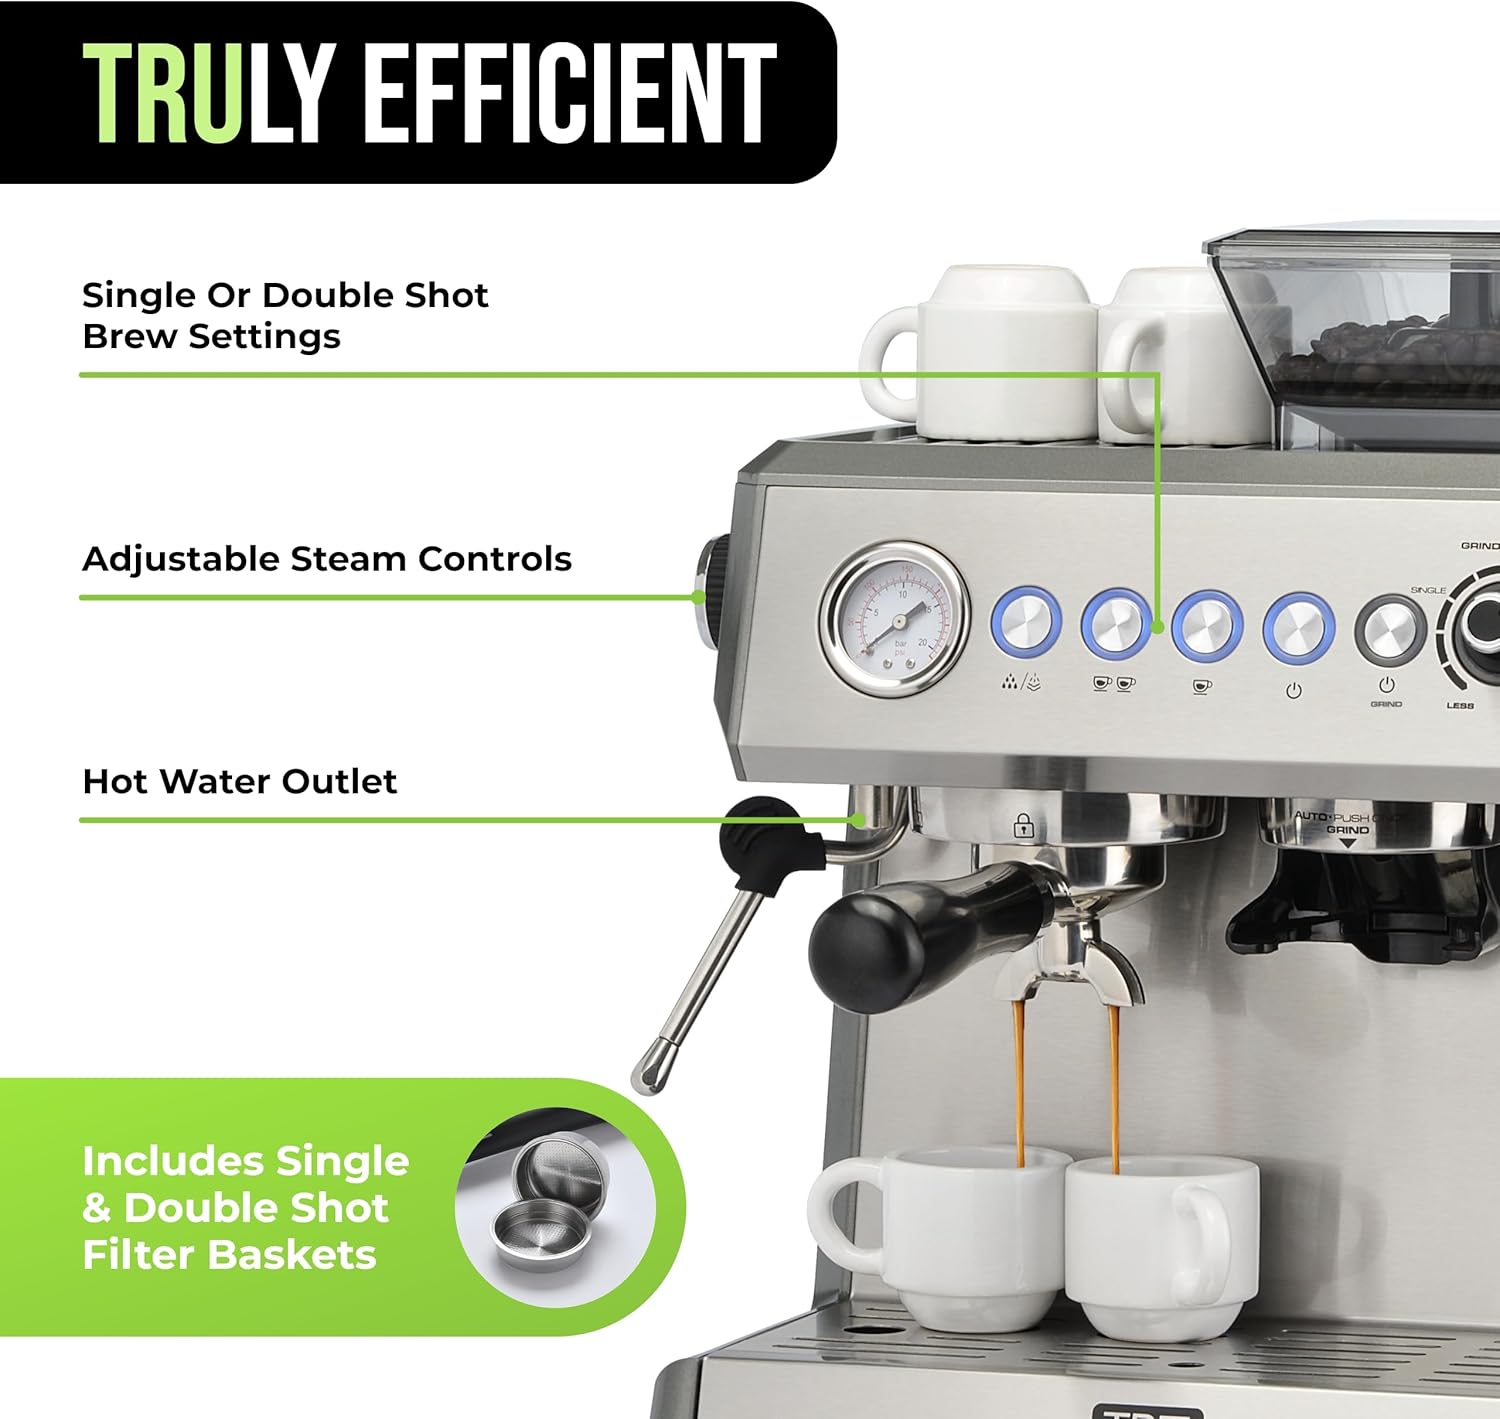
Figure 4: Control panel showing options for single or double shot brew settings and the hot water outlet for versatile beverage preparation.

Figure 5: Power specifications: The machine operates at 120V and 1000 Watts, suitable for household use.
Installationshandbuch
Follow these steps to set up your espresso maker for the first time:
- Auspacken: Sämtliches Verpackungsmaterial und Zubehör vorsichtig entfernen.
- Sauber: Wash the water tank, portafilter, filter baskets, and milk frothing pitcher with warm, soapy water. Rinse thoroughly and dry.
- Position: Place the machine on a stable, flat, heat-resistant surface, away from walls and heat sources.
- Wassertank auffüllen: Remove the water tank from the back of the machine, fill it with fresh, cold water up to the MAX line, and place it back securely.
- Kaffeebohnen hinzufügen: Open the lid of the bean hopper and pour fresh whole coffee beans into the hopper. Close the lid.
- Erstes Spülen: Before first use, perform an initial rinse cycle without coffee to prime the system. Turn on the machine, allow it to heat up, then run a hot water cycle through the portafilter and steam wand.
Bedienungsanleitung
Learn how to brew your favorite coffee beverages:
1. Kaffeebohnen mahlen
- Stellen Sie sicher, dass der Bohnenbehälter mit frischen Kaffeebohnen gefüllt ist.
- Select your desired grind amount using the "GRIND AMOUNT" dial (Less for finer, More for coarser).
- Place the portafilter with the appropriate filter basket (single or double) under the grinder outlet.
- Press the "GRIND" button to start grinding. The machine will automatically stop when the selected amount is dispensed.
- Verwenden Sie das beiliegende tamper to gently press down the coffee grounds in the portafilter.
2. Espresso zubereiten
- Nach dem Mahlen und tamping, securely insert the portafilter into the brew head by twisting it to the right until it locks into place.
- Stellen Sie Ihre Espressotasse(n) auf die Abtropfschale direkt unter die Ausläufe des Siebträgers.
- Once the machine is heated (indicator lights are solid), press the "SINGLE SHOT" or "DOUBLE SHOT" button.
- The machine will automatically brew the espresso and stop. The pressure gauge will indicate optimal brewing pressure.
3. Frothing Milk (for Lattes & Cappuccinos)
- Füllen Sie den Milchaufschäumkännchen mit kalter Milch (Milchprodukte oder pflanzliche Milch) bis knapp unter den Ausguss.
- Positionieren Sie die Dampfdüse in der Milch, knapp unterhalb der Oberfläche.
- Press the "STEAM" button. Once the steam light is solid, turn the steam control knob on the side of the machine to release steam.
- Move the pitcher up and down to create foam. When desired texture and temperature are reached, turn off the steam control knob and then press the "STEAM" button again.
- Wischen Sie die Dampfdüse sofort mit einem Tuch ab.amp Tuch, um zu verhindern, dass Milchreste eintrocknen.
4. Warmwasserausgabe
- Place a cup under the hot water outlet.
- Press the "HOT WATER" button. The machine will dispense hot water. Press again to stop.
Wartung und Reinigung
Regular cleaning ensures optimal performance and longevity of your espresso maker.
- Tägliche Reinigung:
- Empty and clean the drip tray and grid.
- Nehmen Sie den Siebträger und den Filterkorb nach jedem Gebrauch heraus und reinigen Sie diese.
- Wischen Sie die Außenseite der Maschine mit Werbung abamp Tuch.
- Reinigen Sie die Dampfdüse sofort nach dem Aufschäumen der Milch.
- Wassertank: Reinigen Sie den Wassertank wöchentlich mit einem milden Reinigungsmittel und spülen Sie ihn gründlich aus.
- Entkalkung: Descale the machine every 2-3 months, or more frequently with hard water, using a commercial descaling solution designed for espresso machines. Follow the descaling solution's instructions carefully.
- Reinigung der Mühle: Periodically clean the burr grinder to remove coffee oil buildup. Refer to the detailed instructions in the full manual for specific steps.
Fehlerbehebung
If you encounter issues, refer to this section before contacting customer support:
| Problem | Mögliche Ursache | Lösung |
|---|---|---|
| Es gibt keinen Kaffeeautomaten. | Wassertank leer; Maschine nicht beheizt; Filter verstopft. | Fill water tank; wait for indicator lights; clean filter basket. |
| Espresso ist zu schwach. | Kaffeepulver zu grob; zu wenig Kaffee; unzureichende Temperaturamping. | Adjust grind to finer setting; increase coffee amount; tamp fester. |
| Kein Dampf aus der Lanze. | Dampffunktion nicht aktiviert; Dampfdüse verstopft. | Press STEAM button and wait for light; clean steam wand hole with pin. |
| Die Maschine ist undicht. | Wassertank nicht richtig eingesetzt; Tropfschale voll. | Stellen Sie sicher, dass der Wassertank fest sitzt; leeren und reinigen Sie die Tropfschale. |
Technische Daten
- Marke: Tru
- Modellname: TRU 15-Bar All-in-One Espresso Maker
- Artikelmodellnummer: CM-7301
- Farbe: Schwarz und Silber
- Produktabmessungen: 12.6"T x 16.46"B x 15.59"H
- Artikelgewicht: 20.5 Pfund
- Leistung: 120 V, 1000 Watt
- Druck: 15-Bar-Pumpe
- Betriebsmodus: Halbautomatisch
- Kaffeeeingabeart: Bohnen
- Filtertyp: Wiederverwendbar
- Enthaltene Komponenten: Milk Frother, Espresso Tamper
- UPC: 655772021397
- Hersteller: Wählen Sie Marken aus
- Ursprungsland: China
Garantie und Support
For warranty information or technical support, please refer to the warranty card included with your product or visit the official Tru webBewahren Sie Ihren Kaufbeleg als Kaufnachweis für eventuelle Garantieansprüche auf.
For additional assistance, you may contact Select Brands customer service.
Ask a question about this manual
Ask about setup, troubleshooting, compatibility, parts, safety, or missing instructions. Manuals+ will review the question and use this page’s manual context to help answer it.