
1. Einleitung
This manual provides essential information for the safe and efficient operation of your NEC NP-M271X Projector. Please read this manual thoroughly before using the projector and retain it for future reference. The NEC NP-M271X projector is designed to provide bright, detailed image projection with native XGA resolution, 3200 lumens brightness, and HDMI connectivity, suitable for various presentation and viewUmgebungen.
2. Sicherheitshinweise
Um einen sicheren Betrieb zu gewährleisten und Schäden zu vermeiden, beachten Sie bitte folgende Vorsichtsmaßnahmen:
- Stromversorgung: Verwenden Sie nur das angegebene Netzteil voltage. Stellen Sie sicher, dass das Netzkabel fest angeschlossen und nicht beschädigt ist.
- Belüftung: Blockieren Sie nicht die Lüftungsöffnungen. Sorgen Sie für ausreichend Platz um den Projektor herum, um eine ordnungsgemäße Luftzirkulation zu gewährleisten und eine Überhitzung zu vermeiden.
- Platzierung: Stellen Sie den Projektor auf eine stabile, ebene Fläche. Vermeiden Sie Orte mit hoher Luftfeuchtigkeit, Staub oder extremen Temperaturen.
- Linse: Schauen Sie nicht direkt in die Projektorlinse, wenn der lamp is on, as this can cause eye damage.
- Reinigung: Vor der Reinigung den Netzstecker ziehen. Ein weiches, trockenes Tuch verwenden. Flüssige oder Aerosol-Reinigungsmittel vermeiden.
- Wartung: Versuchen Sie nicht, den Projektor selbst zu reparieren. Überlassen Sie alle Reparaturen qualifiziertem Fachpersonal.
3. Produktüberschreitungview
The NEC NP-M271X projector features a robust design with various input/output ports and user-friendly controls.
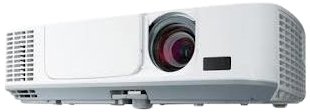
Abbildung 3.1: Front view of the NEC NP-M271X Projector, showing the lens and ventilation grilles.
3.1 Frontplatte
- Projektionsobjektiv: Projiziert das Bild auf den Bildschirm.
- Fokusring: Passt die Bildschärfe an.
- Zoomring: Passt die Bildgröße an.
- IR Empfänger: Empfängt Signale von der Fernbedienung.
3.2 Rückseite (Anschlüsse)
Die Rückseite bietet verschiedene Anschlüsse zum Verbinden externer Geräte.
- HDMI-Eingang: For connecting digital video/audio sources.
- VGA Input (Computer IN): For connecting computers via VGA cable.
- USB-Anschluss: Zum Anschließen von USB-Geräten oder für Firmware-Updates.
- Audio-Ein-/Ausgang: For connecting external audio sources or outputting audio.
- LAN-Anschluss: Zur Netzwerkverbindung und -steuerung.
- Stromeingang: Zum Anschließen des Netzkabels.
3.3 Oberseite (Bedienelemente)
- Netzschalter: Schaltet den Projektor ein oder aus.
- Eingabetasten: Wählt die Eingangsquelle aus.
- Menü-Schaltfläche: Öffnet das On-Screen-Display-Menü (OSD-Menü).
- Navigationstasten: Dient zur Navigation durch Menüs und zum Anpassen von Einstellungen.
- Trapezkorrektur: Korrigiert Bildverzerrungen.
4. Einrichtung
4.1 Aufstellung des Projektors
Position the projector on a stable surface or mount it securely. Ensure the projector is perpendicular to the screen for optimal image geometry. Adjust the projector's height using the adjustable feet if necessary.
4.2 Stromversorgung anschließen
- Schließen Sie das mitgelieferte Netzkabel an den Stromeingang des Projektors an.
- Stecken Sie das andere Ende des Netzkabels in eine geerdete Steckdose.
- The power indicator light will illuminate, typically in amber or red, indicating standby mode.
4.3 Anschließen von Eingangsquellen
Verbinden Sie Ihre Videoquelle (z. B. Laptop, Blu-ray-Player) mit dem entsprechenden Kabel mit dem Projektor.
- HDMI: Connect an HDMI cable from your source device to the projector's HDMI input.
- VGA: Connect a VGA cable from your computer to the projector's Computer IN port. If audio is required, connect a separate audio cable from your computer's audio output to the projector's Audio IN port.
- USB: For certain media playback or control functions, connect a USB device to the USB port.
5. Bedienung des Projektors
5.1 Ein-/Ausschalten
- Einschalten: Press the Power button on the projector's control panel or remote control. The power indicator will turn green, and the lamp leuchtet auf.
- Ausschalten: Press the Power button again. A confirmation message may appear. Press Power again to confirm shutdown. The projector will enter cooling mode, and the power indicator will return to amber/red. Do not unplug the projector during cooling.
5.2 Basic Image Adjustment
- Fokus: Drehen Sie den Fokusring am Objektiv, bis das Bild scharf ist.
- Zoom: Drehen Sie den Zoomring am Objektiv, um die Bildgröße anzupassen.
- Trapezkorrektur: If the image appears trapezoidal, use the Keystone buttons on the control panel or remote to correct the distortion.
5.3 Auswahl der Eingangsquelle
Press the "Input" or specific input source buttons (e.g., "HDMI", "Computer") on the control panel or remote control to switch between connected devices.
5.4 Menünavigation
Press the "Menu" button to access the On-Screen Display (OSD) menu. Use the navigation arrows to browse options and the "Enter" button to select. Press "Menu" or "Exit" to close the OSD.
6. Wartung
Regelmäßige Wartung gewährleistet optimale Leistung und verlängert die Lebensdauer Ihres Projektors.
6.1 Reinigung der Projektorlinse
Gently wipe the lens with a soft, lint-free cloth specifically designed for optical lenses. Do not use abrasive cleaners or excessive force.
6.2 Reinigung des Luftfilters
The air filter prevents dust from entering the projector. Clean the filter regularly (e.g., every 100-200 hours of use) by removing it and using a vacuum cleaner or compressed air to remove accumulated dust. Refer to the projector's specific filter access instructions.
6.3 Literamp Ersatz
Der Projektor lamp hat eine begrenzte Lebensdauer. Wenn die lamp indicator illuminates or the image brightness significantly decreases, the lamp may need replacement. Always use genuine NEC replacement lamps. Consult a qualified technician for lamp replacement if you are unsure.
7. Fehlerbehebung
Sollten Sie Probleme mit Ihrem Projektor haben, beachten Sie bitte die folgenden häufig auftretenden Probleme und Lösungen:
| Problem | Mögliche Ursache | Lösung |
|---|---|---|
| Kein Bild angezeigt | Incorrect input source selected, loose cable connection, source device not outputting signal. | Verify input source, check cable connections, ensure source device is on and configured to output. |
| Bild ist verschwommen | Objektiv unscharf. | Stellen Sie den Fokusring am Projektorobjektiv ein. |
| Das Bild ist trapezförmig | Der Projektor steht nicht senkrecht zur Leinwand. | Verwenden Sie die Trapezkorrektur oder positionieren Sie den Projektor neu. |
| Der Projektor überhitzt und schaltet sich ab. | Verstopfte Lüftungsanlage, verschmutzter Luftfilter. | Ensure clear ventilation paths, clean the air filter. |
8. Spezifikationen
Key technical specifications for the NEC NP-M271X Projector:
| Besonderheit | Detail |
|---|---|
| Marke | NEC |
| Modellname | NP M271X |
| Produkttyp | LCD-Projektor |
| Native Auflösung | 1024 x 768 (XGA) |
| Maximale Bildschirmauflösung | 1600 x 1200 |
| Helligkeit | 2700 Lumens (Standard Mode) |
| Kontrastverhältnis | 3000:1 |
| Konnektivitätstechnologie | HDMI, USB, VGA |
| Maximale Bildgröße | 300 Zoll |
| Artikelgewicht | 4 Kilogramm |
| Controllertyp | Tastensteuerung |
| Wastage | 248 Watt |
| Montagetyp | Tischhalterung |
| UPC / GTIN | 657768275883 |
9. Garantie und Support
9.1 Garantieinformationen
This NEC NP-M271X Projector (Renewed) comes with a 90 Tage eingeschränkte GarantieBitte bewahren Sie Ihren Kaufbeleg für Garantieansprüche auf. Die Garantie deckt Material- und Verarbeitungsfehler bei normalem Gebrauch ab.
9.2 Kundendienst
For technical assistance, troubleshooting beyond this manual, or warranty service, please contact the seller or refer to the official NEC support channels. You may find additional resources and contact information on the NEC webWebsite.