
Einführung
This manual provides essential information for setting up, operating, and maintaining your GEEKOM Mini PC AS5. Please read these instructions carefully before using the device to ensure optimal performance and longevity. The GEEKOM Mini PC AS5 is a compact and powerful computing solution designed for various applications, from home entertainment to professional tasks.
Packungsinhalt
Bevor Sie mit der Einrichtung fortfahren, überprüfen Sie bitte, ob alle unten aufgeführten Artikel in Ihrem Paket enthalten sind:
- GEEKOM Mini PC AS5
- Netzteil
- VESA-Halterung (mit Schrauben)
- SSD-Befestigungsschrauben
- HDD Mounting Screws
- Kurzanleitung
- Benutzerhandbuch (dieses Dokument)
- USB-C-auf-USB-C-Kabel

Abbildung 1: Contents of the GEEKOM Mini PC AS5 package.
Installationshandbuch
1. Peripheriegeräte anschließen
Connect your monitor, keyboard, and mouse to the GEEKOM Mini PC AS5. Refer to the port diagram below for correct connections.
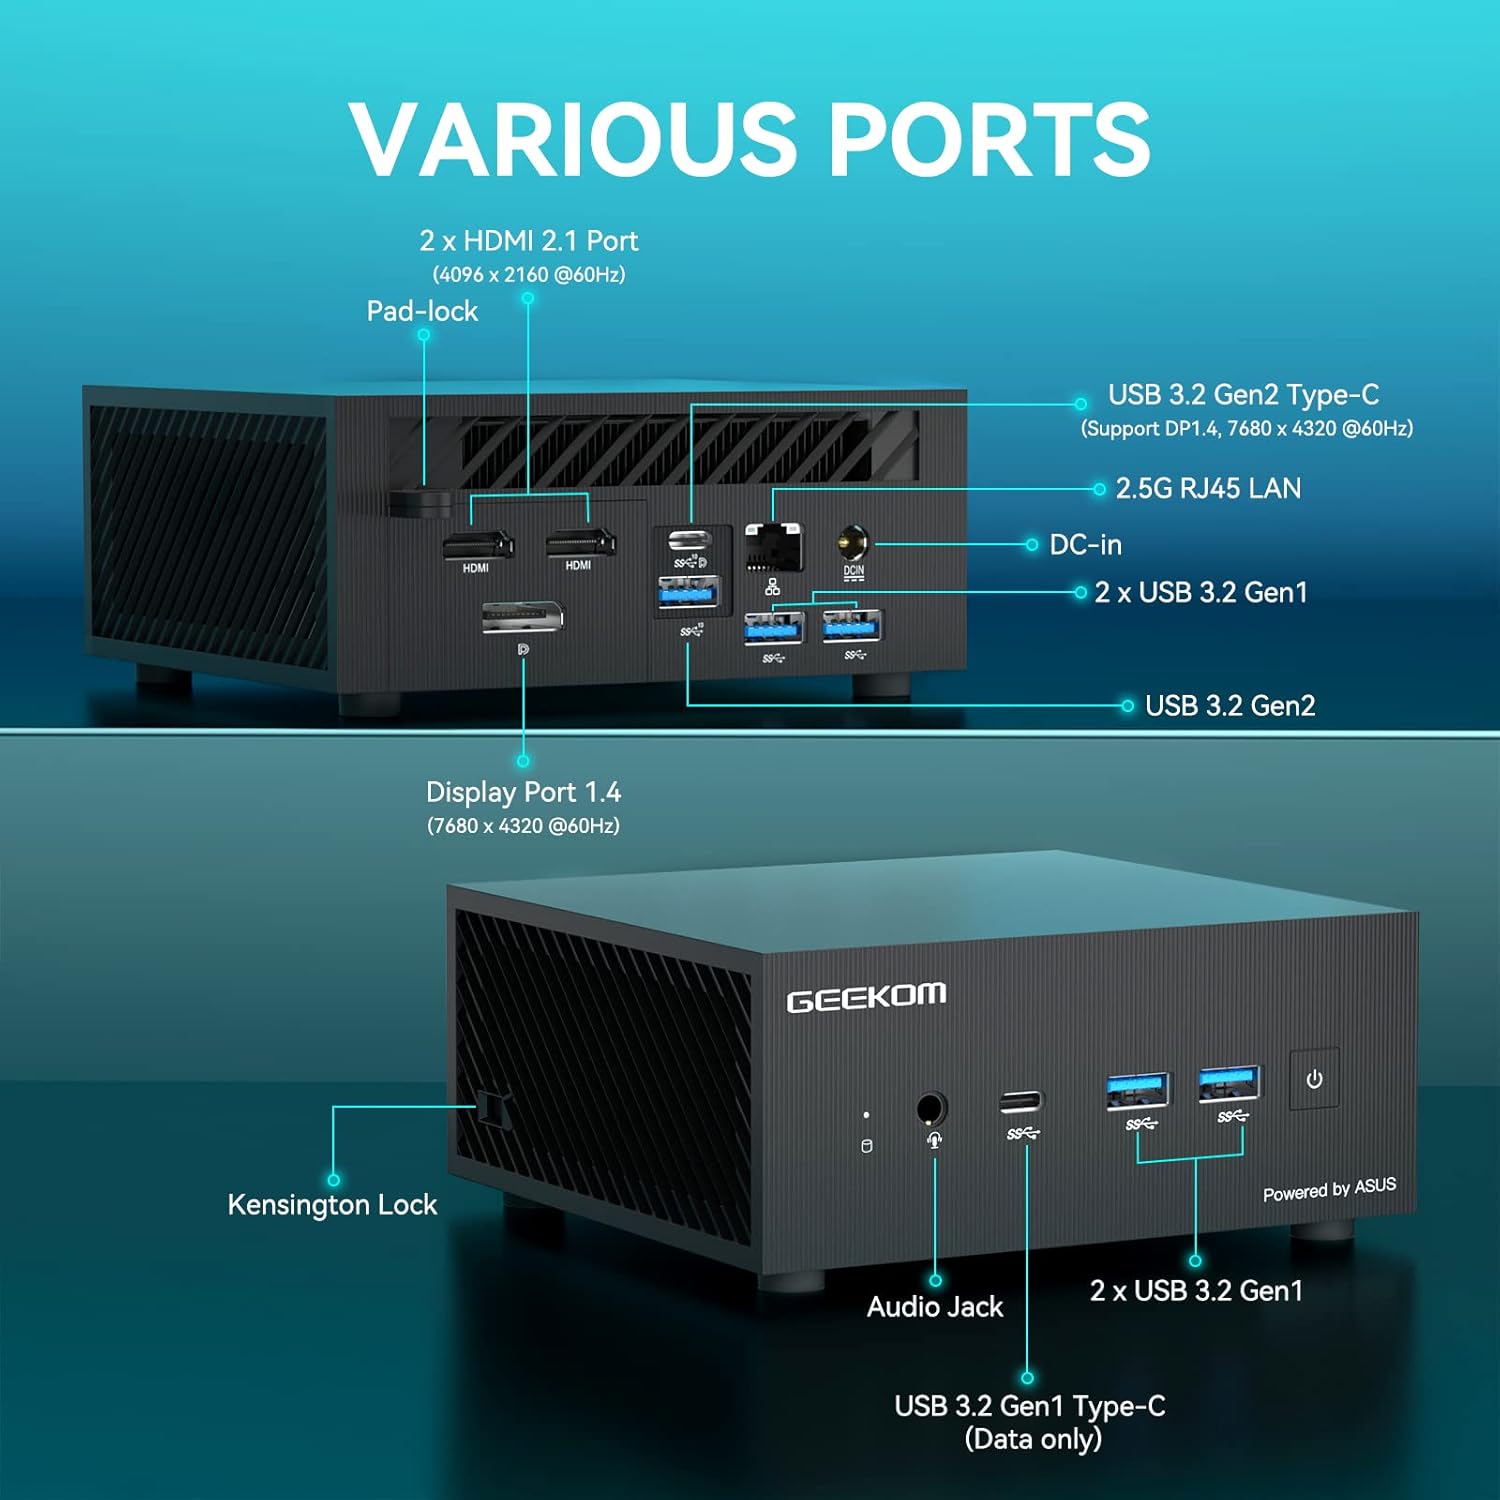
Abbildung 2: Überview of available ports on the GEEKOM Mini PC AS5.
- Anzeigeverbindung: Use an HDMI cable to connect your monitor to one of the two HDMI 2.1 ports, or a DisplayPort cable to the Display Port 1.4. The USB 3.2 Gen2 Type-C port also supports DisplayPort 1.4 for video output.
- USB-Geräte: Connect your keyboard, mouse, and other USB devices to the available USB 3.2 Gen1 and Gen2 ports.
- Netzwerkverbindung: For a wired network connection, connect an Ethernet cable to the 2.5G RJ45 LAN port. For wireless, ensure your Wi-Fi network is available.
- Audio: Connect headphones or speakers to the Audio Jack.
2. Stromanschluss
Connect the power adapter to the DC-In port on the Mini PC, then plug the power adapter into a wall outlet.
3. Erstes Einschalten
Press the power button located on the front of the Mini PC. The system will boot up, and you will see the operating system loading on your connected display.
4. Betriebssystem-Setup
Follow the on-screen instructions to complete the initial setup of Windows 10 Pro, including language selection, network configuration, and user account creation.
Bedienungsanleitung
Grundlegende Bedienung
- Ein-/Ausschalten: Drücken Sie den Netzschalter, um das Gerät einzuschalten. Zum Ausschalten verwenden Sie die Windows-Option zum Herunterfahren oder halten Sie den Netzschalter 5 Sekunden lang gedrückt.
- Neustart: Nutzen Sie die Neustart-Option innerhalb des Windows-Betriebssystems.
- Schlafmodus: The system will enter sleep mode after a period of inactivity. Press any key or move the mouse to wake it up.
Anzeigekonfiguration
The GEEKOM Mini PC AS5 supports multiple displays, including up to four 4K displays or ultra-realistic 8K visuals.

Abbildung 3: The GEEKOM Mini PC AS5 supports ultra-realistic 8K visuals.

Abbildung 4: Multitasking across four 4K displays with the GEEKOM Mini PC AS5.
To configure multiple displays, right-click on the desktop, select "Display settings," and arrange your monitors as desired.
Network Connectivity (Wi-Fi 6E)
The Mini PC supports Wi-Fi 6E, offering enhanced wireless performance. To connect to a Wi-Fi network:

Abbildung 5: GEEKOM Mini PC AS5 featuring Wi-Fi 6E support for faster, lower-latency wireless connectivity.
- Klicken Sie auf das WLAN-Symbol in der Taskleiste.
- Wählen Sie das gewünschte Netzwerk aus der Liste aus.
- Geben Sie das Netzwerkkennwort ein, wenn Sie dazu aufgefordert werden.
- Click "Connect."
Wartung
Reinigung
- Stellen Sie vor der Reinigung sicher, dass das Gerät ausgeschaltet und vom Stromnetz getrennt ist.
- Verwenden Sie ein weiches, trockenes Tuch, um die Außenseite des Mini-PCs abzuwischen.
- Bei hartnäckigen Flecken leicht andrücken.ampspülen Sie das Tuch mit Wasser aus. Vermeiden Sie aggressive Chemikalien oder Scheuermittel.
- Keep ventilation openings clear of dust and debris using compressed air.
Software-Updates
Regularly update your Windows operating system and drivers to ensure optimal performance and security. You can check for updates via Windows Update settings.
Speicherverwaltung
Überprüfen Sie regelmäßig Ihren Speicherplatz und entfernen Sie unnötige Speichermengen. files to maintain system speed. The Mini PC supports additional storage expansion (SSD/HDD) if needed.
Fehlerbehebung
- Kein Strom:
- Stellen Sie sicher, dass das Netzteil sowohl mit dem Mini-PC als auch mit einer funktionierenden Steckdose fest verbunden ist.
- Überprüfen Sie die Funktionsfähigkeit der Steckdose, indem Sie ein anderes Gerät anschließen.
- Kein Bildschirm:
- Prüfen Sie, ob der Monitor eingeschaltet ist und die richtige Eingangsquelle ausgewählt ist.
- Ensure the HDMI or DisplayPort cable is securely connected to both the Mini PC and the monitor.
- Versuchen Sie gegebenenfalls ein anderes Kabel oder einen anderen Monitor.
- Keine Internetverbindung:
- Bei kabelgebundenen Verbindungen überprüfen Sie bitte den Status des Ethernet-Kabels und des Routers.
- Stellen Sie bei WLAN-Verbindungen sicher, dass WLAN in den Windows-Einstellungen aktiviert ist und Sie mit dem richtigen Netzwerk und dem richtigen Passwort verbunden sind.
- Starten Sie Ihren Router und den Mini-PC neu.
- Systemverlangsamung:
- Schließen Sie unnötige Anwendungen, die im Hintergrund laufen.
- Prüfen Sie, ob Windows-Updates ausstehen, und installieren Sie diese gegebenenfalls.
- Führen Sie eine Datenträgerbereinigung und Defragmentierung (bei HDDs) oder TRIM (bei SSDs) durch.
- Auf Schadsoftware oder Viren scannen.
Technische Daten
| Modellname | AS5 |
| Prozessor | AMD Ryzen™ 9 5900HX (8 Cores, 16 Threads, Max Turbo Frequency 4.60 GHz, 16MB Cache, cTDP 35W) |
| Betriebssystem | Windows 10 Pro |
| RAM | 32 GB DDR4 SDRAM |
| Lagerung | 1 TB (PCIE x 2 interface) |
| Grafik | AMD Radeon™ Vega 8 Graphics (supports 8K visuals) |
| Kabellose Konnektivität | WLAN 6E |
| Häfen |
|
| Maße | 13 x 12 x 5.8 cm |

Abbildung 6: AMD Ryzen™ 9 5900HX Processor details.
Garantie und Support
Garantieinformationen
GEEKOM products typically come with a standard manufacturer's warranty. Please refer to the warranty card included in your package or visit the official GEEKOM webAuf der Website finden Sie die detaillierten Garantiebedingungen, die für Ihre Region und Ihr Kaufdatum gelten. Bewahren Sie Ihren Kaufbeleg für Garantieansprüche auf.
Kundenservice
For technical assistance, troubleshooting beyond this manual, or warranty inquiries, please contact GEEKOM customer support. You can usually find contact information on the official GEEKOM website or in the quick guide provided with your product.
GEEKOM Offiziell WebWebsite: www.geekompc.com