
1. Produktüberschreitungview
The TOPPING A70 Pro is a high-performance fully balanced headphone ampLifier und Preamplifier designed for superior audio reproduction. It incorporates advanced circuit architecture and user-friendly features to enhance your listening experience.

Bild 1.1: Vorderseite view of the TOPPING A70 Pro, showcasing its display and controls.
Hauptmerkmale:
- Optimized Circuit Architecture: Features an optimized circuit architecture with a newly developed ultra-low noise input stage, improving balanced input noise performance and increasing input impedance to 20kΩ for enhanced compatibility. The revised gain architecture further reduces noise and distortion at high gain settings.
- Beseitigung von Brummschleifen: Includes a GND/LIFT switch to eliminate ground loop noise when multiple devices are connected. If ground loop noise occurs, switch to LIFT to resolve it.
- Aurora UI: The Aurora UI provides a new user experience with a full-color screen and three touch buttons. Users can switch between playback information, FFT, and VU meter displays.
- Relay Volume Control: Equipped with a relay-based R2R volume control module, ensuring precise and consistent volume adjustment with long-term reliability, even at low levels.
- Kopfhörer Amplifier und Preamplifier Functionality: Functions as both a powerful headphone amplifier and a high-performance preamplifier. It features low output impedance (RCA: 500Ω, XLR: 100Ω) for broad compatibility with various power amplifiers. A comprehensive remote control is included for convenient operation.

Bild 1.2: Überview of the A70 Pro's core features and performance metrics.
2. Einrichtung
2.1 Auspacken und Prüfen
Carefully remove the A70 Pro from its packaging. Inspect the unit for any signs of damage. Ensure all accessories, including the power cable and remote control, are present.
2.2 An die Stromversorgung anschließen
Connect the provided power cable to the IEC power AC connection on the rear panel of the A70 Pro and then to a suitable AC power outlet. The unit can be powered on via the soft start button on the front or with the included remote control.
2.3 Audioverbindungen
The A70 Pro offers various input and output options:
- Eingänge: One set of balanced XLR inputs and one set of single-ended RCA inputs are available on the rear panel.
- Outputs (Headphone): The front panel features 4-pin XLR, 4.4mm Pentacon, and 6.3mm headphone output connections.
- Outputs (Preamplifizierer): Balanced XLR and single-ended RCA outputs are located on the rear panel for connecting to power ampVerstärker oder Aktivlautsprecher.

Image 2.1: Typical connection setup: PC to DAC, DAC to A70 Pro, and A70 Pro to headphones.
2.4 Optional Expansion (EXT90)
The A70 Pro supports input expansion with the optional EXT90 module (sold separately). Connecting the EXT90 provides additional balanced XLR and single-ended RCA inputs, expanding the total to four balanced XLR and two single-ended RCA inputs.

Image 2.2: The A70 Pro connected to the optional EXT90 expansion module for additional inputs.
3. Bedienungsanleitung
3.1 Ein-/Ausschalten
Press the power button on the front panel or the remote control to turn the unit on or off. The display will illuminate upon power-up.
3.2 Lautstärkeregelung
The A70 Pro features a precise relay-based R2R volume control. Adjust the volume using the rotary knob on the front panel or the volume up/down buttons on the remote control. The current volume level is displayed on the screen.
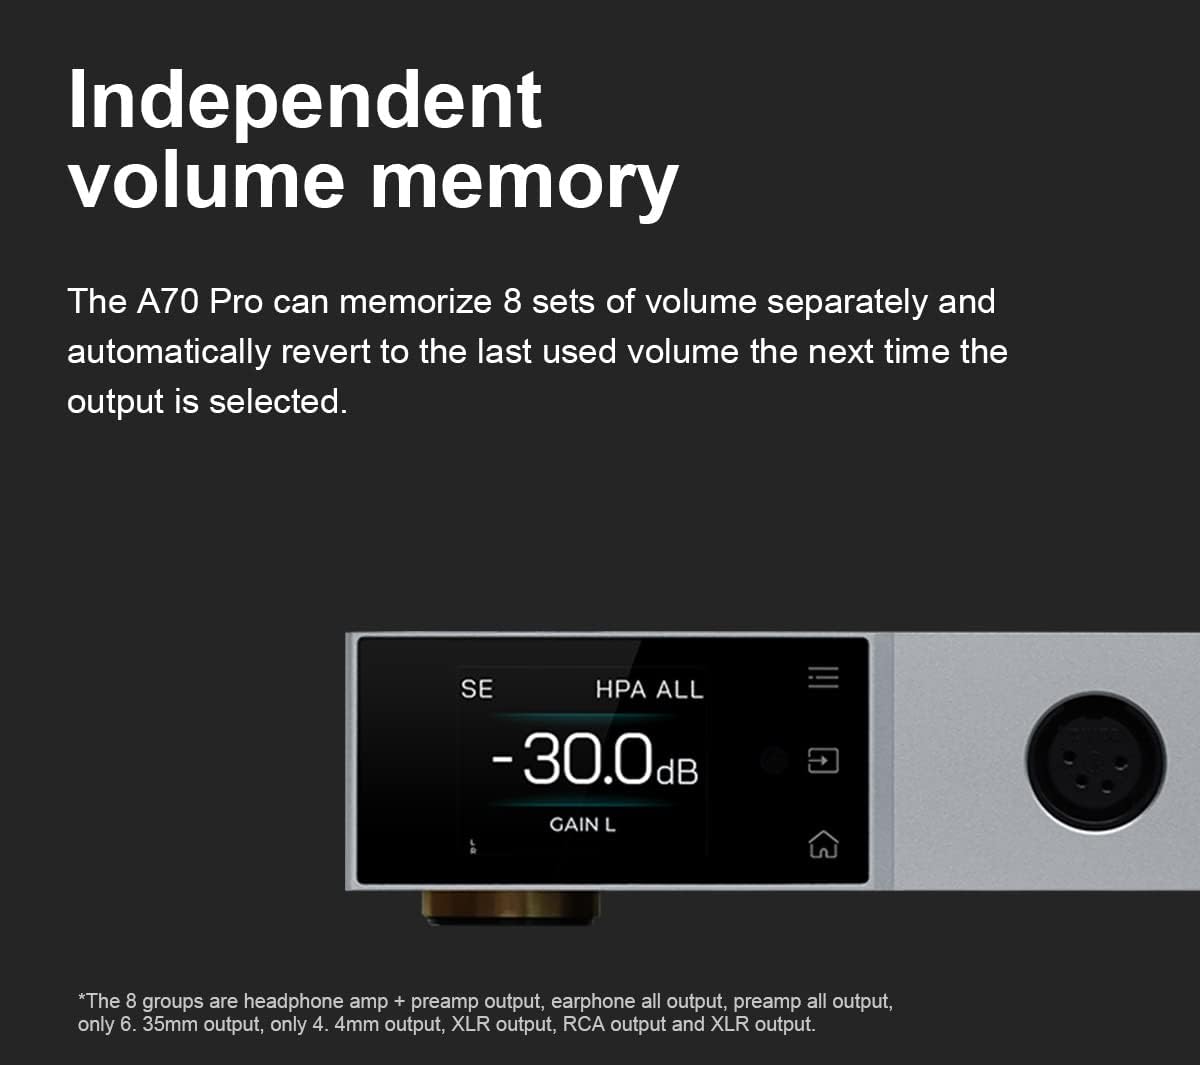
Image 3.1: The display showing the current volume level and gain setting.
The A70 Pro can memorize up to 8 separate volume settings. It automatically reverts to the last used volume for each output selection.
3.3 Aurora UI Navigation
The full-color display and three touch buttons provide intuitive control. Use the touch buttons to navigate menus and select options. The display offers various modes, including playback information, FFT (Fast Fourier Transform), and VU (Volume Unit) meter displays, which can be switched according to user preference.
3.4 Verstärkungseinstellungen
The A70 Pro features two gain settings (Low and High) to accommodate a wide range of headphones and audio sources. Adjust the gain setting via the menu or remote control to match your headphones' sensitivity and achieve optimal sound quality without distortion.
3.5 Eingangsauswahl
Select the desired audio input (XLR or RCA) using the input selector on the front panel or the remote control. The active input will be indicated on the display.
4. Wartung
4.1 Reinigung
To clean the unit, use a soft, dry cloth. Do not use liquid cleaners or abrasive materials, as they may damage the finish or internal components.
4.2 Speicherung
When not in use for extended periods, store the A70 Pro in a cool, dry place away from direct sunlight and extreme temperatures.
5. Fehlerbehebung
5.1 Kein Ton
- Ensure the unit is powered on and the volume is not set to minimum or muted.
- Vergewissern Sie sich, dass die richtige Eingangsquelle ausgewählt ist.
- Prüfen Sie alle Audiokabel auf festen Sitz.
- Confirm that your headphones or connected power ampDie Verstärker funktionieren einwandfrei.
5.2 Ground Loop Noise
If you experience humming or buzzing sounds, especially when multiple devices are connected, it may be due to a ground loop. The A70 Pro is equipped with a GND/LIFT switch on the rear panel to address this.
- Suchen Sie die GND/LIFT Schalter auf der Rückseite.
- If noise is present, switch the setting to AUFZUG. This can help break the ground loop and eliminate the noise.

Image 5.1: Rear panel detail showing the GND/LIFT switch for ground loop noise reduction.
6. Spezifikationen
| Besonderheit | Detail |
|---|---|
| Marke | Belag |
| Modellnummer | A70 Pro |
| Farbe | Silber |
| Output Power (SE IN/SE OUT, BAL IN/SE OUT) |
|
| Output Power (SE IN/BAL OUT, BAL IN/BAL OUT) |
|
| Lastimpedanz | > 8 Ω |
| Klirrfaktor | <0.00005% @500mW 32Ω (1kHz A-wt) |
| Geräuschpegel | <0.2uVrms @G=L, <0.8uVrms @G=H |
| Dynamikbereich | 147dB (overall), 106.3dB @50mV output |
| Eingangsimpedanz (symmetrisch) | 20kΩ |
| Voramplifier Output Impedance (RCA) | 500 Ω |
| Voramplifier Output Impedance (XLR) | 100 Ω |
| Verpackungsabmessungen | 37.01 x 24 x 8.89 cm |
| Gewicht | 2.18 kg |
| Erstes verfügbares Datum | 2023 |
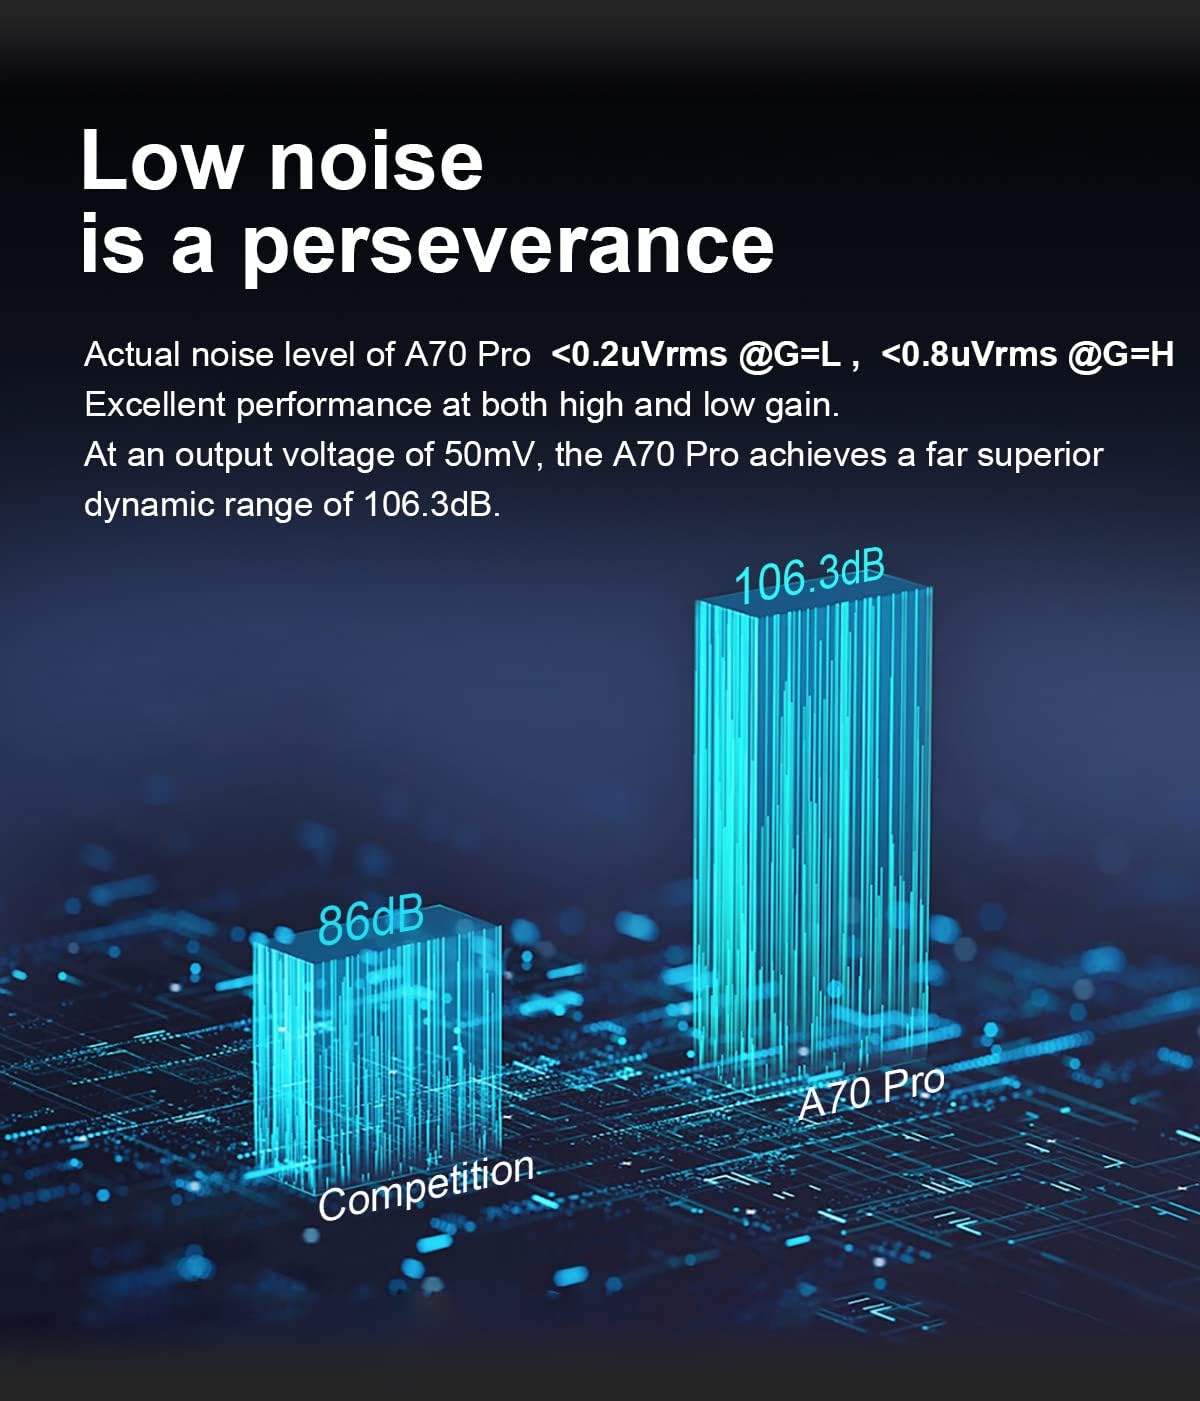
Image 6.1: Comparison of A70 Pro's low noise performance.
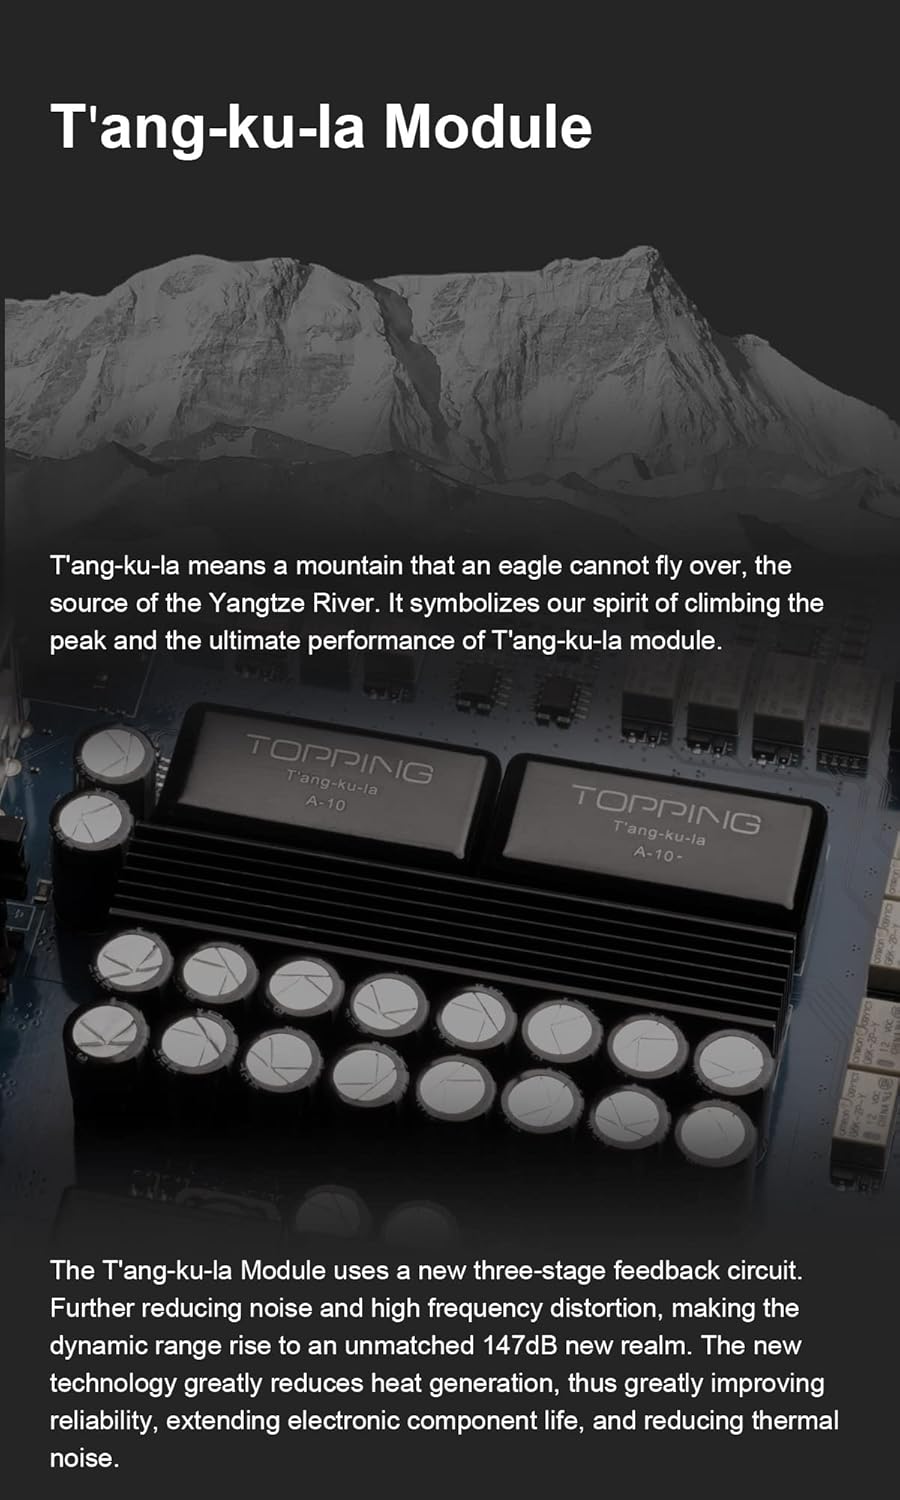
Abbildung 6.2: Intern view highlighting the T'ang-ku-la Module, a key component for performance.
7. Garantie und Support
For warranty information and technical support, please refer to the documentation included with your product or contact the manufacturer directly. Keep your purchase receipt as proof of purchase for warranty claims.