
1. Einleitung
Thank you for choosing the Luxbird 2-Pack Seedling Heat Mats with Digital Thermostat. This system is designed to provide a warm, controlled environment essential for successful seed germination, rooting cuttings, and promoting vigorous growth of young plants. The kit includes two durable heating mats, a precise temperature probe, and a user-friendly digital thermostat for accurate temperature regulation.
This energy-efficient 21W set is ideal for various applications, including seedlings, cuttings, potted plants, and greenhouse cultivation, ensuring healthier plants throughout the year.

Abbildung 1.1: Beispielamples of plants benefiting from the Luxbird heat mats.
2. Sicherheitshinweise
Please read all safety instructions before using the product to prevent injury or damage. Keep this manual for future reference.
- Elektrische Sicherheit: Stellen Sie sicher, dass die Steckdose mit der Lautstärke übereinstimmttage requirements (100-240V AC, 50/60Hz). Do not overload the circuit. Always unplug the unit when not in use or before cleaning.
- Wasser und Feuchtigkeit: The heat mats feature an IP67 waterproof rating, protecting against splashes and humidity. However, the thermostat controller is not waterproof. Keep the controller dry and away from water sources. Do not immerse the heat mats or controller in water.
- Platzierung: Place the heat mats on a flat, stable, and dry surface. Do not place the mats on sharp objects or surfaces that could puncture them.
- Wärmeverteilung: Do not fold or crease the heat mats, as this can damage the internal heating elements and create hot spots. Ensure proper air circulation around the mats.
- Kinder und Haustiere: Bewahren Sie das Produkt außerhalb der Reichweite von Kindern und Haustieren auf.
- Schaden: Do not use the product if the power cord, plug, heat mat, or controller is damaged. Contact customer support for assistance.

Image 2.1: Heat mat with printed safety guidelines.
3. Packungsinhalt
Überprüfen Sie, ob alle Artikel im Paket vorhanden sind:
- 2 x Luxbird Seedling Heat Mats (21W each)
- 1 x Digitaler Thermostatregler
- 2 x Temperaturfühler
- 1 x Benutzerhandbuch (dieses Dokument)
4. Produktüberschreitungview
The Luxbird heating system consists of two main components: the heat mats and the digital thermostat controller with probes.
4.1. Heat Mats
The heat mats are designed to provide uniform and stable heat to the root zone of your plants. They measure 52.7 x 25.4 cm (20.75 x 10 inches), fitting standard 1020 trays. The durable PVC surface and IP67 rating ensure protection against moisture.

Image 4.1: Illustration of soft, even, and stable heat distribution.
4.2. Digitaler Thermostatregler
The digital thermostat controller allows precise temperature setting and monitoring. It features a clear LCD display, control buttons, and two probe sockets (P1, P2) and two thermostat sockets (WORK1, WORK2) for connecting the heat mats.

Image 4.2: Compact design and clear layout of the thermostat controller.
4.3. Temperature Probes
Two high-precision temperature probes are included to monitor the soil temperature in real-time. These probes are crucial for accurate temperature control and can be calibrated for optimal performance.

Image 4.3: Premium precision probes for accurate temperature measurement.
5. Einrichtungsanweisungen
Follow these steps to set up your Luxbird heating system:
- Komponenten auspacken: Nehmen Sie alle Artikel vorsichtig aus der Verpackung. Überprüfen Sie sie auf etwaige Schäden.
- Place Heat Mats: Lay the two heat mats flat on a stable, dry surface where your plants will be located. Ensure they are not folded or creased.
- Heizmatten anschließen: Plug the power cords of the two heat mats into the "WORK1" and "WORK2" sockets on the bottom of the digital thermostat controller.
- Insert Temperature Probes: Insert the two temperature probes into the "P1" and "P2" sockets on the side of the controller. Place the probe tips directly into the soil of your plant trays, ensuring they are at the desired depth for temperature monitoring.
- Einschalten: Plug the thermostat controller's power cord into a suitable electrical outlet. The display will light up.

Image 5.1: Complete setup with two heat mats and controller.
5.1. Thermostat Configuration
The thermostat allows precise control over the heating process. Use the three buttons below the display: SATZ (left, three lines icon), RUNTER (middle, down arrow), and UP (right, up arrow).
- Einstellungsmodus aufrufen: Halten Sie die SATZ Die Taste etwa 3 Sekunden lang gedrückt halten, bis sich die Anzeige ändert.
- Change Temperature Unit (Fahrenheit/Celsius): The first setting allows you to switch between Fahrenheit (°F) and Celsius (°C). Use the UP or RUNTER buttons to select your preferred unit. Press SATZ um zu bestätigen und zur nächsten Einstellung zu gehen. Note: Changing the unit will reset other settings.
- Set Minimum Heating Temperature (ST1 for P1): This is the temperature below which heating for probe 1 (P1) will activate. Use UP/RUNTER Zum Einstellen drücken. SATZ.
- Set Target Temperature (SP1 for P1): This is the desired maximum temperature for probe 1 (P1). Heating will stop when this temperature is reached. Use UP/RUNTER Zum Einstellen drücken. SATZ.
- Set High Alarm Limit (AH1 for P1): This is the maximum temperature at which an alarm will sound or display for P1. Use UP/RUNTER Zum Einstellen drücken. SATZ.
- Set Low Alarm Limit (AL1 for P1): This is the minimum temperature at which an alarm will sound or display for P1. Use UP/RUNTER Zum Einstellen drücken. SATZ.
- Calibrate Probe (CR1 for P1): If the probe reading for P1 is inaccurate, you can calibrate it here. Enter a positive or negative offset (e.g., 0.5 for +0.5°C). Use UP/RUNTER Zum Einstellen drücken. SATZ.
- Repeat for P2 (ST2, SP2, AH2, AL2, CR2): Follow steps 3-7 for the second probe (P2).
- Einstellung des Alarmtons: The final setting allows you to choose whether the alarm should sound audibly or only display visually on the screen. Use UP/RUNTER zur Auswahl. Drücken Sie SATZ Alle Einstellungen speichern und beenden.
The thermostat will now operate according to your configured settings.
6. Bedienungsanleitung
Once configured, the Luxbird thermostat will automatically maintain the desired temperature range for your plants.
6.1. Temperatur überwachen
The thermostat display shows the current temperature measured by each probe (P1, P2) and their respective set temperatures (SP1, SP2). The heating indicator will illuminate when the mats are actively heating.
6.2. Alarmfunktion
The controller features a high- and low-temperature alarm system. If the temperature measured by a probe exceeds the set high alarm limit (AH) or falls below the low alarm limit (AL), the alarm will activate (audibly or visually, depending on your setting) to alert you to potential issues.

Image 6.1: Alarm feature for safe operation.
7. Wartung
Proper maintenance ensures the longevity and optimal performance of your Luxbird heating system.
- Cleaning Heat Mats: The PVC surface of the heat mats is easy to clean. Disconnect the mats from the controller and power source before cleaning. Wipe them with a damp cloth. Do not use abrasive cleaners or immerse them in water.
- Cleaning Controller: Wipe the thermostat controller with a dry cloth. Do not use water or cleaning solutions directly on the controller.
- Lagerung: When not in use, ensure the heat mats are clean and dry. They can be rolled up for compact storage, but avoid sharp creases. Store the controller and probes in a dry, safe place.
8. Fehlerbehebung
If you encounter issues with your Luxbird heating system, refer to the following common problems and solutions:
| Problem | Mögliche Ursache | Lösung |
|---|---|---|
| Heat mat not heating | Not plugged in correctly; thermostat not set correctly; mat damaged. | Check all connections. Verify thermostat settings (ST, SP). Inspect mat for visible damage. |
| Die Temperaturanzeige ist ungenau | Probe not placed correctly; probe needs calibration; probe damaged. | Ensure probe tip is fully in the soil. Calibrate the probe using the CR setting (Section 5.1). Replace probe if damaged. |
| Der Alarm ertönt häufig | Alarm limits (AH/AL) set too close to target temperature (SP); rapid temperature fluctuations. | Adjust AH and AL settings to provide a wider buffer around your target SP. Ensure stable ambient conditions. |
| Anzeige ist leer | Kein Strom; Steuerungsfehler. | Check power outlet. Ensure controller is securely plugged in. If problem persists, contact support. |
If these solutions do not resolve the issue, please contact Luxbird customer support.
9. Spezifikationen
Technical specifications for the Luxbird 2-Pack Seedling Heat Mats with Digital Thermostat:
| Besonderheit | Detail |
|---|---|
| Modellnummer | B0C5HB3HSC |
| Abmessungen der Heizmatte | 52.7 x 25.4 cm (20.75 x 10 Zoll) |
| Heat Mat Power | 21 Watts per mat |
| Eingangs-/Ausgangs-Voltage | 100~240V Wechselstrom, 50/60Hz |
| Maximale Last (Regler) | 500W max |
| Temperaturregelbereich | 0 °C bis 45 °C (32 °F bis 113 °F) |
| Messbereich der Sonde | -5.0 °C bis 50.0 °C (23.0 °F bis 122 °F) |
| Messgenauigkeit | ± 1 ° C / ± 2 ° F |
| Kalibrierungsbereich | -4.9 °C bis 4.9 °C / -9.9 °F bis 9.9 °F |
| Sondenlänge | 2 m (6.5 Fuß) |
| Waterproof Rating (Mats) | IP67 |
| Zertifizierungen | CE, RoHS, UKCA, MET, FC |
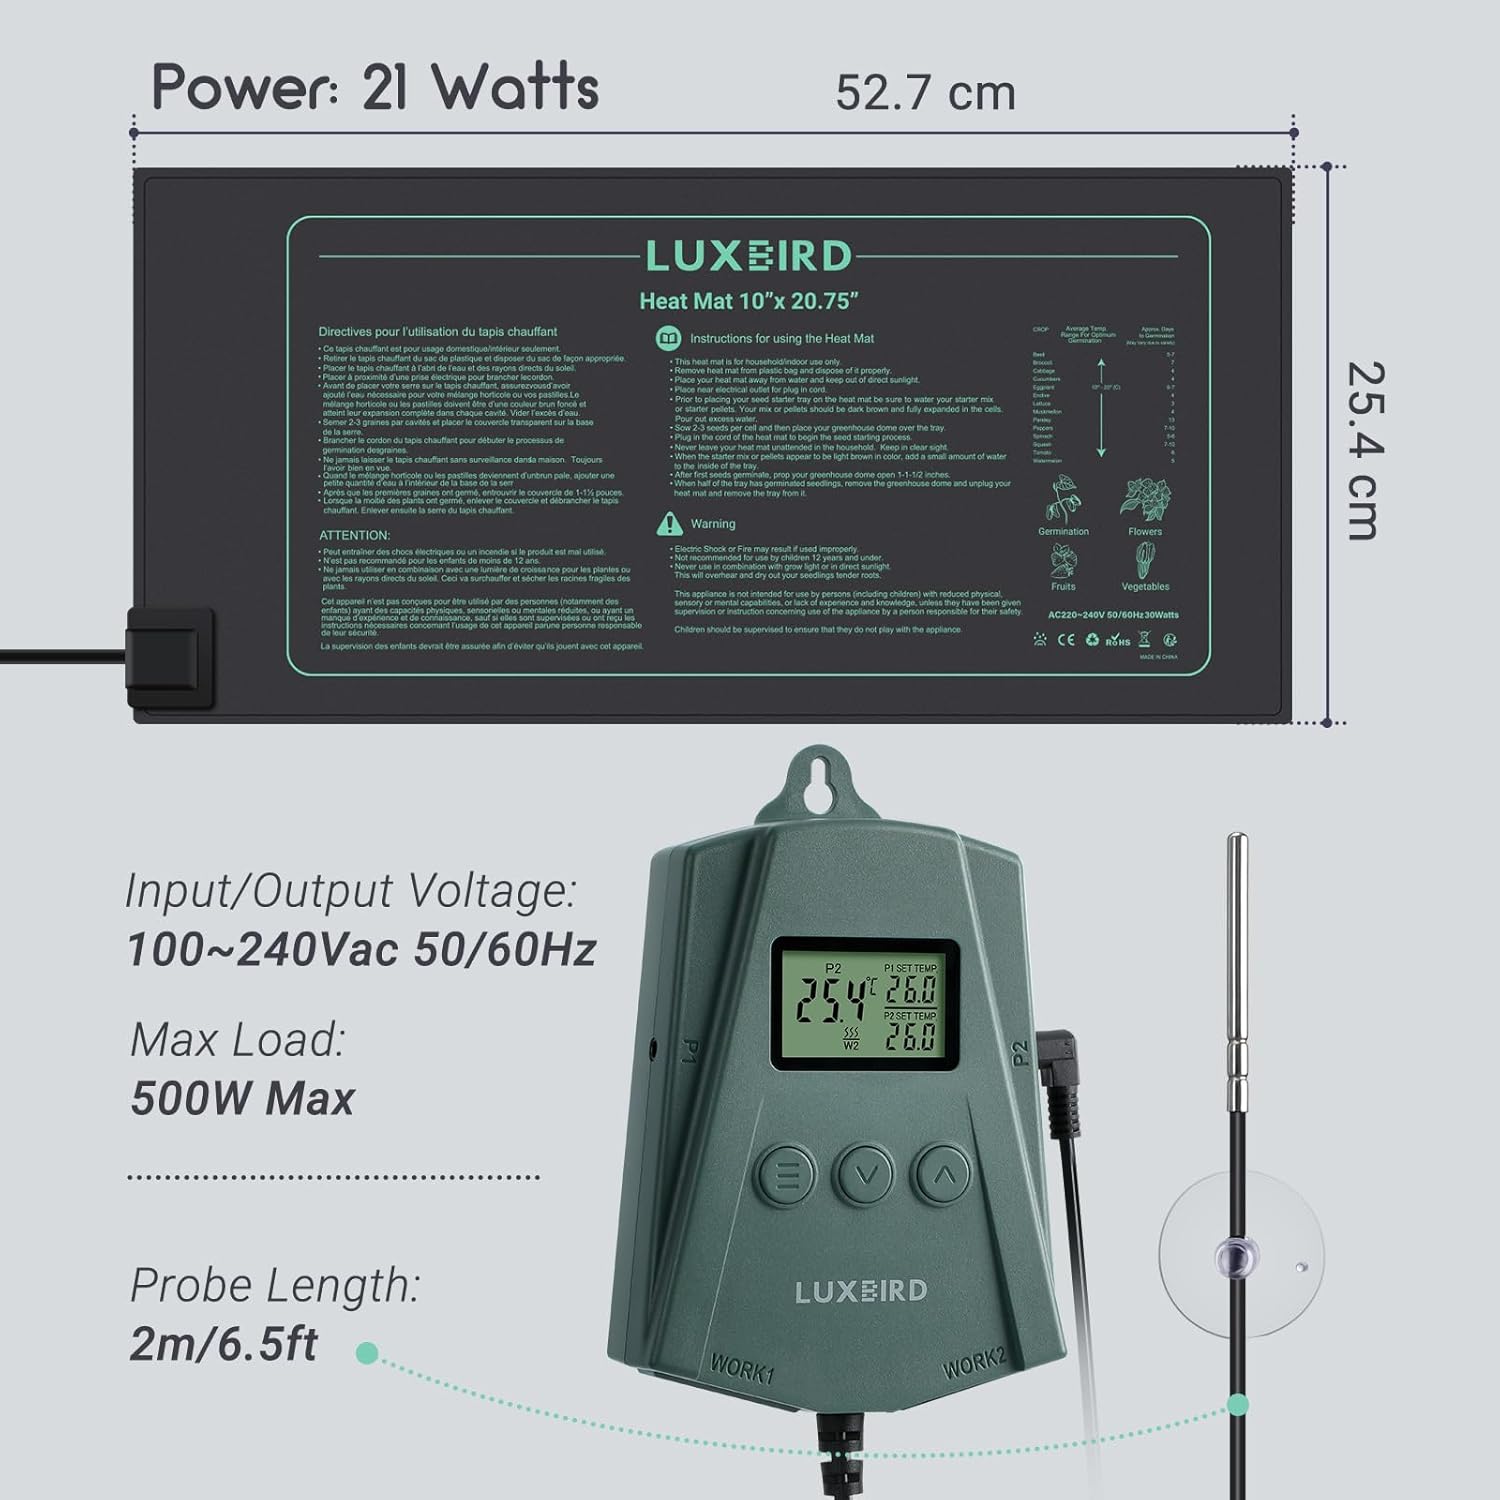
Abbildung 9.1: Produktabmessungen und elektrische Spezifikationen.
10. Garantie und Support
Luxbird products are manufactured to high-quality standards. For warranty information or technical support, please refer to the contact details provided with your purchase or visit the official Luxbird website. Please have your model number (B0C5HB3HSC) ready when contacting support.