
1. Einleitung
Thank you for choosing the ENERMAX PABYS PB30 ECB-PB30-BB-ARGB ATX PC Case. This manual provides essential information for the proper installation, operation, and maintenance of your new PC case. Please read this manual thoroughly before beginning the assembly process to ensure optimal performance and safety.

Abbildung 1: Vorderseite view of the ENERMAX PABYS PB30 PC case.
2. Produktmerkmale
The ENERMAX PABYS PB30 PC case is designed to provide a robust and aesthetically pleasing enclosure for your PC components. Key features include:
- Edge-to-Edge Tempered Glass Side Panel: Bietet eine klare view Ihrer internen Komponenten und RGB-Beleuchtung.
- Addressable RGB Lighting Synchronization Support: Compatible with major motherboard RGB software for unified lighting control.
- Pre-installed Square-shaped Lighting RGB Fan: Enhances cooling and visual appeal right out of the box.
- Removable HDD Cage: Facilitates easier cable management and provides flexibility for power supply installation.
3. Einrichtungsanweisungen
3.1. Auspacken und Vorbereitung
- Nehmen Sie das PC-Gehäuse vorsichtig aus der Verpackung.
- Stellen Sie das Gehäuse auf eine stabile, ebene Fläche.
- Remove the tempered glass side panel by unscrewing the thumb screws located at the rear of the case and gently pulling the panel away. Set it aside on a soft, non-abrasive surface to prevent scratches.
3.2. Komponenteninstallation
Follow these steps to install your PC components:
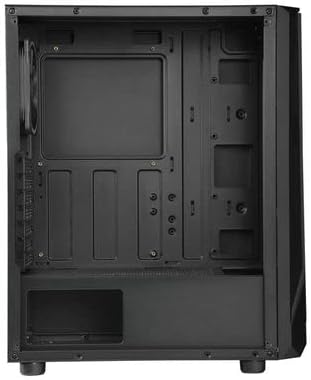
Figure 2: Interior layout of the ENERMAX PABYS PB30 PC case.
- Motherboard-Installation: Align your ATX, MicroATX, or Mini-ITX motherboard with the standoffs inside the case. Secure it with the provided screws.
- Installation des Netzteils (PSU): Install your PSU into the dedicated compartment at the bottom rear of the case. Secure it with screws from the rear.
- Installation des Speicherlaufwerks: Utilize the removable HDD cage for 3.5-inch drives or dedicated mounts for 2.5-inch SSDs. Secure drives with appropriate screws.
- Installation der Erweiterungskarte: Remove the necessary expansion slot covers (7 available) at the rear of the case. Insert your graphics card or other expansion cards and secure them with screws.
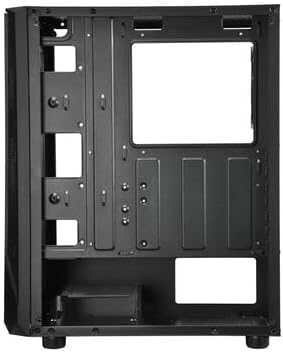
Figure 3: Cable management area behind the motherboard tray.
3.3. Kabelmanagement
Route all power and data cables through the designated cutouts and tie-down points behind the motherboard tray. This improves airflow and maintains a clean interior aesthetic. The removable HDD cage can assist in managing PSU cables.
3.4. Anschlüsse an der Vorderseite
Connect the front panel cables (USB 3.2 Gen1 x1, USB 2.0 x1, HD Audio, Power, Reset, LED) from the case to the corresponding headers on your motherboard. Refer to your motherboard manual for exact header locations.
4. Bedienung
4.1. Einschalten
Once all components are installed and cables are connected, replace the side panel. Connect your monitor, keyboard, mouse, and power cable to the PSU. Press the power button on the front panel to start your system.
4.2. RGB-Beleuchtungssteuerung
The pre-installed RGB fan and any other addressable RGB components connected to the case can be controlled via your motherboard's RGB synchronization software (e.g., ASUS Aura Sync, MSI Mystic Light Sync, GIGABYTE RGB Fusion, ASRock Polychrome Sync). Ensure the RGB cables are correctly connected to the motherboard's 3-pin 5V ARGB header.
5. Wartung
Regelmäßige Wartung trägt dazu bei, die optimale Leistung und Langlebigkeit Ihres PC-Gehäuses und Ihrer Komponenten zu gewährleisten.
- Reinigung des Staubfilters: Periodically remove and clean any dust filters (if present) to maintain good airflow and prevent dust buildup inside the case.
- Außenreinigung: Wischen Sie die Außenflächen mit einem weichen, damp cloth. Avoid harsh chemicals that may damage the finish or tempered glass.
- Innenraumstaubentfernung: Use compressed air to gently remove dust from internal components and fan blades. Ensure the system is powered off and unplugged before cleaning.
6. Fehlerbehebung
Sollten Sie Probleme mit Ihrem PC-Bau feststellen, beachten Sie die folgenden gängigen Schritte zur Fehlerbehebung:
- Kein Strom: Ensure the PSU is switched on, the power cable is securely connected, and all motherboard power connectors (24-pin ATX, 8-pin CPU) are properly seated. Check front panel power button connection to the motherboard.
- Lüfter drehen sich nicht: Verify that all fan cables are correctly connected to the motherboard fan headers or any fan controller. Check BIOS settings for fan control.
- RGB-Beleuchtung funktioniert/synchronisiert nicht: Confirm that the ARGB cable is connected to the correct 3-pin 5V ARGB header on the motherboard. Ensure your motherboard's RGB software is installed and configured correctly.
- Keine Anzeigeausgabe: Ensure your graphics card is properly seated in its PCIe slot and all necessary power cables are connected. Check that your monitor cable is connected to the graphics card, not the motherboard (if using a dedicated GPU).
7. Spezifikationen
| Besonderheit | Beschreibung |
|---|---|
| Modellname | ECB-PB30-BB-ARGB |
| Form Factor Support | ATX, MicroATX, Mini-ITX |
| Front I / O Ports | 1x USB 3.2 Gen1, 1x USB 2.0, HD Audio |
| Erweiterungssteckplätze | 7 |
| Abmessungen (L x B x H) | 375 x 200 x 458 mm |
| Farbe | Schwarz |
| Materialien | Gehärtetes Glas, Stahl |
| Kühlmethode | Luftkühlung |
8. Garantie und Support
ENERMAX products are manufactured to the highest quality standards. For warranty information, technical support, or service inquiries, please refer to the official ENERMAX webBesuchen Sie unsere Website oder wenden Sie sich an Ihren Händler vor Ort. Bewahren Sie Ihren Kaufbeleg für Garantieansprüche auf.