
DIHOOL 1
DIHOOL Solar Panel Disconnect Switch Box (1 String 1000VDC) User Manual
Model: 1 String 1000VDC
1. Einleitung
This manual provides essential information for the safe and efficient installation, operation, and maintenance of your DIHOOL Solar Panel Disconnect Switch Box. Please read this manual thoroughly before installation and retain it for future reference. This device is designed to protect photovoltaic (PV) systems, specifically for RV applications with a single string up to 1000VDC.
2. Sicherheitshinweise
WARNUNG: Installation and maintenance should only be performed by qualified personnel. High DC voltage is present and can cause severe injury or death. Always disconnect power sources before servicing.
- Vor Installation oder Wartung muss sichergestellt werden, dass alle Stromquellen getrennt sind.
- Überprüfen Sie die Lautstärketage and current ratings of your solar array match the specifications of this device.
- Verwenden Sie geeignete persönliche Schutzausrüstung (PSA), einschließlich isolierender Handschuhe und Augenschutz.
- Do not open the enclosure or attempt repairs if you are not qualified.
- Stellen Sie eine ordnungsgemäße Erdung des Systems sicher.
3. Produktüberschreitungview und Packungsinhalt
The DIHOOL Solar Panel Disconnect Switch Box is an IP65-rated enclosure containing a 40 Amp DC circuit breaker and a 20-40kA 2P DC1000V surge protector. It is designed for outdoor use and offers protection against overcurrent and lightning strikes in a single string PV system.

Abbildung 3.1: DIHOOL Solar Panel Disconnect Switch Box and accessories. This image shows the main disconnect switch box along with MC4 connectors, mounting screws, wall anchors, and a grounding wire.
Packungsinhalt:
- 1x IP65 Waterproof Housing (PC+ABS material)
- 1x Surge Protector DC 1000V 2P 20kA / 40kA Type 2
- 1x Solar Disconnect Switch 2-pole DC1000V 40A
- MC4 Connectors (for Type B wiring)
- Befestigungsschrauben und Wandanker
- Erdungskabel

Abbildung 3.2: Detaillierte view of the disconnect switch box, showing the internal circuit breaker and surge protector, along with external connectors and mounting hardware.
Produkteigenschaften:
- Robustes Gehäuse: Constructed from high-quality PC+ABS engineering plastics, offering long service life, IP65 waterproof and dustproof rating, anti-ultraviolet properties, and flame retardancy. Features a transparent viewing window for easy status checks.
- Fast Arc Extinguishing: The DC circuit breaker is designed with a robust arc extinguishing capability to safely interrupt high DC voltages.
- Enhanced Surge Protection: Utilizes a standard lightning protection chip for effective voltage surge absorption, superior to piezoresistor-based devices.

Abbildung 3.3: This image compares the PC+ABS material used for the enclosure, highlighting its superior corrosion resistance, heat resistance, and UV resistance compared to standard ABS or iron enclosures, making it suitable for harsh outdoor environments.

Abbildung 3.4: This image illustrates key features including the fast arc extinguishing capability of the circuit breaker, the flame-retardant properties of the PC+ABS enclosure material, and general wiring considerations.
4. Spezifikationen
| Technische Daten | 8.27 x 5.51 x 3.86 Zoll |
| Artikelgewicht | 3.02 Pfund |
| Marke | DIHOOL |
| Modellnummer | 1 (1 String 1000VDC) |
| Material | PC+ABS Engineering Plastics |
| Schutzart (IP) | IP65 (wasser- und staubdicht) |
| Gleichstrom-Leistungsschalter | 40 Amp, 2-pole, 1000VDC |
| Überspannungsschutz | 20-40kA, 2-pole, 1000VDC |
| Anwendbares Voltage Reichweite | DC 12V ~ 1000V |
| Anwendbares Kabel | 6mm² / 10AWG Cable (for MC4), 5-10mm² / 10-4AWG Cable (for direct wiring) |
| Umgebungslufttemperatur | -25°C bis 55°C |

Abbildung 4.1: Physical dimensions of the DIHOOL Solar Panel Disconnect Switch Box, showing measurements of 140mm width and 285mm height.

Abbildung 4.2: Illustration of the IP65 waterproof rating, indicating resistance to various environmental conditions including temperature, snow, and rain.
5. Installation und Einrichtung
5.1 Montage des Gehäuses
The enclosure is designed for screw installation. Select a suitable outdoor location, ensuring it is easily accessible for operation and maintenance, and protected from direct mechanical impact.
- Mark the drilling points on the mounting surface using the enclosure as a template.
- Bohren Sie Löcher und setzen Sie die mitgelieferten Wandanker ein.
- Secure the enclosure to the surface using the provided screws.
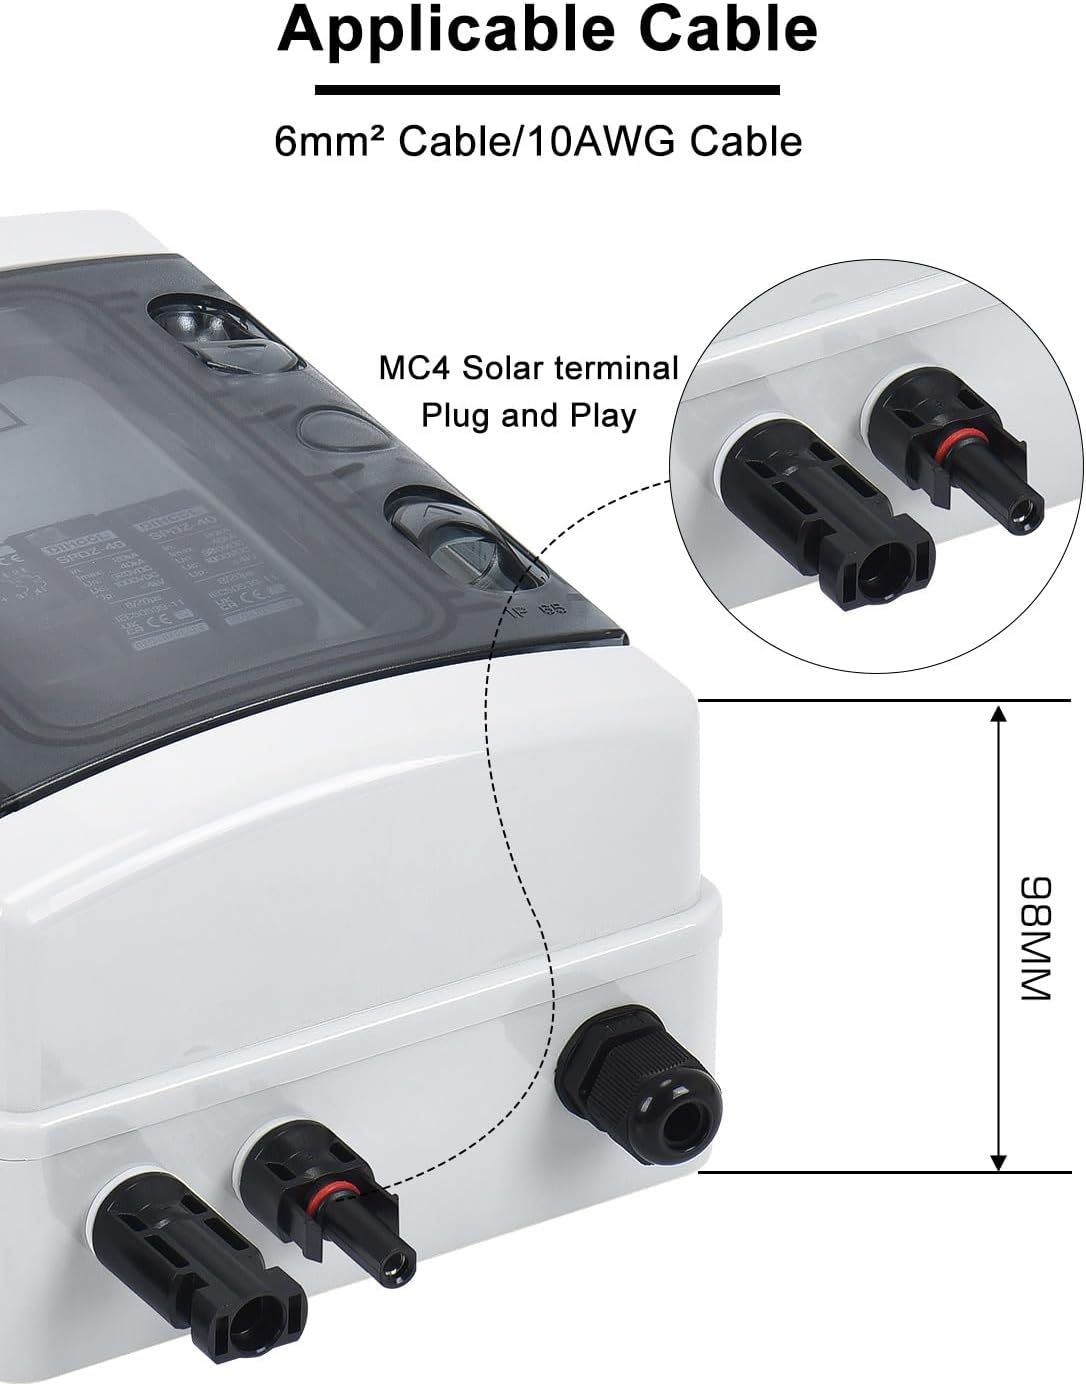
Abbildung 5.1: Diagram showing the screw installation points within the enclosure and the included mounting hardware.
5.2 Verdrahtungsmethoden
The DIHOOL Disconnect Switch Box supports two primary wiring methods:

Abbildung 5.2: Illustration of Type A (direct wiring with cable gland) and Type B (plug-and-play with solar terminals) wiring methods.
Type A: Direct Wiring through Waterproof Connectors and Terminals
- For this method, use 5-10mm² (10-4AWG) cables.
- Feed the cables through the waterproof cable glands at the bottom of the enclosure.
- Strip the cable insulation and crimp appropriate terminals onto the wires.
- Connect the positive (+) and negative (-) wires from the solar panel string to the corresponding terminals inside the box.
- Connect the output wires to your MPPT controller or inverter.
- Stellen Sie sicher, dass alle Verbindungen fest und sicher sind.
- Tighten the cable glands to maintain IP65 rating.
Type B: Solar Connectors (MC4) for Plug-and-Play
- This method uses MC4 solar terminals for faster and safer connection.
- Use 6mm² (10AWG) cables with pre-attached MC4 connectors.
- Connect the MC4 connectors from your solar panel string directly to the input MC4 ports on the disconnect box.
- Connect the output MC4 ports from the disconnect box to your MPPT controller or inverter.
- Ensure all MC4 connections are fully seated and locked.
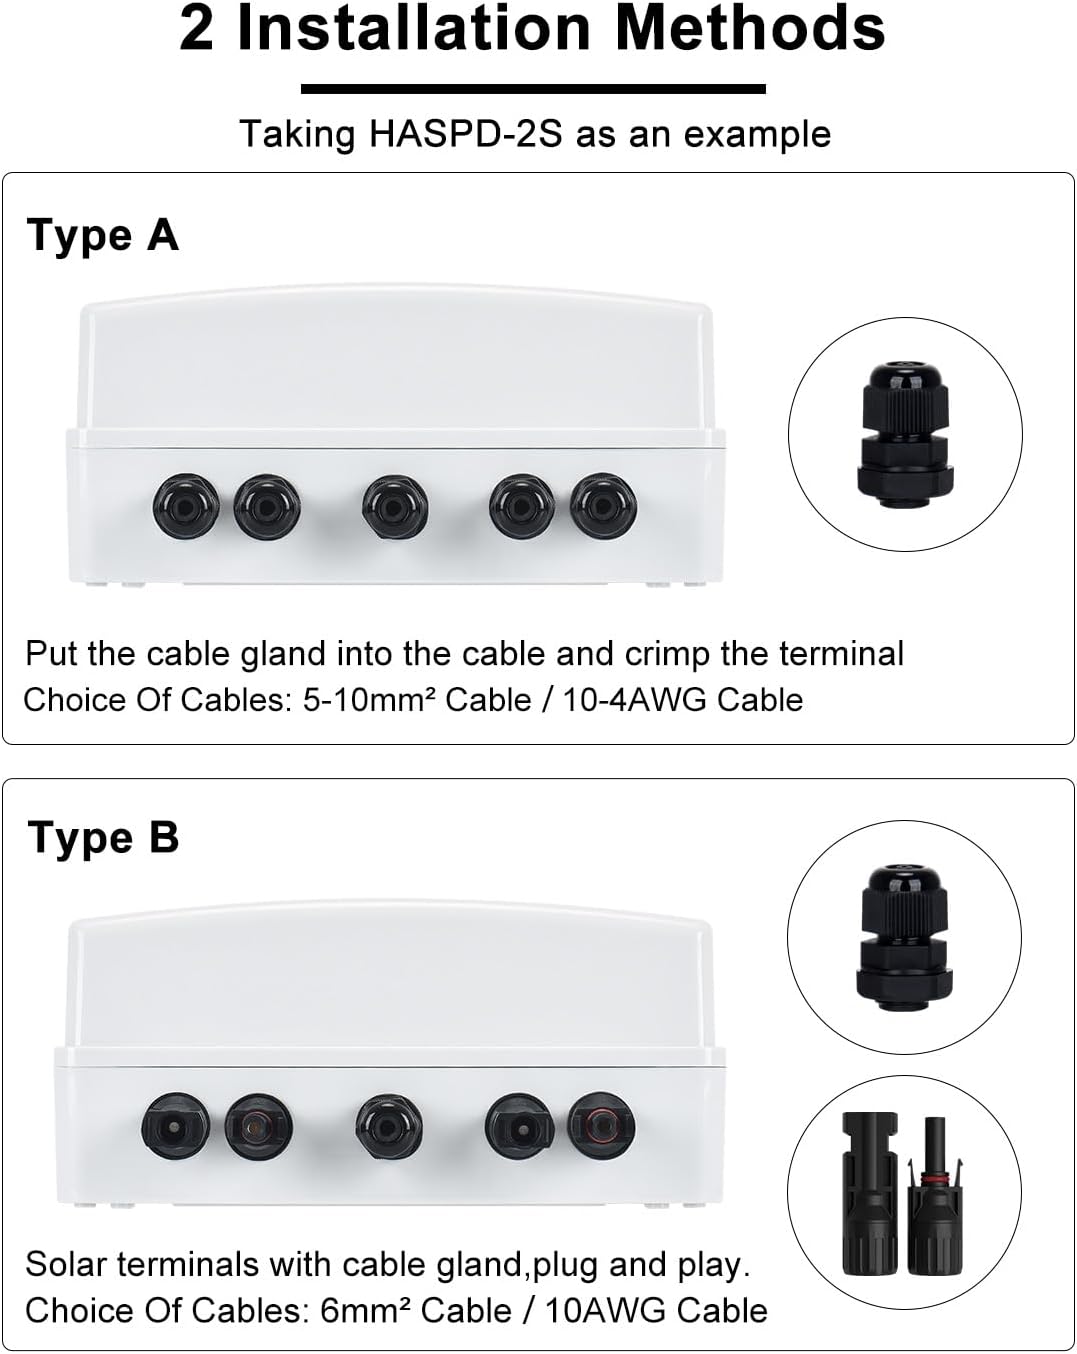
Abbildung 5.3: Nahaufnahme view of the MC4 solar terminal, indicating compatibility with 6mm² / 10AWG cable.
5.3 Systemschaltplan
Refer to the following diagram for a typical installation of the disconnect switch box within a solar PV system.

Abbildung 5.4: A typical wiring diagram showing the connection of the solar panel disconnect switch box between the solar panel array and an MPPT charge controller, leading to a battery bank. The diagram also illustrates the grounding connection.
5.4 Grounding and Sealing
Proper grounding is crucial for safety. Connect the provided grounding wire from the designated grounding terminal inside the enclosure to a reliable earth ground point. Ensure all cable glands are securely tightened after wiring to maintain the IP65 waterproof and dustproof rating.

Abbildung 5.5: The image highlights the sealing rubber ring and waterproof cable gland, which contribute to the IP65 rating and protect internal components from moisture and dust.
6. Bedienungsanleitung
6.1 DC Circuit Breaker Operation
The integrated DC circuit breaker acts as the main disconnect switch. It is designed to interrupt the DC current from the solar panels to the rest of the system.
- Zum Einschalten: Push the breaker switch to the "ON" position (typically indicated by a color, often red).
- Ausschalten: Push the breaker switch to the "OFF" position (typically indicated by a color, often green). This disconnects the solar array from the system.
- In case of an overcurrent event, the breaker will automatically trip to the "OFF" position. Investigate the cause before resetting.
6.2 Surge Protector Status
The surge protector is designed to protect your system from lightning strikes and voltage Wellen.
- The surge protector has an indicator light.
- If the indicator light is Grün, the surge protector is functioning correctly.
- If the indicator light turns Rot, it indicates that a lightning strike or significant surge has occurred, and the surge protection module needs to be replaced.

Abbildung 6.1: This image illustrates the difference between DIHOOL's surge protector, which uses a standard lightning protection chip for effective voltage release, and other brands that may use less effective piezoresistors.
7. Wartung
7.1 Allgemeine Inspektion
- Periodically inspect the enclosure for any signs of damage, cracks, or loose connections.
- Ensure the transparent viewing window is clean for clear visibility of the breaker and surge protector status.
- Check that all cable glands are securely tightened.
7.2 Surge Protector Replacement
If the surge protector indicator turns red, the module has absorbed a surge and needs replacement to ensure continued protection.
- WARNUNG: Disconnect all power to the solar array and the system before attempting to replace the surge protector.
- Öffnen Sie das Gehäuse.
- Carefully remove the old surge protector module from its DIN rail mounting.
- Install a new, compatible surge protector module (DC 1000V 2P 20kA / 40kA Type 2).
- Verschließen Sie das Gehäuse fest.
- Restore power and verify the new surge protector indicator is green.
7.3 Disassembly of Solar Terminals (MC4)
If you need to disconnect MC4 solar terminals, use an MC4 wrench as shown below:

Abbildung 7.1: Step-by-step guide for safely disassembling MC4 solar terminals using a specialized MC4 wrench. This process involves preparing the wrench, inserting it into the terminal groove, clamping, and applying force to separate the terminals.
8. Fehlerbehebung
| Problem | Mögliche Ursache | Lösung |
|---|---|---|
| No power output from the box. | DC circuit breaker is in the "OFF" or tripped position. | Check the breaker position. If tripped, investigate for overcurrent (e.g., short circuit, overloaded panels) before resetting. |
| Surge protector indicator is red. | Surge protector has absorbed a voltage Welle. | Replace the surge protector module immediately to restore protection. |
| Loose or intermittent connections. | Wiring not properly secured. | Ensure all MC4 connectors are fully seated and locked. For direct wiring, check terminal tightness and cable gland seals. |
| Water or dust ingress into the enclosure. | Improperly sealed cable glands or damaged enclosure. | Check and tighten all cable glands. Inspect the enclosure for damage; replace if compromised. |
9. Garantieinformationen
DIHOOL products are manufactured to high-quality standards. For specific warranty terms and conditions, please refer to the warranty card included with your product or contact DIHOOL customer support. The warranty typically covers defects in materials and workmanship under normal use.
10. Kundendienst
If you encounter any issues or have questions regarding your DIHOOL Solar Panel Disconnect Switch Box, please contact DIHOOL customer support through the retailer where you purchased the product or visit the official DIHOOL webWebsite für Kontaktinformationen.
For more information about DIHOOL products, you can visit the DIHOOL Store on Amazon.
Ask a question about this manual
Ask about setup, troubleshooting, compatibility, parts, safety, or missing instructions. Manuals+ will review the question and use this page’s manual context to help answer it.