
Della 048-OPAC-6H
Della 10000 BTU Portable Air Conditioner User Manual
Model: 048-OPAC-6H | Brand: Della
1. Wichtige Sicherheitshinweise
Please read this manual carefully before operating your portable air conditioner. Keep this manual for future reference. Always follow basic safety precautions to reduce the risk of fire, electric shock, or injury.
- Stellen Sie sicher, dass das Gerät auf einer ebenen, stabilen Oberfläche steht, um ein Umkippen zu verhindern.
- Betreiben Sie das Gerät nicht mit beschädigtem Kabel oder Stecker.
- Führen Sie keine Finger oder Gegenstände in den Lufteinlass oder -auslass ein.
- Halten Sie das Gerät von brennbaren Materialien und offenen Flammen fern.
- Vor der Reinigung oder Durchführung von Wartungsarbeiten muss das Gerät immer vom Stromnetz getrennt werden.
- Dieses Gerät ist nicht für den Gebrauch durch Personen (einschließlich Kinder) mit eingeschränkten physischen, sensorischen oder geistigen Fähigkeiten oder Mangel an Erfahrung und Wissen bestimmt, es sei denn, sie werden von einer für ihre Sicherheit verantwortlichen Person beaufsichtigt oder erhalten Anweisungen zur Verwendung des Geräts.
2. Produktüberschreitungview
The Della 10000 BTU Portable Air Conditioner is a versatile unit designed to provide cooling, heating, dehumidification, and fan functions for spaces up to 450 sq. ft. It features smart WiFi connectivity for convenient control via a mobile app, a remote control, and an intuitive soft-touch control panel.

Image: Della Portable Air Conditioner unit, remote control, and smartphone displaying the control app.
Key components include the main unit with integrated handle, exhaust hose, window installation kit, and remote control.

Image: Diagram showing the dimensions of the portable air conditioner: 12.2 inches (width) x 12.2 inches (depth) x 27.6 inches (height).
3. Einrichtung
3.1 Auspacken
Carefully remove the unit and all accessories from the packaging. Retain the original packaging for future storage or transport. Allow the unit to stand upright for at least 24 hours before initial use to allow the refrigerant to settle.
3.2 Platzierung
Place the air conditioner on a firm, level surface in a location that allows for proper air circulation. Ensure there is at least 20 inches (50 cm) of space from walls or other objects to allow for adequate airflow around the unit.
3.3 Fensterkit-Montage
The included window kit is designed for easy installation in both horizontal and vertical sliding windows. No drilling is required.

Image: Diagrams illustrating the installation of the window kit in both horizontal and vertical sliding windows, showing compatibility with window openings from 25.5 to 64.1 inches.
- Assemble the window slider kit by sliding the adjustable panels together to fit your window opening. The kit is compatible with window sizes from 25.5 to 64.1 inches.
- Befestigen Sie die Paneele mit den mitgelieferten Schrauben.
- Open the window and place the assembled window kit into the window frame. Extend the panels to fit snugly and close the window against the kit to secure it.
- Ensure the window kit is sealed properly to prevent air leakage. Use foam seals if necessary.
3.4 Abgasschlauchanschluss
- Attach the exhaust hose connector to one end of the exhaust hose.
- Befestigen Sie den Fensterkit-Adapter am anderen Ende des Abgasschlauchs.
- Insert the exhaust hose connector into the exhaust outlet on the back of the air conditioner unit.
- Insert the window kit adapter into the opening on the window slider kit.
- Stellen Sie sicher, dass alle Verbindungen fest sitzen, damit keine warme Luft wieder in den Raum gelangt.
3.5 Stromanschluss
Stecken Sie das Netzkabel in eine geerdete 115-V-/60-Hz-Steckdose. Verwenden Sie keine Verlängerungskabel oder Mehrfachsteckdosen.
4. Bedienungsanleitung
4.1 Systemsteuerung
The unit features an intuitive soft-touch control panel on the top of the unit.
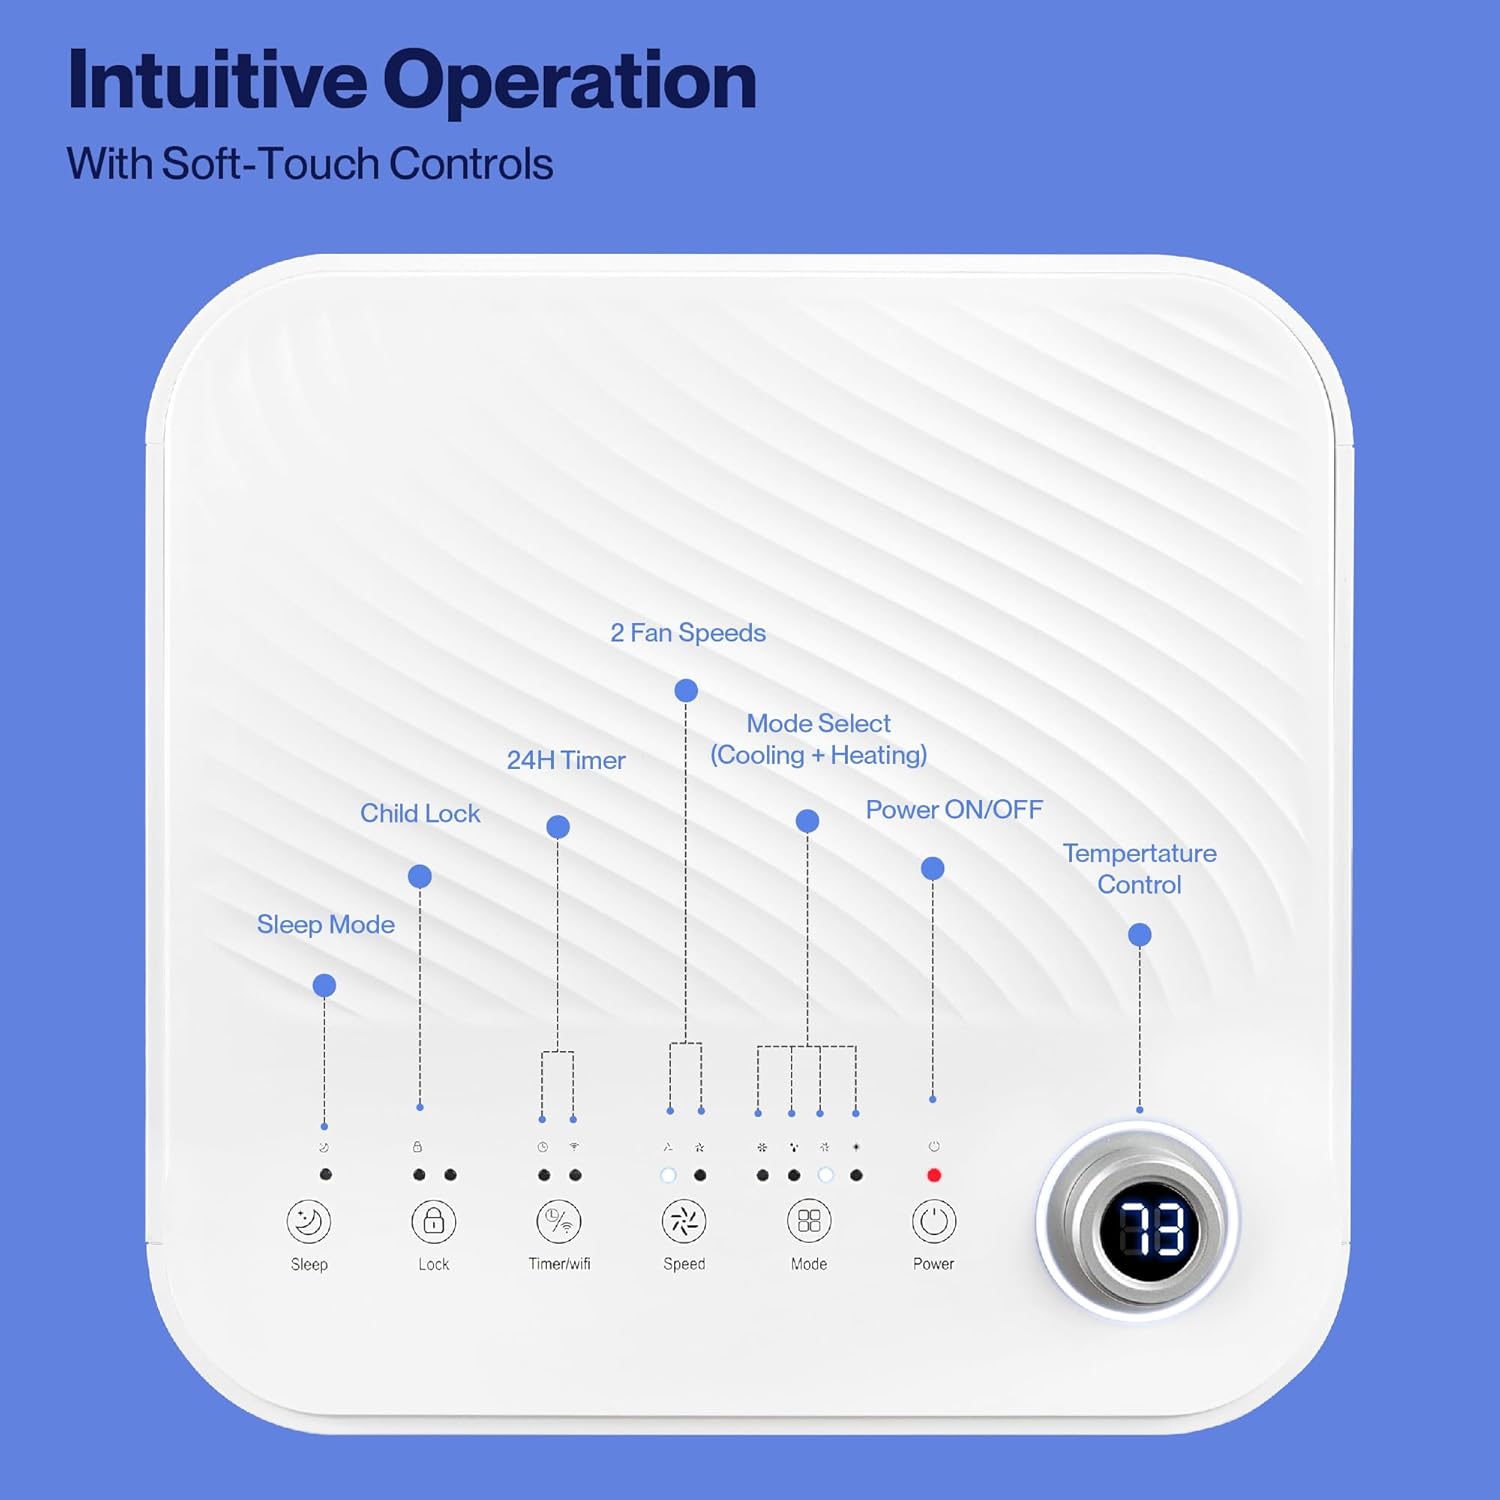
Image: Detailed diagram of the control panel with labels for each button: Sleep, Child Lock, Timer/WiFi, Fan Speed, Mode Select (Cooling + Heating), Power ON/OFF, and Temperature Control with digital display.
- Ein-/Ausschalten: Drücken Sie, um das Gerät ein- oder auszuschalten.
- Modusauswahl: Cycle through Cooling, Heating, Dehumidification, Ventilation (Fan), and Sleep modes.
- Temperaturkontrolle: Mit den Auf-/Abwärtspfeilen kann die gewünschte Temperatur eingestellt werden.
- Lüftergeschwindigkeit: Select between 2 fan speeds (Low, High).
- Timer: Stellen Sie einen 24-Stunden-Timer für den automatischen Ein-/Ausschaltbetrieb ein.
- Kindersicherung: Aktiviert oder deaktiviert die Kindersicherungsfunktion.
- Schlafmodus: Aktiviert den Schlafmodus für einen leiseren Betrieb und eine schrittweise Temperaturanpassung.
4.2-Fernbedienung
The unit comes with a remote control for convenient operation from a distance. All functions available on the control panel can be accessed via the remote.
4.3 WiFi/Smart App Control
Control your Della Portable Air Conditioner from anywhere using the free DELLA+ app on your smartphone. The unit is compatible with Google Assistant and Amazon Alexa for voice control.

Image: A person relaxing on a couch, using a smartphone to control the air conditioner, with text indicating compatibility with Google Assistant and Amazon Alexa.
- Download the DELLA+ app from your smartphone's app store.
- Folgen Sie den Anweisungen in der App, um Ihre Klimaanlage mit Ihrem WLAN-Heimnetzwerk zu verbinden.
- Once connected, you can control modes, temperature, fan speed, and set schedules remotely.
The app also supports Smart Geo Location, allowing the unit to automatically turn on or off based on your proximity to home.

Image: A smartphone screen showing a map with a car icon and a notification indicating the AC unit automatically turned on due to Smart Geo Location.
5. Wartung
Regular maintenance ensures optimal performance and extends the lifespan of your unit. Always unplug the unit before cleaning.
5.1 Reinigung des Luftfilters
Der Luftfilter sollte je nach Nutzung und Luftqualität alle zwei Wochen oder auch häufiger gereinigt werden.
- Suchen Sie die Luftfilterabdeckung (normalerweise auf der Rück- oder Seitenfläche des Geräts).
- Entfernen Sie den Filter.
- Waschen Sie den Filter mit warmem Seifenwasser. Spülen Sie ihn gründlich aus und lassen Sie ihn vollständig an der Luft trocknen, bevor Sie ihn wieder einsetzen.
5.2 Wasser ablassen
The unit has a self-evaporating system, but in high humidity conditions, water may accumulate. The "Water-full indicator" will illuminate when the water tank needs draining.
- Stellen Sie eine flache Schale oder ein Tablett unter den Abfluss (befindet sich unten hinten am Gerät).
- Entfernen Sie die Ablassschraube.
- Allow all accumulated water to drain out.
- Den Ablassstopfen wieder fest anbringen.
5.3 Speicherung
Bei längerer Lagerung des Geräts:
- Lassen Sie das gesamte angesammelte Wasser ab.
- Reinigen Sie den Luftfilter.
- Lassen Sie das Gerät einige Stunden lang nur im Lüftermodus laufen, um den Innenraum zu trocknen.
- Ziehen Sie den Netzstecker und wickeln Sie das Kabel ordentlich auf.
- Lagern Sie das Gerät an einem kühlen, trockenen Ort, vorzugsweise in der Originalverpackung.
6. Fehlerbehebung
In diesem Abschnitt finden Sie häufig auftretende Probleme und deren Lösungen.
| Problem | Mögliche Ursache | Lösung |
|---|---|---|
| Das Gerät lässt sich nicht einschalten | Kein Strom; Netzkabel nicht angeschlossen; Sicherung ausgelöst; Wassertank voll | Steckdose prüfen; Netzkabel einstecken; Sicherungsautomat zurücksetzen; Wassertank entleeren |
| Gerät kühlt nicht effektiv | Air filter dirty; Exhaust hose not properly installed; Room too large; Doors/windows open; Temperature setting too high | Clean air filter; Ensure exhaust hose is sealed; Close doors/windows; Lower temperature setting |
| Gerät ist laut | Unit not on level surface; Air filter dirty; Obstruction in fan | Place unit on level surface; Clean air filter; Check for obstructions |
| Wasserleck | Drain plug loose or missing; Unit tilted | Ablassstopfen sichern; sicherstellen, dass das Gerät waagerecht steht |
| WLAN-Verbindungsprobleme | Incorrect WiFi password; Unit too far from router; Router issues | Verify password; Move unit closer to router; Restart router |
Wenn das Problem nach dem Ausprobieren dieser Lösungen weiterhin besteht, wenden Sie sich bitte an den Kundensupport.
7. Spezifikationen
| Besonderheit | Spezifikation |
|---|---|
| Modellnummer | 048-OPAC-6H |
| Kühlleistung | 10000 BTU |
| Abdeckungsbereich | Bis zu 450 qm Ft. |
| Funktionen | Cooling, Heating, Dehumidifier, Fan, Sleep Mode |
| Bandtage | 115 Volt |
| Geräuschpegel | 54 dB |
| Kältemittel | R 410A |
| Abmessungen (L x B x H) | 12.2 x 12.2 x 27.6 Zoll |
| Material | ABS-Kunststoff |
| Besondere Merkmale | Portable, Dehumidifier, WiFi Enabled, Remote Control, Built-in Handle, 24-hour timer, Child Lock |
8. Garantie und Kundendienst
For warranty information or technical assistance, please refer to the warranty card included with your product or visit the official Della website. You may also contact Della customer support directly for further assistance with troubleshooting or parts replacement.
Ask a question about this manual
Ask about setup, troubleshooting, compatibility, parts, safety, or missing instructions. Manuals+ will review the question and use this page’s manual context to help answer it.