Einführung
Thank you for choosing the GROWNSY Digital Alarm Clock. This multi-functional digital clock is designed for bedroom use, offering time display, alarm functions, and temperature monitoring. Please read this manual carefully to ensure proper setup and operation of your device.
Produkt überview
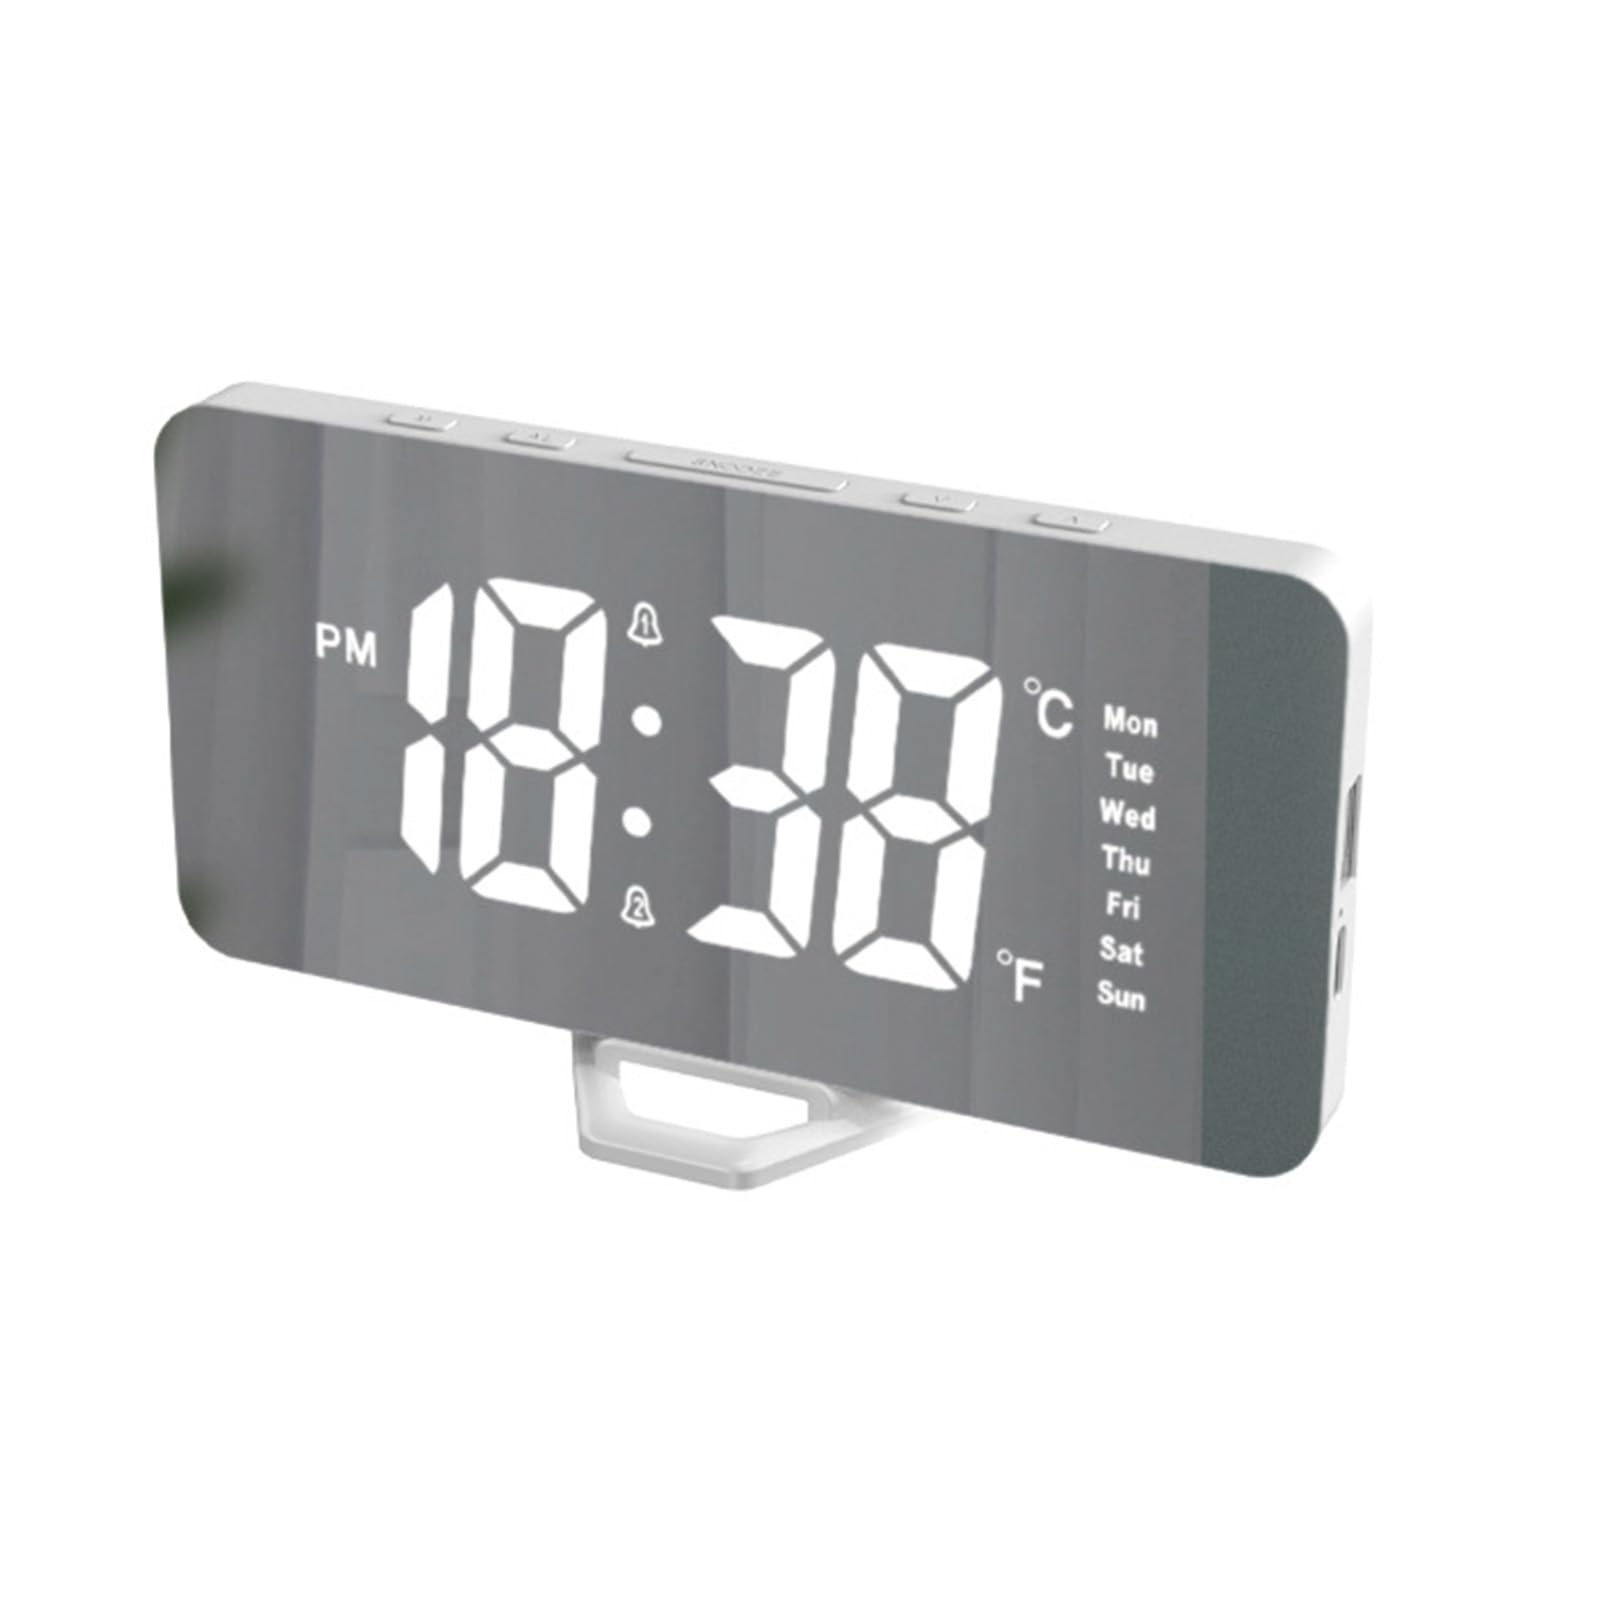
Abbildung 1: Front view of the GROWNSY Digital Alarm Clock, showcasing its large, clear digital display.
The GROWNSY Digital Alarm Clock features a sleek, rectangular design with a mirrored surface and a large, easy-to-read display. It includes essential functions for daily use. Please note that while some descriptions may mention a 'white noise machine,' this model does nicht include a white noise feature.
Aufstellen
- Auspacken: Carefully remove the alarm clock and its accessories from the packaging. Verify that all components are present: the alarm clock unit, a USB-C to USB-A cable, and a detachable plastic stand.
- Befestigen Sie den Ständer: Locate the small plastic stand. Align it with the slot at the bottom of the alarm clock and snap it into place. Once attached, the stand is generally not designed to be removed.
- Stromanschluss: The alarm clock requires continuous power via USB. Connect the provided USB-C cable to the USB-C port on the side of the clock. Connect the USB-A end of the cable to a USB power adapter (not included) or a powered USB port. The clock will not operate without external power.
- Internal Battery (Memory): The clock contains an internal button battery (e.g., CR2032, not user-replaceable for primary power) which serves to retain time and settings in memory if the main power supply is interrupted. This battery does not power the display or functions independently.
- Erstes Einschalten: Once connected to power, the display will illuminate. You may need to set the current time and date.
Bedienungsanleitung
The control buttons are located on the top of the unit. These typically include: MODUS, ALARM, SCHLAFEN, AUF (▲), Und UNTEN (▼).
Einstellen der Uhrzeit
- Drücken Sie die MODUS Durch einmaliges Drücken der Taste gelangen Sie in den Zeiteinstellungsmodus. Die Stundenziffern blinken.
- Verwenden Sie die AUF (▲) Und UNTEN (▼) Tasten zum Einstellen der Stunde.
- Drücken MODUS Um die Stunde erneut zu bestätigen, wechseln Sie zur Minuteneinstellung. Die Minutenziffern blinken.
- Verwenden Sie die AUF (▲) Und UNTEN (▼) Tasten zum Einstellen der Minuten.
- Drücken MODUS a third time to confirm minutes and exit time setting.
- Um zwischen 12-Stunden- und 24-Stunden-Format umzuschalten, drücken Sie die Taste AUF (▲) Drücken Sie die Taste im normalen Zeitanzeigemodus.
Setting the Date and Temperature Unit
- Drücken Sie im normalen Zeitdisplay die Taste MODUS button repeatedly until the year, month, or day digits flash.
- Verwenden AUF (▲) Und UNTEN (▼) to adjust the values. Press MODUS to cycle through year, month, and day settings.
- After setting the date, you may encounter the temperature unit setting. Use AUF (▲) or UNTEN (▼) to select between Celsius (℃) and Fahrenheit (℉).
- Drücken MODUS to exit date/temperature settings.
Alarme einstellen (Alarm 1 und Alarm 2)
Die Uhr unterstützt zwei unabhängige Alarme.
- Drücken Sie die ALARM button once to enter Alarm 1 setting mode. The Alarm 1 hour digits will flash.
- Verwenden AUF (▲) Und UNTEN (▼) um die gewünschte Alarmstunde einzustellen.
- Drücken ALARM Um die Stunde erneut zu bestätigen, wechseln Sie zur Minuteneinstellung. Die Minutenziffern blinken.
- Verwenden AUF (▲) Und UNTEN (▼) die gewünschte Alarmzeit in Minuten einstellen.
- Drücken ALARM a third time to confirm minutes and activate/deactivate Alarm 1. An alarm icon will appear on the display when active.
- Um Alarm 2 einzustellen, drücken Sie die ALARM button repeatedly until Alarm 2 hour digits flash, then follow the same steps as for Alarm 1.
Schlummerfunktion
Wenn ein Alarm ertönt, drücken Sie die Taste SCHLAFEN button to temporarily silence the alarm for a few minutes (typically 5-10 minutes). The alarm will sound again after the snooze period. To turn off the alarm completely, press any other button.
Display Brightness and Night Mode
- The display has two brightness levels. In normal time display mode, press the UNTEN (▼) button to cycle between brighter and dimmer settings.
- The clock may feature a 'night mode' which automatically dims the display during a set period. Refer to the specific instructions for activating and customizing this feature, usually by holding the MODUS button or cycling through settings.
Display Cycle (Time, Date, Temperature)
By default, the clock display may cycle through time, date, and temperature. To set the display to show only the time, or to disable the cycling feature, consult the detailed instructions provided with your product. This setting is often accessed by holding the MODUS Taste oder eine Kombination von Tasten.
Wartung
- Reinigung: To clean the clock, gently wipe the surface with a soft, dry cloth. Avoid using abrasive cleaners or solvents, as these can damage the display and casing.
- Energiequelle: Ensure the clock is always connected to a stable USB power source for continuous operation.
- Interne Batterie: The internal memory battery (CR2032) is not intended for user replacement. If settings are frequently lost after power interruptions, contact customer support.
Fehlerbehebung
- Die Uhr schaltet sich nicht ein: Ensure the USB-C cable is securely connected to both the clock and a powered USB port or adapter. Verify the power source is active.
- Alarm is too soft or not sounding: The alarm volume on this model is fixed and generally soft. There is no volume adjustment. Ensure the alarm is activated (alarm icon visible on display). If you are a deep sleeper, this alarm may not be sufficient.
- Display is too bright, even on dim setting: The clock has two brightness levels. If the dimmest setting is still too bright for your preference, consider placing the clock further away or flipping it over at night.
- Die Zeitangabe ist ungenau: If the time drifts significantly, ensure the clock has a stable power supply. The internal memory battery helps maintain time during power outages but does not correct drift during normal operation.
- No white noise feature: This model does not include a white noise machine, despite some product descriptions. This is a basic digital alarm clock.
- Schwierigkeiten beim Einstellen von Zeit/Alarm: The control buttons can be small. Press firmly and follow the instructions carefully. If you get stuck, unplug the clock for a few seconds and plug it back in to reset, then try again.
Technische Daten
| Marke | GROWNS |
| Modellnummer | MBZ185-SEED |
| Farbe | Weiß |
| Technische Daten | 2.54 x 2.54 x 2.54 cm |
| Artikelgewicht | 150 Gramm |
| Besondere Merkmale | Alarm, Large Display |
| Anzeigetyp | Digitales |
| Stromquelle | USB Powered (Internal battery for memory retention only) |
| Zimmertyp | Schlafzimmer |
| Form | Rectangular (as described by users) |
| Batterien im Lieferumfang enthalten | No (Internal memory battery is pre-installed) |
| Installationstyp | Tischplatte |
Garantie und Support
For warranty information or technical support, please refer to the contact details provided with your purchase or visit the official GROWNSY webBewahren Sie Ihren Kaufbeleg für eventuelle Garantieansprüche auf.