
1. Einleitung
This manual provides detailed instructions for the safe and effective use of your AOPUTTRIVER AP-856A CFM Anemometer and AP-QX-1201 HVAC Manometer. Please read this manual thoroughly before operating the devices and retain it for future reference. These instruments are designed for measuring air flow, wind velocity, and gas pressure in various applications, including HVAC systems.
2. Sicherheitshinweise
Always observe the following safety precautions to prevent injury and damage to the instruments:
- Versuchen Sie nicht, die Geräte selbst zu reparieren oder zu verändern. Überlassen Sie alle Wartungsarbeiten qualifiziertem Fachpersonal.
- Ensure proper battery installation and replacement. Do not mix old and new batteries or different battery types.
- Keep the instruments away from water, dust, and extreme temperatures.
- When measuring pressure, ensure the tubes are securely connected to prevent leaks and inaccurate readings.
- Vermeiden Sie es, die Geräte fallen zu lassen oder starken Stößen auszusetzen.
- Always power off the devices when not in use to conserve battery life.
3. Produktüberschreitungview
3.1. AOPUTTRIVER AP-856A CFM Anemometer
The AP-856A is a digital anemometer designed for accurate measurement of wind velocity and air flow (CFM/CMM). It features a separate vane sensor for flexible positioning and PC connectivity for data download and analysis.

Figure 3.1: AP-856A Anemometer Components. This image displays the AOPUTTRIVER AP-856A Anemometer, highlighting its key components with numbered labels. These include the LCD display, Max/Min value switch, Power key, Wind velocity/flow transform key, Data holding key, Unit transform key, Data record key, Measuring key for average value of wind flow, Read out recorded data key, Wind flow AVG 2/3 MAX and figure input, Reset key, Backlight on/off key, Temperature unit switch, Duct area input and sampling time setting key, USB interface, Connecting wire, and Wind velocity sensors.
Hauptmerkmale:
- Wind Velocity Range: 0.001~100 mph (0.001~45 m/s)
- Wind Flow Range: 0-999900 m³/min or 0-999900 ft³/min (CFM/CMM)
- Multiple Wind Speed Units: m/s, km/h, ft/min, knots, mph
- Temperature Measurement: 14℉-113℉ (-10℃~45℃) with ℃/℉ option
- Data Hold, Data Logging, Backlight Display
- PC Connect for data download and analysis
- Max/Min/Average/Current wind speed readings
3.2. AOPUTTRIVER AP-QX-1201 HVAC Manometer
The AP-QX-1201 is a digital manometer designed for measuring gas pressure, differential pressure, and ambient temperature. It offers high accuracy and a wide range of measurement units, making it suitable for HVAC applications.

Figure 3.2: AP-QX-1201 Manometer Components. This image illustrates the AOPUTTRIVER AP-QX-1201 Manometer, showing its main parts. These include the Tube Connector (-) and (+), LCD Screen, 12 Unit Switch, Hold Data button, Pressure Differential Mode (DIF) button, Max/Min Mode button, ℃/℉ Switchable button, and Manual Power ON/Auto Power OFF button.
Hauptmerkmale:
- Measurement Range: ±2.999 psi / ±20.68 KPa
- Accuracy: ±0.3% FSO (25℃)
- 12 Optional Units: mmHg, inHg, ftH₂O, cmH₂O, inH₂O, Pa, KPa, mbar, bar, psi, Kgcm², ozin²
- Measurement Modes: Max, Min, Differential (DIF)
- Ambient Temperature Display: -40℉~176℉ (-40℃~80℃)
- Automatic Shut Down (15 minutes)
- 100 Groups Data Storage
- Fahrenheit & Celsius degree Switchable
- Dual Input Ports for differential pressure measurement

Figure 3.3: Portable Carrying Case. This image shows a person carrying a black portable case, indicating that the instruments come with a protective case for easy transport and storage.
4. Einrichtung
4.1. Einlegen der Batterie
Both the AP-856A Anemometer and AP-QX-1201 Manometer require batteries for operation. Open the battery compartment cover on the back of each device, insert the required batteries (typically 9V or AAA, refer to device markings) observing correct polarity, and close the cover securely.
4.2. AP-856A Anemometer PC Connection Setup
To utilize the PC connect feature for data download and analysis:
- Insert the provided CD into your computer's CD drive.
- Double-click the "Setup.exe" program icon to begin the software installation.
- Follow the on-screen prompts, clicking "Next" to proceed through the installation wizard until completion.
- Once installed, connect the AP-856A Anemometer to your PC using the provided USB cable.
- Open the installed software to analyze and save the data from the anemometer.

Figure 4.1: PC Software Installation and Data Interface. This image shows the steps for installing the AP-856A software from a CD and the interface for viewing and analyzing recorded wind data on a computer. The software allows for graphical representation and tabular display of wind values and temperature.
4.3. AP-QX-1201 Manometer Tube Connection
For differential pressure measurements, connect the pressure tubes to the designated input ports on the top of the manometer. Ensure the tubes are securely fitted to prevent leaks. The ports are typically labeled for positive (+) and negative (-) pressure inputs.
5. Bedienungsanleitung
5.1. AP-856A Anemometer Operation
- Ein-/Ausschalten: Drücken Sie die Kraftschlüssel (labeled '3' in Figure 3.1) to turn the device on or off.
- Wind Velocity/Flow Measurement: Position the wind velocity sensor (vane) in the airflow. The LCD will display the current wind speed or flow.
- Umschalteinheiten: Drücken Sie die Unit Transform Key (labeled '4') to cycle through wind speed units (m/s, km/h, ft/min, knots, mph).
- CFM/CMM Calculation: To measure air flow (CFM/CMM), you may need to input the duct area. Use the Duct Area Input Key (labeled '14') to set the area. The device will automatically calculate and display the CFM/CMM value.
- Datenaufnahme: Drücken Sie die Data Holding Key (labeled '5') to freeze the current reading on the display. Press again to release.
- Max/Min/Durchschnitt: Verwenden Sie die Max/Min Value Switch (labeled '2') to view maximum, minimum, or average recorded values.
- Datenaufzeichnung: Drücken Sie die Data Record Key (labeled '7') to start/stop recording data. Use the Read Out Recorded Data Key (labeled '9') to review gespeicherte Daten.
- Hintergrundbeleuchtung: Drücken Sie die Backlight On/Off Key (labeled '12') to activate or deactivate the display backlight.
- Temperatureinheit: Drücken Sie die Schalter für Temperatureinheit (labeled '13') to toggle between Celsius (℃) and Fahrenheit (℉).

Figure 5.1: Anemometer in Use. This image demonstrates the AP-856A Anemometer being used to measure airflow within an HVAC duct. The separate vane sensor, attached via a telescopic rod, allows for precise positioning in confined spaces, while the main unit displays readings.
5.2. AP-QX-1201 Manometer Operation
- Ein-/Ausschalten: Drücken Sie die Manual Power ON/Auto Power OFF button (labeled 'Power' in Figure 3.2) to turn the device on. It will automatically shut down after 15 minutes of inactivity.
- Druckmessung: Connect the pressure source to the appropriate tube connectors. The LCD will display the pressure reading.
- Umschalteinheiten: Drücken Sie die EINHEITEN button (labeled '12 Unit Switch') to cycle through the 12 available pressure units (mmHg, inHg, ftH₂O, cmH₂O, inH₂O, Pa, KPa, mbar, bar, psi, Kgcm², ozin²).
- Datenaufnahme: Drücken Sie die HALTEN button (labeled 'Hold Data') to freeze the current reading. Press again to release.
- Max/Min-Modus: Drücken Sie die MAX button (labeled 'Max / Min Mode') to display the maximum or minimum pressure recorded since the mode was activated.
- Differential (DIF) Mode: Drücken Sie die DIF button (labeled 'Pressure Differential Mode') to measure the difference between two pressure inputs.
- Temperatureinheit: Drücken Sie die ℃ / ℉ button (labeled '℃ & ℉ Switchable') to toggle between Celsius (℃) and Fahrenheit (℉) for ambient temperature display.

Figure 5.2: Manometer Unit Conversions. This image shows the AP-QX-1201 Manometer's display cycling through its 12 available measurement units, including mmHg, inHg, ftH₂O, cmH₂O, inH₂O, Pa, KPa, mbar, bar, psi, Kgcm², and ozin². This highlights the device's versatility in different pressure measurement contexts.
6. Wartung
- Reinigung: Wipe the device surfaces with a soft, dry cloth. Do not use abrasive cleaners or solvents.
- Batteriewechsel: Tauschen Sie die Batterien aus, sobald die Anzeige für niedrigen Batteriestand erscheint. Entfernen Sie die Batterien, wenn das Gerät längere Zeit nicht benutzt wird.
- Lagerung: Store the instruments in their protective case in a cool, dry place, away from direct sunlight and extreme temperatures.
- Sensor Care (AP-856A): Keep the wind velocity sensor (vane) clean and free from obstructions to ensure accurate readings. Avoid bending or damaging the fan blades.
- Tube Care (AP-QX-1201): Inspect pressure tubes regularly for cracks or damage. Replace if necessary to maintain measurement accuracy.
7. Fehlerbehebung
| Problem | Mögliche Ursache | Lösung |
|---|---|---|
| Gerät lässt sich nicht einschalten. | Defekte oder falsch eingesetzte Batterien. | Prüfen Sie die Batteriepolarität und ersetzen Sie die Batterien gegebenenfalls durch neue. |
| Inaccurate readings (Anemometer). | Obstructed vane sensor; incorrect duct area input. | Clear any obstructions from the vane. Verify the duct area setting. |
| Inaccurate readings (Manometer). | Leaking pressure tubes; incorrect unit selection. | Ensure tubes are securely connected. Select the correct measurement unit. |
| PC software not detecting Anemometer. | Incorrect USB connection; driver issue; software not installed correctly. | Ensure USB cable is firmly connected. Reinstall software and drivers if necessary. |
| Das Display ist dunkel oder flackert. | Schwache Batterie. | Batterien ersetzen. |
8. Spezifikationen
8.1. AOPUTTRIVER AP-856A CFM Anemometer
- Windgeschwindigkeitsbereich: 0.001~100 mph (0.001~45 m/s)
- Wind Velocity Accuracy: ±3% + 0.2 rdg (mph), ±3% + 0.1 rdg (m/s)
- Wind Velocity Resolution: 0.001 Meilen pro Stunde
- Wind Flow Range: 0-999900 m³/min or 0-999900 ft³/min
- Wind Flow Resolution: 001-100
- Wind Flow Area: 0.001-9999 m²
- Einheiten der Windgeschwindigkeit: m/s, km/h, ft/min, knots, mph
- Temperaturbereich: 14℉-113℉ (-10℃~45℃)
- Temperatureinheiten: ℃/℉ umschaltbar
- Merkmale: Data Hold, Data Logging, Backlight Display, Wind Chill Indicator, Low Battery Indicator, Max/Min/Average/Current readings, PC Connect.
- Material: Polycarbonat (PC)
8.2. AOPUTTRIVER AP-QX-1201 HVAC Manometer
- Messbereich: ±2.999 psi / ±20.68 KPa
- Genauigkeit: ±0.3 % FSO (25 °C)
- Wiederholbarkeit: ±0.2% (MAX ± 0.5% FSO)
- Linearity / Hysteresis: ±0.29 % FSO (25 °C)
- Messrate: 0.5er Jahre
- Maximaler Druck: 20 KPa
- Automatische Abschaltung: 15 Мinuten
- Maßeinheiten: 12 units (mmHg, inHg, ftH₂O, cmH₂O, inH₂O, Pa, KPa, mbar, bar, psi, Kgcm², ozin²)
- Datenspeicherung: 100 Gruppen
- Anzeige der Umgebungstemperatur: -40℉~176℉ (-40℃~80℃)
- Merkmale: Low Power Indicator, Automatic Power OFF, 0.5 Second Quick Response, Fahrenheit & Celsius degree Switchable, Max/Min/Differential (DIF) modes, Dual Input Ports.
- Material: Polycarbonat (PC)
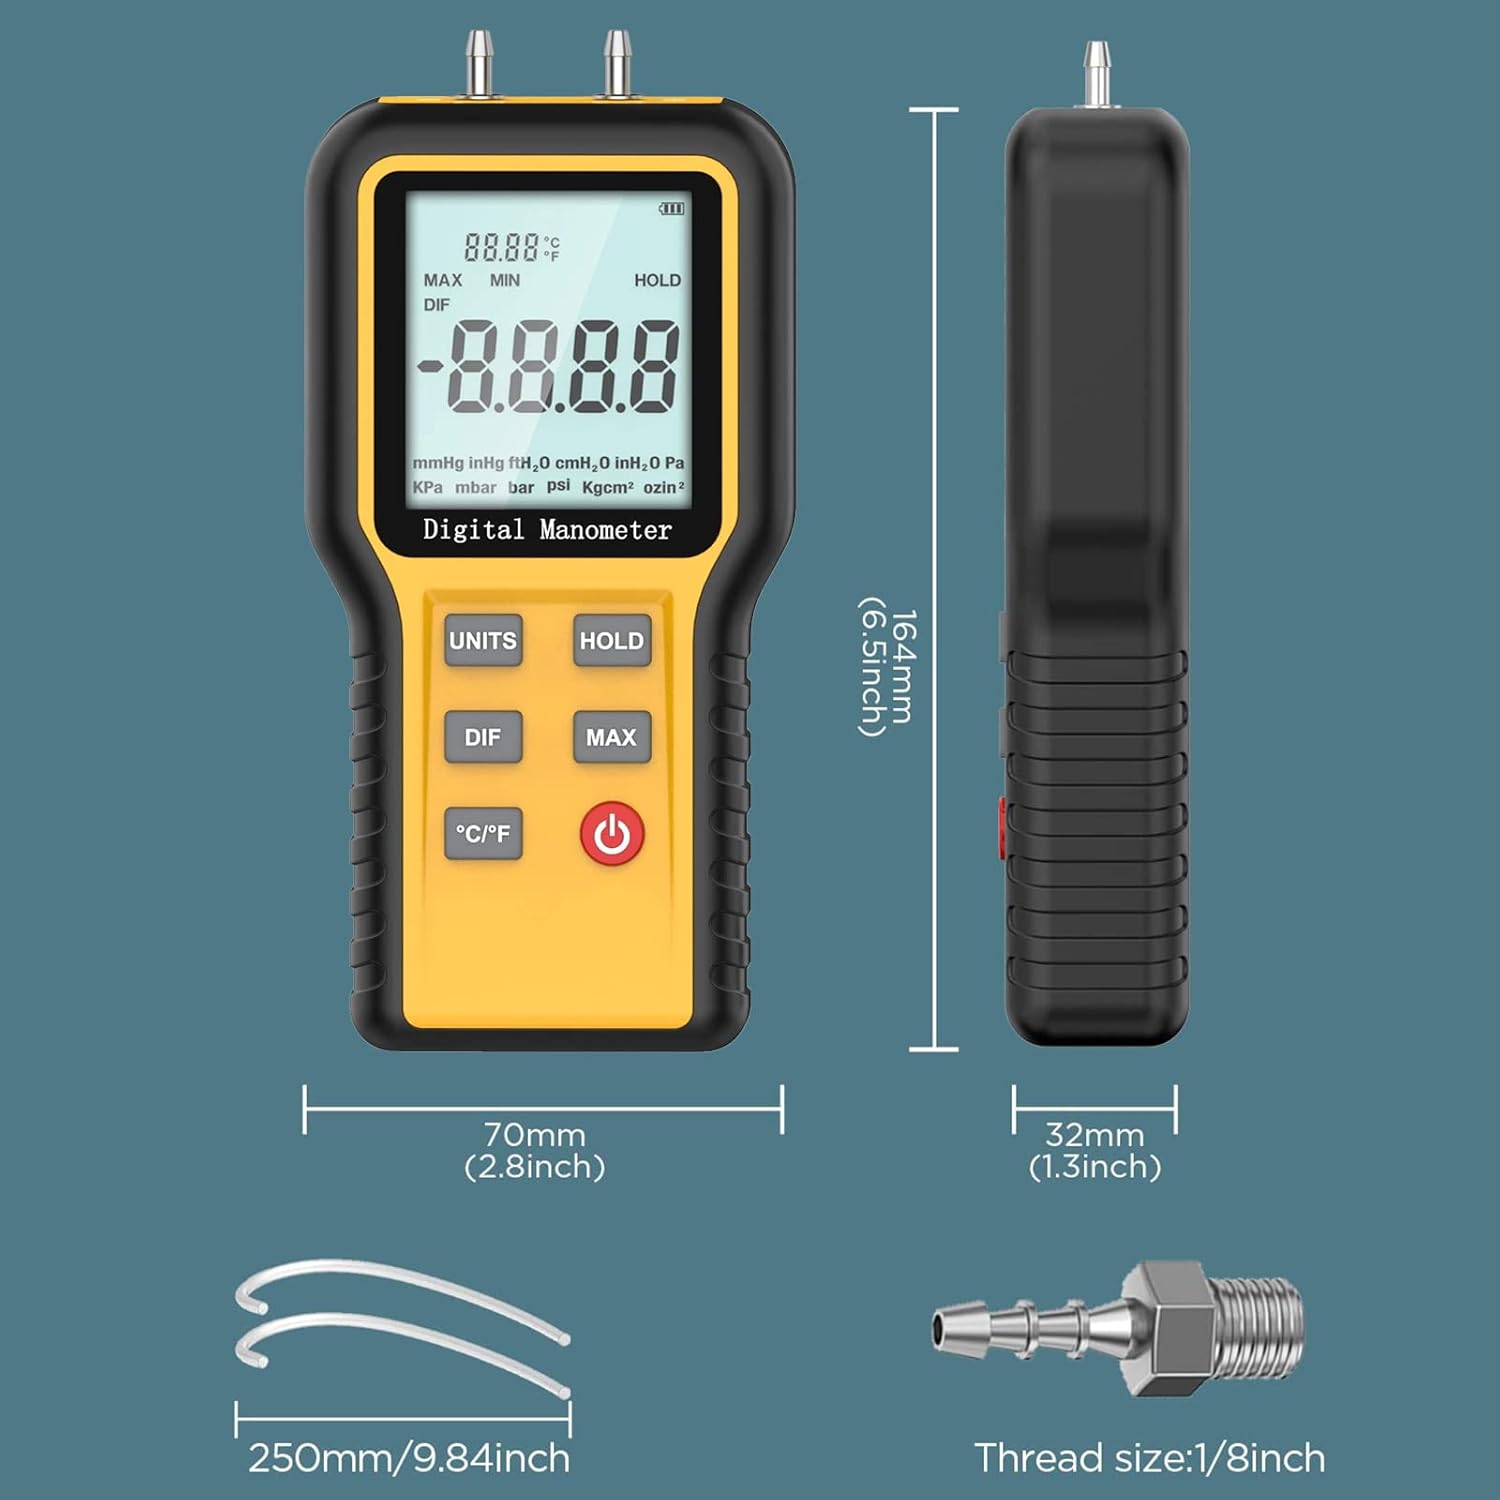
Figure 8.1: Manometer Dimensions and Accessories. This image provides the physical dimensions of the AP-QX-1201 Manometer (164mm height, 70mm width, 32mm thickness) and illustrates included accessories such as 250mm pressure tubes and a 1/8 inch thread connector, essential for setup and operation.
9. Garantie und Support
AOPUTTRIVER provides a 365-Tage-Qualitätsgarantie for the AP-856A CFM Anemometer and AP-QX-1201 HVAC Manometer combo package. Additionally, lebenslanger technischer Support is available for these products.
For technical assistance, warranty claims, or any questions regarding your product, please contact AOPUTTRIVER customer support through the official channels provided at the point of purchase or on the manufacturer's webWebsite.