
1. Einleitung
Thank you for choosing the Deko TV PRO2 DVB-T2 HEVC Digital Terrestrial Receiver. This device allows you to receive digital terrestrial television broadcasts (DVB-T2) with HEVC (H.265) encoding, providing high-quality video and audio. This manual will guide you through the setup, operation, and maintenance of your new receiver to ensure optimal performance and enjoyment.
2. Inhalt der Box
Bitte überprüfen Sie den Packungsinhalt sorgfältig. Sollten Artikel fehlen oder beschädigt sein, wenden Sie sich bitte an Ihren Händler.
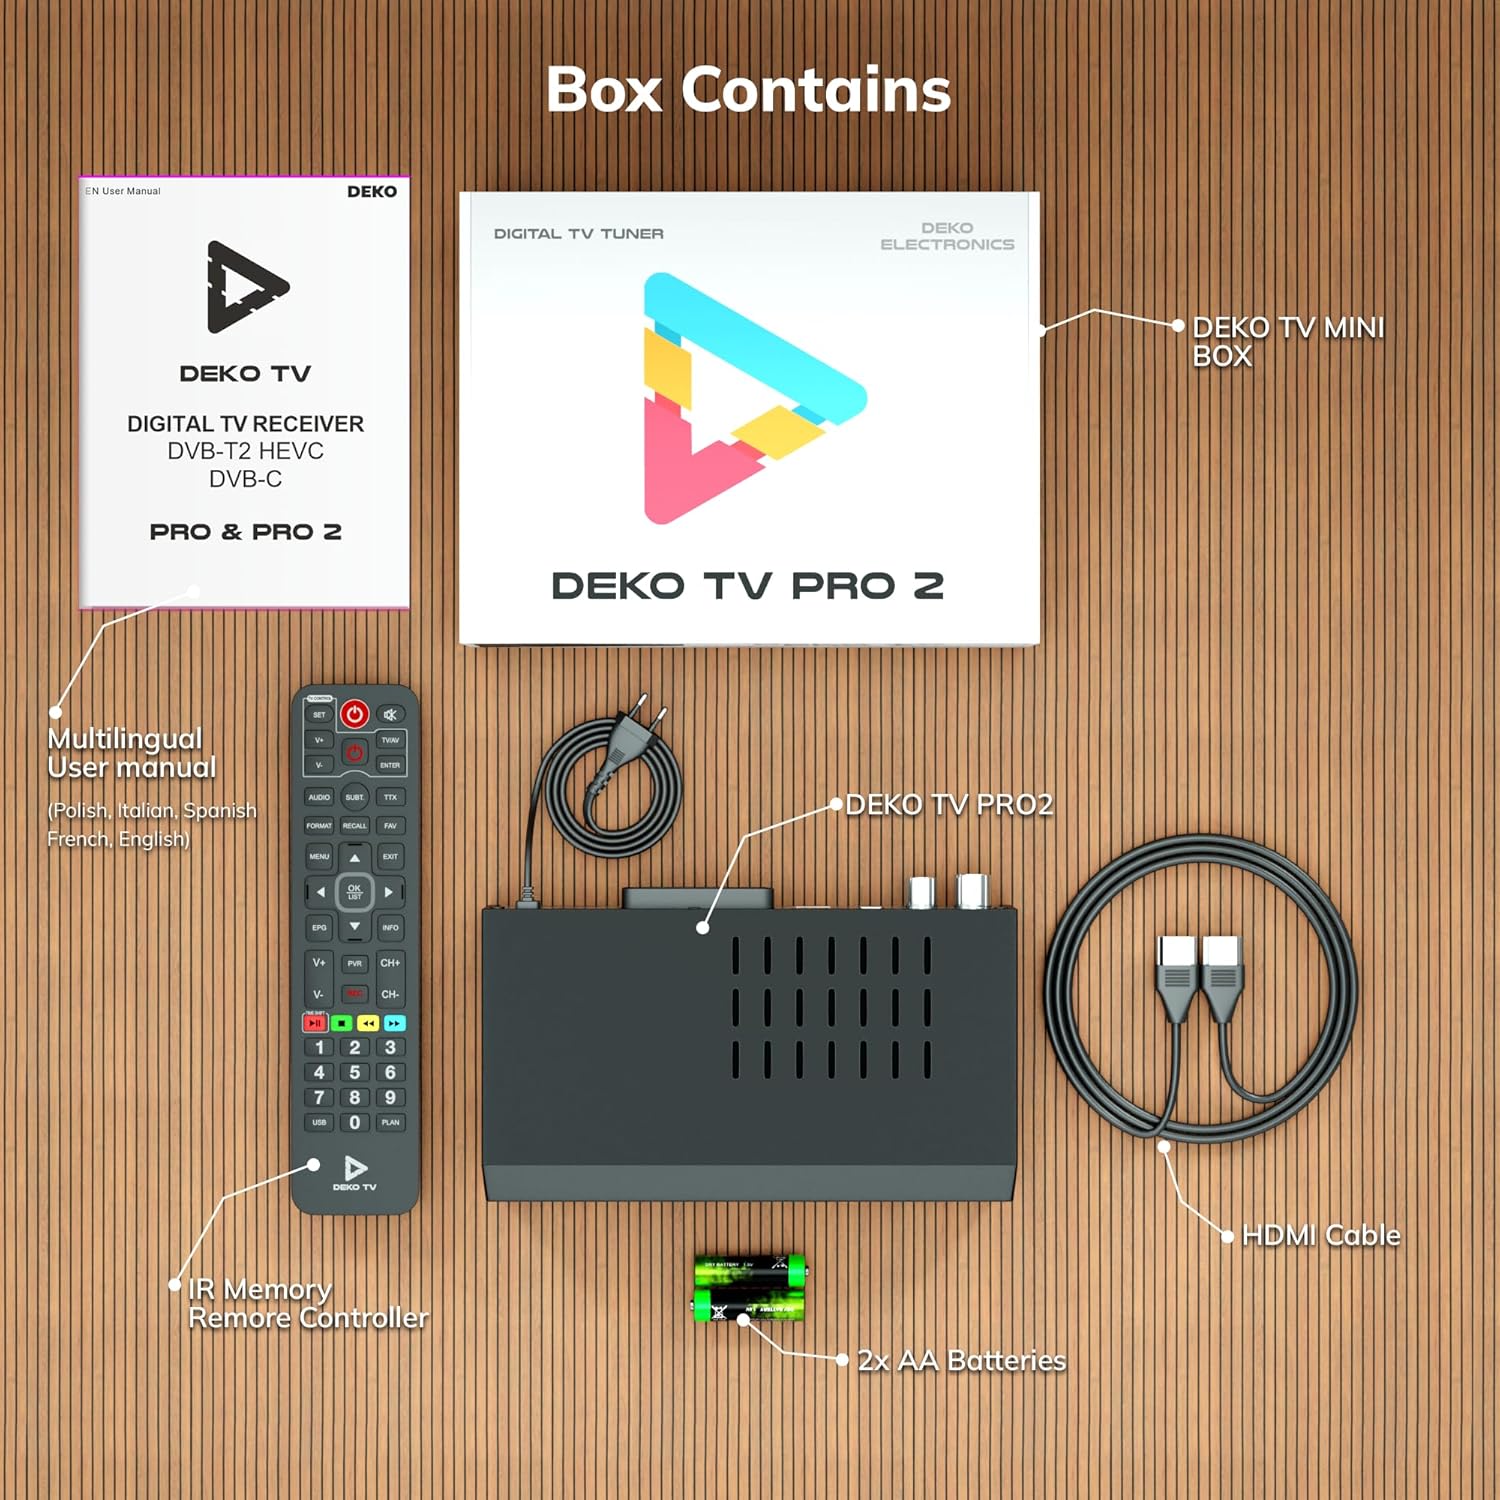
Abbildung 2.1: Deko TV PRO2 Box Contents. The image displays the Deko TV PRO2 receiver, a multilingual user manual, an IR remote control, two AA batteries, a power cable, and an HDMI cable.
- Deko TV PRO2 Digital Terrestrial Receiver
- IR-Fernbedienung
- 2x AAA-Batterien
- Stromkabel
- HDMI-Kabel
- Mehrsprachiges Benutzerhandbuch
3. Produktmerkmale
The Deko TV PRO2 offers a range of features designed to enhance your viewErfahrung:

Abbildung 3.1: Deko TV PRO2 Key Features. This image illustrates the main functionalities including DVB-T2 Terrestrial reception, Timeshift, HEVC H.265 Codec support, Personal Video Recorder (PVR), universal compatibility, and Crystal Clear Full HD output.
- DVB-T2 Terrestrial: Supports the latest digital terrestrial broadcasting standard.
- HEVC H.265 Codec: Ensures efficient video compression for high-quality picture.
- Universelle Kompatibilität: Works with both modern and older television models.
- Zeitverschiebung: Pause live TV and resume watching later.
- Personal Video Recorder (PVR): Record your favorite programs to a connected USB storage device.
- Crystal Clear Full HD: Delivers high-definition video output.
- Dual USB Ports: For media playback and PVR functionality.
4. Installationsanleitung
4.1. Physische Verbindungen
Before powering on the device, ensure all necessary connections are made.

Abbildung 4.1: Rear Panel Connections. This image details the rear panel of the Deko TV PRO2, indicating the RF IN, RF LOOP THROUGH, two USB ports, HDMI output, and SCART connector.
- Antennenanschluss: Schließen Sie Ihr terrestrisches Antennenkabel an die HF-EINGANG port on the back of the receiver. If you have another device (e.g., a TV with an integrated tuner) that also needs an antenna signal, you can connect it to the RF LOOP THROUGH Hafen.
- TV-Anschluss (HDMI): For high-definition video and audio, connect an HDMI cable from the HDMI port on the receiver to an HDMI input on your television.
- TV-Anschluss (SCART): For older televisions, connect a SCART cable from the SCART Verbinden Sie den Receiver mit dem SCART-Eingang Ihres Fernsehers. (Note: Do not use both HDMI and SCART simultaneously for video output.)
- USB-Geräte: Insert USB storage devices (for PVR or media playback) into the USB ports. The device has two USB ports.
- Stromanschluss: Connect the power cable to the receiver and then plug it into a wall outlet.
4.2. Installation der Fernbedienungsbatterie
Open the battery compartment on the back of the remote control and insert two AAA batteries, ensuring correct polarity (+/-). Close the compartment.
4.3. Erstes Einschalten und Kanalsuche
- Stellen Sie sicher, dass alle Verbindungen sicher sind.
- Turn on your television and select the correct HDMI or SCART input source corresponding to where the Deko TV PRO2 is connected.
- Power on the Deko TV PRO2 using the power button on the front panel or the remote control.
- The first time you power on the receiver, an initial setup wizard will appear. Follow the on-screen instructions to select your language, country, and initiate an automatic channel scan. This process will find and store all available digital terrestrial channels.
- Sobald der Scan abgeschlossen ist, sollten Sie in der Lage sein, view die Kanäle.
5. Bedienungsanleitung
5.1. Grundlegende TV-Funktionen
- Kanalauswahl: Verwenden Sie die CH+/CH- buttons or the numeric keypad on the remote control to change channels.
- Lautstärkeregelung: Verwenden Sie die VOL+/VOL- Tasten auf der Fernbedienung.
- Menüzugriff: Drücken Sie die SPEISEKARTE Taste zum Aufrufen des Hauptmenüs für Einstellungen und Funktionen.
- Elektronischer Programmführer (EPG): Drücken Sie die EPG Taste, um view program information and schedules.
- Informationsanzeige: Drücken Sie die INFO Taste zur Anzeige des aktuellen Kanals und der Programmdetails.
5.2. USB-Medienwiedergabe
The Deko TV PRO2 supports media playback from USB storage devices.
- Stecken Sie einen USB-Stick oder eine externe Festplatte in einen der USB-Anschlüsse.
- Navigate to the "Media" or "USB" section in the main menu.
- Wählen Sie den Medientyp aus, den Sie abspielen möchten (z. B. Video, Musik, Foto).
- Durchsuchen Sie Ihre fileund wählen Sie die gewünschten Inhalte zum Abspielen aus.
5.3. PVR (Personal Video Recorder) and Timeshift
To use PVR and Timeshift functions, a USB storage device must be connected and formatted by the receiver.
- Aufnahme: Drücken Sie während des Ansehens einer Sendung die Taste AUFNAHME Drücken Sie die Taste auf der Fernbedienung, um die Aufnahme zu starten. STOPPEN to end the recording. Recorded programs can be accessed via the "PVR" or "Recordings" menu.
- Zeitverschiebung: Drücken Sie die PAUSE button during live TV to activate Timeshift. The program will pause, and recording will begin in the background. You can then use SPIELEN, SCHNELLER VORLAUF, Und ZURÜCKSPULEN buttons to control playback. Press STOPPEN to exit Timeshift and return to live TV.
5.4. Internet and Multimedia Features (Optional Wi-Fi Adapter)
The Deko TV PRO2 supports internet connectivity via a compatible USB Wi-Fi adapter (sold separately). Once connected, you can access certain online multimedia features.

Abbildung 5.1: Internet Connectivity. This image shows the Deko TV PRO2 with an optional USB Wi-Fi adapter, indicating support for Wi-Fi, YouTube, and IPTV functionalities.
- Insert a compatible USB Wi-Fi adapter into one of the USB ports.
- Go to the "Network Settings" in the main menu to configure your Wi-Fi connection.
- Once connected, you may find options for applications like YouTube or IPTV within the receiver's menu, depending on the firmware version.
6. Wartung
- Reinigung: Reinigen Sie den Empfänger mit einem weichen, trockenen Tuch. Verwenden Sie keine flüssigen oder Aerosolreiniger.
- Belüftung: Stellen Sie sicher, dass der Empfänger ausreichend belüftet ist. Blockieren Sie die Lüftungsschlitze nicht.
- Software-Updates: Überprüfen Sie regelmäßig die Herstellerangaben. website for available software updates. Updates can improve performance and add new features. Follow the instructions provided with the update carefully.
7. Fehlerbehebung
| Problem | Mögliche Ursache | Lösung |
|---|---|---|
| Kein Bild oder Ton | Incorrect TV input selected; loose cables; receiver not powered on. | Select the correct HDMI/SCART input on your TV. Check all cable connections. Ensure the receiver is powered on. |
| Meldung „Kein Signal“ | Antenna not connected; poor antenna signal; no channels scanned. | Check antenna connection. Adjust antenna position. Perform a channel scan (refer to Section 4.3). |
| Fernbedienung funktioniert nicht | Batteries are dead or incorrectly inserted; obstruction between remote and receiver. | Replace batteries with new AAA batteries, ensuring correct polarity. Remove any obstructions. Point the remote directly at the receiver. |
| Aufnahme auf USB nicht möglich | USB device not connected or formatted; insufficient storage space. | Ensure USB device is properly connected. Format the USB device via the receiver's menu (this will erase all data). Check available storage space. |
8. Spezifikationen
| Besonderheit | Detail |
|---|---|
| Marke | Deko |
| Modellnummer | PRO2 |
| Konnektivitätstechnologie | USB |
| Anschlüsse | USB, Wi-Fi (via adapter), HDMI, SCART, RF IN, RF LOOP THROUGH |
| Kompatible Geräte | Fernsehen |
| Besondere Merkmale | Connected and multimedia functions, universal remote control |
| Anzahl USB-Anschlüsse | 2 |
| Gesamtzahl der HDMI-Anschlüsse | 1 |
| Audiokodierung | DD |
| Audioausgabemodus | Stereo, Surround |
| Surround Sound-Kanalkonfiguration | 2.1 |
| Fernbedienungstyp | Fernbedienung |
| Batterien erforderlich | 2 AAA batteries (Zinc-carbon) |
9. Garantie und Support
The Deko TV PRO2 receiver comes with a standard manufacturer's warranty. Please refer to the warranty card included in your package or contact your retailer for specific warranty terms and conditions.
For technical support, troubleshooting assistance beyond this manual, or inquiries about spare parts and software updates, please visit the official Deko Electronics webSie können die Website besuchen oder sich an den Kundendienst wenden. Die Kontaktdaten finden Sie in der Regel auf der Produktverpackung oder beim Hersteller. webWebsite.