1. Einleitung
The Askar FMA180 Pro OTA (Optical Tube Assembly) is a high-performance sextuplet air-spaced APO refractor telescope designed for both deep-sky astrophotography and visual astronomy. Featuring a 40mm aperture and a 180mm focal length at f/4.5, this instrument incorporates two ED (Extra-low Dispersion) glass elements to ensure excellent chromatic aberration correction and deliver sharp, clear images. Its compact and robust design makes it a versatile tool for astronomical enthusiasts.

Figure 1: The Askar FMA180 Pro OTA, a compact and high-performance telescope.
2. Hauptmerkmale
- Optisches Design: Sextuplet air-spaced APO design with three lenses in front and three in the rear, including two ED glass elements for superior chromatic aberration correction.
- Aperture & Focal Length: 40mm aperture, f/4.5 focal ratio, and 180mm focal length.
- Astrophotography Optimization: Features an integrated finder base and a 360° rotator for precise framing and guiding. The internal focusing mechanism enhances stability during long exposures.
- Vielseitige Konnektivität: Equipped with an M48 adapter at the rear end, providing a standard 55mm back focus for various camera setups.
- Multifunktionale Basis: The base can be used for astrophotography or detached to mount the OTA onto other telescopes' finder bases as a finder scope.
- Tragbar und robust: Compact length of 167.5mm and a 40mm aperture size. The entire lens barrel is crafted using high-quality CNC processing technology, with a matte black interior to minimize stray light reflection.
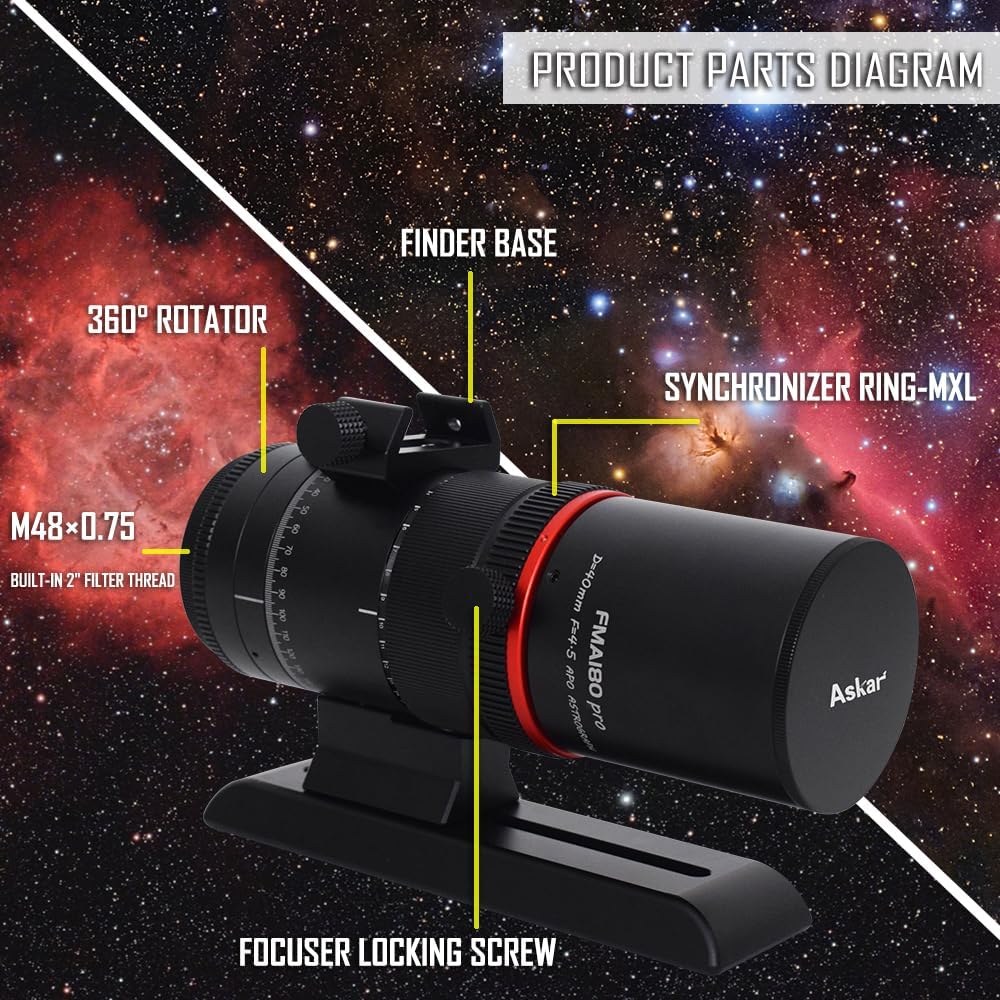
Figure 2: Detailed diagram illustrating the key components of the FMA180 Pro.

Figure 3: Visual representation of the FMA180 Pro's advantagEs und Funktionen.
3. Einrichtung
- Auspacken: Nehmen Sie alle Komponenten vorsichtig aus der Verpackung. Prüfen Sie sie auf Beschädigungen.
- Mounting the Dovetail Plate: The FMA180 Pro comes with an upgraded Vixen dovetail plate. Attach this plate securely to your equatorial or alt-azimuth mount. Ensure all screws are tightened to prevent slippage.
- Attaching Camera: Connect your astrophotography camera or DSLR to the M48 adapter at the rear of the OTA. The 55mm back focus is standard for many imaging setups.
- Autoguider Setup: If using an autoguider, mount it onto the integrated finder base. Connect the autoguider camera to your control unit (e.g., ASI Air Mini) via a USB port.
- Auswuchten: Properly balance the telescope assembly on your mount to ensure smooth tracking and prevent strain on the mount motors.
Video 1: A detailed guide on setting up the Askar FMA180 Pro for astrophotography, including mounting and connecting accessories.
4. Bedienungsanleitung
4.1 Polarausrichtung
Accurate polar alignment is crucial for long-exposure astrophotography. Use your mount's polar scope or a dedicated electronic polar alignment routine (e.g., via ASI Air) to align your mount with the celestial pole.
4.2 Fokussierung
The FMA180 Pro features an internal focusing system. Achieve precise focus by adjusting the focus ring. For astrophotography, it is recommended to use a Bahtinov mask on a bright star to achieve critical focus.
4.3 Target Acquisition (Go-To)
Utilize your mount's Go-To capabilities or a plate-solving application (e.g., via ASI Air) to accurately slew to your desired celestial target. The 360° rotator allows for optimal framing of your object.
4.4 Guiding
Engage your autoguider system to correct for minor tracking errors of your mount during long exposures. Monitor the guiding graph to ensure stable tracking.
Video 2: Ein Wiedersehenview demonstrating the use of the Askar FMA180 Pro in an astrophotography setup, including polar alignment, focusing, and image capture.
4.5 Bilderfassung
Once guiding is stable and focus is achieved, begin capturing your light frames. The FMA180 Pro is capable of capturing wide-field images of nebulae and star clusters. Experiment with exposure times and gain settings to achieve optimal results for your target and sky conditions.

Abbildung 4: Bspample astrophotography image of the Rosette Nebula taken with the FMA180 Pro.

Abbildung 5: Bspample astrophotography image of the Orion Nebula taken with the FMA180 Pro.
5. Wartung
- Reinigung der Optik: Use a soft, lint-free cloth and specialized optical cleaning solution to gently clean the lens surfaces. Avoid touching the optical elements directly with your fingers.
- Staubschutz: Always keep the dust caps on the front and rear of the OTA when not in use to prevent dust accumulation.
- Lagerung: Store the telescope in a dry, dust-free environment, preferably in its original case or a padded bag. Avoid extreme temperature fluctuations.
- Mechanische Inspektion: Periodically check all screws and connections for tightness. Do not overtighten.
6. Fehlerbehebung
- Verschwommene Bilder: Ensure precise focus using a Bahtinov mask. Check for atmospheric seeing conditions. Verify camera back focus is correctly set to 55mm.
- Star Trailing: Re-check polar alignment. Ensure mount is properly balanced. Verify autoguider is functioning correctly and calibrated.
- Kein Bild/Dunkles Bild: Confirm camera is connected and powered. Check exposure settings (too short exposure or too low gain). Ensure lens caps are removed.
- Uneven Illumination/Vignetting: This can sometimes occur with certain camera sensors. Ensure all adapters are correctly seated.
7. Spezifikationen
| Besonderheit | Spezifikation |
|---|---|
| Technische Daten | 9.06 x 6.69 x 4.72 Zoll (23.01 x 17.00 x 11.99 cm) |
| Artikelgewicht | 2.86 Pfund (1.3 Kilogramm) |
| Modellname | FMA180 pro |
| Objektivlinsendurchmesser | 55 Millimeters (Effective aperture 40mm) |
| Brennweite | 180 mm |
| Brennweite | f/4.5 |
| Optisches Design | Sextuplet Air-Spaced APO (2 ED Glasses) |
| Fokustyp | Manueller Fokus (intern) |
| Sucherfernrohr | Reflex (Integrated Finder Base) |
| Beschreibung der Linsenbeschichtung | Mehrfach beschichtet |
| Kompatible Geräte | Camera, Laptop |

Figure 6: Dimensional drawing of the FMA180 Pro.
8. Garantie und Support
For warranty information and technical support, please refer to the official Askar webBesuchen Sie unsere Website oder wenden Sie sich an Ihren autorisierten Händler. Bewahren Sie Ihren Kaufbeleg für eventuelle Garantieansprüche auf.