
DinoFire X17
DinoFire Rechargeable Presentation Clicker X17 User Manual
Modell: X17
Einführung
Thank you for choosing the DinoFire Rechargeable Presentation Clicker, Model X17. This device is designed to enhance your presentations with its wireless control, integrated laser pointer, and user-friendly features. This manual provides detailed instructions for setup, operation, maintenance, and troubleshooting to ensure optimal performance.
Packungsinhalt
Bitte überprüfen Sie, ob alle Artikel in Ihrem Paket vorhanden sind:
- DinoFire Rechargeable Presentation Clicker (X17)
- USB Receiver (stored inside the clicker)
- Micro-USB-Ladekabel
- Benutzerhandbuch (dieses Dokument)
Produkt überview
The DinoFire X17 Presentation Clicker features an ergonomic design with intuitive controls for seamless presentation delivery. Familiarize yourself with the device's components and button functions.
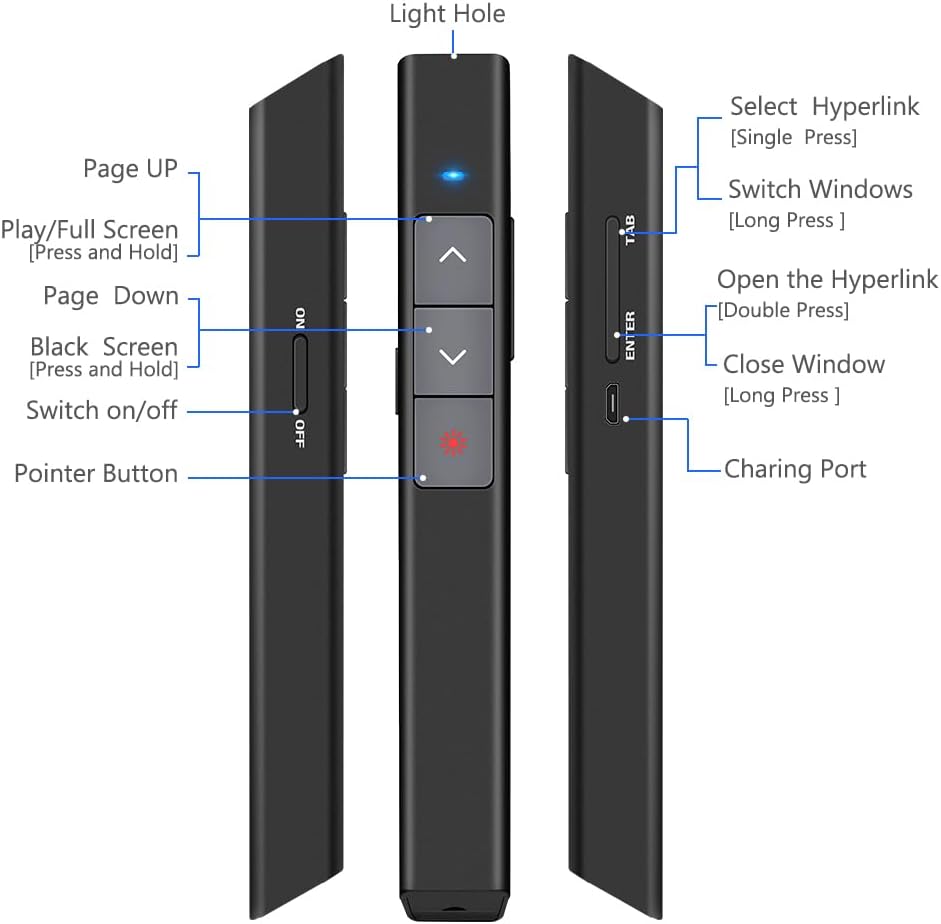
Abbildung 1: Detaillierte view of the DinoFire X17 Presentation Clicker showing button functions and port locations.
Tastenfunktionen:
- Seite hoch (▲): Advances to the previous slide.
- Seite nach unten (▼): Weiter zur nächsten Folie.
- Pointer Button: Aktiviert den roten Laserpointer.
- Play/Full Screen (Press and Hold): Aktiviert oder deaktiviert den Vollbild-Präsentationsmodus.
- Black Screen (Press and Hold): Toggles a black screen during presentation.
- Ein-/Ausschalten: Netzschalter für das Gerät.
- Select Hyperlink (Single Press): Selects a hyperlink on the slide.
- Open the Hyperlink (Double Press): Opens the selected hyperlink.
- Switch Windows (Long Press): Cycles through open application windows.
- Close Window (Long Press): Closes the active window.
- Ladeanschluss: Micro USB port for recharging the device.
- Light Hole: Location of the laser emitter.
Installationshandbuch
1. Den Präsentator in Rechnung stellen
Before initial use, fully charge the presentation clicker. A full charge typically takes approximately one hour and provides power for over one week of use.
- Connect the provided Micro USB charging cable to the charging port on the side of the presenter.
- Verbinden Sie das andere Ende des Kabels mit einer USB-Stromquelle (z. B. einem USB-Anschluss am Computer oder einem USB-Netzteil).
- The charging indicator light will illuminate (refer to "Low Power Indicator" section for details).
- Sobald der Akku vollständig aufgeladen ist, trennen Sie das Kabel.

Abbildung 2: The presentation clicker being charged via its Micro USB port, connected to a laptop.
2. Anschließen des USB-Empfängers
The USB receiver is stored magnetically within the presentation clicker for convenience and to prevent loss.
- Gently pull out the USB receiver from the bottom end of the presentation clicker.
- Stecken Sie den USB-Empfänger in einen freien USB-Anschluss Ihres Computers (Laptop oder Desktop-PC).
- Das System erkennt und installiert die benötigten Treiber automatisch. Eine manuelle Treiberinstallation ist nicht erforderlich.

Abbildung 3: The magnetic storage for the USB receiver, demonstrating its removal and insertion into a computer's USB port.
3. Ein-/Ausschalten
- Locate the "Switch on/off" button on the side of the clicker.
- Slide the switch to the "ON" position to power on the device.
- Um die Batterielebensdauer zu verlängern, schieben Sie den Schalter in die Position „AUS“, wenn das Gerät nicht verwendet wird.
4. System- und Softwarekompatibilität
The DinoFire X17 is widely compatible with various operating systems and presentation software.
- Unterstützte Systeme: Windows 2003, XP, Windows Vista, Windows 7, 8, 10, Linux, Android, Mac OS.
- Unterstützte Software: Keynote, Prezi, MS Word, Excel, PowerPoint, ACD See, website browsers, iWork, Google Slides, etc.
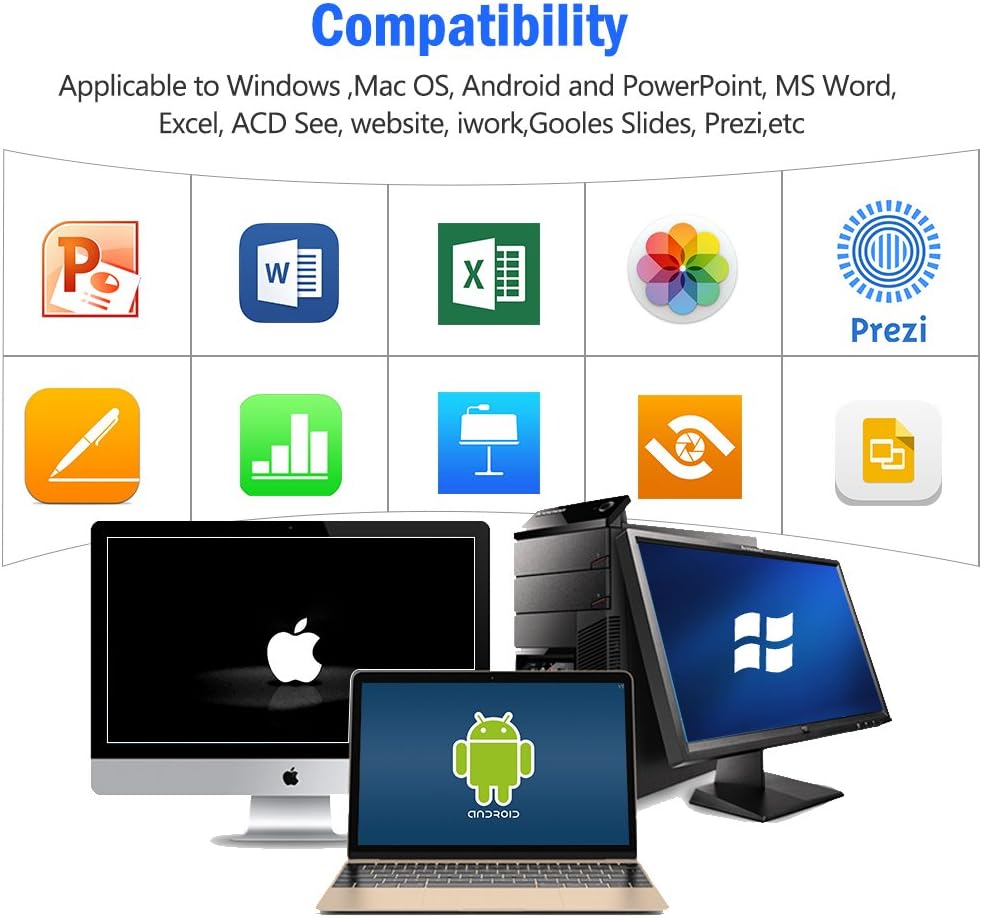
Abbildung 4: Visual representation of the broad compatibility of the presentation clicker with different operating systems and presentation applications.
Bedienungsanleitung
Basic Presentation Control
- Nächste Folie: Press the "Page Down" (▼) button.
- Vorherige Folie: Press the "Page Up" (▲) button.
- Start/Exit Full Screen: Press and hold the "Page Up" (▲) button.
- Schwarzer Bildschirm: Press and hold the "Page Down" (▼) button to toggle a black screen.
Verwenden des Laserpointers
The integrated red laser pointer allows you to highlight specific content on your screen or projection.
- Press and hold the "Pointer Button" (red dot icon) to activate the laser.
- Zum Ausschalten des Lasers den Knopf loslassen.
- The laser has a range of up to 300 feet (91 meters).
- Vorsicht: Do not point the laser directly at people's eyes or at highly reflective surfaces.

Abbildung 5: The red laser pointer in operation, highlighting its visibility and including a safety warning.
Erweiterte Funktionen
- Select Hyperlink: Single press the "ENTER" button.
- Open Hyperlink: Double press the "ENTER" button.
- Fenster wechseln: Long press the "TAB" button to cycle through open applications.
- Close Window: Long press the "ENTER" button to close the active window.
Reichweite der drahtlosen Steuerung
The DinoFire X17 offers a wireless control range of up to 100 feet (30 meters), allowing you freedom of movement during your presentation.

Abbildung 6: Illustration of the presentation clicker's effective long control range in a presentation setting.
Wartung
Laderichtlinien
- Charge the device when the low power indicator flashes continuously.
- Avoid overcharging by disconnecting the cable once fully charged.
- Use the provided Micro USB cable or a certified equivalent for charging.
USB-Empfängerspeicher
Always store the USB receiver inside the magnetic compartment of the clicker when not in use to prevent loss and damage.
Reinigung
Wischen Sie das Gerät mit einem weichen, trockenen Tuch ab. Verwenden Sie keine flüssigen Reinigungsmittel oder Scheuermittel.
Fehlerbehebung
| Problem | Mögliche Ursache | Lösung |
|---|---|---|
| Gerät reagiert nicht. | Low battery; USB receiver not connected; Device is off. | Charge the device; Ensure USB receiver is securely plugged in; Turn on the device. |
| Laserpointer funktioniert nicht. | Low battery; Laser button not pressed correctly. | Charge the device; Press and hold the laser button firmly. |
| Kurzer Regelbereich. | Obstructions; Interference; Low battery. | Ensure clear line of sight to the receiver; Move away from sources of interference; Charge the device. |
| Hyperlink function not working. | Software specific issue; Hyperlink not properly selected. | Ensure the hyperlink is active and selected (single press ENTER) before attempting to open (double press ENTER). Check software settings. |
Low-Power-Anzeige
The device features a low power indicator to alert you when charging is needed. When the indicator flashes continuously, please charge the device. The device will enter auto-sleep mode after approximately 5 minutes of inactivity to save energy.

Abbildung 7: Explanation of the indicator light states for working, charging, and fully charged conditions.
Technische Daten
- Modell: X17
- Marke: DinoFeuer
- Drahtlose Technologie: 2.4GHz RF
- Kontrollbereich: Bis zu 100 Fuß (30 Meter)
- Lasertyp: Roter Laser
- Laserreichweite: Bis zu 300 Fuß (91 Meter)
- Akku-Typ: 1 Lithium-Polymer-Akku (im Lieferumfang enthalten)
- Ladezeit: Ungefähr 1 Stunde
- Nutzungsdauer: Over one week (on a single charge)
- Abmessungen: 6.42 x 1.61 x 1.14 Zoll (16.3 x 4.1 x 2.9 cm)
- Artikelgewicht: 1.6 Unzen (45 Gramm)
- Kompatible Systeme: Windows 2003/XP/Vista/7/8/10, Linux, Android, Mac OS
- Kompatible Software: Keynote, Prezi, MS Word, Excel, PowerPoint, ACD See, web browsers, iWork, Google Slides
Garantie und Support
Garantieinformationen
The DinoFire Rechargeable Presentation Clicker X17 typically comes with a 3-year warranty. Please refer to your purchase documentation or the manufacturer's official webDie genauen Garantiebedingungen finden Sie auf der Website.
Kundenservice
For technical assistance, troubleshooting beyond this manual, or warranty claims, please contact DinoFire customer support through their official website or the retailer where the product was purchased. Keep your purchase receipt or order number handy for faster service.
Ask a question about this manual
Ask about setup, troubleshooting, compatibility, parts, safety, or missing instructions. Manuals+ will review the question and use this page’s manual context to help answer it.