1. Einleitung
This manual provides detailed instructions for the installation, operation, and maintenance of your Real HD A-Series 16 Channel PoE IP Camera System. This system includes the ARN-1610S 4K H.265 NVR and 12 ANV-L7012R 4MP IP Dome Weatherproof Cameras. Please read this manual thoroughly before using the product to ensure proper setup and functionality.
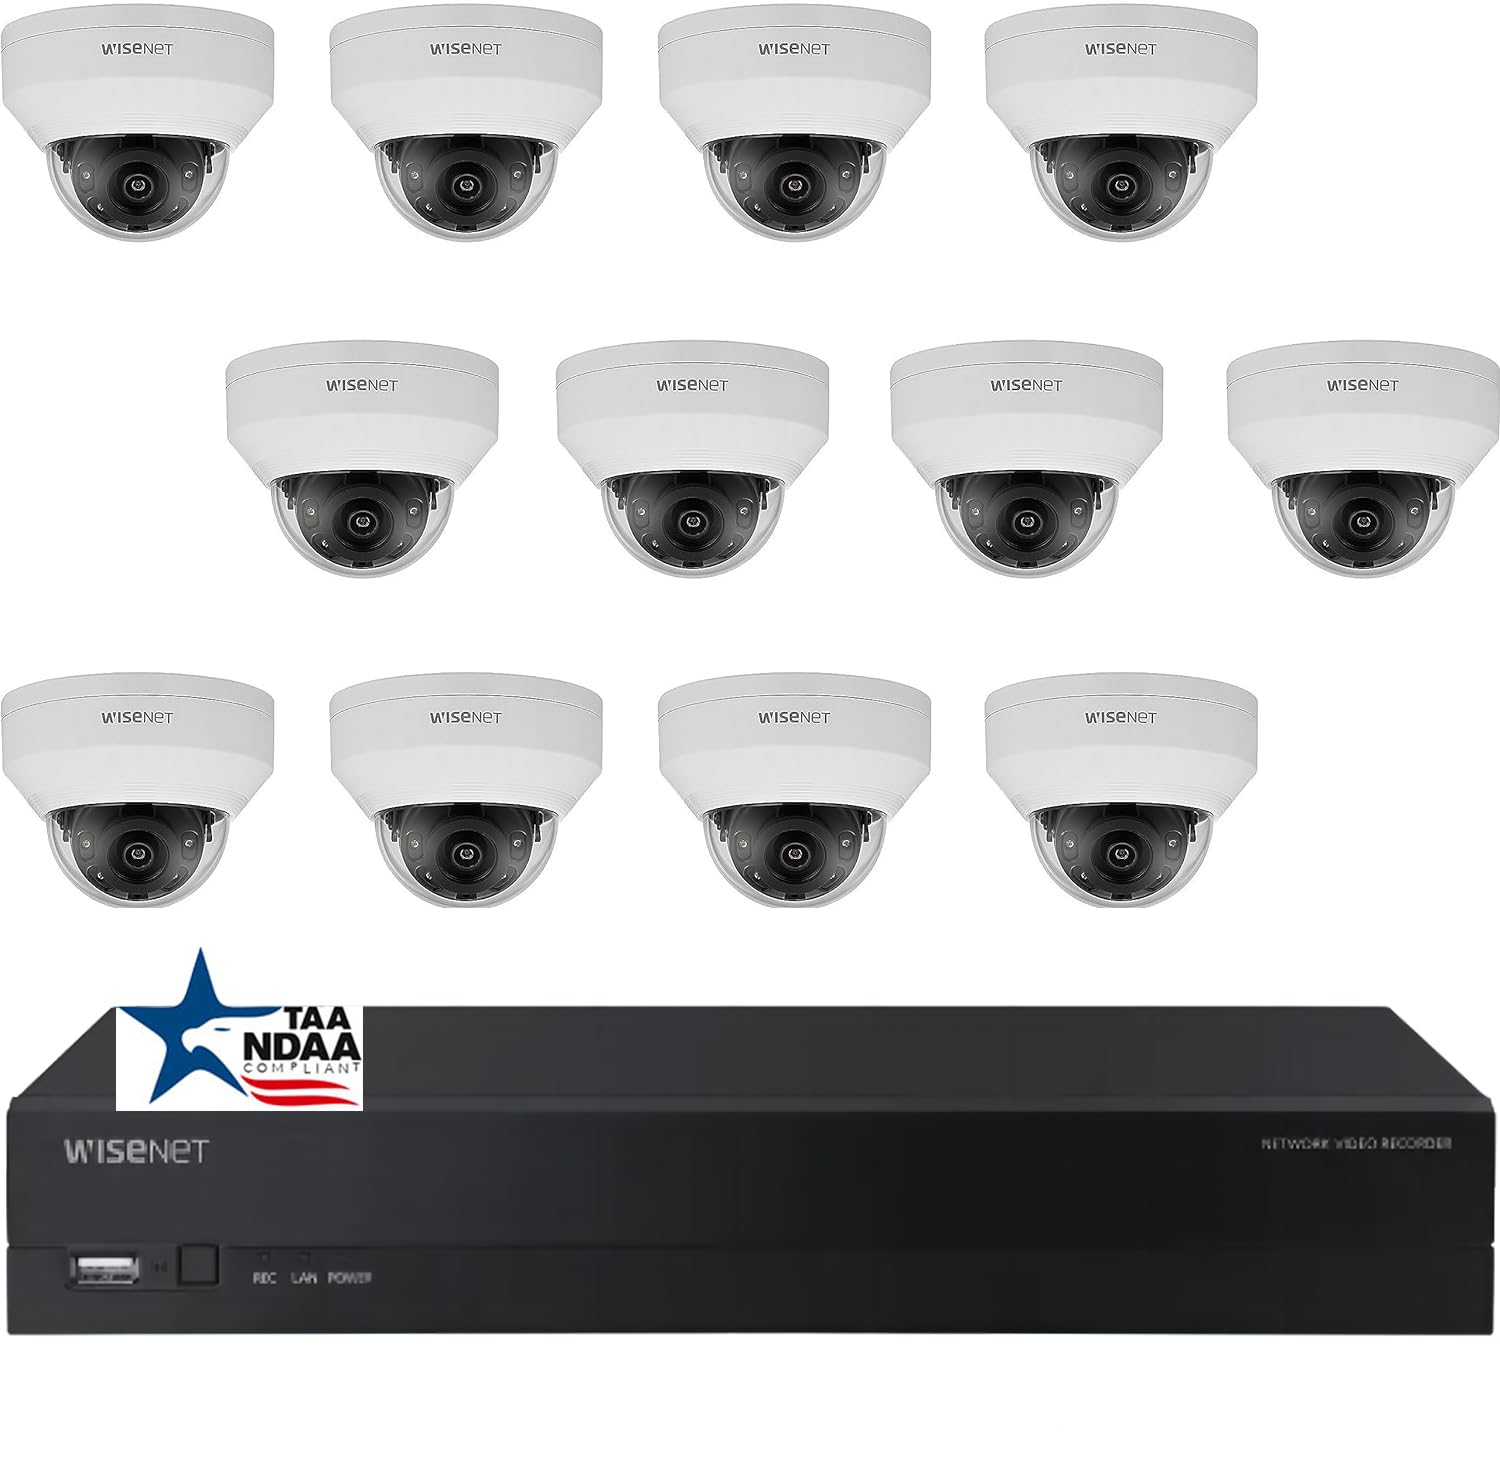
Bild: Überview of the Real HD A-Series 16 Channel PoE IP Camera System, showing the NVR and dome cameras.
2. Sicherheitshinweise
Beachten Sie beim Gebrauch dieses Produkts stets die grundlegenden Sicherheitsvorkehrungen, um das Risiko von Bränden, Stromschlägen und Verletzungen zu verringern. Bewahren Sie diese Bedienungsanleitung zum späteren Nachschlagen auf.
- Verwenden Sie ausschließlich das für dieses Gerät angegebene Netzteil.
- Do not expose the NVR to rain or moisture.
- Sorgen Sie für ausreichende Belüftung des NVR, um eine Überhitzung zu vermeiden.
- Versuchen Sie nicht, das Produkt zu zerlegen oder zu modifizieren.
- Die Installation sollte von qualifiziertem Fachpersonal durchgeführt werden, wenn Sie sich bei einzelnen Schritten unsicher sind.
3. Packungsinhalt
Bitte prüfen Sie, ob alle unten aufgeführten Artikel in Ihrem Paket enthalten sind. Sollten Artikel fehlen oder beschädigt sein, wenden Sie sich bitte an Ihren Händler.
- 1 x ARN-1610S 16 Channel PoE NVR with 4TB HDD
- 12 x ANV-L7012R 4MP IP Dome Weatherproof Cameras
- Netzteil für NVR
- USB-Maus
- Kurzanleitung
- Befestigungsschrauben und -stopfen für Kameras
Notiz: Ethernet cables for connecting cameras to the NVR are not included and must be purchased separately.
4. Einrichtung
4.1 NVR Overview

Bild: Vorderseite view of the ARN-1610S NVR, showing LED indicators and USB ports.

Bild: Rückseite view of the ARN-1610S NVR, displaying PoE ports, VGA, HDMI, LAN, and power input.
4.2 Kamera überview

Bild: Vorderseite view of the ANV-L7012R 4MP IP Dome Camera.
4.3 Systemanschluss
Befolgen Sie diese Schritte, um Ihren NVR und Ihre Kameras zu verbinden:
- Connect Monitor/TV: Connect a monitor or TV to the NVR's HDMI or VGA port. For optimal performance, a 1080P monitor/TV is recommended.
- Maus anschließen: Schließen Sie die mitgelieferte USB-Maus an einen der USB-Anschlüsse des NVR an.
- Kameras anschließen: Connect the IP cameras to the NVR's PoE ports using Ethernet cables. The NVR provides power and data through these ports.
- Connect Router (Optional for Remote Access): Connect the NVR's LAN port to your network router using an Ethernet cable for remote viewing-Fähigkeiten.
- Strom anschließen: Stecken Sie das Netzteil des NVR in den NVR und anschließend in eine Steckdose.

Image: Connection diagram illustrating how to connect the NVR to a monitor, mouse, cameras, router, and power source.
4.4 Mobile App Setup (Wisenet Mobile)
To access your surveillance system remotely, download the Wisenet Mobile app:
- Scan the QR code below with your smartphone or tablet.
- Download and install the Wisenet Mobile app from Google Play Store or Apple App Store.
- Follow the in-app instructions to add your NVR by scanning the QR code displayed on the NVR's monitor interface.

Image: QR codes for downloading the Wisenet Mobile app from Google Play Und Apple App Store.
5. Bedienungsanleitung
5.1 NVR Interface Basics
Upon powering on, the NVR will boot up and display the live view from connected cameras. Use the USB mouse to navigate the on-screen menus. Right-click to access the main menu, which includes options for live view, playback, recording settings, system configuration, and more.
5.2 Aufnahmemodi
Der NVR unterstützt verschiedene Aufnahmemodi:
- Kontinuierliche Aufnahme: Aufzeichnungen rund um die Uhr.
- Aufnahme mit Bewegungserkennung: Die Kamera zeichnet nur dann auf, wenn eine Bewegung erkannt wird. view.
- Geplante Aufnahme: Aufzeichnungen zu bestimmten Tages- oder Wochenzeiten.
- Alarmaufzeichnung: Records when an alarm event (e.g., sensor trigger) occurs.
Configure these settings in the NVR's menu under Record > Schedule or Event > Motion Detection.
5.3 Advanced Image Features
Your cameras are equipped with advanced image processing features to enhance video quality:
- WDR (Wide Dynamic Range): Balances extremely bright and dark areas in the same scene to provide clear images.
- 3DNR (3D Digital Noise Reduction): Reduces image noise, especially in low-light conditions, for clearer video.
- BLC (Gegenlichtkompensation): Improves the visibility of objects in front of a strong backlight.
- Smart-IR: Automatically adjusts the intensity of the infrared LEDs to prevent overexposure of objects close to the camera, ensuring clear night vision.

Image: Visual comparison demonstrating the effects of WDR, 3DNR, and BLC on video quality.

Image: Comparison illustrating the improved clarity and balanced illumination provided by Smart IR compared to ordinary IR night vision.
6. Wartung
6.1 Reinigung
- Kameras: Reinigen Sie das Kameraobjektiv regelmäßig mit einem weichen Tuch.amp Tuch. Scheuermittel vermeiden.
- NVR: Keep the NVR free from dust. Ensure ventilation openings are not blocked.
6.2 Firmware-Updates
Überprüfen Sie die Angaben des Herstellers website periodically for firmware updates. Firmware updates can improve performance, add new features, or fix bugs. Follow the instructions provided with the firmware update carefully.
6.3 Festplattenverwaltung
The NVR is equipped with a 4TB surveillance-grade hard drive. The system is configured to overwrite the oldest recordings when the hard drive is full. You can adjust recording retention settings in the NVR menu.
7. Fehlerbehebung
| Problem | Mögliche Ursache | Lösung |
|---|---|---|
| Es wird kein Videobild auf dem Monitor angezeigt. | Lose Kabelverbindung, falsche Eingangsquelle, NVR nicht eingeschaltet. | Check HDMI/VGA cable, ensure monitor is on correct input, verify NVR power. |
| Kamera zeigt kein Video an | Ethernet cable issue, camera not powered, camera fault. | Check Ethernet cable connection to NVR PoE port, try a different port/cable. |
| Fernzugriff auf NVR nicht möglich | NVR not connected to router, network configuration issues, app setup error. | Ensure NVR is connected to router, check network settings on NVR, re-add NVR to mobile app. |
| Schlechte Nachtsicht | Dirty lens, IR obstruction, camera placement. | Clean camera lens, ensure no objects are blocking the IR illuminators, adjust camera angle. |
8. Spezifikationen
ARN-1610S NVR
- Kanäle: 16 Channel PoE
- Videokomprimierung: H.265
- Videoausgang: 4K (3840 x 2160 Pixel)
- Lagerung: 4TB Surveillance Hard Drive (Pre-installed)
- USB-Anschlüsse: 2
- Hardware-Schnittstelle: Ethernet
- Betriebssystem: Hanwha A Series NVR OS
- Energiequelle: Kabelgebundene Elektrik
- Abmessungen: 18 x 20 x 16 Zoll
ANV-L7012R IP Dome Camera
- Auflösung: 4 MP (2560 x 1440 Pixel)
- Linse: 2.8mm Feste Linse
- Fachgebiet View: 100° Horizontal Field of View (HFoV), 108° Viewing-Winkel
- Nachtsichtbereich: Bis zu 65 Fuß
- Wetterfeste Bewertung: IP67
- Besondere Merkmale: Night Vision, Built-in Microphone, WDR, 3DNR, BLC, Smart IR
- Betriebstemperatur: -30 °C bis 60 °C (-22 °F bis 140 °F)
- Optische Sensortechnologie: CMOS
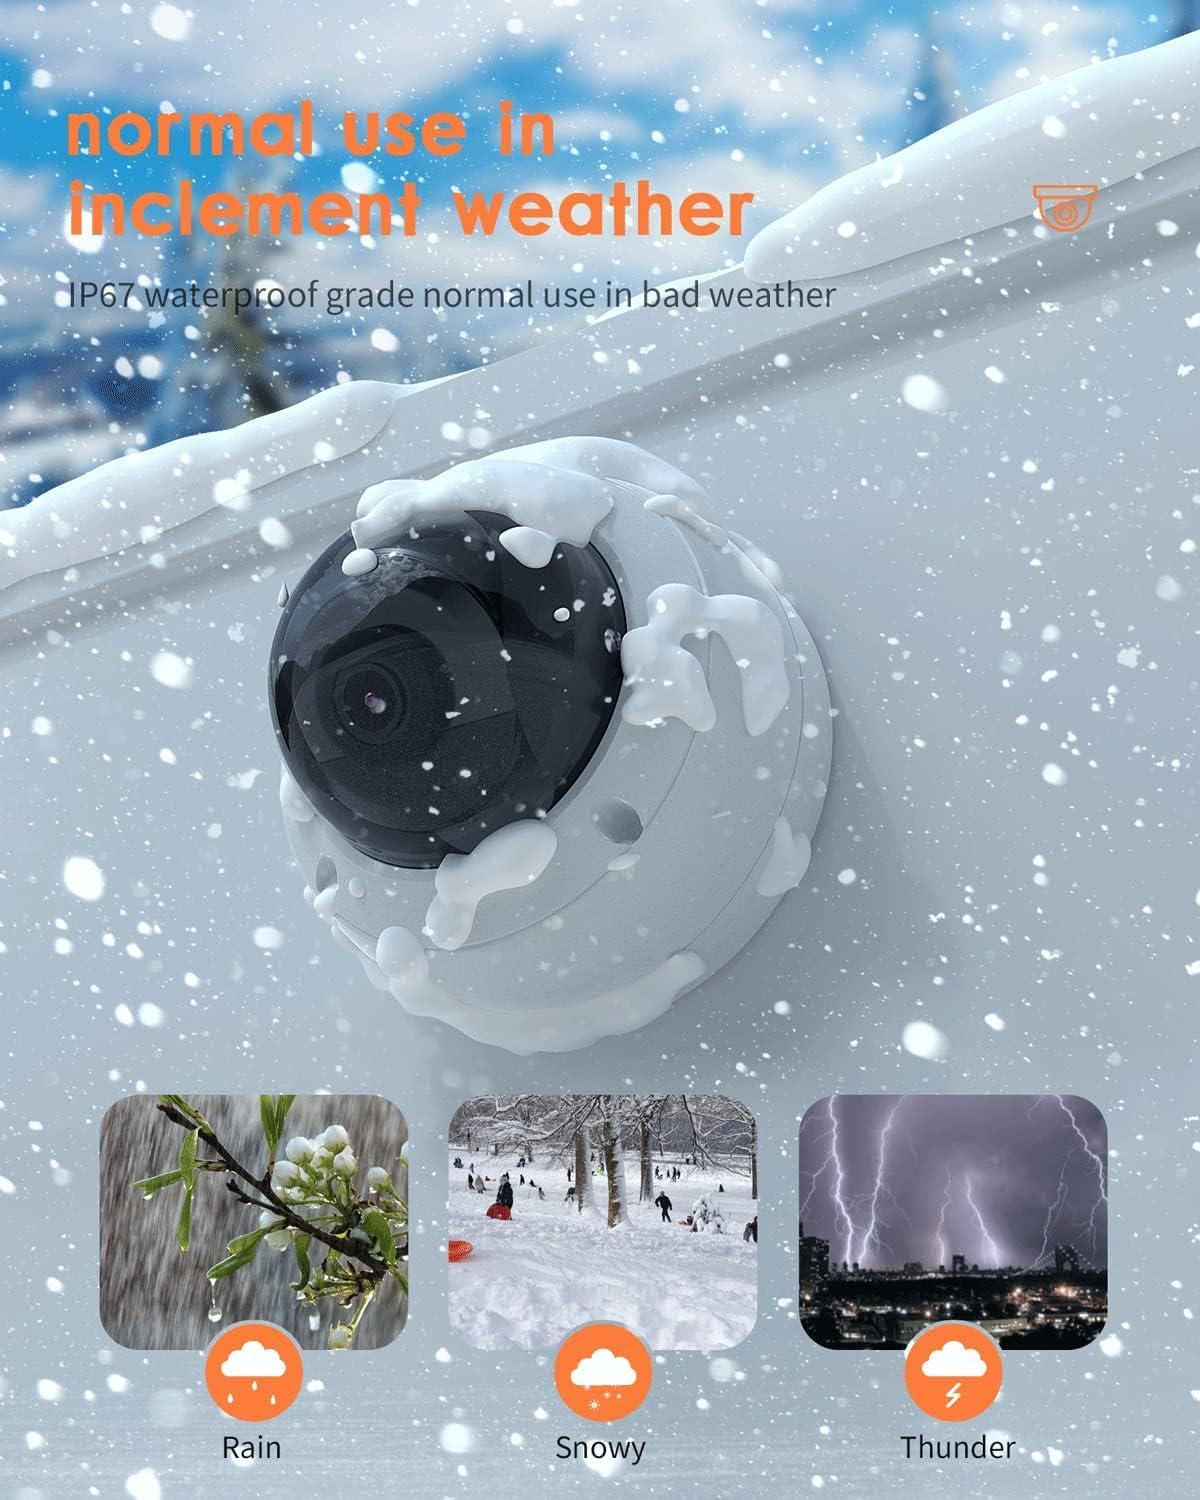
Image: The ANV-L7012R camera demonstrating its IP67 weatherproof capability in various conditions including rain, snow, and thunder.
9. Garantie und Support
9.1 Garantieinformationen
This product comes with a standard manufacturer's warranty. Please refer to the warranty card included in your package or visit the Real HD official webDie vollständigen Garantiebedingungen finden Sie auf der Website. Bewahren Sie Ihren Kaufbeleg als Kaufnachweis für Garantieansprüche auf.
9.2 Technischer Support
If you encounter any issues that cannot be resolved using the troubleshooting guide, please contact Real HD customer support. Contact information can be found on the Real HD weboder auf Ihrer Produktverpackung.