
1. Einleitung
This manual provides essential information for the safe and effective operation of your iFlight Defender-16 2S HD Cinewhoop Drone. Please read this manual thoroughly before operating the drone to ensure proper setup, usage, and maintenance. The Defender-16 is a compact FPV quadcopter designed for high-definition video capture and agile flight.
2. Produktüberschreitungview
Hauptmerkmale
- No soldering required for assembly; motors and propellers utilize a plug-in mounting method.
- Dedicated VTX mount bracket with central grille opening and air duct design for efficient heat dissipation.
- USER1 preset for video transmitter power supply switch, allowing manual VTX shutdown to conserve power and prevent overheating.
- Crash-protected battery shell with an innovative quick-release structure for easy battery replacement.
- Drone can be disassembled with only 6 screws for convenient maintenance and repair.
- Full plug-and-play high-performance AIO (All-In-One) flight controller with increased redundancy.
- Integrated beeper for quick retrieval in case of accidental loss.
- Injection-molded frame for durability and lightweight construction.
- Customized vibration-damped O3 camera mount for smooth footage and stable Gyro Data.
- Turtle Mode pre-setup for easy recovery after a crash.
Lieferumfang
- 1 x Defender-16 O3 HD BNF Drone
- 1 x Defender-16 900mAh 25C 2S Battery
- 1 x Defender-16 Type-C Charging Adapter
- 4 x Defender-1809-3 Propellers (pairs)
- 1 x Propeller Removal Tool
Produktbilder

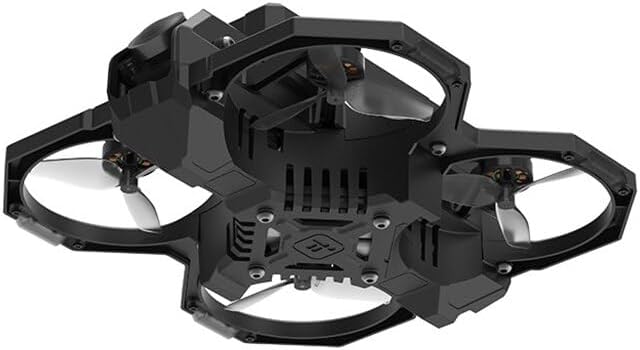
3. Einrichtung
3.1 Einlegen der Batterie
- Stellen Sie sicher, dass die Drohne ausgeschaltet ist.
- Locate the battery compartment, typically on the top or bottom of the drone.
- Insert the provided Defender-16 900mAh 2S battery into the compartment. The quick-release structure allows for easy and secure attachment.
- Connect the battery's power connector to the drone's power input.
3.2 Propellerbefestigung
- Identify the correct rotation direction for each propeller (CW for clockwise, CCW for counter-clockwise).
- Align the propeller with the motor shaft. The Defender-16 uses a plug-in mounting method, eliminating the need for screws.
- Gently push and twist the propeller onto the motor shaft until it is securely seated.
- Repeat for all four motors. Use the provided propeller removal tool for detachment when necessary.
3.3 Binding with Transmitter (ELRS 2.4GHz)
Refer to your ELRS 2.4GHz transmitter's manual for specific binding procedures. Generally, this involves putting both the drone's receiver and the transmitter into binding mode. Ensure both devices are powered on and in close proximity during the binding process.
4. Bedienungsanleitung
4.1 Vorflugkontrolle
- Stellen Sie sicher, dass der Akku vollständig geladen und fest angeschlossen ist.
- Verify all propellers are correctly attached and free from damage.
- Suchen Sie nach losen Kabeln oder Komponenten.
- Confirm your FPV goggles (e.g., DJI Goggles 2) are powered on and receiving a clear video feed.
- Ensure your transmitter is powered on and bound to the drone.
4.2 Arming and Takeoff
- Stellen Sie die Drohne auf eine ebene Fläche.
- Arm the motors using the designated switch on your transmitter (refer to your transmitter's configuration). The motors will spin slowly.
- Gently increase the throttle to lift off.
4.3 Flugmodi
The Defender-16 supports various flight modes, including Manual Mode, which allows for maximum control and agility. Familiarize yourself with your transmitter's flight mode switch assignments.
4.4 Video Transmitter (VTX) Control
The USER1 preset on the flight controller is configured as a video transmitter power supply switch. This allows you to manually turn off the VTX when the drone is idle, conserving power and preventing overheating. Consult your flight controller's documentation for details on how to activate this switch via your transmitter.
4.5 Turtle Mode
The Defender-16 comes with Turtle Mode pre-setup. If the drone lands upside down after a crash, activate Turtle Mode via your transmitter. This will allow the motors to spin in reverse, flipping the drone back over without needing to retrieve it manually.
4.6 Landung
Reduce throttle slowly to descend. Once on the ground, disarm the motors immediately using the designated switch on your transmitter.
5. Wartung
5.1 Allgemeine Reinigung
Regularly clean the drone to remove dust, dirt, and debris. Use a soft brush or compressed air. Avoid using liquids directly on electronic components.
5.2 Propellerprüfung und -austausch
Inspect propellers before and after each flight for cracks, bends, or other damage. Damaged propellers can affect flight performance and safety. Replace any damaged propellers immediately using the provided propeller removal tool.
5.3 Batteriepflege
- Always use the provided Defender-16 Type-C Charging Adapter or a compatible 2S LiPo charger.
- Überladen oder entladen Sie den Akku nicht.
- Store batteries in a cool, dry place at storage voltage (approximately 3.8V per cell).
- Discontinue use if the battery shows signs of swelling or damage.
5.4 Disassembly for Repair
The Defender-16 is designed for easy maintenance. The drone can be disassembled by removing only 6 screws, providing access to internal components for repair or replacement.
6. Fehlerbehebung
6.1 Drone Lost Signal / Crashed
- The integrated beeper can assist in locating the drone. Activate the beeper via your transmitter if configured.
- If the drone is upside down, activate Turtle Mode to flip it over.
6.2 Kein Videofeed
- Ensure your FPV goggles are on the correct frequency/channel.
- Check VTX power status. If USER1 preset is used, ensure the VTX is powered on.
- Inspect the O3 Air Unit and its connections for any damage or dislodged cables.
6.3 Drone Not Arming
- Ensure the transmitter is powered on and bound to the drone.
- Batterieanschluss und Ladezustand prüfen.
- Verify that the drone is on a flat, level surface. Some flight controllers prevent arming if the drone is not level.
- Check for any error messages in your FPV goggles or flight controller OSD.
7. Spezifikationen
| Flight Electronics | Defender-16/20 F411 AIO |
| Videoübertragung | DJI O3 Air Unit (naked version) |
| Rahmen Radstand | 81 mm |
| Motoren | Defender-16 1002 14000KV |
| Propeller | Defender-16 1809-3 (3-blade) |
| Takeoff Weight (incl. 900mAh battery) | 120g |
| Abmessungen (L×B×H) | 121x117x47mm |
| Max Speed (Manual Mode) | 55 km/h |
| Max Hover Time (with 2S 900mAh battery) | Ca. 6 Minuten |
| Max Windgeschwindigkeit Widerstand | Stufe 3 |
| Antennen | Doppelantennen |
| FOV (Einzelbildschirm) | 155° |
| Betriebstemperaturbereich | -10 bis 40 °C (14 bis 104 °F) |
| Leistungsaufnahme | 7.4-26.4 V |
| Video Transmission Specifications (DJI O3 Air Unit) | |
| Kommunikationsbandbreite | Max. 40 MHz |
| Kommunikationsfrequenz | 2.400-2.4835 GHz (RX only), 5.725-5.850 GHz (RX and TX) |
| End-to-End Latency (with DJI Goggles 2, 1080p/100fps) | So niedrig wie 30 ms |
| End-to-End Latency (with DJI Goggles 2, 1080p/60fps) | So niedrig wie 40 ms |
| Max Video Transmission Bitrate | 50 Mbit/s |
| Max Video Transmission Range | 10 km (FCC), 2 km (CE), 6 km (SRRC) |
8. Garantie und Support
For warranty information, technical support, or service inquiries, please refer to the official iFlight webBesuchen Sie die Website oder kontaktieren Sie direkt den Kundendienst. Bewahren Sie Ihren Kaufbeleg für eventuelle Garantieansprüche auf.
Offizieller iFlight-Shop: Besuchen Sie den iFlight Store auf Amazon.