1. Einleitung
Thank you for choosing the PPLEE CR1023i Vibrating Digital Alarm Clock. This device is designed to provide a reliable and versatile wake-up experience, especially for heavy sleepers and individuals with hearing impairments. It features a large, dimmable LED display, dual alarms, multiple wake-up modes including a powerful bed shaker, a night light, and a convenient USB charging port.

Image 1.1: The PPLEE CR1023i alarm clock, bed shaker, and a smartphone connected for charging.
2. Packungsinhalt
Bitte prüfen Sie das Paket auf folgende Artikel:
- 1 x PPLEE CR1023i Digital Alarm Clock
- 1 x Wired Bed Shaker
- 1 x Netzteil
- 1 x Stromkabel
- 1 x Benutzerhandbuch

Image 2.1: All components included in the PPLEE CR1023i alarm clock package.
3. Produktüberschreitungview
The PPLEE CR1023i features a clear digital display and intuitive controls for easy operation.
3.1. Bedienelemente und Anzeige
Familiarize yourself with the buttons and display indicators on your alarm clock. The large LED digits show the current time, and indicators for AM/PM, Alarm 1, and Alarm 2 are present.

Image 3.1: Key features and components of the PPLEE CR1023i alarm clock.
4. Ersteinrichtung
- Stromanschluss: Connect the power cable to the alarm clock and plug the power adapter into a standard electrical outlet. The display will light up.
- Bed Shaker Connection: Plug the wired bed shaker into the designated port on the back of the alarm clock.
- Batterie-Backup (optional): Zur Sicherung bei Stromausfalltages, insert 2 AAA batteries (not included) into the battery compartment. Note that the battery backup only maintains time settings and alarm functions; the display will not be active.
5. Zeit- und Datumseinstellungen
5.1. Uhrzeit einstellen
- Halten Sie die ZEITEINSTELLUNG button (usually located on the back or top) until the hour digits begin to flash.
- Verwenden Sie die STUNDE Und MINUTE buttons (or +/- buttons) to adjust the hour and minute. Pay attention to the AM/PM indicator.
- Drücken ZEITEINSTELLUNG Zur Bestätigung und zum Verlassen des Zeiteinstellungsmodus erneut den Zeiteinstellungsmodus aufrufen.
5.2. 12H/24H Format and DST
The clock supports both 12-hour and 24-hour time formats, as well as Daylight Saving Time (DST) adjustments.
- To switch between 12H/24H: Drücken Sie im normalen Zeitanzeigemodus die Taste 12/24 Uhr button (or a dedicated button, refer to the clock's labels) to toggle between the formats.
- To activate/deactivate DST: Halten Sie im normalen Zeitanzeigemodus die Taste gedrückt Sommerzeit button (or a dedicated button) to adjust the time by one hour forward or backward.

Abbildung 5.1: Beispielamples of 12H, 24H, and DST time display options.
6. Alarmeinstellungen
The PPLEE CR1023i features dual alarms and multiple wake-up modes.
6.1. Einstellen von zwei Alarmen
- Halten Sie die ALARM 1 button until the hour digits for Alarm 1 begin to flash.
- Verwenden Sie die STUNDE Und MINUTE buttons (or +/- buttons) to set the desired alarm time.
- Drücken ALARM 1 erneut, um die Uhrzeit zu bestätigen.
- Wiederholen Sie die Schritte 1-3 für ALARM 2 if a second alarm is needed.
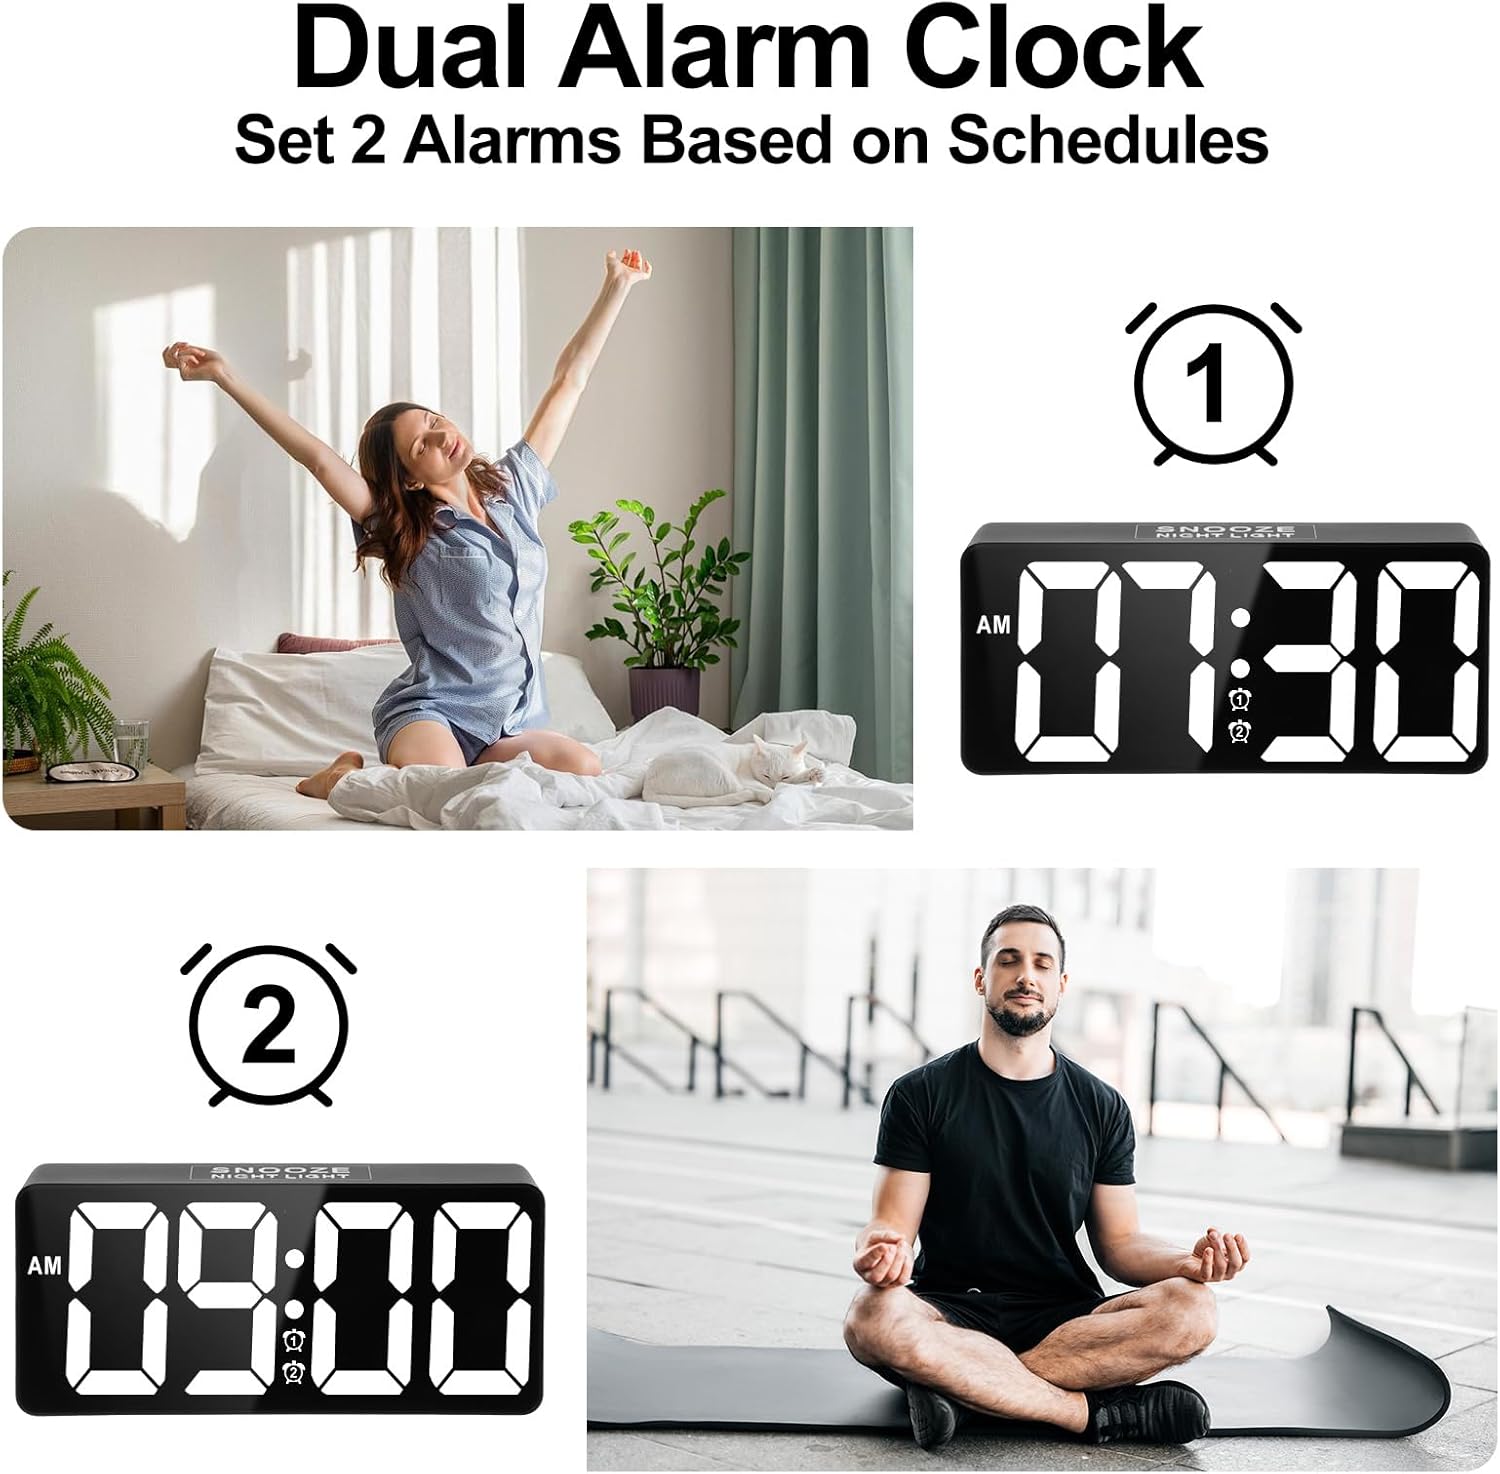
Image 6.1: Setting up two independent alarms for different schedules.
6.2. Wake-up Modes
Choose from three wake-up modes: Sound Only, Vibration Only, or Sound + Vibration.
- After setting an alarm time, press the ALARM 1/2 button repeatedly to cycle through the wake-up modes. The display will show corresponding icons (bell for sound, wavy lines for vibration, or both).
- Wählen Sie Ihren bevorzugten Modus.

Image 6.2: The three available wake-up solutions: sound, vibration, or both.
6.3. Einstellung der Alarmlautstärke
The alarm volume can be adjusted to 7 levels, from 50dB to 120dB.
- While the alarm is sounding, or during alarm setup, use the VOLUMEN button (or +/- buttons) to adjust the sound level.
- The display will indicate the current volume level (e.g., U01 for lowest, U07 for highest).

Image 6.3: Visual representation of the 7-level volume adjustment for the alarm.
6.4. Disabling an Alarm
Um einen Alarm auszuschalten, drücken Sie die Taste ALARM AUS button. To disable an alarm completely, press the corresponding ALARM 1/2 Drücken Sie die Taste so lange, bis das Alarmsymbol vom Display verschwindet.
7. Schlummerfunktion
When an alarm sounds, gently tap the large SCHLAFEN button on the top of the clock to activate the snooze function. The alarm will pause for 9 minutes and then sound again. You can repeat this process.

Image 7.1: Activating the 9-minute snooze by touching the top button.
8. Helligkeitseinstellung
The large LED display features a 0-100% dimmable brightness control.
- Suchen Sie die rotary stepless switch (often on the side or back of the clock).
- Rotate the switch to adjust the display brightness to your desired level, from completely off to maximum brightness.
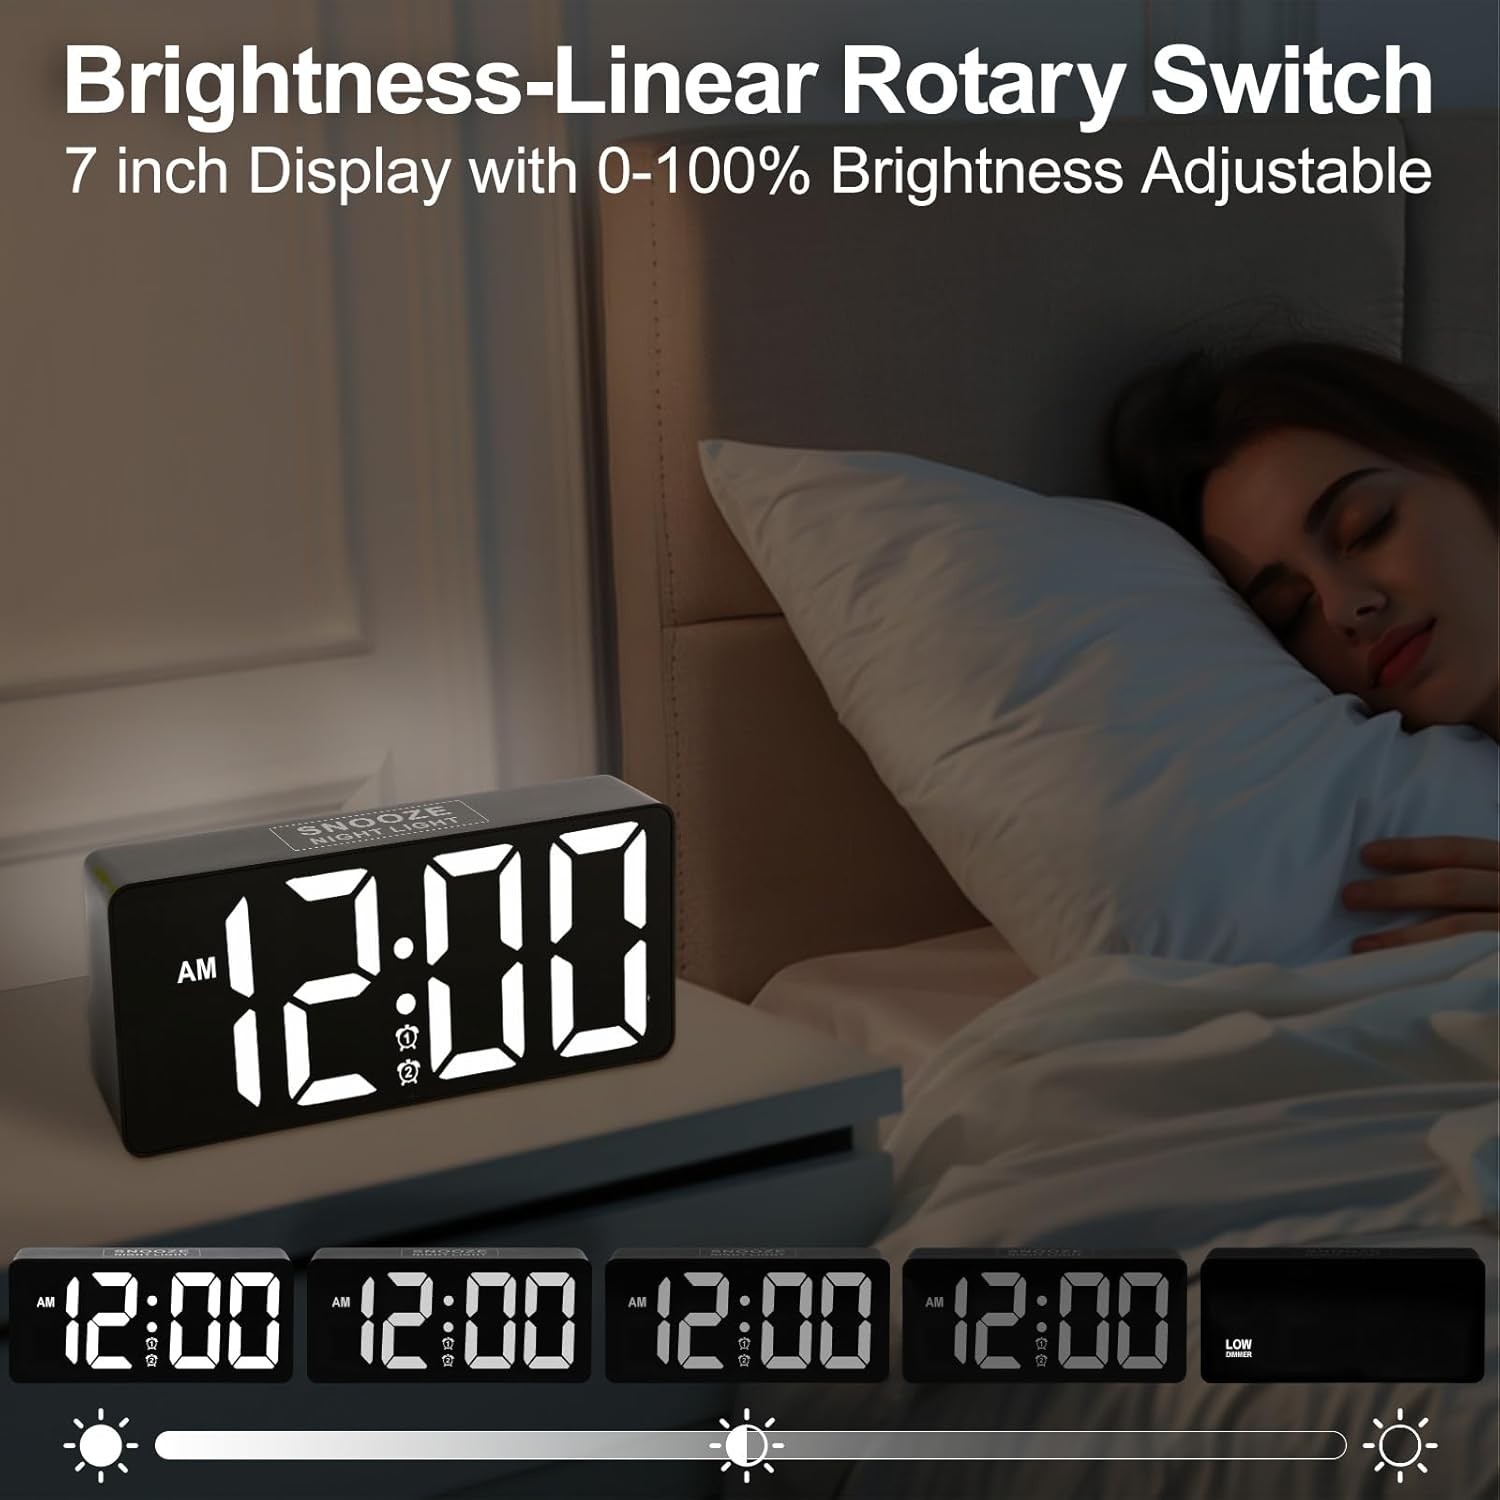
Image 8.1: Demonstrating the range of display brightness settings.
9. Nachtlichtfunktion
The alarm clock includes a soft rear night light, providing a gentle illumination.
- To turn the night light on or off, tap the SCHLAFEN Taste.
- The night light offers a warm and relaxed ambiance, ideal for pre-bedtime or as a subtle light source during the night.

Image 9.1: The night light feature providing soft illumination.
10. USB-Ladeanschluss
A built-in USB charging port allows you to charge your devices conveniently while you sleep.
- Locate the USB port on the side or back of the alarm clock.
- Schließen Sie das USB-Ladekabel Ihres Geräts an diesen Anschluss an.
- The charging function operates independently of the alarm clock's other settings.
11. Bed Shaker Placement
The wired bed shaker is designed to be placed in various locations to effectively wake heavy sleepers.
- Unter dem Kopfkissen: Place the shaker directly under your pillow for direct vibration.
- Under Fitted Sheet: Position the shaker under your fitted sheet, near your head or torso.
- Between Mattress and Box Spring: For a more subtle but still effective vibration, place it between the mattress and box spring.

Image 11.1: Recommended placements for the bed shaker.
12. Pflege und Wartung
- Reinigung: Wipe the clock and bed shaker with a soft, dry cloth. Do not use abrasive cleaners or solvents.
- Platzierung: Place the clock on a stable, flat surface. Avoid direct sunlight, extreme temperatures, and high humidity.
- Leistung: Ensure the power adapter and cable are not damaged. Disconnect from power during electrical storms or when not in use for extended periods.
13. Fehlerbehebung
| Problem | Mögliche Ursache | Lösung |
|---|---|---|
| Die Uhranzeige ist aus. | Kein Strom, Stromausfalltage, or brightness set to minimum. | Check power connection. If using battery backup, display will not show. Adjust brightness. |
| Der Alarm ertönt/vibriert nicht. | Alarm not activated, incorrect mode selected, or volume too low. | Ensure alarm is set and activated (icon visible). Verify wake-up mode (sound/vibration). Adjust volume. Check bed shaker connection. |
| Die Uhrzeit ist falsch. | Time not set correctly, or DST needs adjustment. | Re-set the time. Check 12H/24H format. Adjust DST if applicable. |
| USB-Ladefunktion funktioniert nicht. | Cable issue, device not compatible, or power issue. | Try a different USB cable. Ensure the clock is powered. Check device compatibility. |
14. Spezifikationen
| Besonderheit | Detail |
|---|---|
| Marke | PPLEEE |
| Modellnummer | CR1023i |
| Anzeigetyp | Digitale LED |
| Anzeigegröße | 7 Zoll |
| Aufwachmodi | Sound, Vibration, Sound + Vibration |
| Alarmlautstärke | 7 Stufen (50 dB bis 120 dB) |
| Schlummerdauer | 9 Мinuten |
| Helligkeitsregelung | 0-100% Dimmable (Rotary Switch) |
| Nachtlicht | Yes (Soft rear light) |
| USB-Ladeanschluss | Ja (für externe Geräte) |
| Stromquelle | Kabelgebundene Elektrik |
| Batterie-Backup | Yes (2x AAA, not included; for time/alarm memory only) |
| Technische Daten | 1.77"W x 3.03"H (Clock unit) |
| Artikelgewicht | 13.7 Unzen |
| Material | Kunststoff, Acrylnitril-Butadien-Styrol |
15. Garantieinformationen
This product comes with an extended warranty. For specific details regarding warranty coverage and duration, please refer to the warranty card included in your package or contact customer support.
16. Kundendienst
If you encounter any issues or have questions regarding your PPLEE CR1023i alarm clock, please contact our customer support team. You can typically find contact information on the product packaging, the warranty card, or by visiting the official PPLEE store on Amazon: PPLEE Store.