1. Einleitung
This manual provides detailed instructions for the installation, operation, and maintenance of your MINIEYE 2 Pro C2M Dash Cam. This device is designed to enhance driving safety through advanced recording capabilities and an integrated Advanced Driver-Assistance System (ADAS).
The MINIEYE 2 Pro C2M features high-resolution front and rear cameras, AI-powered detection, and real-time alerts to assist drivers. Please read this manual thoroughly before using the product to ensure proper functionality and safety.
2. Produktüberschreitungview
The MINIEYE 2 Pro C2M is a dual-camera dash cam system equipped with a 2.4-inch display and AI-driven ADAS features. It records both front and rear views Ihres Fahrzeugs.

Image 2.1: Main unit of the MINIEYE 2 Pro C2M Dash Cam, showing the front camera module and the separate display unit.
Hauptmerkmale:
- Dual-Kamera-Aufnahme: Front camera records in 4K (2160p) with a 150° field of view, and the rear camera records in 1080p with a 130° field of view.
- KI-gestützte Fahrerassistenzsysteme: Utilizes AI for real-time detection of vehicles, pedestrians, motorcycles, and lane markings.
- Safety Driving Support: Provides alerts for vehicle distance, collision, lane departure, pedestrian distance, and front vehicle departure.
- SONY IMX415 Sensor: Ensures clear recording even in low-light conditions.
- Wi-Fi-Konnektivität: Connects to your smartphone for video viewing, settings adjustment, and data transfer via a dedicated app.
- 2.4-Zoll-Display: For real-time monitoring and alert display.
- 24-Stunden-Überwachung: Provides continuous surveillance (requires constant power supply, not included).
- Japanese Voice Guidance: Offers audio alerts and instructions in Japanese.
- Firmware-Updates: Supports over-the-air firmware updates via the smartphone app.

Image 2.2: Icons illustrating key features such as collision warning, lane departure warning, pedestrian warning, front vehicle departure alert, 24-hour monitoring, 3D mapping, 4K recording, voice guidance, and night mode.
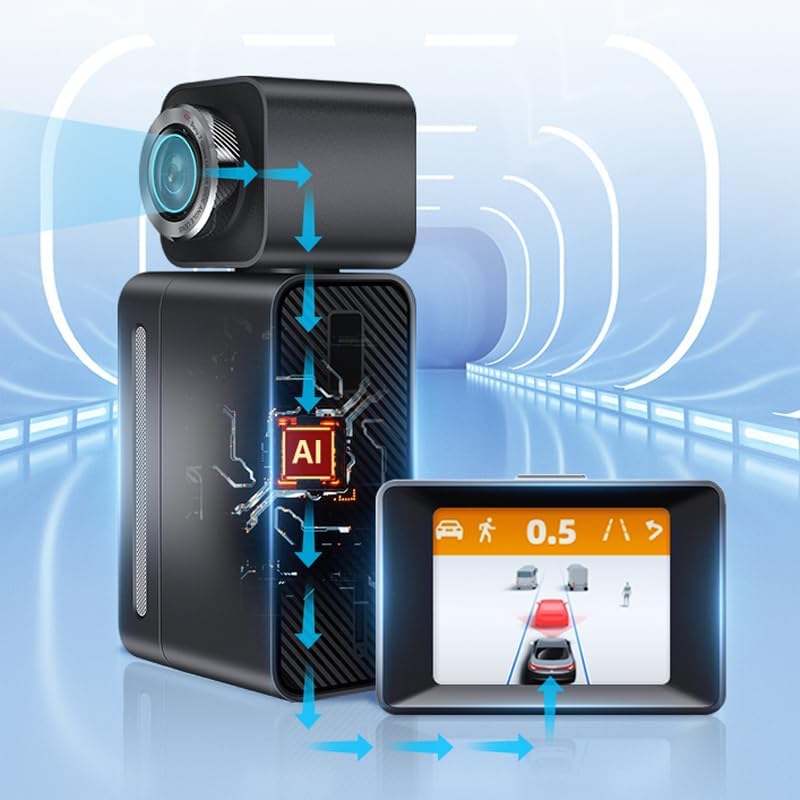
Image 2.3: Diagram showing the AI processing within the MINIEYE 2 Pro C2M, where the camera captures data, the AI unit processes it, and the display shows real-time driving assistance information.
3. Einrichtung und Installation
3.1 Packungsinhalt
Vor der Installation sicherstellen, dass alle Komponenten vorhanden sind:
- MINIEYE 2 Pro C2M Main Unit (Front Camera)
- Rückfahrkamera
- Anzeigeeinheit
- Stromkabel (Zigarettenanzünderadapter)
- Anschlusskabel für Rückfahrkamera
- Montagekleber
- User Manual (Warranty Card included)
3.2 Montage der Dashcam
The dash cam uses an adhesive mounting method. Choose a location on your windshield that does not obstruct your view and allows for optimal camera angles.
- Reinigen Sie den ausgewählten Bereich auf der Windschutzscheibe gründlich.
- Attach the main unit to the front windshield using the provided adhesive mount. Ensure the front camera has a clear view der vor uns liegenden Straße.
- Montieren Sie die Rückfahrkamera an der Heckscheibe und achten Sie dabei auf eine klare Sicht. view der Straße dahinter.
- Verbinden Sie die Rückkamera mithilfe des mitgelieferten Kabels mit dem Hauptgerät.
- Mount the display unit on the dashboard in a position that is easily visible but does not obstruct driving.
Hinweis zur Verkabelung: The cables for this device are relatively thick. Exercise caution and plan your cable routing carefully to avoid interference with vehicle operations. Specialized tools like a cable routing needle may be helpful for a clean installation, especially when routing the rear camera cable through rubber grommets.
3.3 Stromanschluss
Connect the power cable to the main unit and plug the cigarette lighter adapter into your vehicle's 12V power outlet. The device will power on automatically when the vehicle starts.
Wichtig: The included power adapter is designed to convert voltage for the dash cam. Using a different power source directly without proper voltage conversion may damage the device. If you prefer a hardwired installation, consider purchasing a compatible hardwire kit with voltage Verordnung.
3.4 GPS-Funktionalität
This model does not feature an internal GPS module. For GPS functionality, the display unit must be placed on the dashboard where it has a clear view des Himmels, um Satellitensignale zu empfangen.
4. Bedienungsanleitung
4.1 Grundlegende Aufnahmefunktionen
Once powered on, the dash cam will automatically begin recording. The front camera records in 4K, and the rear camera records in 1080p. Recordings are saved to a microSD card (not included, sold separately).
The device supports loop recording, meaning older files will be overwritten when the memory card is full, ensuring continuous recording.
4.2 Anzeigemodi
The 2.4-inch display unit can switch between different views:
- Center Screen: Displays real-time ADAS information, such as vehicle distance and warnings.
- Dash Cam Screen: Shows the live feed from the front or rear camera.
To switch between display modes, quickly double-click the button located on the top of the display unit.

Image 4.1: Illustration of switching between the ADAS center screen view and the dash cam recording view by double-clicking the top button.
4.3 Nachtsicht
Equipped with a SONY IMX415 sensor, the MINIEYE 2 Pro C2M provides clear video recording even in low-light conditions, enhancing visibility during nighttime driving.
5. App-Konnektivität
The MINIEYE 2 Pro C2M can connect to your smartphone via Wi-Fi, allowing you to manage the device and access recordings.
- Download the official MINIEYE app from your smartphone's app store.
- Schalten Sie die Dashcam ein.
- Enable Wi-Fi on your smartphone and connect to the dash cam's Wi-Fi network (SSID and password can be found in the device settings or initial setup guide).
- Open the MINIEYE app. You can now:
- View live video feeds from both cameras.
- Access and download recorded videos to your smartphone.
- Adjust various settings of the dash cam, including recording resolution, ADAS sensitivity, and time zone.
6. Advanced Driver-Assistance System (ADAS) Features
The integrated ADAS provides real-time driving assistance to help prevent accidents.
6.1 AI Detection and 3D Mapping
The system uses AI analysis to detect various objects on the road, including cars, SUVs, minivans, trucks, motorcycles, pedestrians, and bicycles. It also recognizes lane markings. The real-time 3D mapping feature displays these detected objects on the screen, adapting the display based on the type of vehicle ahead.

Image 6.1: Illustration showing the dash cam's ability to detect vehicles up to 120 meters ahead, displaying the distance on the screen.

Image 6.2: Illustration showing the dash cam's ability to detect pedestrians up to 60 meters ahead, displaying the distance on the screen.
6.2 Safety Driving Support Functions
- Vorwärtskollisionswarnung (FCW): Alerts you if you are approaching a vehicle too quickly, indicating a potential collision risk.
- Spurverlassenswarnung (LDW): Benachrichtigt Sie, wenn Ihr Fahrzeug ohne Blinken die Fahrspur verlässt.
- Fußgängerkollisionswarnung (PCW): Warns you of potential collisions with pedestrians in your path.
- Front Vehicle Departure Alert (FVDA): Informs you when the vehicle in front of you starts moving after a stop (e.g., at a traffic light).
- Sudden Braking/Acceleration Warning: Alerts for abrupt changes in driving behavior.
Wichtiger Hinweis: The ADAS functions are for warning purposes only and do not control the vehicle's brakes or steering. Always maintain awareness of your surroundings and drive safely. The effectiveness of these functions may vary depending on road conditions, weather, and lighting.
7. Wartung
7.1 Firmware-Updates
The device supports firmware updates via the smartphone app. Regularly check for and install updates to ensure optimal performance and access to new features.
- Connect your dash cam to the smartphone app via Wi-Fi.
- Navigate to the firmware update section within the app.
- Befolgen Sie die Anweisungen auf dem Bildschirm, um die neueste Firmware herunterzuladen und zu installieren.
7.2 Allgemeine Pflege
- Keep the camera lenses clean to ensure clear recordings. Use a soft, lint-free cloth.
- Vermeiden Sie es, das Gerät über längere Zeiträume extremen Temperaturen oder direkter Sonneneinstrahlung auszusetzen, wenn es nicht in Gebrauch ist.
- Ensure the microSD card is properly inserted and formatted periodically to maintain recording stability.
8. Fehlerbehebung
8.1 Häufige Probleme und Lösungen
- Gerät lässt sich nicht einschalten:
- Check the power cable connection to the dash cam and the cigarette lighter socket.
- Stellen Sie sicher, dass die 12-V-Steckdose des Fahrzeugs funktioniert.
- Aufnahmeprobleme (z. B. unscharfes Video, keine Aufnahme):
- Reinigen Sie die Kameralinsen.
- Ensure a compatible microSD card is inserted and formatted correctly.
- Check if the microSD card is full or corrupted. Replace if necessary.
- ADAS warnings not functioning correctly:
- Stellen Sie sicher, dass die Kamera view ist frei und sauber.
- Verify that the dash cam is properly calibrated (refer to app settings).
- Note that ADAS functionality can be affected by vehicle conditions, driving style, and environmental factors.
- Device generates heat during operation:
- It is normal for electronic devices to generate some heat during operation. If the heat is excessive or causes the device to malfunction, contact support.
- Probleme mit der Wi-Fi-Verbindung:
- Stellen Sie sicher, dass das WLAN der Dashcam aktiviert ist.
- Starten Sie sowohl die Dashcam als auch Ihr Smartphone neu.
- Überprüfen Sie das WLAN-Passwort.
9. Spezifikationen
| Modell | MINIEYE C2M |
| Anzeigegröße | 2.4 inches (LCD) |
| Auflösung der Frontkamera | 4K (2160p) |
| Auflösung der Rückkamera | 1080p |
| Sichtfeld der Frontkamera View (Sichtfeld) | 150° |
| Rückkamerafeld View (Sichtfeld) | 130° |
| Bildsensor | SONY IMX415 |
| Montagetyp | Klebstoff |
| Kontrollmethode | App (via Wi-Fi) |
| Main Unit Dimensions (Approx.) | 110 mm (L) x 50 mm (H) x 35 mm (T) |
| Display Unit Dimensions (Approx.) | 74 mm (L) x 49.7 mm (H) x 40.7 mm (T) |

Image 9.1: Detailed dimensions of the main unit, front camera module, and display unit.

Image 9.2: Diagram illustrating the 150-degree field of view for the front camera and 130-degree field of view for the rear camera, showing comprehensive coverage.
10. Garantie und wichtige Informationen
10.1 Gewährleistungsfrist
Die Garantiezeit für dieses Produkt beträgt ein Jahr ab Kaufdatum.
Wichtig: The manufacturer's warranty for this product is only valid for items purchased from "MINIEYE Store". Please verify the seller when making your purchase.
10.2 Wichtige Sicherheitsinformationen
- This product is an aftermarket collision prevention "warning" system only. It does not control the vehicle's brakes or steering.
- Some functions may not operate normally depending on vehicle conditions, driving style, and environmental factors.
- The manufacturer assumes no responsibility for any accidents, property damage, personal injury, or any other incidents that may occur due to the misuse of this product or reliance on its warnings.
- This product is a parallel import.