
1. Produktüberschreitungview
The IINE Switch Pro Controller is a versatile wireless gamepad designed for a superior gaming experience across multiple platforms. It features advanced Hall Effect joysticks and triggers to prevent drift, ensuring precision and durability. This controller supports wireless connectivity via Bluetooth 5.0 and can also be used in wired mode. Key features include NFC functionality, motion sensing, macro programming, adjustable rumble, and a convenient wake-up function.

Bild 1.1: Vorderseite view of the IINE Switch Pro Controller, highlighting Hall Effect, NFC, Headset Jack, and Custom Button Mapping features.
2. Einrichtung und Verbindung
2.1 Laden des Controllers
Before initial use, fully charge the controller. Connect the included USB-C cable to the controller's charging port and the other end to a power source (e.g., console, PC, or USB wall adapter). The controller features a 1000mAh battery, providing approximately 15 hours of gameplay on a full charge. Charging typically takes 2-3 hours.

Image 2.1: Illustration of the controller's 1000mAh battery, 15 hours runtime, and 2-3 hours charging time.
2.2 Drahtlose Kopplung
The controller supports wireless connection via Bluetooth 5.0 to Nintendo Switch, PC, Android, and iOS devices.
- Plattform auswählen: Use the 'Easy-Switch Button' located on the back of the controller to select the desired platform (NS, Android, iOS, PC).
- Kopplungsmodus aktivieren: Press and hold the 'Pairing Button' (small button next to the Easy-Switch) for 3 seconds until the indicator lights flash rapidly.
- Connect on Device:
- Nintendo-Schalter: Go to 'Controllers' > 'Change Grip/Order' on the HOME Menu.
- PC: Go to Bluetooth settings and select 'Add device'.
- Android/iOS: Go to Bluetooth settings and select the controller from the available devices.
- Verbindung bestätigen: Once connected, the indicator light(s) on the controller will become solid.

Image 2.2: Location of the Easy-Switch button for platform selection and the Pairing button for initiating Bluetooth connection.
2.3 Kabelverbindung
For a wired connection, simply connect the controller to your device using a USB-C cable. For Nintendo Switch, a wired connection is required to use the 3.5mm headset port.

Image 2.3: The 3.5mm headset port is functional only when the controller is wired to a Nintendo Switch console.
3. Bedienungsanleitung
3.1 Joysticks und Trigger mit Hall-Effekt
The controller is equipped with Hall Effect joysticks and triggers, designed to provide precise input and eliminate stick drift over time. The analog triggers offer adjustable sensitivity for different game genres.
- Verstellbare Abzüge: Use the physical switches on the back of the controller to toggle between 'Short Gear' (quick response for shooting games) and 'Long Gear' (gradual input for racing games).
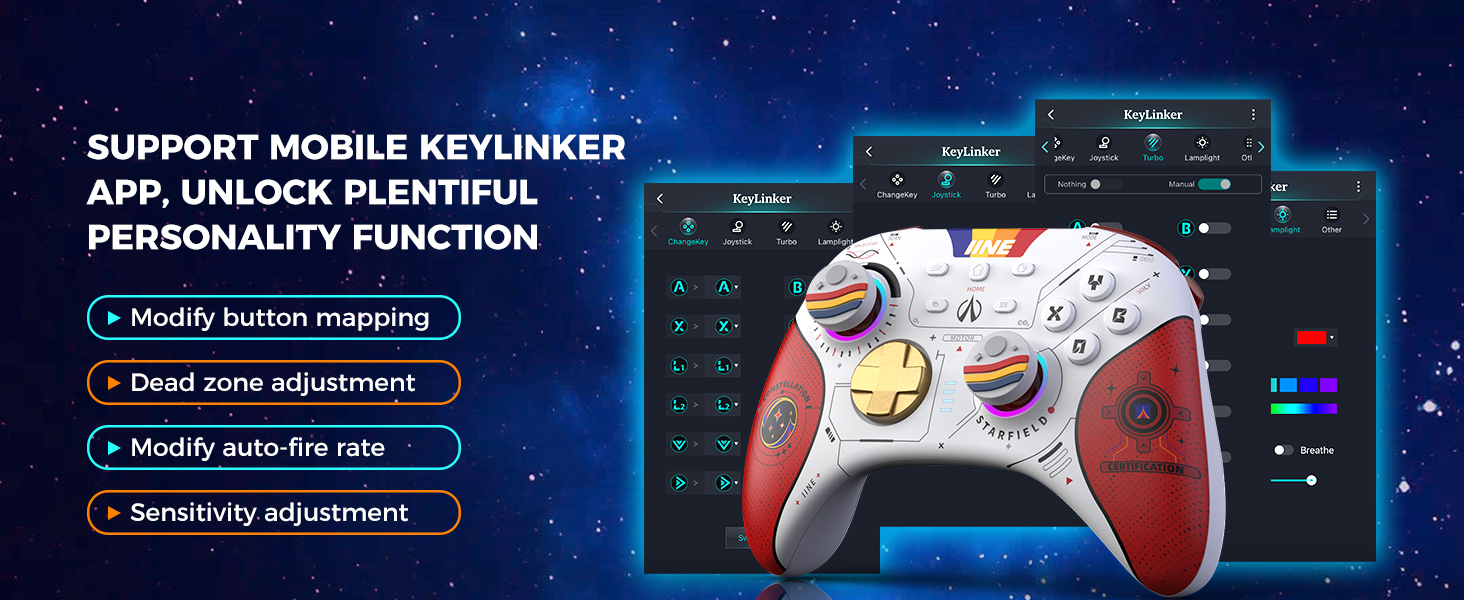
Image 3.1: Adjustable trigger settings for 'Short Gear' (shooting games) and 'Long Gear' (racing games).
3.2 Makroprogrammierung
The controller features two programmable back buttons, MR and ML, allowing you to assign complex sequences or single button presses for quick execution.
- Programmiermodus aufrufen: Press and hold the 'Macro' button (usually a small button near MR/ML) until the indicator light changes.
- Makro aufnehmen: Press the MR or ML button, then input the desired button sequence.
- Makro speichern: Press the 'Macro' button again to save and exit programming mode.

Image 3.2: Back buttons MR and ML for macro programming, enabling functions like one-button zoom, sprint, or combos.
3.3 NFC-Funktionalität
The controller supports NFC (Near Field Communication) for compatible devices, such as scanning Amiibo figures on Nintendo Switch.

Image 3.3: The controller's NFC function allows interaction with compatible devices and accessories.
3.4 Motion Sensing (6-axis Gyro)
The integrated 6-axis gyroscope provides precise motion control for games that support this feature, enhancing immersion and gameplay.

Image 3.4: The 6-axis gyroscope enables motion control for compatible games on platforms like Nintendo Switch.
3.5 Adjustable Rumble
Customize your gaming feedback with four levels of adjustable rumble vibration. This allows you to tailor the intensity of haptic feedback to your preference for different in-game events like collisions, explosions, or fighting.

Image 3.5: Visual representation of the four adjustable rumble levels (0, 30, 70, 100) for various in-game effects.
3.6 Aufwachfunktion
When connected to a Nintendo Switch console, you can press the HOME button on the controller to wake up the console from sleep mode.

Image 3.6: The HOME button can be used to wake up Nintendo Switch, Switch Lite, and Switch OLED consoles.
3.7 Keylinker APP Support
For advanced customization, download the Keylinker mobile application. This app allows you to:
- Modify button mapping.
- Adjust joystick dead zones.
- Modify auto-fire rates.
- Passen Sie die Empfindlichkeitseinstellungen an.

Image 3.7: Screenshots of the Keylinker app demonstrating options for button remapping, dead zone, auto-fire, and sensitivity adjustments.
4. Wartung
4.1 Reinigung
Reinigen Sie den Controller mit einem weichen, trockenen Tuch. Bei hartnäckigem Schmutz kann ein leicht feuchtes Tuch hilfreich sein.amp Ein Tuch mit milder Seife kann verwendet werden. Achten Sie darauf, dass keine Flüssigkeit in die Öffnungen des Controllers gelangt. Vermeiden Sie scharfe Chemikalien oder scheuernde Materialien.
4.2 Speicherung
Store the controller in a cool, dry place away from direct sunlight and extreme temperatures. The controller comes with a protective carrying case, which is recommended for storage and transport to prevent damage.

Image 4.1: The included storage bag provides full protection for the controller with shockproof layers and a soft lining.
5. Fehlerbehebung
5.1 Controller verbindet/koppelt nicht
- Stellen Sie sicher, dass der Controller aufgeladen ist.
- Verify the correct platform is selected using the 'Easy-Switch Button'.
- Stellen Sie sicher, dass sich der Controller im Kopplungsmodus befindet (die Kontrollleuchten blinken schnell).
- Deaktivieren und aktivieren Sie Bluetooth auf Ihrem Gerät erneut.
- Try connecting the controller via USB-C cable to confirm functionality.
- If connecting to PC, ensure you have the latest Bluetooth drivers installed.
5.2 Eingangsverzögerung oder -unterbrechungen
- Ensure the controller is within 10 meters of the connected device.
- Minimieren Sie Störungen durch andere drahtlose Geräte.
- Stellen Sie sicher, dass der Akku des Controllers nicht schwach ist.
- Consider using a wired connection if wireless performance is consistently poor.
5.3 Tasten oder Joysticks reagieren nicht
- Starten Sie den Controller neu und versuchen Sie, die Verbindung wiederherzustellen.
- Prüfen Sie, ob sich um die Knöpfe/Joysticks herum physische Hindernisse oder Ablagerungen befinden.
- Perform a factory reset if available (refer to the Keylinker APP or manufacturer's web(siehe Website für genaue Anweisungen).
6. Spezifikationen
| Modellnummer | B0CLYF3WF7 |
| Marke | IINE |
| Kompatible Geräte | Nintendo Switch, PC, Android, Mac, Tablet, Phone |
| Konnektivitätstechnologie | Wireless (Bluetooth 5.0), Wired (USB-C) |
| Besondere Merkmale | Hall Effect Joysticks, Hall Effect Triggers, NFC, Motion Sense (6-axis Gyro), Macro Programming, Adjustable Rumble (4 levels), Wake-up Function, Turbo Auto-Fire, 3.5mm Headset Port |
| Batteriekapazität | 1000 mAh |
| Akkulaufzeit | Ca. 15 Stunden |
| Ladezeit | Ca. 2-3 Stunden |
| Hersteller | WEUTOP |
7. Garantie und Support
For warranty information and technical support, please refer to the official IINE webBesuchen Sie die Website oder kontaktieren Sie den Händler, bei dem Sie das Produkt gekauft haben. Bewahren Sie Ihren Kaufbeleg für Garantieansprüche auf.