1. Einleitung
The tenlamp G1 Live Sound Card is an integrated audio mixer designed for live streaming, podcasting, recording, singing, and gaming. This equipment bundle includes the G1 audio console and two 3.5mm studio condenser microphones, providing a comprehensive solution for audio production. This manual provides detailed instructions for setting up, operating, maintaining, and troubleshooting your G1 system.
2. Packungsinhalt
Bevor Sie fortfahren, überprüfen Sie bitte, ob alle Artikel in Ihrem Paket vorhanden sind:
- Tenlamp G1-Audiokonsole
- 2 x 3.5mm Studio Condenser Microphones
- Microphone Stands and Pop Filters
- USB-C to USB-A Cable (for power and data)
- 3.5mm TRRS Audio Cables (for mobile device connection)
- Bedienungsanleitung
3. Produktüberschreitungview
The tenlamp G1 audio console features multiple inputs and outputs, along with various controls for audio mixing and effects. Familiarize yourself with the layout before setup.

Image: The tenlamp G1 Live Sound Card and two condenser microphones set up for a two-person podcast, demonstrating a typical usage scenario.
3.1 Bedienelemente auf der Vorderseite
- Mic VOL Fader: Adjusts the input volume of the connected microphones.
- Music VOL Fader: Adjusts the volume of the background music input.
- Monitor VOL Knob: Controls the volume of the monitoring headphones.
- Output VOL Knob: Regelt die Hauptausgangslautstärke.
- Reverb Effect Fader: Passt die Intensität des Hall-Effekts an.
- Höhen-/Bass-EQ: Adjusts high and low frequencies for microphone input.
- Voice-change Buttons: Activates various voice modulation effects.
- Sound Pad Buttons: Triggers pre-loaded sound effects.
- Noise Reduction Buttons: Activates different levels of intelligent noise reduction.
3.2 Anschlüsse auf der Rückseite

Bild: Eine detaillierte view of the tenlamp G1 audio console's rear panel, showing various input and output ports including USB-C, Output, Music, Monitor, Headset, and Mic inputs.
- USB-C-Anschluss: For power supply, data transfer to computer, and digital audio I/O. Note: Does not support USB mic connection via this port.
- Output Ports (TRRS): Connects to mobile devices for live streaming or recording.
- Musikeingang: Connects external audio sources (e.g., phone, tablet) for background music.
- Monitorausgang: Connects monitoring headphones.
- Headset-Eingang: Connects a headset with integrated microphone.
- Mic Inputs (3.5mm): Connects the included 3.5mm condenser microphones.
4. Installationsanleitung
Follow these steps to set up your tenlamp G1 Live Sound Card for optimal performance.
- Mikrofone anschließen: Insert the 3.5mm plugs of the condenser microphones into the designated Mikrofon input jacks on the rear panel of the G1 console. Secure microphones on their stands.
- Monitoring-Kopfhörer anschließen: Schließen Sie Ihre Kopfhörer an den Monitor Ausgangsbuchse.
- Anschluss an Strom/Computer: Connect the USB-C end of the provided cable to the USB-C port on the G1 console and the USB-A end to your computer's USB port or a power adapter. The device will power on.
- Connect to Mobile Device (Optional): If live streaming or recording on a mobile device, use the TRRS audio cables to connect the Ausgabe ports on the G1 to your mobile device's headphone jack.
- Connect Music Source (Optional): If using external background music, connect your music device to the Musik Eingangsbuchse.
5. Bedienungsanleitung
This section details how to use the various features of your tenlamp G1 Live Sound Card.
5.1 Grundlagen der Audiomischung
- Mikrofonlautstärke anpassen: Verwenden Sie die Mic VOL fader to control the loudness of your voice.
- Musiklautstärke anpassen: Verwenden Sie die Musik VOL fader to balance the background music with your voice.
- Überwachen Sie Ihr Audio: Passen Sie die Monitor VOL knob to set a comfortable listening level in your headphones.
- Control Output Volume: Der Output VOL knob controls the overall volume sent to your recording device or live stream.

Image: A close-up of the tenlamp G1 audio console, illustrating the various knobs and faders for fine-tuning audio parameters such as microphone volume, music volume, monitoring, output, reverb, treble/bass, and voice effects.
5.2 Rauschunterdrückung
The G1 features intelligent noise reduction to enhance audio clarity.
- Drücken Sie die entsprechende Rauschunterdrückung buttons (e.g., "Denoise1", "Denoise2", "Denoise3") to activate different levels of noise cancellation. Experiment to find the best setting for your environment.

Image: The tenlamp G1 audio console displaying its noise reduction capabilities, with three distinct levels labeled "Cheer Denoise1", "Kiss Denoise2", and "Guffaw Denoise3" for clear and clean audio recording.
5.3 Special Streaming Features
Enhance your live streams and recordings with these integrated functions:
- Dodge (Auto Ducking): When activated, this feature automatically lowers background music volume when you speak into the microphone, making your voice clearer.
- Gesang entfernen: This function attempts to remove the vocal track from accompaniment music, allowing you to sing over instrumental versions.
- Schleife: Enables recording of internal PC audio along with your microphone input via the USB-C connection.

Image: The tenlamp G1 audio console showcasing convenient features for streaming, including "Dodge" for auto-ducking microphone input, "Remove Vocals" to eliminate vocals from accompaniment, and "Loopback" for recording PC internal audio via USB-C.
5.4 Creating Atmosphere
Utilize the built-in effects to customize your audio environment:
- Stimmverzerrer: Select from 4 different voice modulation effects.
- Reverb-Modi: Choose from 5 preset reverb modes to add depth to your vocals.
- Automatische Abstimmung: Apply 12-step auto-tune for pitch correction.
- Soundpads: Trigger various sound effects using the dedicated buttons.
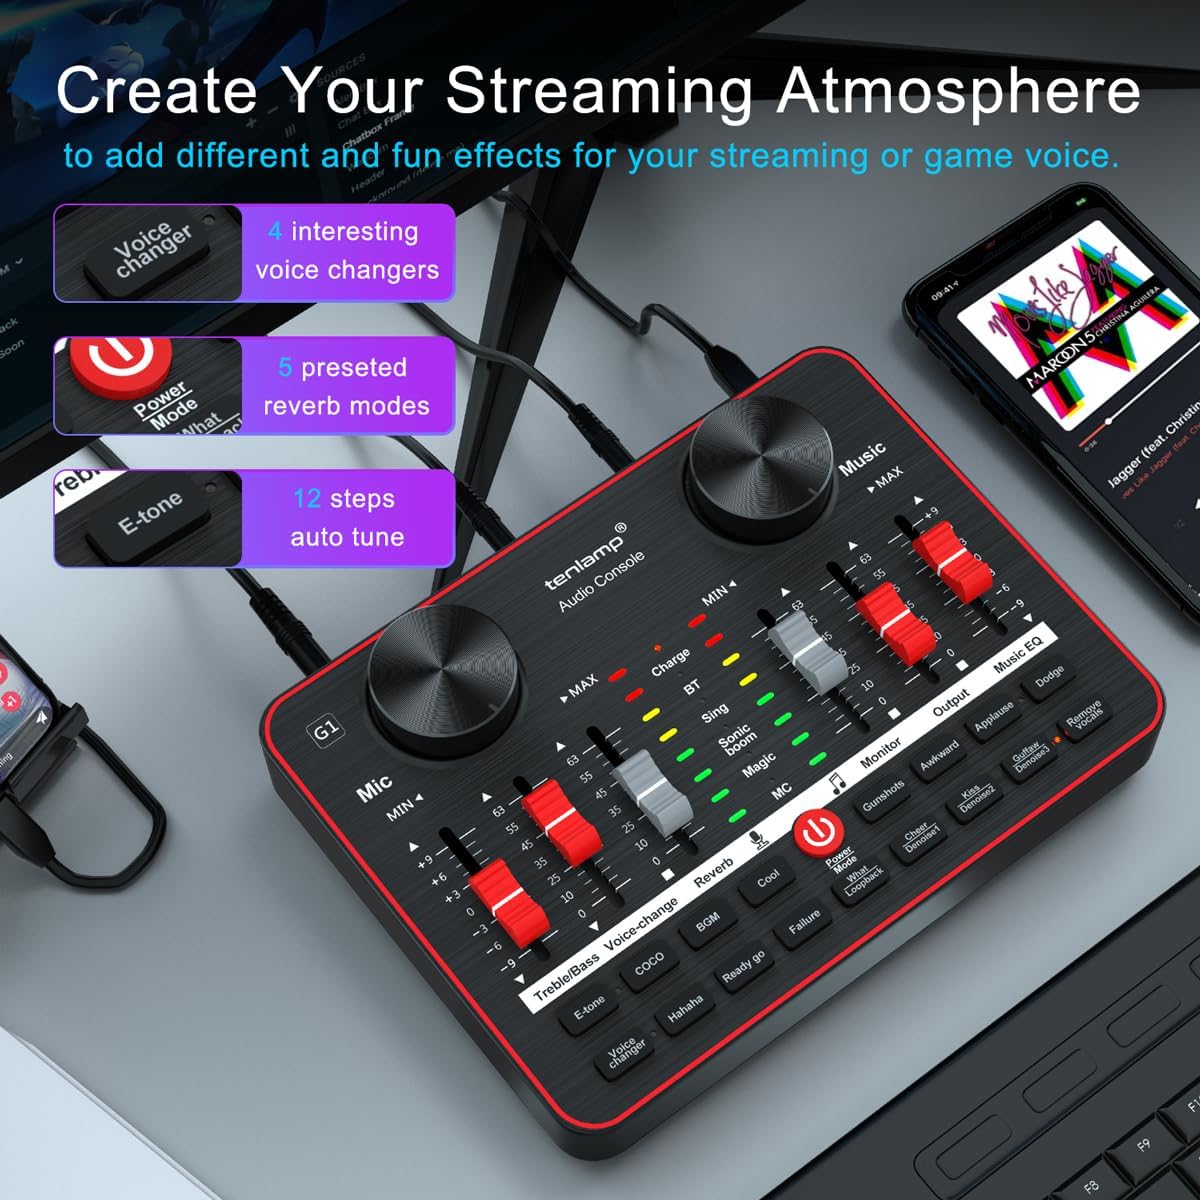
Image: The tenlamp G1 audio console highlighting features designed to create a streaming atmosphere, such as 4 interesting voice changers, 5 preset reverb modes, and 12 steps of auto-tune.
6. Wartung
Proper care ensures the longevity and performance of your tenlamp G1-System.
- Reinigung: Use a soft, dry cloth to wipe the surface of the audio console and microphones. Avoid liquid cleaners or abrasive materials.
- Lagerung: Bewahren Sie das Gerät bei Nichtgebrauch an einem kühlen, trockenen Ort fern von direkter Sonneneinstrahlung und extremen Temperaturen auf.
- Kabelmanagement: Um Beschädigungen zu vermeiden, sollten Kabel nicht übermäßig gebogen oder gequetscht werden.
- Mikrofonpflege: Keep microphones dry and free from dust. Use pop filters to protect against moisture and plosives.
7. Fehlerbehebung
Sollten Sie auf Probleme stoßen, konsultieren Sie bitte die folgenden häufigen Probleme und Lösungen:
| Problem | Mögliche Ursache | Lösung |
|---|---|---|
| Keine Tonausgabe | Incorrect cable connection, low volume settings, device not powered on. | Check all cable connections. Ensure G1 is powered. Adjust Mic VOL, Music VOL, Monitor VOL, and Output VOL faders/knobs. Verify computer/mobile device audio settings. |
| Mikrofon funktioniert nicht | Microphone not properly connected, Mic VOL too low, faulty microphone. | Ensure microphone is securely plugged into the correct 3.5mm Mic input. Increase Mic VOL. Test with the second microphone to rule out a faulty unit. |
| Schlechte Audioqualität/Rauschen | High gain, environmental noise, incorrect noise reduction setting. | Lower Mic VOL if distortion occurs. Activate or adjust noise reduction levels. Ensure proper microphone placement (e.g., close to mouth, away from noise sources). |
| Gerät wird vom Computer nicht erkannt | USB cable issue, driver problem (rare for plug-and-play), computer settings. | Try a different USB port or cable. Restart your computer. Check your computer's sound settings to ensure the G1 is selected as the input/output device. |
8. Spezifikationen
Key technical specifications for the tenlamp G1 Live Sound Card:
- Marke: Tenlamp
- Modell: G1
- Anzahl der Kanäle: 5
- Konnektivitätstechnologie: USB
- Energiequelle: Kabelgebunden (über USB)
- Ausgangssteckertyp: TRS
- Audioeingang: USB, XLR (via 3.5mm adapter for condenser mics)
9. Garantie und Support
For warranty information or technical support, please refer to the documentation included with your purchase or visit the official tenlamp website. You can also contact tenlamp customer service through their brand store on Amazon: