1. Einleitung
This manual provides detailed instructions for the safe and effective operation, setup, and maintenance of your LLAVETOR Digital Torque Wrench, Model LD001. This electronic torque wrench is designed for precise torque applications across various tasks, from automotive and motorcycle maintenance to bicycle assembly and general DIY projects. Please read this manual thoroughly before using the tool to ensure proper function and to prevent damage or injury.
2. Sicherheitshinweise
Always observe basic safety precautions when using any power tool. Failure to follow these instructions may result in injury or damage to the tool or workpiece.
- Tragen Sie geeignete persönliche Schutzausrüstung, wie z. B. eine Schutzbrille.
- Vor dem Anlegen des Drehmoments sicherstellen, dass das Werkstück stabil und gesichert ist.
- Do not exceed the maximum torque capacity of 400 NM.
- Halten Sie Hände und Finger von beweglichen Teilen fern.
- Verwenden Sie den Schraubenschlüssel nicht, wenn er beschädigt ist oder nicht richtig funktioniert.
- Store the wrench in a dry, secure place away from children.
- Entfernen Sie die Batterien, wenn das Gerät über einen längeren Zeitraum nicht benutzt wird.
3. Packungsinhalt
Überprüfen Sie, ob alle Artikel im Paket vorhanden sind:
- LLAVETOR Digital Torque Wrench (1/2" drive)
- Aufbewahrungskoffer
- Bedienungsanleitung
- Batteries (AAA type, pre-installed or included separately)
- Kalibrierzertifikat
4. Produktüberschreitungview und Funktionen
The LLAVETOR Digital Torque Wrench offers advanced features for precise and reliable torque measurement.
- Breiter Drehmomentbereich: Measures from 20 to 400 Newton-meters (Nm).
- Hohe Genauigkeit: Provides a precision of ±2% in clockwise direction.
- Mehrere Maßeinheiten: Easily switch between ft-lb, Nm, in-lb, and kg-cm.
- Buzzer and LED Notification: Audible and visual alerts indicate when the target torque is approached and reached.
- Track and Peak Modes:
- PEAK-Modus: Records the maximum torque value applied.
- TRACK Mode: Displays real-time torque values during application.
- Preset Modes (M0-M9): Store up to 10 frequently used torque settings for quick recall.
- Langlebige Konstruktion: Head made from hardened chrome-vanadium steel with an ergonomic, anti-slip handle.

Figure 1: LLAVETOR Digital Torque Wrench, Model LD001. This image shows the overall design of the digital torque wrench with its display and control buttons.

Figure 2: Displaying the wrench's ±2% accuracy and the four available measurement units: N.m (20-400), in-lb (177.0-3540), ft-lb (14.75-295.0), and kg-cm (203.9-4078).
5. Einrichtung
5.1 Einlegen der Batterie
The wrench requires two AAA batteries for operation. If batteries are not pre-installed, follow these steps:
- Suchen Sie den Batteriefachdeckel am Griff.
- Unscrew the cover (screwdriver not included).
- Legen Sie zwei AAA-Batterien ein und achten Sie dabei auf die richtige Polarität (+/-).
- Bringen Sie die Abdeckung wieder an und befestigen Sie sie mit der Schraube.
Note: Remove batteries if the wrench will not be used for an extended period to prevent leakage.
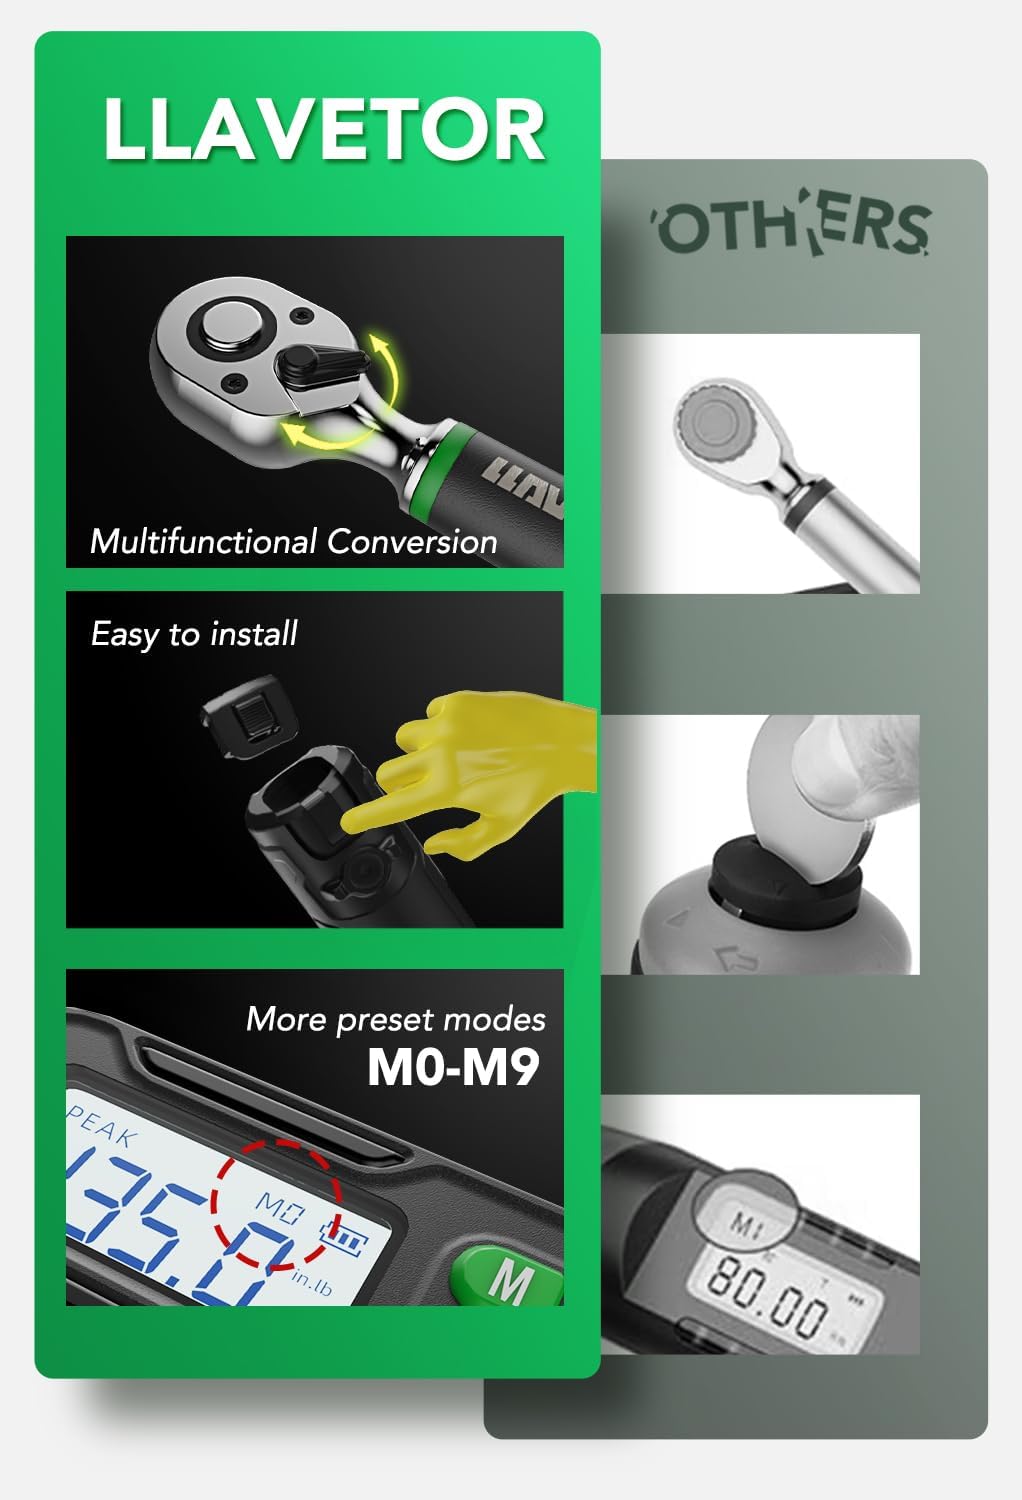
Figure 3: Illustrates the easy battery installation process and highlights features like multifunctional conversion and preset modes (M0-M9).
6. Bedienungsanleitung
6.1 Kontrollen überview

Abbildung 4: Nahaufnahme view of the control panel, showing the 'M' button for preset modes, 'Up' and 'Down' buttons for value adjustment, 'C' for Power On/Off, and 'U' for switching measurement units.
- C-Taste: Einschalten / Ausschalten.
- U-Taste: Switch between measurement units (Nm, ft-lb, in-lb, kg-cm).
- Auf/Ab-Tasten: Adjust torque values or navigate menus.
- M-Taste: Select and manage preset torque modes (M0-M9).
6.2 Ein-/Ausschalten
Drücken Sie die C Knopf zum Einschalten des Schraubenschlüssels. Drücken und halten Sie den Knopf. C Taste, um es auszuschalten.
6.3 Auswahl von Maßeinheiten
With the wrench powered on, press the U button to cycle through the available measurement units: Nm, ft-lb, in-lb, and kg-cm. Select the unit appropriate for your task.
6.4 Setting Target Torque and Operating Modes
The wrench supports both PEAK and TRACK modes.
- To set a target torque: In the desired mode, use the Up Und Runter buttons to adjust the target torque value on the display.
- PEAK-Modus: This mode captures and displays the maximum torque applied during a tightening operation. It is useful for verifying the peak torque achieved.
- TRACK Mode: This mode displays the torque value in real-time as it is being applied. This is ideal for monitoring torque during the tightening process.
6.5 Buzzer and LED Notification
When approaching the set target torque, the wrench provides both audible and visual feedback:
- As you get closer to the target torque, the buzzer will emit a regular beeping sound.
- Die LED-Anzeige blinkt grün.
- Once the target torque is reached, the buzzer will emit a continuous tone, and the LED light will turn solid red. This indicates that you should stop applying force to prevent over-tightening.

Figure 5: Illustration of the digital display showing the torque value, battery indicator, and the active buzzer and LED light notification system.
6.6 Using Preset Modes (M0-M9)
The wrench allows you to save up to 10 preset torque values for quick access.
- Drücken Sie die M button to enter preset mode selection.
- Verwenden Sie die Up Und Runter buttons to select a preset slot (M0-M9).
- To save a new value, select an empty slot or overwrite an existing one by setting the desired torque value using the Up Und Runter buttons, then press and hold the M Schaltfläche zum Speichern.
- To recall a preset value, simply select the desired slot using the M Und Hoch/Runter Schaltflächen.

Figure 6: Visual representation of the 10 available preset modes (M0-M9) on the digital display, designed to save time by storing common torque settings.
6.7 Allgemeine Verwendung
Attach the appropriate socket to the 1/2" square drive. Place the socket onto the fastener. Apply smooth, steady force to the wrench handle. Observe the digital display and listen for the buzzer/LED notifications. Stop applying force immediately when the target torque is indicated to prevent over-tightening.

Figure 7: The LLAVETOR Digital Torque Wrench being used to tighten lug nuts on a car wheel, demonstrating a typical application.
7. Wartung
- Reinigung: Reinigen Sie den Schraubenschlüssel nach jedem Gebrauch mit einem weichen, trockenen Tuch. Verwenden Sie keine Scheuermittel oder Lösungsmittel.
- Lagerung: Store the wrench in its protective case in a dry, cool environment. Remove batteries if storing for extended periods.
- Kalibrierung: Digital torque wrenches require periodic calibration to maintain accuracy. Refer to the included calibration certificate for details.

Abbildung 8: Ein Bspample of the calibration certificate provided with each torque wrench, confirming its accuracy and adherence to standards.
8. Fehlerbehebung
| Problem | Mögliche Ursache | Lösung |
|---|---|---|
| Wrench lässt sich nicht einschalten. | Defekte oder falsch eingesetzte Batterien. | Batteriepolung prüfen. Batterien durch neue AAA-Batterien ersetzen. |
| Das Display ist dunkel oder flackert. | Niedriger Batteriestand. | Batterien ersetzen. |
| Ungenaue Drehmomentmesswerte. | Wrench needs recalibration; improper usage. | Ensure smooth, steady application of force. Refer to calibration instructions or contact support for recalibration. |
| Wrench turns off unexpectedly during use. | Low battery power; loose battery connection. | Replace batteries. Ensure batteries are securely seated in the compartment. |
9. Spezifikationen
| Besonderheit | Detail |
|---|---|
| Modell | LD001 |
| Laufwerksgröße | 1/2 Zoll |
| Drehmomentbereich | 20-400 Nm (14.75-295.0 ft-lb, 177.0-3540 in-lb, 203.9-4078 kg-cm) |
| Genauigkeit | ±2% (im Uhrzeigersinn) |
| Maßeinheiten | Nm, ft-lb, in-lb, kg-cm |
| Betriebsarten | Gipfel, Strecke |
| Stromquelle | 2 x AAA-Alkalibatterien |
| Material | Chrome-Vanadium Steel (Head) |
| Farbe | Schwarz |
| Abmessungen (ca.) | 25.7 Zoll (65.2 cm) Länge |
| Hersteller | LLAVETOR.Inc |
10. Garantie und Support
For warranty information or technical support, please refer to the documentation included with your purchase or contact LLAVETOR customer service. Keep your purchase receipt as proof of purchase.