
Einführung
Vielen Dank für Ihren Einkauf.asing the mooas Wooden Frame LED Silent Wall Clock. This manual provides detailed instructions for setting up, operating, and maintaining your new clock. Please read this manual thoroughly before use to ensure proper functionality and to maximize your product experience.
Sicherheitshinweise
- Ensure the clock is powered by the provided adapter only.
- Setzen Sie das Gerät nicht Wasser oder übermäßiger Feuchtigkeit aus.
- Vermeiden Sie es, die Uhr direkter Sonneneinstrahlung oder der Nähe von Wärmequellen auszusetzen.
- Außerhalb der Reichweite von Kindern aufbewahren.
- Versuchen Sie nicht, das Gerät selbst zu zerlegen oder zu reparieren. Wenden Sie sich an den Kundendienst, um Hilfe zu erhalten.
Packungsinhalt
Überprüfen Sie, ob alle Artikel in Ihrem Paket vorhanden sind:
- mooas Wanduhr mit Holzrahmen, LED-Beleuchtung und geräuschlosem Betrieb
- Fernbedienung
- USB-C-Stromkabel
- US-Netzteil (110 V)
- Wooden Desk Stand
- Wall Mounting Accessories (Wall mount pin, Art wall hook, Cable clip, Screw anchor, Wall mount screw)
- Bedienungsanleitung

Abbildung 1: Packungsinhaltview
Aufstellen
1. Stromanschluss
Connect the provided USB-C power cable to the clock and plug the US (110V) power adapter into a wall outlet. The clock requires continuous power via the adapter to function. The built-in CR2032 battery is for time memory only and does not power the clock.

Figure 2: Updated US Power Adapter
2. Aktivierung per Fernbedienung
Before first use, remove the protective film from the back of the remote control. If the remote control does not respond, separate both the battery and cable from the clock and remote control, then reconnect them. This will reset the time, which you will need to set again.
3. Montagemöglichkeiten
The clock offers two display options: wall mounting or desk standing.
- Wandmontage: Use the hanging hole on the back of the clock and the provided wall mounting accessories (wall mount pin, art wall hook, screw anchor, wall mount screw) to securely hang the clock on a wall.
- Desk Standing: Insert the clock into the included wooden desk stand for stable placement on any flat surface.

Figure 3: Wall Mounting and Desk Standing Options
4. Kabelmanagement
The clock features a thin cable (0.043 inch) designed for neat installation, making it less visible when the clock is set up.

Figure 4: Thin Cable for Discreet Installation
Bedienungsanleitung
1. Grundlegende Anzeige
The LED display shows the time, date, and day of the week. The day of the week can be set in 8 languages: English, German, Italian, French, Dutch, Spanish, Danish, and Russian.

Abbildung 5: Anzeigeelemente
2. Betriebsarten
The clock features three operating modes:
- Uhrmodus: Displays time, date, and day.
- Nachtlichtmodus: Activates the backlight nightlight only.
- Nachtlicht- und Uhrmodus: Displays time, date, day with the backlight nightlight active.

Abbildung 6: Drei Betriebsmodi
3. Nightlight Features
The backlight nightlight offers three color options to suit your preference:
- Yellow (Warm White): 2700
- White (Daylight): 4000
- Blue (Cool White): 5500
You can also set a nightlight timer for automatic shut-off, with a maximum setting of 120 minutes and a default of 30 minutes.

Figure 7: Nightlight Color Options
4. Helligkeitseinstellung
The LED display and mood light brightness can be adjusted to 5 levels. The clock also features an automatic brightness adjustment function controlled by an illuminance sensor. To activate auto-brightness, long-press the display brightness button on the remote; the display will blink twice to confirm activation.
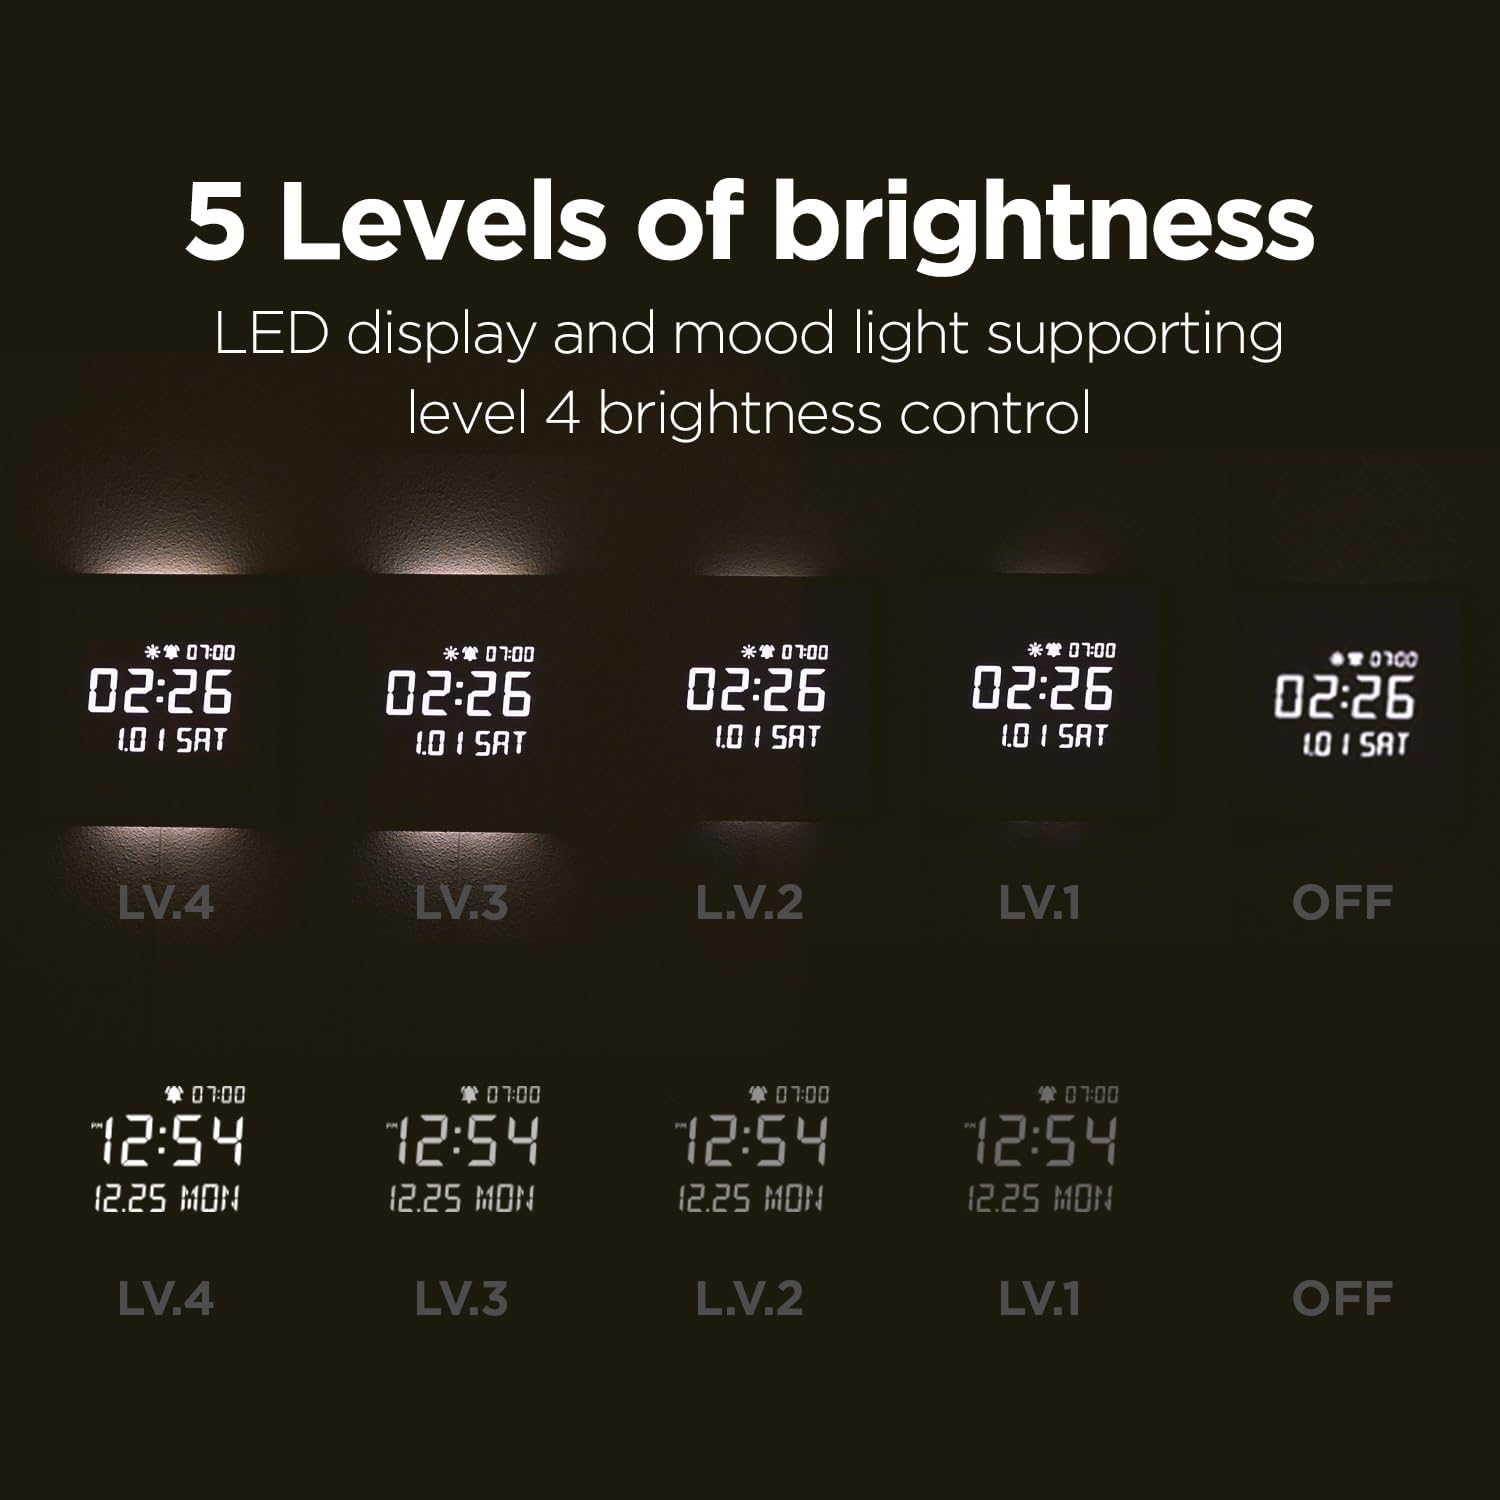
Figure 8: 5 Levels of Brightness

Figure 9: Auto Brightness Control
5. Alarmfunktionen
- Sonnenaufgangsalarm: Set a 10, 20, or 30-minute sunrise mode where the backlight gradually brightens before the alarm time, providing a gentle wake-up experience.
- Wochentagsalarm: Configure alarms to activate only on weekdays, allowing for uninterrupted rest on weekends.
- Melodien: Choose from 5 available melodies, including bird sounds, rain sounds, and a standard beep.
- Lautstärkeregelung für Alarme: Adjust the alarm volume to High (03), Mid (02), Low (01), or Off. The sequence for adjustment is High (03) → Off → Low (01) → Mid (02).

Figure 10: Melody Alarm Feature

Figure 11: Alarm Volume Control
6. Fernsteuerung überview
The remote control provides easy access to all clock functions. Refer to the diagram below for button functions:
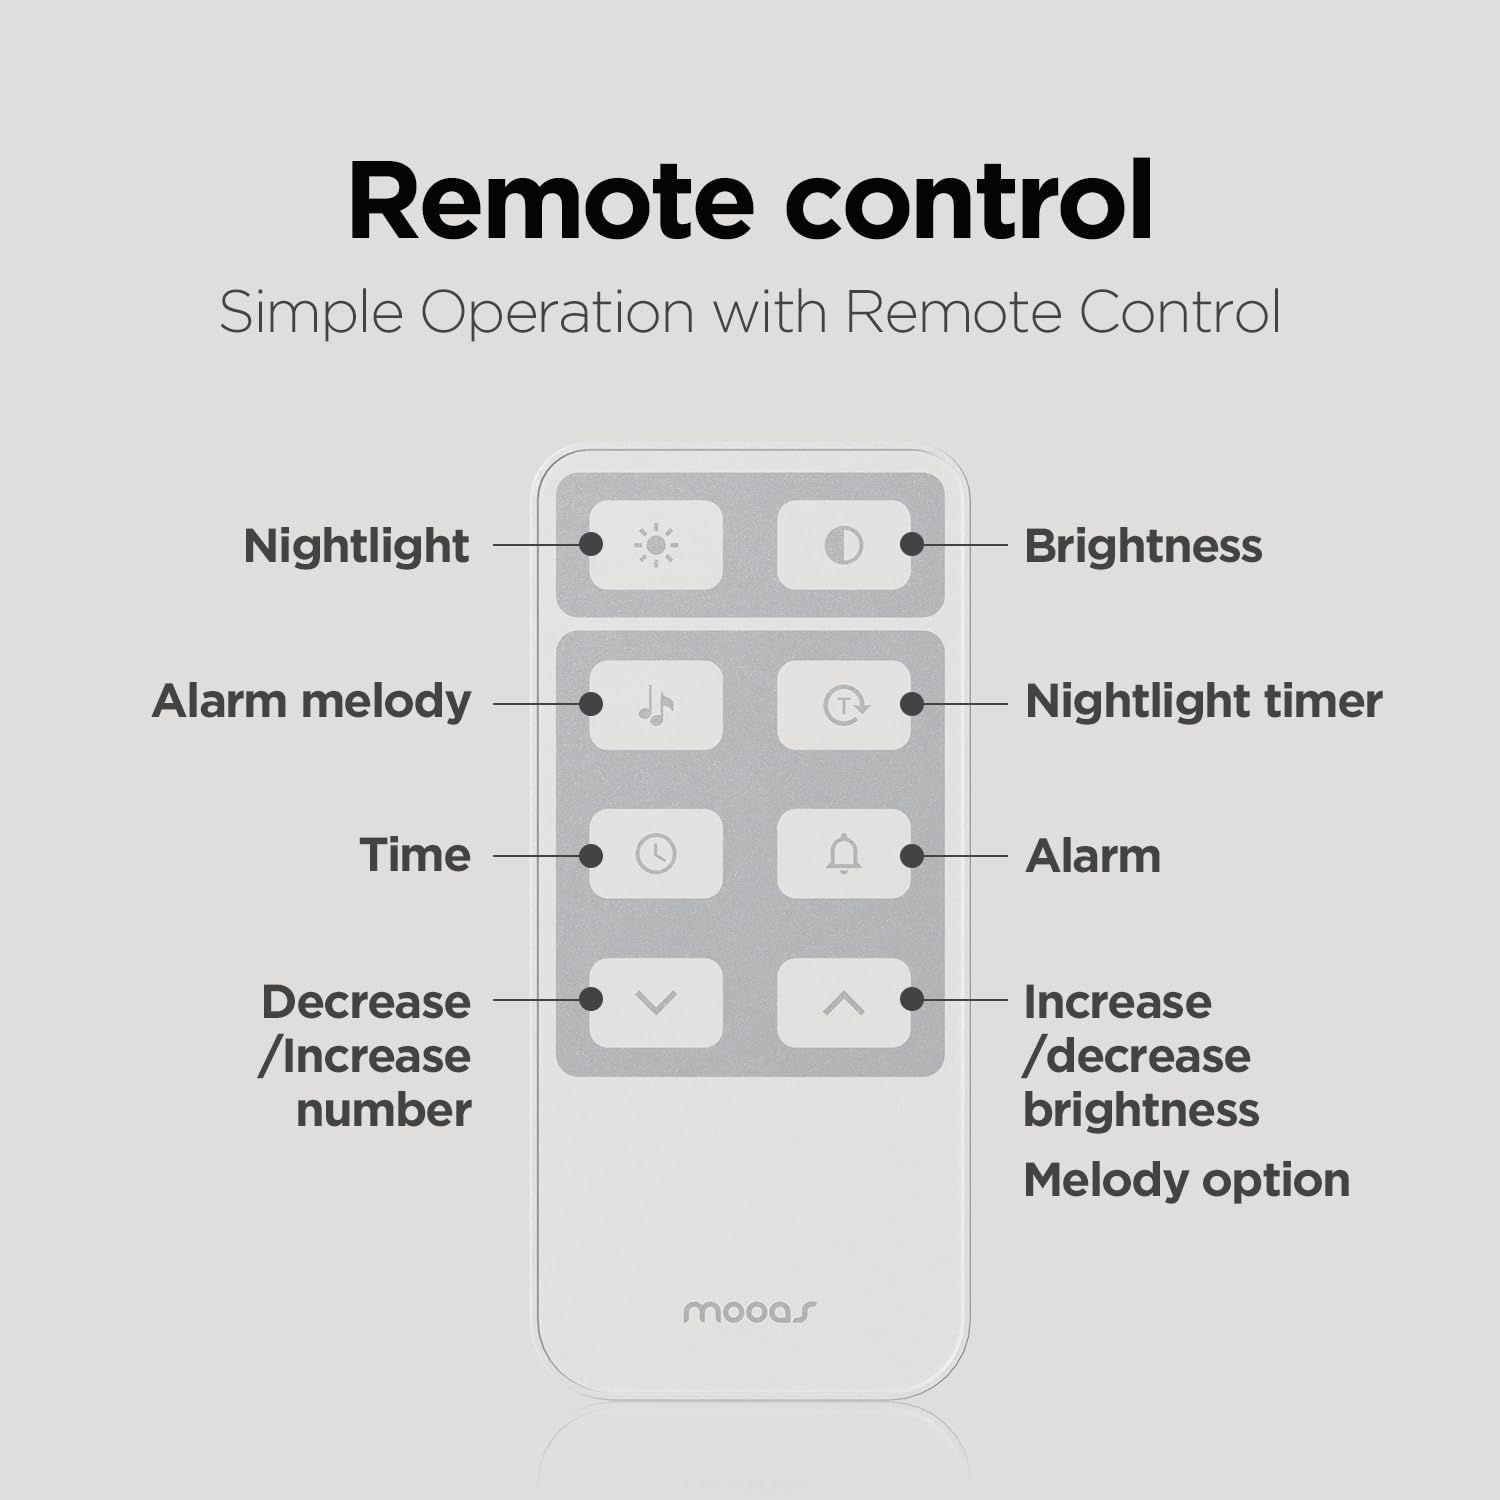
Abbildung 12: Fernbedienungsfunktionen
7. Temperaturanzeige (Celsius/Fahrenheit)
To switch between Celsius (C) and Fahrenheit (F) temperature display, short press the UP Taste auf der Fernbedienung.
Wartung
To maintain your mooas clock, gently wipe the surface with a soft, dry cloth. Avoid using abrasive cleaners or solvents, as these may damage the wooden frame or LED display. Ensure the clock is unplugged before cleaning.
Fehlerbehebung
- Uhr lässt sich nicht einschalten: Stellen Sie sicher, dass das Netzteil sowohl mit der Uhr als auch mit einer funktionierenden Steckdose fest verbunden ist.
- Fernbedienung reagiert nicht: Remove the protective film from the remote. If issues persist, disconnect and reconnect the battery and cable from both the clock and remote to reset.
- Display too bright: Adjust the brightness manually using the remote control or activate the auto-brightness function.
- Falsche Uhrzeit/falsches Datum: Reset the time and date using the remote control. The internal CR2032 battery helps retain settings during brief power outages.
Technische Daten
| Besonderheit | Spezifikation |
|---|---|
| Marke | Muh |
| Modellnummer | MC-L8 |
| Technische Daten | 11.4 Zoll B x 11.4 Zoll H |
| Materialtyp | Holz |
| Anzeigetyp | Digitale LED |
| Stromquelle | Corded Electric (5V 2A adapter) |
| Besondere Merkmale | Alarm, Backlit Nightlight, Remote Control, Auto Brightness Adjustment, Sunrise Alarm, Nightlight Timer |
| Montagetyp | Wandmontage, Tischständer |
Produkt überview Video
Sehen Sie sich dieses offizielle Video an, um einen visuellen Eindruck zu erhalten.view of the mooas Wooden Frame LED Silent Wall Clock's features and design.
Video 1: mooas Wooden Frame LED Clock Overview
Garantie und Support
For warranty information or technical support, please refer to the product packaging or contact mooas customer service directly. Keep your purchase receipt for warranty claims.


