1. Einleitung
This manual provides essential information for the safe and effective operation of the FNNEMGE MY2600D Digital Clamp Meter. This versatile instrument is designed for precise measurement of AC/DC voltage, AC/DC current, resistance, capacitance, frequency, duty cycle, diode, continuity, and temperature. It features True RMS measurement, Non-Contact Voltage (NCV) detection, Low Pass Filter (LPF), and Low Impedance (LowZ) functions, making it suitable for industrial, automotive, household, and educational applications.

Image 1.1: The FNNEMGE MY2600D Digital Clamp Messgerät inklusive Messleitungen und schützendem Tragekoffer.
2. Sicherheitshinweise
To ensure safe operation and prevent damage to the meter, please read and follow all safety instructions carefully. This device complies with IEC 61010-1, CAT III 600V, and CE standards.
- Generelle Sicherheit: Always use the meter according to the instructions. Do not operate the meter if it appears damaged or if the insulation is compromised.
- Bandtage Grenzen: Nicht mehr als die angegebene Menge auftragen.tage, as marked on the meter, between the terminals or between any terminal and earth ground. The maximum operating voltage beträgt 600 Volt.
- Strommessung: Ensure the circuit is de-energized before connecting the clamp meter for current measurements, especially when measuring high currents.
- Messleitungen: Use only the test leads provided with the meter. Inspect test leads for damage before each use.
- Unter Spannung stehende Stromkreise: Bei Arbeiten an stromführenden Leitungen ist äußerste Vorsicht geboten. Vermeiden Sie den Kontakt mit blanken Leitern oder Klemmen.
- Umfeld: Verwenden Sie das Messgerät nicht in Umgebungen mit explosiven Gasen, Dämpfen oder Staub.
- Überlastschutz: The meter features overload protection, double ceramic fuses, and thermistors to protect the circuit. However, always operate within specified ranges.
- Batteriewechsel: Tauschen Sie die Batterien umgehend aus, sobald die Anzeige für niedrigen Batteriestand erscheint, um genaue Messwerte zu gewährleisten.

Image 2.1: Illustration of the internal overload protection mechanism within the clamp meter, designed to prevent damage from misuse.
3. Produktüberschreitungview
Familiarize yourself with the components of your FNNEMGE MY2600D Digital Clamp Meter:

Image 3.1: Detailed diagram of the clamp meter indicating its various parts and controls.
- Clamp: Wird zur berührungslosen Messung von Wechsel- und Gleichstrom verwendet.
- Safety Barrier: Indicates the safe limit for hand placement.
- Function Range Switch: Rotary dial to select measurement functions.
- Data Hold Button (H): Friert den aktuellen Messwert auf dem Display ein.
- Taschenlampentaste: Aktiviert die eingebaute LED-Taschenlampe.
- LCD Bildschirm: Digital display for readings, units, and indicators.
- Eingangsanschluss: Positiver Eingang für Testleitungen.
- COM-Eingangsanschluss: Gemeinsamer (negativer) Eingang für Messleitungen.
- Backlight Reset Button: Steuert die Hintergrundbeleuchtung des Displays.
- Function Selection Button (SEL): Toggles between functions within a rotary switch position (e.g., AC/DC, Diode/Continuity).
- Warnanzeige: Visual alert for certain conditions (e.g., NCV detection).
- Auslösen: Öffnet und schließt die clamp Kiefer.
- Beleuchtung lamp: Provides light for the measurement area.
- NCV Detection Probe: Bereich für kontaktloses Voltage Erkennung.
4. Einrichtung
4.1 Einlegen der Batterie
The FNNEMGE MY2600D requires two AAA batteries (included). To install or replace batteries:
- Stellen Sie sicher, dass der Zähler ausgeschaltet ist.
- Suchen Sie den Batteriefachdeckel auf der Rückseite des Messgeräts.
- Lösen Sie die Schraube(n) mit einem Schraubendreher und entfernen Sie die Abdeckung.
- Legen Sie zwei AAA-Batterien ein und achten Sie dabei auf die richtige Polarität (+ und -), wie im Batteriefach angegeben.
- Bringen Sie die Abdeckung des Batteriefachs wieder an und befestigen Sie sie mit der/den Schraube(n).

Abbildung 4.1: Die clamp meter package contents, including the meter, manual, test leads, and AAA batteries.
5. Bedienungsanleitung
Before operating, ensure the meter is in good condition and the batteries are properly installed.
5.1 Ein-/Ausschalten
Rotate the Function Range Switch to any desired measurement function to turn the meter ON. Rotate it to the "OFF" position to turn the meter OFF. The meter features an automatic shutdown function to conserve battery life after a period of inactivity.
5.2 AC/DC Current Measurement (0-600A)
To measure current using the clamp:
- Rotate the Function Range Switch to the "600A" or "60A" position for AC/DC current.
- Press the "SEL" button to switch between AC and DC current measurement if necessary.
- Drücken Sie den Auslöser, um die Cl zu öffnenamp Kiefer.
- Enclose only one conductor (not a cable with multiple conductors) within the clamp Kiefer.
- Zum Schließen des Kiefers den Auslöser loslassen. Der aktuelle Messwert wird auf dem LCD-Display angezeigt.

Abbildung 5.1: Die clamp jaw open, demonstrating how to enclose a single conductor for current measurement. The jaw opening is 26mm.
5.3 AC/DC-Voltage Messung
Zur Messung der Lautstärketage:
- Stecken Sie die rote Messleitung in den Anschluss „INPUT“ und die schwarze Messleitung in den Anschluss „COM“.
- Rotate the Function Range Switch to the "V~" (AC Voltage) oder "V-" (DC Vol)tage) position. The meter may automatically detect AC or DC.
- Press the "SEL" button to switch between AC and DC voltage bei Bedarf.
- Schließen Sie die Messleitungen parallel an den Stromkreis oder das Bauteil an, das Sie messen möchten.
- Lesen Sie den Bandtage-Wert auf dem LCD.

Image 5.2: Measuring voltage by inserting test leads into a power outlet.
5.4 Resistance, Diode, Continuity, Capacitance, Frequency, Duty Cycle Measurement
For these measurements, connect the test leads as described for voltage-Messung.
- Widerstand (Ω): Rotate the switch to the "Ω" position. Connect leads across the component.
- Diode (→|): Rotate the switch to the "Ω" position and press "SEL" until the diode symbol appears. Connect leads across the diode.
- Continuity (🔊): Rotate the switch to the "Ω" position and press "SEL" until the continuity symbol appears. Connect leads across the circuit. An audible beep indicates continuity.
- Kapazität (F): Rotate the switch to the "F" position. Connect leads across the capacitor.
- Frequenz (Hz) / Tastverhältnis (%): Rotate the switch to the "Hz%" position. Press "SEL" to toggle between frequency and duty cycle. Connect leads to the signal source.

Abbildung 5.3: Beispielamples of various measurements including voltage, resistance, battery, and diode testing using the meter and its test leads.
5.5 Temperaturmessung
So messen Sie die Temperatur:
- Rotate the Function Range Switch to the "°C/°F" position.
- Insert the temperature probe into the "INPUT" and "COM" terminals, observing polarity.
- Platzieren Sie die Spitze des Temperaturfühlers auf oder in der Nähe des Objekts, dessen Temperatur Sie messen möchten.
- Read the temperature on the LCD. Press "SEL" to switch between Celsius and Fahrenheit.
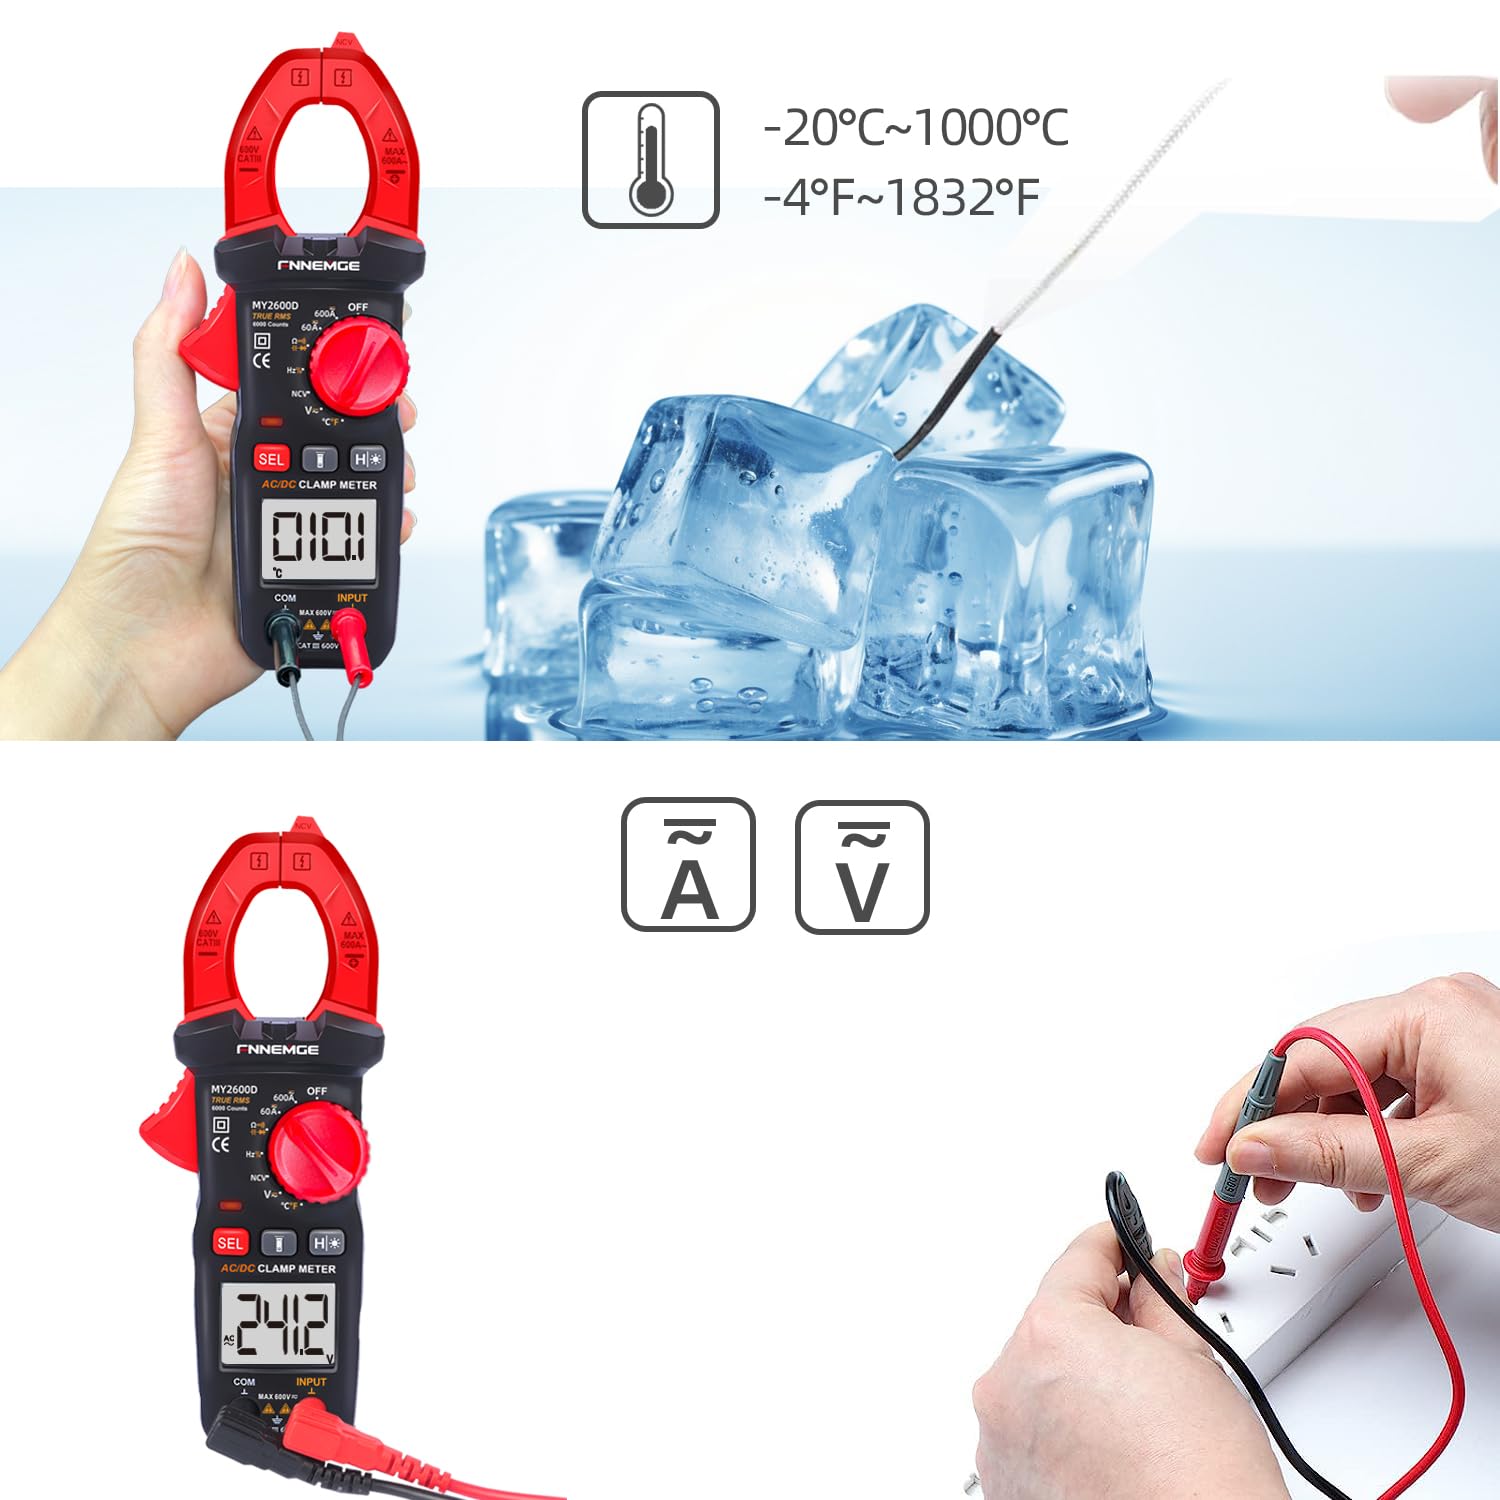
Image 5.4: Using the temperature probe to measure the temperature of ice, demonstrating the meter's temperature function.
5.6 Sonderfunktionen
- Kontaktloses Volumentage (NCV): Rotate the switch to the "NCV" position. Bring the NCV detection probe (top of the clamp jaw) near a live AC voltagDie Quelle. Das Messgerät zeigt das Vorhandensein von Volumen an.tage with an audible alarm and visual warning.
- Tiefpassfilter (LPF): Beim Messen der AC-Voltage or current in circuits with variable frequency drives or other noise sources, activate LPF by pressing the dedicated button (if available, or via SEL in AC V/A mode). This filters out high-frequency interference for more accurate True RMS readings.
- Low Impedance (LowZ): This function helps prevent ghost voltages by providing a low impedance input, which drains away stray capacitance. Activate LowZ by selecting the appropriate function on the rotary switch or via the "SEL" button.
- Echter Effektivwert (TRMS): The meter automatically measures True RMS for AC voltage und Stromstärke, wodurch genaue Messwerte auch für nicht-sinusförmige Wellenformen bereitgestellt werden.
- Datenhaltung (H): Press the "H" button to freeze the current reading on the display. Press it again to release.
- Hintergrundbeleuchtung/Taschenlampe: Press the backlight button to turn on the LCD backlight. Press the flashlight button to activate the LED flashlight for illuminating the measurement area.

Abbildung 5.5: Die clamp meter's flashlight in use, illuminating a dark area for easier measurement, with the NCV indicator visible.
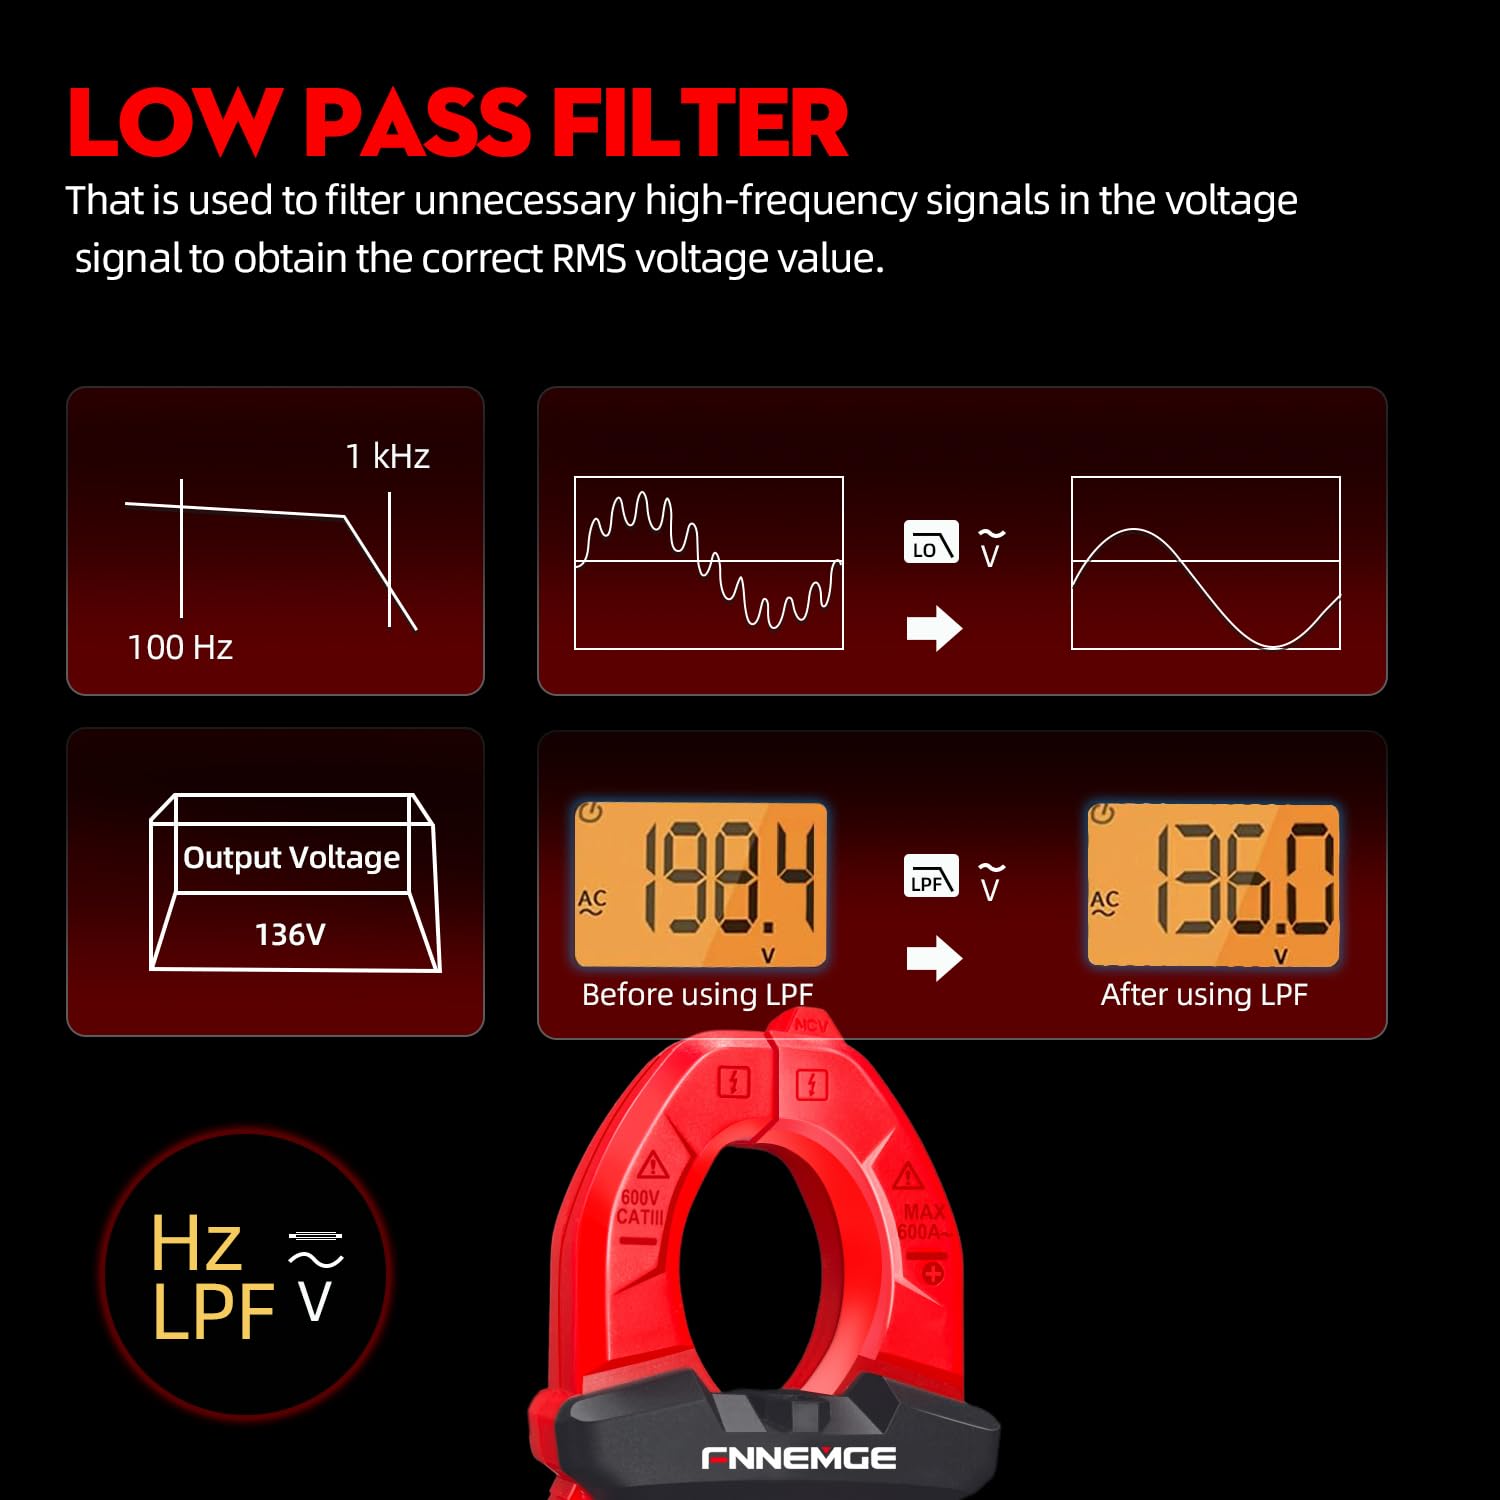
Image 5.6: An illustration detailing the function of the Low Pass Filter (LPF) in filtering out high-frequency noise for accurate voltage-Lesungen.
6. Wartung
6.1 Reinigung
Reinigen Sie das Messgerät mit einem trockenen, weichen Tuch. Verwenden Sie keine Scheuermittel oder Lösungsmittel. Halten Sie die Anschlüsse frei von Schmutz und Feuchtigkeit.
6.2 Batteriewechsel
When the low battery indicator appears on the LCD, replace the batteries as described in Section 4.1. Remove batteries if the meter is not used for an extended period.
6.3 Speicherung
Bewahren Sie das Messgerät an einem kühlen, trockenen Ort, vor direkter Sonneneinstrahlung und extremen Temperaturen geschützt auf. Verwenden Sie die mitgelieferte Tragetasche zum Schutz.
7. Fehlerbehebung
If you encounter issues with your FNNEMGE MY2600D, refer to the following common problems and solutions:
- Anzeige/Zähler schaltet sich nicht ein:
- Prüfen Sie den Einbau der Batterie und stellen Sie die korrekte Polarität sicher.
- Tauschen Sie die Batterien aus, wenn sie leer sind.
- Ensure the Function Range Switch is not in the "OFF" position.
- Ungenaue Messwerte:
- Prüfen Sie, ob die richtige Messfunktion ausgewählt ist.
- Stellen Sie sicher, dass die Messleitungen ordnungsgemäß angeschlossen und nicht beschädigt sind.
- For current measurement, ensure only one conductor is within the clamp Kiefer.
- Check for external interference or strong magnetic fields.
- For AC measurements, consider using the LPF function if high-frequency noise is suspected.
- „OL“ oder Überlastungsanzeige:
- The measured value exceeds the meter's range for the selected function. Switch to a higher range if available, or ensure the input is within the meter's capabilities.
- NCV erkennt keine Lautstärketage:
- Ensure the NCV function is selected.
- Bring the NCV probe closer to the live AC source.
- Überprüfen Sie die LautstärketagDie Quelle ist aktiv.
Wenn die Probleme weiterhin bestehen, wenden Sie sich an den Kundendienst, um Hilfe zu erhalten.
8. Spezifikationen
| Besonderheit | Spezifikation |
|---|---|
| Marke | FNNEMGE |
| Modellnummer | MY2600D |
| Anzeige | 6000 Zählwerte |
| Messtyp | True RMS Digital Clamp Meter |
| AC/DC-Strombereich | 0-600A |
| Max. Betriebsvoltage | 600 Volt |
| Widerstandsbereich | Bis zu 60 MΩ |
| Kapazitätsbereich | Up to 100 mF |
| Temperaturbereich | -20 °C bis 1000 °C (-4 °F bis 1832 °F) |
| Sonderfunktionen | NCV, LowZ, LPF, Data Hold, Auto Ranging, Backlight, Flashlight |
| Sicherheitsstandards | IEC 61010-1, CAT III 600V, CE |
| Stromquelle | 2 x AAA-Batterien (im Lieferumfang enthalten) |
| Produktabmessungen (L x B x H) | 18 x 6.4 x 3.4 cm |
| Produktgewicht | 400 Gramm |
| Ursprungsland | China |
9. Garantie und Support
FNNEMGE provides a 36-month after-sales service and lifetime technical support for the MY2600D Digital Clamp Meter. If you have any questions, require technical assistance, or need to claim warranty service, please contact FNNEMGE customer support through your purchase platform or the official FNNEMGE webWebsite.