Einführung
This manual provides detailed instructions for the installation, operation, and maintenance of your XTRONS IQ72DLRP Car Stereo GPS unit. Please read this manual thoroughly before using the product to ensure proper functionality and to prevent damage. Keep this manual for future reference.
Sicherheitshinweise
- Do not attempt to operate the unit while driving. Distracted driving can lead to accidents.
- Ensure all wiring is correctly connected before powering on the unit to avoid short circuits or damage.
- Consult a professional for installation if you are unsure about any steps. Incorrect installation can void your warranty.
- Vermeiden Sie es, das Gerät extremen Temperaturen, direkter Sonneneinstrahlung über längere Zeiträume oder übermäßiger Feuchtigkeit auszusetzen.
- Do not disassemble the unit. This may cause damage and will void the warranty.
Packungsinhalt
Bitte prüfen Sie vor der Installation, ob alle Artikel im Paket enthalten sind.
- XTRONS IQ72DLRP Head Unit
- GPS-Antenne
- Stromkabel
- USB-Kabel
- Cinch-Kabel
- Externes Mikrofon
- Benutzerhandbuch (dieses Dokument)
- Other accessories as pictured below.

Abbildung 1: Mitgeliefertes Zubehör
Aufstellen
1. Installation überview
The XTRONS IQ72DLRP is designed for specific integration with the Land Rover Freelander 2. Professional installation is recommended. Ensure the vehicle's battery is disconnected before starting any electrical work.
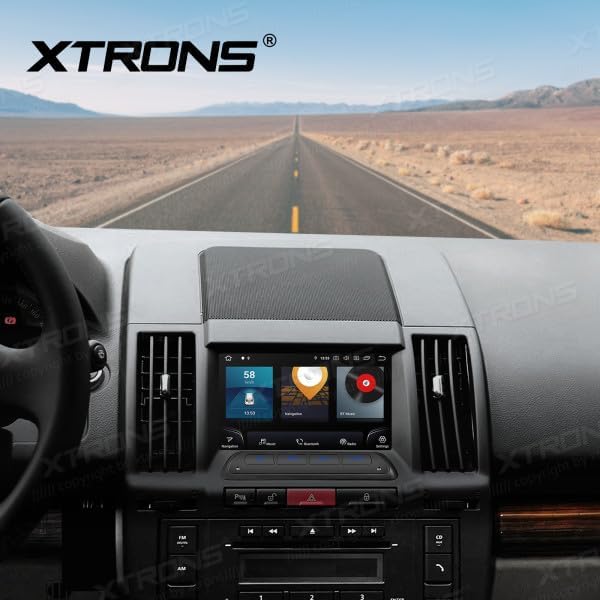
Figure 2: Unit installed in Land Rover Freelander 2 dashboard
2. Kabelverbindungen
Connect the main power harness, speaker wires, and other auxiliary cables according to your vehicle's wiring diagram and the provided XTRONS harness. Pay close attention to the following connections:
- Leistung: Verbinden Sie das gelbe Kabel (Dauerplus 12V), das rote Kabel (Zubehörplus 12V) und das schwarze Kabel (Masse).
- Referenten: Connect the speaker wires to the corresponding vehicle speaker wires (e.g., Front Left +, Front Left -).
- GPS-Antenne: Montieren Sie die GPS-Antenne an einem Ort mit freiem Blick view des Himmels, typischerweise auf dem Armaturenbrett oder unter der Windschutzscheibe.
- USB: Schließen Sie die USB-Kabel für externe Speichermedien oder Smartphone-Verbindungen an.
- Externes Mikrofon: Schließen Sie das externe Mikrofon an, um die Anrufqualität zu verbessern.
3. Erstes Einschalten
After all connections are secure, reconnect the vehicle's battery. Turn on the ignition. The unit should power on automatically. Follow any on-screen prompts for initial setup, such as language selection and time zone.
Bedienungsanleitung
1. Grundfunktionen
- Ein-/Ausschalten: Drücken und halten Sie den Ein-/Ausschalter (falls vorhanden) oder schalten Sie die Zündung des Fahrzeugs ein/aus.
- Lautstärkeregelung: Verwenden Sie den Lautstärkeregler oder die Bedienelemente auf dem Bildschirm, um die Lautstärke anzupassen.
- Startbildschirm: Tippen Sie auf das Home-Symbol, um zur Android-Hauptoberfläche zurückzukehren.

Figure 3: Main Android Home Screen
2. Android-OS-Navigation
The unit runs on Android 12. Navigate through menus and applications by tapping, swiping, and dragging on the touchscreen, similar to a smartphone or tablet.

Figure 4: Application Drawer
3. Radiobetrieb
Access the "Radio" application from the home screen. You can scan for stations, save presets, and switch between AM/FM bands.
4. Bluetooth-Konnektivität
So koppeln Sie Ihr Telefon:
- Gehe zu Einstellungen > Bluetooth.
- Enable Bluetooth on both the head unit and your mobile device.
- Suchen nach available devices on your mobile phone and select "XTRONS IQ72DLRP" (or similar name).
- Bestätigen Sie den Kopplungscode auf beiden Geräten.
Nach der Kopplung können Sie freihändig telefonieren und Audio streamen.
5. CarPlay / Android Auto
Connect your compatible smartphone via USB to use Apple CarPlay or Android Auto. The system will automatically detect and launch the respective interface, allowing access to navigation, music, messages, and more directly from your phone.
6. GPS-Navigation
The unit comes with a built-in GPS module and antenna. You can use pre-installed navigation apps or download others from the Google Play Store. Ensure the GPS antenna is properly installed for optimal signal reception.
7. USB / Media Playback
Insert a USB drive into one of the provided USB ports. Use the "Music" or "Video" applications to browse and play media files. The unit supports various audio and video formats.
8. DSP-Einstellungen
The Digital Sound Processor (DSP) allows for advanced audio customization. Access the "DSP" application to adjust equalizer settings, balance, fader, and other sound effects to optimize your listening experience.

Abbildung 5: DSP-Einstellungsschnittstelle
9. Wi-Fi and 4G Connectivity
Connect to a Wi-Fi network via Einstellungen > Netzwerk & Internet > W-lan. For 4G connectivity, insert a compatible SIM card (if the unit supports it and a slot is available) or use a USB 4G dongle (sold separately) and configure network settings.
Wartung
1. Reinigung des Geräts
Reinigen Sie den Bildschirm und das Gehäuse des Geräts mit einem weichen, trockenen Tuch. Hartnäckige Flecken lassen sich mit einem leicht trocknenden Tuch entfernen.amp cloth with a mild, non-abrasive cleaner can be used. Avoid spraying liquids directly onto the unit.
2. Software-Updates
Periodically check for software updates to ensure optimal performance and access to new features. Updates can usually be found in the system settings or on the official XTRONS website. Follow the instructions provided with the update package carefully.
Fehlerbehebung
| Problem | Mögliche Ursache | Lösung |
|---|---|---|
| Gerät lässt sich nicht einschalten. | Falsche Verkabelung; durchgebrannte Sicherung; Fahrzeugbatterie abgeklemmt. | Check power connections (yellow, red, black wires). Inspect vehicle fuses. Ensure battery is connected. |
| Kein Ton aus den Lautsprechern. | Lautsprecherkabel falsch angeschlossen; Lautstärke zu niedrig; Stummschaltung aktiviert. | Verify speaker wiring. Increase volume. Check if the unit is muted. |
| Das GPS-Signal ist schwach oder nicht verfügbar. | Die GPS-Antenne ist unsachgemäß installiert oder verdeckt. | Stellen Sie sicher, dass die GPS-Antenne freie Sicht hat. view des Himmels. Antennenanschluss prüfen. |
| Die Bluetooth-Kopplung schlägt fehl. | Bluetooth not enabled; Incorrect pairing code; Device out of range. | Enable Bluetooth on both devices. Re-enter pairing code. Ensure devices are close. |
| Touchscreen reagiert nicht. | Temporary software glitch; Unit frozen. | Starten Sie das Gerät neu (Zündung des Fahrzeugs aus- und wieder einschalten). Sollte das Problem weiterhin bestehen, setzen Sie das Gerät auf die Werkseinstellungen zurück (siehe Einstellungen). |
Technische Daten
- Modellnummer: IQ72DLRP
- Marke: XTRONS
- Betriebssystem: Android 12
- Bildschirmgröße: 7 Zoll
- Konnektivität: Bluetooth, Wi-Fi, 4G (optional), Apple CarPlay, Android Auto, USB
- Kompatible Geräte: Mobiltelefon
- Farbe: Schwarz
- Prozessor: Achtkernprozessor
- RAM: 8 GB LPDDR4
- ROM: SSD mit 256 GB
- Anzeigetechnologie: QLED
- Audioausgang: Optical Coaxial, RCA Audio Out
Note: Specifications are subject to change without prior notice. Some product images may show Android 13, but the product title specifies Android 12.
Garantie und Support
1. Garantieinformationen
XTRONS products typically come with a limited warranty covering manufacturing defects. Please refer to the warranty card included with your product or visit the official XTRONS webAuf der Website finden Sie detaillierte Garantiebedingungen speziell für Ihre Region.
2. Kundendienst
If you encounter any issues not covered in the troubleshooting section or require further assistance, please contact XTRONS customer support. You can usually find contact information (email, phone, or support portal) on the official XTRONS webWebsite:
When contacting support, please have your product model number (IQ72DLRP) and purchase details ready.