
1. Einleitung
This manual provides detailed instructions for the installation, operation, and maintenance of the IXITAB KWS-AC301 and KWS-AC300 series Digital AC Power Energy Meters. These devices are designed to measure and display various electrical parameters including voltage, current, power, energy consumption (Kwh), timing, temperature, frequency, and power factor (for KWS-AC301 models). Please read this manual thoroughly before use to ensure proper and safe operation.
2. Sicherheitshinweise
- Vor der Installation oder Verkabelung muss unbedingt die Stromversorgung unterbrochen werden, um einen Stromschlag zu vermeiden.
- Die Installation sollte nur von qualifiziertem Personal durchgeführt werden.
- Betreiben Sie das Gerät nicht bei Nässe oder damp Bedingungen.
- Überschreiten Sie nicht das angegebene Volumentage and current ratings of the meter.
- Stellen Sie sicher, dass alle Verbindungen sicher sind, bevor Sie Strom anlegen.
3. Produktmerkmale
The IXITAB KWS-AC300 and KWS-AC301 series meters offer comprehensive monitoring of AC electrical parameters:
- Echtzeitanzeige der Wechselstromlautstärketage (V), Current (A), and Active Power (W).
- Measurement of cumulative Electrical Energy (Kwh) and Timing (H).
- Temperatur messung.
- Frequency measurement (Hz).
- Power Factor measurement (PF) (KWS-AC301 models only).
- Electrical energy and timing reset function.
- Power-down memory function for electrical energy and timing.
- Optional 485 communication interface for data transmission (KWS-AC301L models).
4. Spezifikationen
KWS-AC300 Series
| Parameter | AC300-20A | AC300-100A |
|---|---|---|
| Bandtage | Wechselstrom 50-300 V | Wechselstrom 50-300 V |
| Aktuell | 0-20A | 0-100A |
| Leistung | 0-3000 W | 0-30 kW |
| Capacity (Kwh) | 0.01-19999 kWh | 0.01-19999 kWh |
| Timing | 0-200 Uhr | 0-200 Uhr |
| Temperatur | -10°C bis 99°C | -10°C bis 99°C |
| Frequenz | 45-65 Hz | 45-65 Hz |
KWS-AC301 Series
| Parameter | AC301-20A / AC301L-20A | AC301-100A / AC301L-100A |
|---|---|---|
| Bandtage | Wechselstrom 50-300 V | Wechselstrom 50-300 V |
| Aktuell | 0-20A | 0-100A |
| Shunt Way | Eingebaut | Eingebaut |
| 485 Kommunikation | AC301-20A: No, AC301L-20A: Yes | AC301-100A: No, AC301L-100A: Yes |
| Leistung | 0-4400 W | 0-22 kW |
| Capacity (Kwh) | 0.01-99999 kWh | 0.01-99999 kWh |
| Timing | 0-999 Uhr | 0-999 Uhr |
| Temperatur | -10°C bis 150°C | -20°C bis 150°C |
| Frequenz | 50-60 Hz | 50-60 Hz |
| Leistungsfaktor | 0.01-1PF | 0.01-1PF |
Note: Dimensions for KWS-AC300 are approximately 79mm x 37.5mm x 20.7mm. Dimensions for KWS-AC301 are approximately 73mm x 44mm x 24mm. Both models use a CT coil with a diameter of 15mm.

Figure 4.1: Physical dimensions of KWS-AC300 and KWS-AC301 models, including CT coil measurements.
5. Packungsinhalt
- 1 x Digital AC Power Energy Meter (KWS-AC300 or KWS-AC301 model)
- 1 x Benutzerhandbuch
- For 100A models: 1 x 100A Shunt / CT Coil
- For 20A models: No external shunt/CT Coil (built-in)
6. Einrichtung und Installation
Befolgen Sie diese Schritte sorgfältig, um eine ordnungsgemäße Installation zu gewährleisten:
6.1 Wiring Diagram (KWS-AC301L-100A Example)
The following diagram illustrates the wiring for the KWS-AC301L-100A model with a closed sensor (CT coil). Ensure all connections are made correctly before applying power.

Figure 6.1: Wiring connections for the KWS-AC301L-100A model, showing input voltage (IN-AC), load connection, and CT coil placement around the live wire.
- Leistungsaufnahme: Connect the AC 50-300V power supply to terminals L and N (typically labeled 3 and 4 on the meter).
- Lastanschluss: Connect the load in series with the live wire (L). The CT coil should be placed around the live wire that feeds the load.
- CT Coil: Connect the CT coil wires to the designated CT terminals on the meter (typically labeled 1 and 2). Ensure the direction of the CT coil is correct as indicated by any arrows on the coil or meter.
- 20A-Modelle: For 20A models without an external CT coil, the current measurement is internal. Connect the AC 50-300V power supply to the meter's input terminals, and the load directly through the meter's designated load terminals.
6.2 485 Communication and Temperature Sensor (KWS-AC301L Models)
For KWS-AC301L models, additional interfaces are available for 485 communication and an external temperature sensor.

Figure 6.2: KWS-AC301L model showing the dedicated interfaces for the temperature sensor and 485 communication (RS485 A+ and B- terminals).
- Temperatursensor: Connect the external temperature sensor to the dedicated interface.
- 485 Schnittstelle: Connect the RS485 A+ and B- terminals to your 485 communication network for data acquisition. PC software may be available for data logging and analysis (refer to product documentation or manufacturer's website for download links).
7. Bedienung
The meter features a clear digital display and intuitive buttons for navigation and settings.
7.1 Anzeige überview
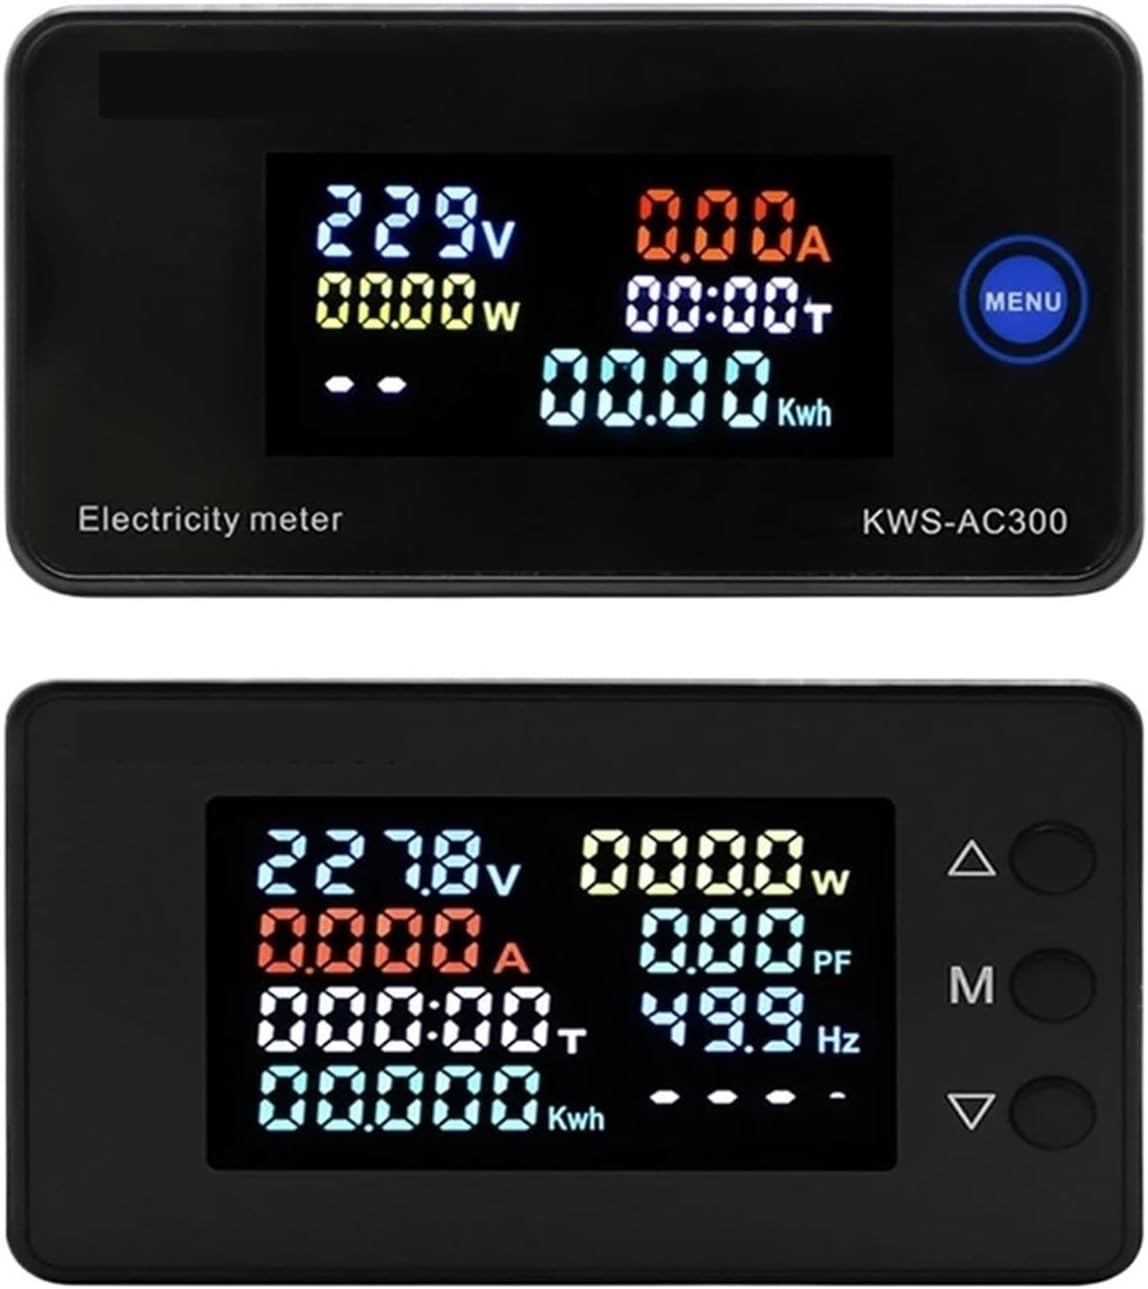
Figure 7.1: Top display shows KWS-AC300 with Voltage, Current, Power, Timing, and Kwh. Bottom display shows KWS-AC301 with Voltage, Current, Power, Timing, Kwh, Power Factor, and Frequency.
The display shows various parameters simultaneously. The KWS-AC300 typically displays Voltage, Current, Power, Timing, and Kwh. The KWS-AC301 models additionally display Frequency and Power Factor.
7.2 Tastenfunktionen
The meters typically feature one or more buttons for interaction:
- KWS-AC300: Features a "MENU" button. Pressing this button allows cycling through display modes or accessing settings.
- KWS-AC301: Features three buttons: Up (Δ), Middle (M), and Down (∇).

Figure 7.2: KWS-AC301 button interaction. Pressing the 'M' button for 3 seconds allows entry into setting or alarm value adjustment modes.
- "M" Button (KWS-AC301):
- Kurzes Drücken: Cycles through different display parameters (e.g., Voltage, Current, Power, Kwh, Timing, Temperature).
- Langes Drücken (3 Sekunden): Enters the setting mode or alarm value adjustment mode. Use the Up (Δ) and Down (∇) buttons to navigate and adjust values.
- Up (Δ) and Down (∇) Buttons (KWS-AC301): Used to navigate menus, increase or decrease values in setting modes.
7.3 Resetting Electrical Energy and Timing
To reset the cumulative electrical energy (Kwh) and timing (H) values, typically a long press on a specific button (often the "M" or "MENU" button) while in the Kwh or Timing display mode will initiate the reset process. Confirm the reset if prompted by the display.
8. Wartung
- Halten Sie das Messgerät sauber und staubfrei. Verwenden Sie zum Reinigen ein weiches, trockenes Tuch.
- Vermeiden Sie es, das Gerät extremen Temperaturen, direkter Sonneneinstrahlung oder korrosiven Umgebungen auszusetzen.
- Versuchen Sie nicht, den Zähler selbst zu öffnen oder zu reparieren, da dies zum Verlust der Garantie und zu einem Sicherheitsrisiko führen kann.
- Ensure all wiring connections remain secure over time.
9. Fehlerbehebung
- Kein Bildschirm:
- Check if the power supply (AC 50-300V) is connected correctly and active.
- Stellen Sie sicher, dass die Eingangslautstärketage liegt innerhalb des angegebenen Bereichs.
- Incorrect Current/Power Reading:
- For 100A models, verify the CT coil is correctly installed around the live wire and connected to the meter.
- Ensure the CT coil direction is correct.
- Prüfen Sie, ob die Last ordnungsgemäß angeschlossen ist.
- Parameters Not Resetting:
- Refer to Section 7.3 for the correct procedure to reset Kwh and Timing. Ensure the button is pressed for the required duration.
- 485 Communication Issues (KWS-AC301L):
- Verify the A+ and B- connections are correct.
- Check communication settings (baud rate, parity, stop bits) on both the meter and the connected device.
10. Garantie und Support
Informationen zu Garantie, technischem Support oder Serviceanfragen erhalten Sie beim Hersteller oder Ihrem autorisierten Händler. Bewahren Sie Ihren Kaufbeleg als Kaufnachweis auf.
Manufacturer: IXITAB