1. Einleitung
This manual provides instructions for the proper use and maintenance of the SUNMI V2SE Smart Mobile Terminal. The V2SE is a versatile device designed for various business applications, featuring an integrated 58mm thermal printer, 1D/2D barcode recognition, NFC capabilities, and running on Android 12.0.
Zu den Hauptmerkmalen gehören:
- Integrated 58mm thermal printer with 80mm/s print speed.
- 1D/2D Barcode recognition for efficient scanning.
- NFC for contactless transactions.
- Android 12.0 operating system with a Quad Core 2.0 GHz CPU.
- 2 GB RAM and 8 GB ROM for smooth operation.
- Connectivity: 4G/3G/2G, 2.4G/5G Wi-Fi, Bluetooth 2.1/3.0/4.2.
- Removable Lithium Ion battery.
2. Gerätekomponenten
Familiarize yourself with the main components of your SUNMI V2SE terminal.
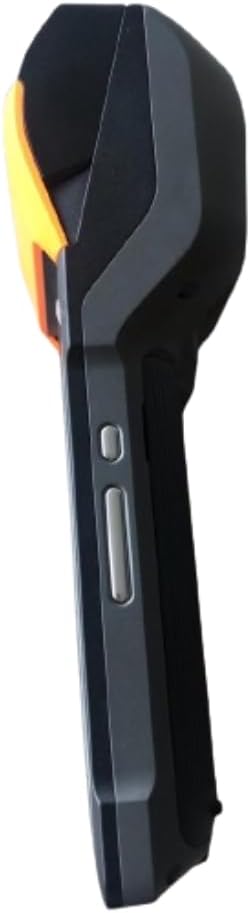
Abbildung 2.1: Vorne und seitlich View. This image displays the device's screen, the integrated barcode scanner at the top, and the power and volume buttons located on the side.

Abbildung 2.2: Seite ViewDieses Bild zeigt die Seitenansichtfile of the terminal, including the cover for the SIM card slot and additional buttons.

Abbildung 2.3: Zurück View. This image illustrates the rear of the device, featuring the thermal printer cover, the 0.3 MP camera, and the charging contact points.
Komponentenliste:
- Bildschirm: Touch-sensitive LCD for user interaction.
- Barcode-Scanner: Integrated 1D/2D scanner for data capture.
- Thermodrucker: For printing receipts and other documents.
- Netzschalter: To turn the device on/off or wake/sleep.
- Lautstärketasten: Zum Einstellen der Audiopegel.
- Kamera: 0.3 MP front photo sensor.
- SIM-Kartensteckplatz: Supports 1 Nano SIM.
- Batteriefach: Houses the removable Lithium Ion battery.
- Charging Port/Contacts: Zum Aufladen des Gerätes.
3. Ersteinrichtung
3.1. Einlegen der Batterie
- Stellen Sie sicher, dass das Gerät ausgeschaltet ist.
- Suchen Sie die Abdeckung des Batteriefachs auf der Rückseite des Geräts (siehe Abbildung 2.3).
- Entfernen Sie die Abdeckung, indem Sie sie entsprechend den Markierungen verschieben oder anheben.
- Setzen Sie die mitgelieferte Lithium-Ionen-Batterie ein und achten Sie darauf, dass die Kontakte korrekt ausgerichtet sind.
- Bringen Sie den Batteriefachdeckel wieder fest an.
3.2. SIM-Karteninstallation
- Ensure the device is powered off and the battery is installed.
- Locate the SIM card slot cover on the side of the device (refer to Figure 2.2).
- Öffnen Sie die Abdeckung.
- Insert a Nano SIM card into the designated slot with the gold contacts facing down and the notched corner aligned.
- Close the SIM card slot cover firmly.
3.3. Thermal Paper Loading
- Locate the printer cover release latch, typically on the top or side of the printer compartment (refer to Figure 2.3).
- Öffnen Sie die Druckerabdeckung.
- Insert a 58mm thermal paper roll into the compartment, ensuring the paper feeds from the bottom and the leading edge extends out of the printer slot.
- Close the printer cover firmly until it clicks into place. Ensure there is no slack in the paper roll.
3.4. Erstes Laden und Einschalten
- Connect the provided power adapter to the device's charging port.
- Plug the adapter into a power outlet. Allow the device to charge fully before first use.
- To power on, press and hold the Power button (refer to Figure 2.1) until the SUNMI logo appears on the screen.
4. Bedienungsanleitung
4.1. Ein-/Ausschalten und Schlafmodus
- Einschalten: Halten Sie den Ein-/Ausschalter gedrückt, bis das Gerät vibriert und der Bildschirm aufleuchtet.
- Ausschalten: Halten Sie die Ein-/Aus-Taste gedrückt, bis ein Menü erscheint. Wählen Sie „Ausschalten“ und bestätigen Sie.
- Schlafen/Wachen: Drücken Sie kurz den Ein-/Ausschalter, um das Gerät in den Schlafmodus zu versetzen oder es aufzuwecken.
4.2. Using the Thermal Printer
The integrated 58mm thermal printer can be used to print receipts, tickets, and other documents.
- Ensure thermal paper is correctly loaded (refer to Section 3.3).
- Open the application that requires printing (e.g., POS software).
- Initiate the print command within the application. The device will automatically print the content.
- Tear off the printed paper against the serrated edge.
4.3. Barcode-Scanning
The V2SE supports 1D and 2D barcode recognition.
- Open an application that requires barcode input.
- Point the scanner window (located at the top of the device, refer to Figure 2.1) at the barcode.
- Press the dedicated scan button (if available) or trigger the scan function within the application.
- Stellen Sie sicher, dass sich der Barcode innerhalb des Erfassungsbereichs des Scanners befindet. view and well-lit for optimal performance.
4.4. NFC-Funktionalität
The device supports Near Field Communication (NFC) for contactless operations.
- Ensure NFC is enabled in the device settings (Settings > Connected devices > NFC).
- Open an application that utilizes NFC (e.g., payment app, data transfer app).
- Hold the NFC-enabled card or device close to the NFC detection area on your terminal (typically near the top or back of the device).
- Follow the on-screen prompts to complete the transaction or data transfer.
4.5. Netzwerkkonnektivität
- W-lan: Gehen Sie zu Einstellungen > Netzwerk & Internet > WLAN, um eine Verbindung zu verfügbaren drahtlosen Netzwerken herzustellen.
- Mobile Daten (4G/3G/2G): Ensure a valid SIM card is installed and mobile data is enabled in Settings > Network & internet > Mobile network.
- Bluetooth: Gehen Sie zu Einstellungen > Verbundene Geräte > Bluetooth, um eine Kopplung mit anderen Bluetooth-Geräten herzustellen.
5. Wartung
5.1. Reinigen des Geräts
- Schalten Sie das Gerät vor der Reinigung aus.
- Mit einem weichen, fusselfreien Tuch leichtampAnschließend mit Wasser oder einem milden, nicht scheuernden Reinigungsmittel die Außenseite abwischen.
- Verwenden Sie für das Display einen Bildschirmreiniger und ein Mikrofasertuch.
- Do not use harsh chemicals, solvents, or abrasive materials. Avoid spraying liquids directly onto the device.
5.2. Batteriepflege
- Charge the battery regularly, avoiding complete discharge whenever possible.
- Setzen Sie den Akku keinen extremen Temperaturen aus.
- Wenn das Gerät längere Zeit nicht benutzt wird, laden Sie den Akku auf etwa 50 % auf und lagern Sie ihn an einem kühlen, trockenen Ort.
- Use only the original or approved charger and battery.
5.3. Printer Head Cleaning
Regular cleaning of the printer head can prevent print quality issues.
- Power off the device and open the printer cover.
- Mit einem Wattestäbchen leicht dampened with isopropyl alcohol to gently wipe the thermal print head.
- Allow the print head to dry completely before closing the cover and powering on the device.
6. Fehlerbehebung
| Problem | Mögliche Ursache | Lösung |
|---|---|---|
| Gerät lässt sich nicht einschalten | Low battery; Faulty battery; Power button issue | Charge the device for at least 30 minutes. Ensure battery is correctly installed. Try a different charger. |
| Drucker druckt nicht | No paper; Paper jammed; Printer head dirty; Application error | Check and load paper. Clear any paper jams. Clean the printer head (Section 5.3). Restart the application or device. |
| Barcode scanner not working | Scanner window obstructed; Barcode damaged; Application error | Ensure scanner window is clean. Try scanning a different barcode. Restart the application or device. |
| Keine Wi-Fi-Verbindung | Wi-Fi off; Incorrect password; Out of range | Enable Wi-Fi in settings. Re-enter password. Move closer to the Wi-Fi router. |
| Keine mobilen Daten | SIM card not installed; Mobile data off; No network coverage | Check SIM card installation. Enable mobile data in settings. Check for network coverage in your area. |
7. Spezifikationen
| Besonderheit | Detail |
|---|---|
| Modell | V2SE |
| Betriebssystem | Android 12.0 |
| CPU | Quad-Core 2.0 GHz |
| RAM | 2 GB |
| ROM | 8 GB |
| Anzeige | LCD, 1920 x 1080 resolution, 16:9 Aspect Ratio |
| Drucker | 58 mm thermal printer, 80 mm/s print speed |
| Barcode Recognition | 1D / 2D Barcode recognition |
| Kamera | 0.3 MP Front Photo Sensor |
| SIM Slot | 1 Nano SIM (Dual SIM support) |
| Konnektivität | 4G/3G/2G Cellular, Wi-Fi (2.4G/5G), Bluetooth 2.1/3.0/4.2, NFC |
| GPS | True, Supports GPS satellite navigation system |
| Batterie | 1 Lithium-Ionen-Akku (herausnehmbar, im Lieferumfang enthalten) |
| Maße | 22 x 9 x 9 cm |
| Gewicht | 400 g |
| Hersteller | SONNENMI |
8. Garantie und Support
For warranty information and technical support, please refer to the documentation provided with your purchase or contact your vendor. Keep your proof of purchase for warranty claims.