1. Produktüberschreitungview
The LIORQUE Digital Kitchen Timer Model YGH5249 is a multi-functional device designed to assist with various timing needs. It features a large LCD display, adjustable alarm volume, and multiple placement options. This timer can function as a countdown timer, a count-up stopwatch, and a digital clock.

Bild 1.1: Vorderseite view of the LIORQUE Digital Kitchen Timer, highlighting its large LCD screen and control buttons.
Hauptmerkmale:
- 3-in-1-Funktionalität: Timer, Stopwatch, and Clock modes.
- Großes LCD-Display: Ensures clear readability of time.
- Einstellbare Alarmlautstärke: Three levels (Mute, Low, High) to suit different environments.
- Benutzerdefinierter Modus: Save frequently used countdown times for quick access.
- Vielseitige Platzierung: Magnetic back, foldable stand, and lanyard hole for flexible use.
- Erinnerung an die Verzögerung: Automatically starts counting up after countdown finishes.
- Automatische Wiederherstellung: Remembers the last set countdown time.

Image 1.2: Visual representation of the timer's main features and functions.
2. Einrichtung und Batterieinstallation
The timer requires 2 AAA batteries (included) for operation. Follow these steps to install them:
- Suchen Sie den Batteriefachdeckel auf der Rückseite des Timers.
- Schieben Sie die Abdeckung auf.
- Legen Sie zwei AAA-Batterien ein und achten Sie dabei auf die richtige Polarität (+ und -), wie im Batteriefach angegeben.
- Schließen Sie den Batteriefachdeckel fest.
Der Timer schaltet sich automatisch ein, sobald die Batterien eingelegt sind.
3. Bedienungsanleitung
3.1 Switching Modes (Timer/Stopwatch/Clock)
The LIORQUE timer offers three modes: Timer (countdown), Stopwatch (count-up), and Clock. To switch between Timer mode and Clock mode, press and hold the ST/SP button for 2 seconds. The timer will display the current time in Clock mode or the timer interface in Timer mode.

Image 3.1: Switching between Counting Mode and Clock Mode.
3.2 Setting Countdown Timer
- Ensure the timer is in Timer mode (displaying H:M:S).
- Verwenden Sie die 1H, 5M, 1M, Und 5S buttons to set the desired countdown time. Each press adds the corresponding time increment.
- Drücken Sie die ST/SP Taste, um den Countdown zu starten.
- Um den Countdown anzuhalten, drücken Sie ST/SP Drücken Sie erneut, um fortzufahren.
- Um den Timer auf Null zurückzusetzen, drücken Sie die ZURÜCKSETZEN Taste.
- When the countdown reaches zero, the alarm will sound for 1 minute.
3.3 Using Stopwatch (Count-Up)
- Ensure the timer is in Timer mode and reset to 00:00:00.
- Drücken Sie die ST/SP Knopf zum Starten des Hochzählens.
- Drücken Sie, um die Stoppuhr anzuhalten ST/SP Drücken Sie erneut, um fortzufahren.
- Um die Stoppuhr auf Null zurückzusetzen, drücken Sie die Taste ZURÜCKSETZEN Taste.

Image 3.2: Illustration of Count-up and Countdown modes.
3.4 Shortcut Setting
The timer allows for quick setting of common intervals:
- Drücken 1H für 1 Stunde.
- Drücken 5M für 5 Minuten.
- Drücken 1M für 1 Minute.
- Drücken 5S für 5 Sekunden.

Abbildung 3.3: Beispielamples of using shortcut buttons for quick time setting.
3.5 Benutzerdefinierter Modus
The Custom Mode allows you to save a frequently used countdown time for instant recall.
- In Timer mode, set your desired countdown time using the 1H, 5M, 1M, Und 5S Schaltflächen.
- Halten Sie die BRAUCH button for 2 seconds. The timer will remember this setting.
- Each subsequent short press of the BRAUCH button will automatically load the saved time.

Image 3.4: Setting and recalling a custom timer value.
3.6 Einstellen der Alarmlautstärke
The timer features a 3-level alarm volume adjustment (Mute, Low, High). A switch on the side of the timer allows you to select the desired volume level.

Image 3.5: Volume adjustment switch and its three settings.
3.7 Platzierungsoptionen
The LIORQUE timer offers flexible placement options:
- Magnetisch: Attach the timer to metal surfaces like refrigerators using its strong magnetic back.
- Stand: Use the integrated foldable stand to place the timer on any flat surface, such as a countertop or desk.
- Lanyard-Loch: Hang the timer using a rope through the designated lanyard hole.
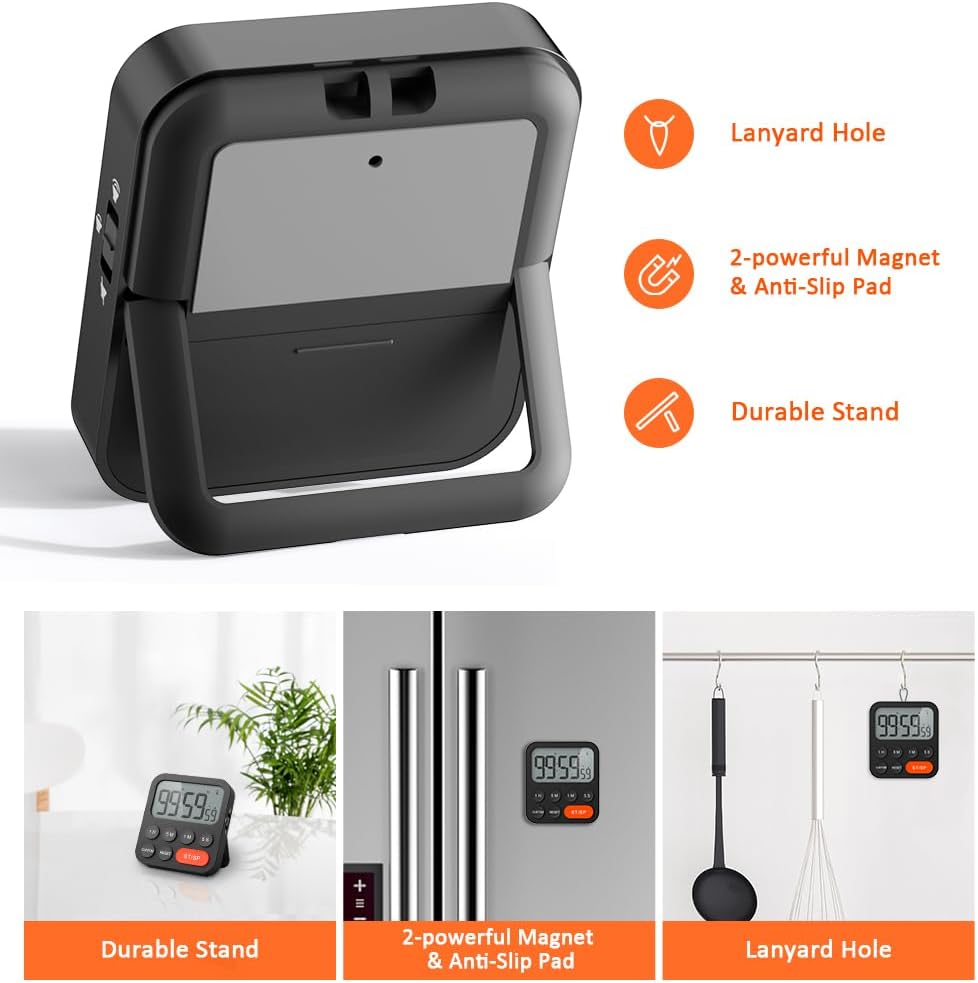
Image 3.6: Various ways to place and use the timer.
3.8 Zusatzfunktionen
- Erinnerung an die Verzögerung: After a countdown finishes, the timer will automatically start counting up, indicating the elapsed time since the alarm.
- Automatische Wiederherstellung: Once a countdown is complete and the alarm has sounded, pressing the ST/SP button will restore the timer to the last set countdown time, making it convenient for repetitive tasks.

Image 3.7: Explanation of Delay Reminder and Auto-restore features.
4. Wartung
- Clean the timer with a soft, dry cloth. Do not use abrasive cleaners or immerse in water.
- Replace batteries when the display becomes dim or the timer functions erratically.
- Bewahren Sie den Timer an einem kühlen, trockenen Ort auf, wenn er längere Zeit nicht benutzt wird.
5. Fehlerbehebung
- Timer reagiert nicht: Prüfen Sie, ob die Batterien richtig eingesetzt sind und ausreichend geladen sind. Tauschen Sie sie gegebenenfalls aus.
- Alarm too quiet/loud: Adjust the volume switch on the side of the timer to your preferred level.
- Anzeige ist leer: Ensure batteries are installed and functional. If the issue persists, contact customer support.
6. Spezifikationen
| Besonderheit | Detail |
|---|---|
| Marke | LIORQUE |
| Modellnummer | YGH5249 |
| Farbe | Schwarz |
| Technische Daten | 0.94 Zoll Durchmesser x 0.94 Zoll Höhe |
| Artikelgewicht | 4.2 Unzen |
| Stromquelle | 2 AAA-Batterien (im Lieferumfang enthalten) |
| Anzahl der Einstellungen | 3 (Lautstärke) |
| Bildschirmgröße | 1E+1 Zentimeter |
7. Garantie und Support
For warranty information or technical support, please refer to the product packaging or contact LIORQUE customer service through their official webDie Website oder der Händler, bei dem das Produkt gekauft wurde, ist für Sie bestimmt. Bewahren Sie Ihren Kaufbeleg für Garantieansprüche auf.