1. Einleitung
Thank you for choosing the OTIC 10.1-inch Portable Dual Screen Car DVD Player. This device is designed to provide versatile entertainment on the go, featuring two synchronized screens, a long-lasting rechargeable battery, and broad media compatibility. This manual will guide you through the proper setup, operation, and maintenance of your new DVD player to ensure optimal performance and longevity.
2. Packungsinhalt
Bitte überprüfen Sie das Paket sorgfältig, um sicherzustellen, dass alle Artikel vorhanden und in einwandfreiem Zustand sind. Sollten Artikel fehlen oder beschädigt sein, wenden Sie sich bitte an Ihren Händler.
- 1 x Main DVD Player Unit
- 1 x Slave Monitor Unit
- 1 x AC/DC-Netzteil
- 1 x DC to DC Connection Cable
- 1 x AV Connection Cable
- 1 x Kfz-Ladeadapter
- 1 x Fernbedienung (Batterien enthalten)
- 2 x Ohrhörer
- 2 x Befestigungsgurte
- 1 x Benutzerhandbuch (dieses Dokument)
- 1 x Kurzanleitung

Notiz: The remote control requires 2 AAA batteries, which are included.
3. Hauptmerkmale
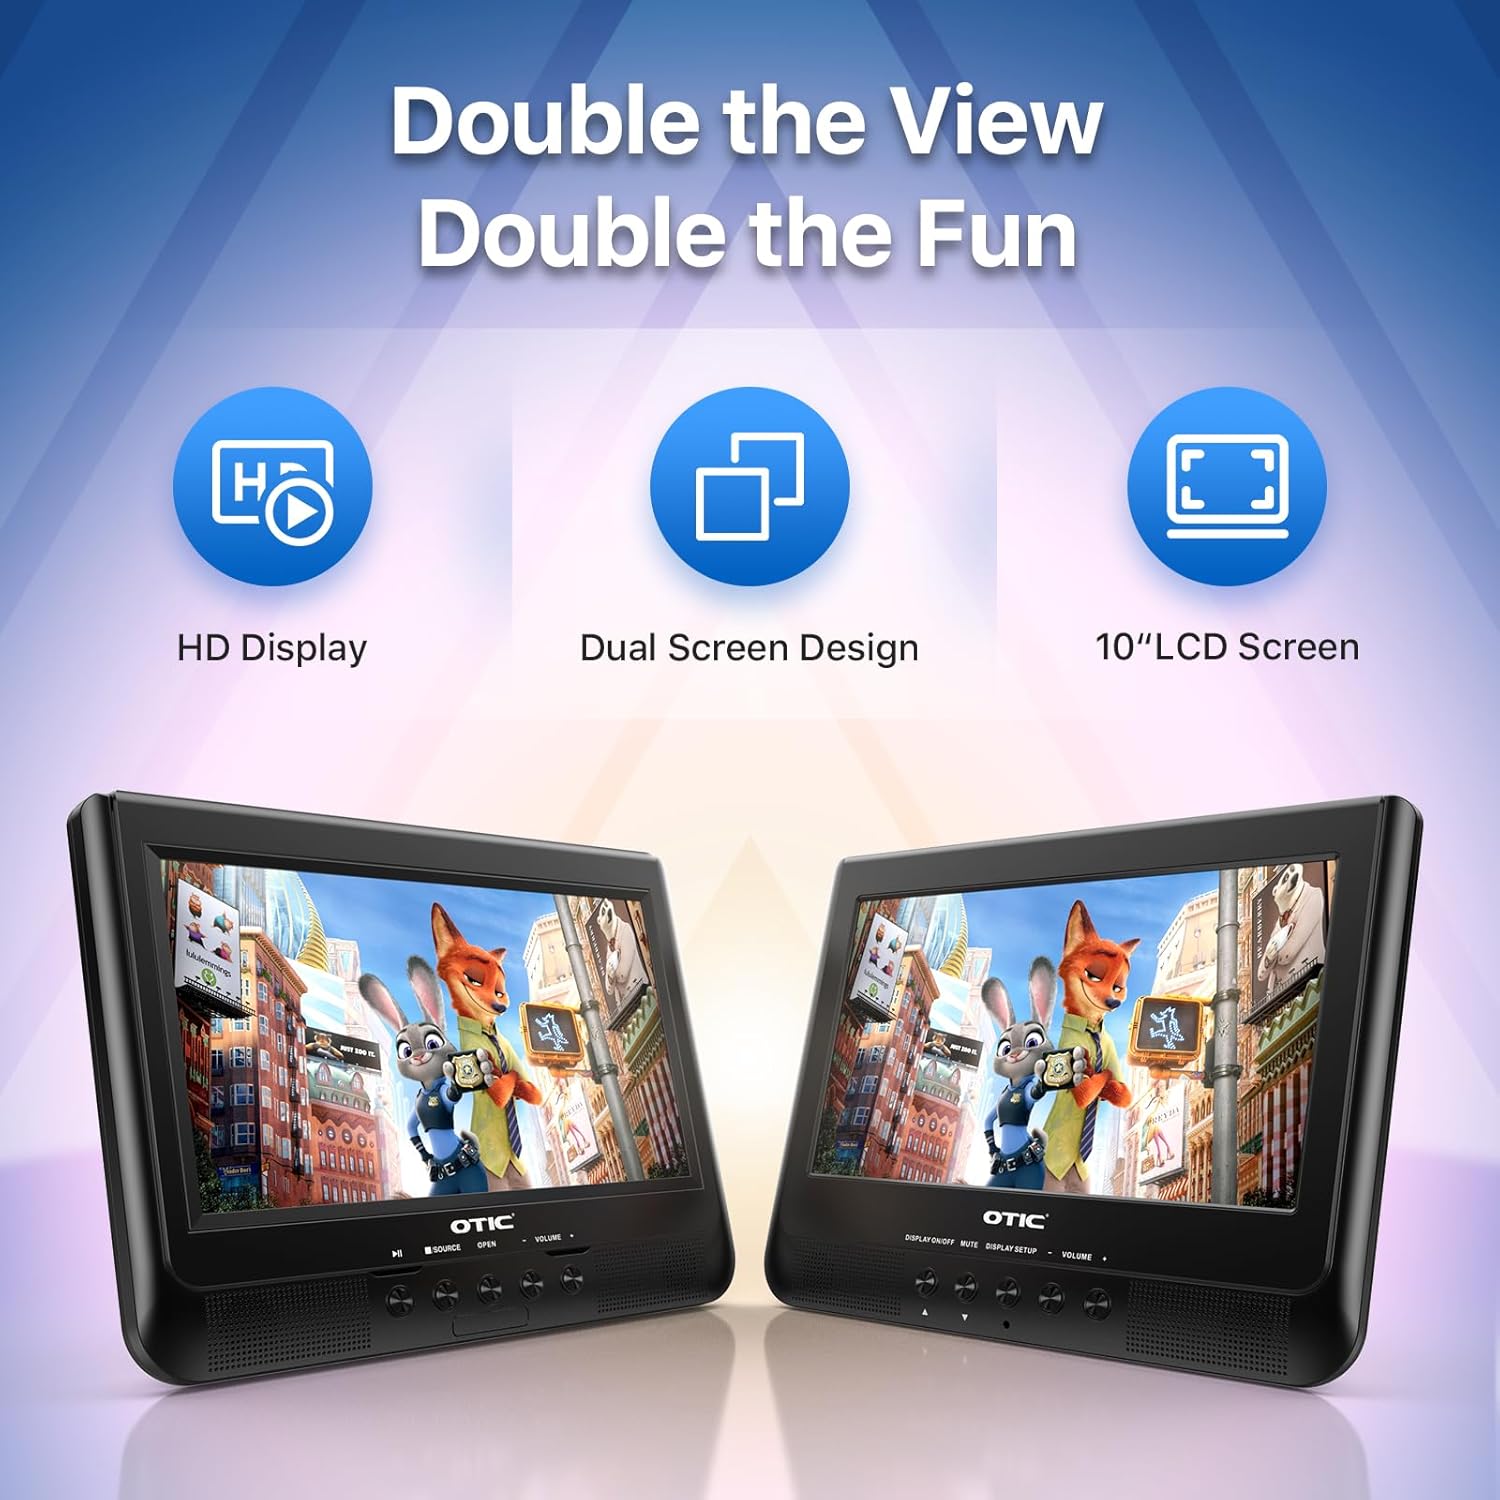
- Dual Display Capability: Connect the host DVD player to the slave monitor using the included AV cable for synchronized viewing of the same content.
- High-Resolution Screens: Both 10.1-inch displays feature a resolution of 1024 x 600 pixels. The main unit's screen can rotate 270° and flip 180° for optimal viewwinkeln.
- Verlängerte Akkulaufzeit: Equipped with a built-in 2500 mAh rechargeable battery, providing 3-5 hours of continuous video playback.
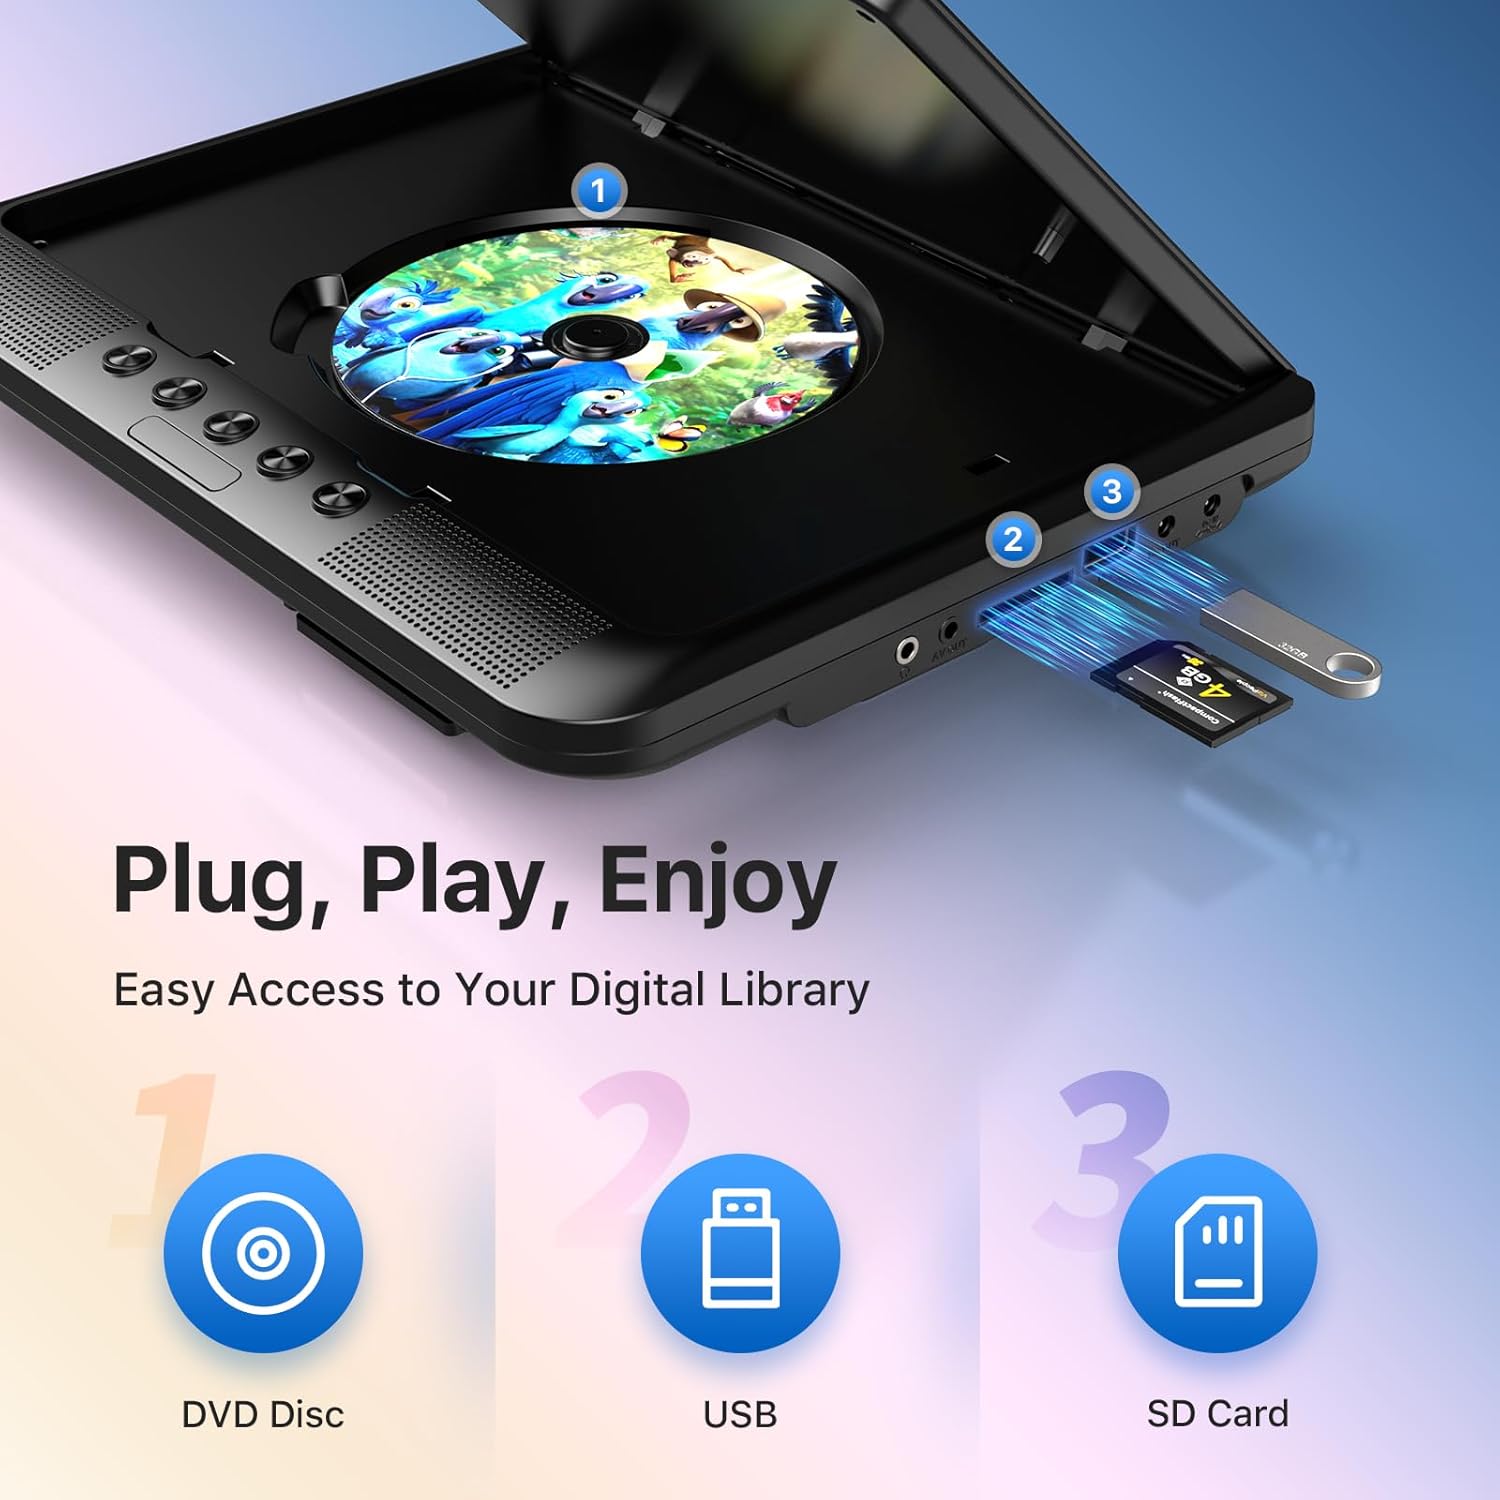
- Versatile Media Support: Plays various formats including CD, DVD, CD-R/RW, DVD±R/±RW, VCD/SVCD. Supports USB drives and SD cards up to 32GB for video (VOB, AVI, MPEG1, MPEG2, XVID), audio (MP3, WMA), and image (JPG, JPEG) files. (Note: Blu-ray DVDs are not supported.)
- Last Memory Funktion: Automatically resumes playback from where you left off, ensuring a seamless viewErfahrung.
- Verbessertes Audio: Integrated dual stereo speakers deliver clear sound. A 3.5mm headphone jack is available for private listening.
- AV-Ein-/Ausgang: Allows connection to larger TV screens for shared viewing or to external video sources.
4. Installationsanleitung
4.1 Erstaufladung
Before first use, fully charge the main DVD player unit. Connect the AC/DC power adapter to the player's DC IN port and plug it into a wall outlet. The charging indicator light will typically turn off or change color when fully charged.
4.2 Connecting the Dual Screens
- Suchen Sie den AV OUT-Anschluss am Hauptgerät des DVD-Players.
- Locate the AV IN port on the slave monitor unit.
- Connect the included AV connection cable between the AV OUT of the main unit and the AV IN of the slave unit.
- Connect the DC to DC connection cable from the main unit's DC OUT port to the slave unit's DC IN port to power the slave monitor.
4.3 Einschalten des Geräts
- Wechselstromversorgung: Use the AC/DC power adapter for home use.
- Fahrzeugleistung: Use the car charger adapter to power the unit from your vehicle's 12V power outlet.
- Batterieleistung: The built-in rechargeable battery provides portable power for outdoor use.
4.4 Montage in einem Fahrzeug
Use the provided mounting straps to securely attach the DVD player and slave monitor to the headrests in your car. Ensure they are positioned safely and do not obstruct the driver's view oder Airbagauslösung.

5. Bedienungsanleitung
5.1 Grundlegende Wiedergabe
- Einschalten: Press the 'POWER' button on the unit or remote control.
- CD einlegen: Gently open the disc cover and place a DVD or CD onto the spindle, label side up. Close the cover firmly.
- USB/SD-Wiedergabe: Insert a USB drive into the USB port or an SD card into the SD card slot. The player should automatically detect the media or allow you to select the source using the 'SOURCE' button.
- Wiedergabesteuerung: Use the 'PLAY/PAUSE', 'STOP', 'NEXT', 'PREVIOUS', 'FF' (Fast Forward), and 'REW' (Rewind) buttons on the unit or remote control to manage playback.
- Lautstärkeregelung: Verwenden Sie die Tasten „VOL+“ und „VOL-“, um die Lautstärke anzupassen.

5.2 Verwenden der Fernbedienung
The included remote control provides full functionality for convenient operation from a distance. Point the remote control directly at the main DVD player unit's IR sensor.
5.3 Letzte Speicherfunktion
The player automatically remembers the last playback point. To resume from where you left off, simply power on the device and press 'PLAY'. This function is active for most disc and digital media formats.
5.4 Connecting to an External Display (TV)
To share your viewing experience on a larger screen, use the AV OUT port on the main DVD player unit and connect it to the AV IN ports of your television using the included AV cable. Select the correct AV input on your TV.

6. Medienkompatibilität
The OTIC DVD player supports a wide range of media formats:
- Disc-Formate: DVD, DVD+R, DVD-R, DVD+RW, DVD-RW, CD, CD+R, CD-R, CD+RW, CD-RW, VCD, SVCD. (Blu-ray discs are not supported.)
- Video Formats (USB/SD): VOB, AVI, MPEG1, MPEG2, XVID.
- Audio Formats (USB/SD): MP3, WMA.
- Image Formats (USB/SD): JPG, JPEG.
USB drives and SD cards up to 32GB capacity are supported.

7. Wartung
7.1 Reinigung des Geräts
Wischen Sie die Außenseite des Players mit einem weichen, trockenen Tuch ab. Bei hartnäckigen Flecken leicht andrücken.ampen the cloth with water. Do not use abrasive cleaners or solvents, as they may damage the surface.
7.2 Disc-Pflege
Handle discs by their edges. Keep discs clean and free of scratches. Store them in their cases when not in use. A dirty or scratched disc can cause playback issues.
7.3 Batteriepflege
Um die Akkulaufzeit zu verlängern, sollte der Akku nicht häufig vollständig entladen werden. Bei längerer Lagerung des Geräts sollte er alle paar Monate auf etwa 50 % aufgeladen werden.
8. Fehlerbehebung
If you encounter issues with your OTIC DVD player, please refer to the following common problems and solutions:
| Problem | Mögliche Ursache | Lösung |
|---|---|---|
| Der Player lässt sich nicht einschalten. | Batterie leer; Netzteil nicht angeschlossen oder defekt. | Laden Sie den Akku auf; Stellen Sie sicher, dass das Netzteil fest angeschlossen und funktionsfähig ist. |
| Kein Bild auf dem Bildschirm. | Disc is dirty/scratched; Incorrect source selected; AV cable loose (for slave monitor/TV). | Clean or replace disc; Press 'SOURCE' button to select correct input; Check AV cable connections. |
| Kein Ton. | Volume too low; Mute function active; Headphone connected. | Increase volume; Press 'MUTE' button on remote; Disconnect headphones if using speakers. |
| Die Disc springt oder friert ein. | Dirty/damaged disc; Player is on an unstable surface; Excessive vibration. | Clean or replace disc; Place player on a stable surface; Reduce vibrations if in a moving vehicle. |
| Fernbedienung funktioniert nicht. | Batteries depleted; Obstruction between remote and player; Incorrect angle. | Replace batteries; Ensure clear line of sight to IR sensor; Point remote directly at player. |
If the problem persists after trying these solutions, please contact OTIC customer support for further assistance.
9. Spezifikationen
| Besonderheit | Spezifikation |
|---|---|
| Marke | OTIC |
| Modellnummer | DP-2123A |
| Bildschirmgröße | 10.1 Inches (visible display area) |
| Bildschirmtyp | LCD |
| Bildschirmauflösung | 1024 x 600 Pixel |
| Batteriekapazität | 2500 mAh (built-in rechargeable) |
| Akku-Wiedergabezeit | 3-5 Stunden |
| Kompatible Disc-Formate | CD, CD-R/RW, DVD, DVD+R/RW, DVD-R/RW, VCD, SVCD |
| Compatible Digital Media | USB drives (up to 32GB), SD cards (up to 32GB) |
| Unterstützte Videoformate | VOB, AVI, MPEG1, MPEG2, XVID |
| Unterstützte Audioformate | MP3, WMA |
| Unterstützte Bildformate | JPG, JPEG |
| Konnektivität | AV In, AV Out, USB, SD Card Slot, 3.5mm Headphone Jack, DC In, DC Out |
| Abmessungen (Hauptgerät) | Ungefähr 35.56 x 13.46 x 25.4 cm (14 x 5.3 x 10 Zoll) |
| Gewicht | Ungefähr 2.23 kg (4.92 lbs) |
| Farbe | Schwarz |
10. Garantie und Support
For information regarding warranty coverage, technical support, or service, please refer to the warranty card included in your package or contact the retailer from whom you purchased the product. You may also visit the official OTIC webWebsite für die neuesten Support-Informationen.
Bitte bewahren Sie Ihren Kaufbeleg für Garantieansprüche auf.