1. Einleitung
This manual provides detailed instructions for the safe and effective operation of your Andoer Mini WiFi Action Camera L11. This compact digital video camera is designed for capturing high-quality 1080P video at 30 frames per second, featuring a 0.96-inch LCD screen, built-in rechargeable battery, motion detection, and versatile mounting options. Please read this manual thoroughly before using the device.
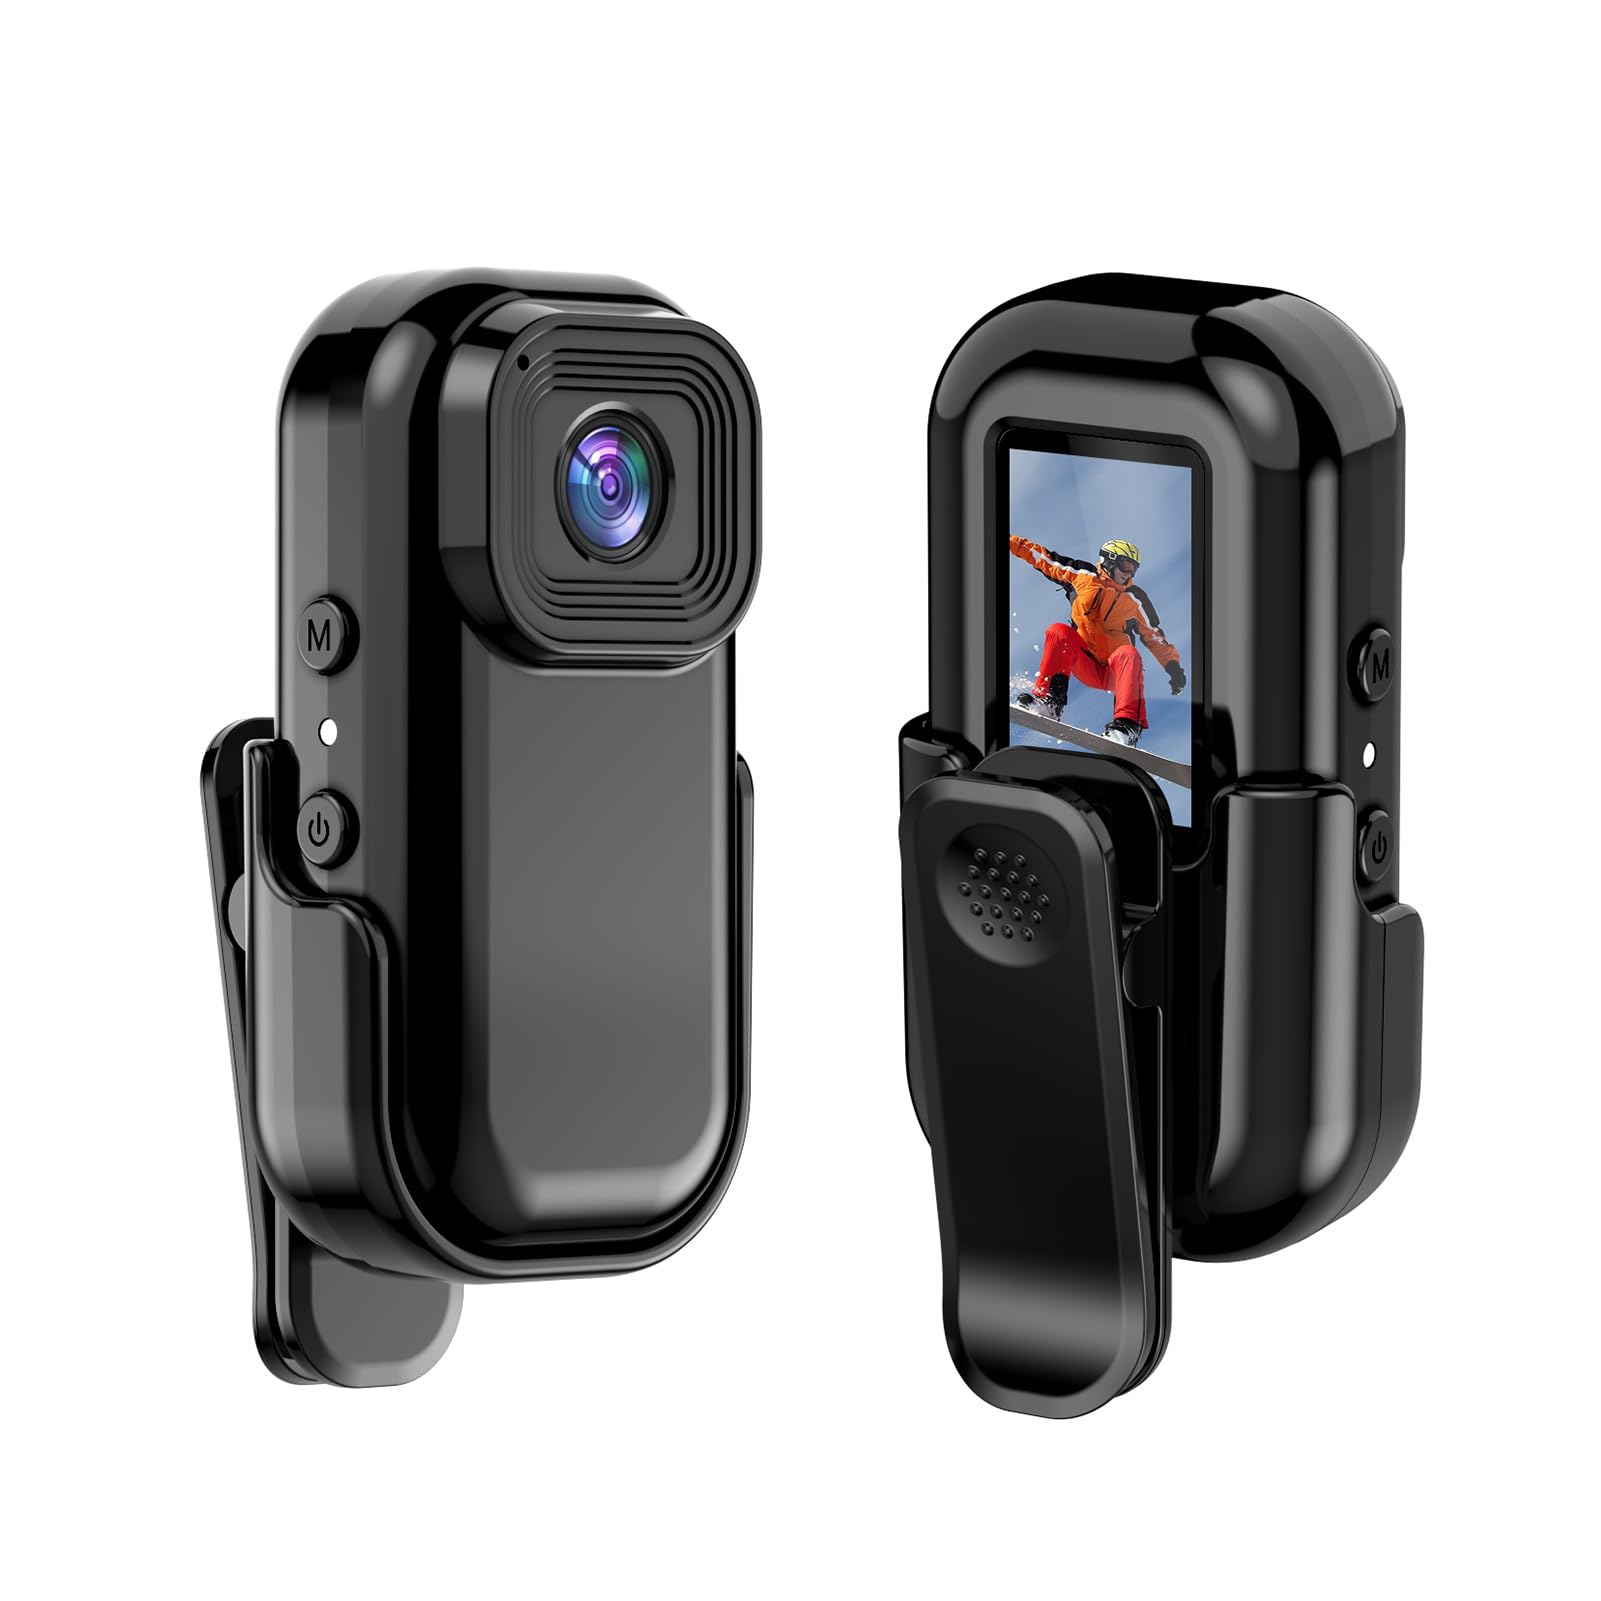
Abbildung: Vorder- und Rückseite view of the Andoer Mini WiFi Action Camera L11, showing the lens and the 0.96-inch LCD screen.
2. Packungsinhalt
Bitte prüfen Sie, ob alle unten aufgeführten Artikel in Ihrem Paket enthalten sind. Sollten Artikel fehlen oder beschädigt sein, kontaktieren Sie bitte unseren Kundenservice.
- 1 x Andoer Mini WiFi Action Camera L11
- 1 x Schutzhülle
- 1 x 1/4in Adapter Mount
- 1 x Back Clip Mount
- 1 x-Kartenleser
- 1 x Typ-C-Kabel
- 1 x Benutzerhandbuch (dieses Dokument)
3. Produktmerkmale
- Hochwertiges Video: Records in 1080P at 30 frames per second, suitable for various applications including live broadcasting and video conferencing.
- Kompakt und tragbar: Super mini size allows for easy portability and discreet placement.
- Magnetischer Körper: Features a magnetic base for secure attachment to smooth metal surfaces.
- Seamless WiFi Connectivity: Connects wirelessly to a dedicated app for live view und Kontrolle.
- Vielseitige Montage: Includes a 1/4-inch adapter mount and a back clip mount for diverse installation options.

Bild: Examples of application scenarios for the camera, including parachute jumping, cycling, parent-child activities, and skiing.

Image: The camera being used as a portable video recorder in various outdoor activities like camping, cycling, climbing, and sports.
4. Einrichtung
4.1 Laden des Akkus
Before first use, fully charge the camera's built-in 400mAh battery. Connect the provided Type-C cable to the camera's USB port and the other end to a standard USB power adapter (5V, ≥1A). The charging indicator light will typically show the charging status and turn off or change color when fully charged.
4.2 Einlegen einer Speicherkarte
The camera supports TF (Micro SD) cards up to 128GB. Ensure the card is formatted to FAT32 for optimal performance. Gently insert the TF card into the designated slot until it clicks into place. To remove, press the card in slightly until it springs out.
Note: A memory card is required for recording video and taking photos.
4.3 Ein-/Ausschalten
- So schalten Sie das Gerät ein: Halten Sie den Ein-/Ausschalter (normalerweise mit einem Ein-/Ausschaltersymbol gekennzeichnet) einige Sekunden lang gedrückt, bis der Bildschirm aufleuchtet.
- So schalten Sie das Gerät aus: Drücken und halten Sie den Ein-/Ausschalter erneut einige Sekunden lang, bis sich der Bildschirm ausschaltet.
5. Bedienungsanleitung
5.1 Grundlegende Bedienung
The 0.96-inch color display provides visual feedback for modes and settings. Use the navigation buttons (if present, typically 'M' for Mode and another for selection/shutter) to cycle through options and confirm selections.
5.2 Video aufnehmen
In video mode, press the Shutter/Record button to start recording. Press it again to stop. Videos are saved in AVI format at 1920x1080P resolution. The camera supports loop recording with 3-minute segments.

Image: The camera's screen displaying a family scene, indicating video recording at 1920x1080P resolution.
5.3 Fotos aufnehmen
Switch to photo mode using the Mode button. Press the Shutter button to capture a still image. Photos are saved in JPG format.

Image: Icons representing photo, video, and audio recording modes, illustrating the camera's ability to capture various moments.
5.4 Bewegungserkennung
The camera features motion detection capabilities. Refer to the on-screen menu or the dedicated app for instructions on how to activate and configure this feature. When enabled, the camera will automatically begin recording when motion is detected within its field of view.
6. WiFi-Konnektivität
The Andoer L11 camera supports wireless WiFi connectivity for remote control and live viewing via a smartphone application. Follow these general steps:
- Download the official Andoer camera app from your device's app store (iOS or Android).
- Power on the camera and activate its WiFi mode (refer to the camera's on-screen menu).
- On your smartphone, go to WiFi settings and connect to the camera's WiFi network (SSID and password will be displayed on the camera screen or in the app).
- Open the Andoer app. You should now see a live view from the camera and be able to control recording and settings remotely.

Image: A smartphone displaying a live view from the camera, demonstrating the WiFi connectivity feature.
7. Montagemöglichkeiten
The Andoer L11 offers flexible mounting solutions:
- Magnethalterung: The camera body has a magnetic feature, allowing it to be securely attached to smooth metal surfaces like refrigerator doors or metal poles.
- 1/4-inch Adapter Mount: Use the included 1/4-inch adapter mount to attach the camera to standard tripods, monopods, or other accessories with a 1/4-inch screw.
- Back Clip Mount: The back clip mount allows you to attach the camera to clothing, backpacks, or other thin objects for hands-free recording.
8. Wartung
- Reinigung: Reinigen Sie das Kameragehäuse mit einem weichen, trockenen Tuch. Verwenden Sie für das Objektiv ein spezielles Objektivreinigungstuch und eine entsprechende Reinigungslösung. Vermeiden Sie aggressive Chemikalien.
- Lagerung: Bewahren Sie die Kamera an einem kühlen, trockenen Ort fern von direkter Sonneneinstrahlung und extremen Temperaturen auf.
- Batteriepflege: Zur Langzeitlagerung sollte der Akku alle paar Monate auf etwa 50 % aufgeladen werden, um seine Funktionsfähigkeit zu erhalten.
- Firmware-Updates: Schauen Sie sich die offizielle Andoer-Website an. webBesuchen Sie die Website regelmäßig, um zu prüfen, ob Firmware-Updates verfügbar sind, um eine optimale Leistung und neue Funktionen zu gewährleisten.
9. Fehlerbehebung
| Problem | Mögliche Lösung |
|---|---|
| Die Kamera lässt sich nicht einschalten. | Ensure the battery is fully charged. Connect to a power source and try again. |
| Videoaufnahmen/Fotos können nicht aufgenommen werden. | Check if a TF card is inserted and properly formatted. Ensure there is sufficient storage space. |
| WLAN-Verbindungsprobleme. | Ensure WiFi is enabled on the camera and your smartphone. Restart both devices. Verify the correct app is installed. |
| Schlechte Video-/Bildqualität. | Ensure the lens is clean. Check lighting conditions. Verify camera settings are correct (e.g., resolution). |
| Die Kamera friert ein oder reagiert nicht mehr. | Perform a soft reset by holding the power button until it turns off, then restart. If persistent, remove and reinsert the memory card. |
10. Spezifikationen
| Besonderheit | Detail |
|---|---|
| Maschinentyp | L11 |
| Linsenwinkel | 140 Grad |
| TFT-Bildschirm | 0.96 Zoll großes Farbdisplay |
| Videoauflösung | 1920 * 1080P |
| Batterie | 400 mAh |
| Video File Format | AVI |
| Fotoformat | JPG |
| Video in Endlosschleife | 3 Мinuten |
| Aufnahme File Format | WAV (Audio) |
| Arbeitsfeuchtigkeit | 30 % |
| Betriebstemperatur | -25 bis + 75 ° C (-13 bis + 167 ° F) |
| Stromversorgung | USB-Lautstärketage 5V, Strom ≥1A |
| Speicherkarte | TF-Karte, unterstützt bis zu 128G |
| Konnektivitätstechnologie | W-lan |
| Formfaktor | Kompakt |
| Artikelgewicht | 4.2 Unzen (ca. 119 g) |
| Verpackungsabmessungen | 3.94 x 2.36 x 1.97 Zoll |
11. Sicherheitshinweise
- Do not expose the camera to extreme temperatures outside the specified operating range (-25°C to +75°C).
- Avoid operating the camera in humidity levels exceeding 30%.
- Keep the device away from water and other liquids unless explicitly stated as waterproof.
- Versuchen Sie nicht, die Kamera zu zerlegen oder zu verändern, da dies zum Erlöschen der Garantie führt und Schäden verursachen kann.
- Use only the specified power supply (USB 5V, ≥1A) for charging.
- Außerhalb der Reichweite von Kindern aufbewahren.