
1. Einleitung
The JoFomp Digital Wall Clock is designed to provide clear and comprehensive timekeeping, environmental monitoring, and alarm functions for various indoor settings. Its large 9-inch LED display ensures excellent visibility, day or night. This manual provides detailed instructions for setup, operation, and maintenance of your new digital clock.

Image: The digital clock shown with its dimensions (8.98" / 22.8cm length, 2.95" / 7.5cm height, 1.38" / 3.5cm depth) and icons representing its multiple functions: Dual Alarm, Temperature, Week, Brightness Control, Drowsiness (Snooze), Humidness, Memory Function, and Date.
2. Packungsinhalt
- JoFomp Digital Wall Clock (Model: 5503)
- USB-Stromkabel
- Netzteil
- Befestigungsnägel (x2)
- Benutzerhandbuch (dieses Dokument)
3. Sicherheitshinweise
- Ensure the power adapter and cable are undamaged before use.
- Setzen Sie das Gerät keinen extremen Temperaturen, direkter Sonneneinstrahlung oder hoher Luftfeuchtigkeit aus.
- Außerhalb der Reichweite von Kindern aufbewahren.
- Versuchen Sie nicht, die Uhr selbst zu zerlegen oder zu reparieren. Wenden Sie sich für Reparaturen an qualifiziertes Fachpersonal.
- Use only the provided USB cable and adapter, or a compatible 5V/1A power source.
- Batterien sind gemäß den örtlichen Vorschriften verantwortungsvoll zu entsorgen.
4. Einrichtung
4.1 Stromanschluss
- Connect the USB power cable to the clock's USB port (located on the back).
- Stecken Sie das andere Ende des USB-Kabels in den mitgelieferten Netzadapter.
- Insert the power adapter into a standard wall outlet. The clock display will illuminate.
4.2 Memory Battery Installation (Optional but Recommended)
The clock requires a constant power supply to operate. A memory battery ensures that time data is retained during power outages, preventing the need to reset the time. Two 1.5V AAA batteries are required (not included).
- Suchen Sie das Batteriefach auf der Rückseite der Uhr.
- Öffnen Sie die Abdeckung des Batteriefachs.
- Legen Sie zwei 1.5V AAA-Batterien ein und achten Sie dabei auf die richtige Polarität (+/-).
- Schließen Sie den Batteriefachdeckel fest.
4.3 Montagemöglichkeiten
The JoFomp Digital Wall Clock can be placed on a desk or mounted on a wall.
- Schreibtischplatzierung: Simply place the clock on any flat, stable surface.
- Wandmontage: Use the two provided mounting nails. Insert the nails into the wall at the desired location, ensuring they are level and spaced correctly to fit the hanging holes on the back of the clock. Carefully hang the clock onto the nails.

Image: The back panel of the clock, highlighting the "SET", "UP", and "DOWN" buttons, the memory battery storage compartment, the wall hanging hole, and the USB power outlet.

Image: Two illustrations demonstrating the clock's versatility: one showing it hung on a wall, and another showing it placed on a desktop.
5. Bedienungsanleitung
5.1 Uhrzeit und Datum einstellen
- Drücken und halten Sie die "SATZ" button on the back of the clock to enter time setting mode.
- Verwenden Sie die "UP" Und "RUNTER" buttons to adjust the hour. Press "SATZ" to confirm and move to minutes.
- Repeat the process to set minutes, year, month, and day.
- After setting the date, press "SATZ" to exit the setting mode.
5.2 Umschaltung zwischen 12- und 24-Stunden-Format
In normal time display mode, short press the "UP" button to switch between 12-hour (with AM/PM indicator) and 24-hour formats.
Video: Demonstration of the JoFomp digital clock's features, including switching between 12-hour and 24-hour time formats, changing temperature units, and showing timer and countdown functions. This video highlights the clock's versatility and ease of use.
5.3 Sommerzeitfunktion
To enable or disable DST, short press the "RUNTER" button in the time display state. The clock will automatically adjust the time by one hour forward or backward as appropriate.

Image: The clock display illustrating the Daylight Saving Time (DST) function, showing how the time shifts by one hour when DST is enabled or disabled, along with visual cues for "Spring Forward" and "Fall Back".
5.4 Helligkeitsregelung
The clock features automatic and manual brightness adjustment modes.
- Automatische Helligkeit: The built-in light sensor adjusts display brightness based on ambient light.
- Manuelle Helligkeit: You can manually set the brightness level to your preference.
- Schlafmodus: A light-sensitive sleep mode is available for minimal disturbance during rest.

Image: The clock display showing different brightness settings: "L-AU" (Third Gear Auto-Brightness), "L-SL" (Fourth Gear Sleep Mode Auto-Brightness), "L-01" (Low light level), "L-02" (Medium brightness), and "L-03" (High brightness).

Image: A side-by-side comparison of the clock's display brightness during the day (bright) and at night (dimmed), demonstrating its automatic brightness adjustment feature for optimal visibility.
5.5 Doppelalarmfunktion
Die Uhr unterstützt zwei unabhängige Alarme.
- Drücken Sie die "SATZ" button repeatedly until "AL1" or "AL2" appears on the display.
- Press and hold "SATZ" to enter alarm setting mode.
- Verwenden "UP" Und "RUNTER" to set the alarm hour and minutes.
- Drücken Sie "SATZ" to confirm each step.
- To activate/deactivate an alarm, short press the "UP" oder "RUNTER" button when "AL1" or "AL2" is displayed. An alarm icon will appear when active.
- When an alarm sounds, press any button to activate snooze, or press and hold "SATZ" to turn off the alarm.

Image: The clock display showing two alarm icons, indicating the dual alarm function. The image also depicts scenarios like "Wake Up Time" and "Exercise Time" to illustrate practical uses of the dual alarms.

Image: A visual representation of the dual alarm feature, showing the clock in two different environments (a kitchen and a gym), suggesting its utility for setting multiple reminders for various daily activities.
5.6 Temperatur- und Feuchtigkeitsanzeige
The clock continuously displays temperature in Celsius (°C) or Fahrenheit (°F) and relative humidity (%).
- To switch between °C and °F, short press the "RUNTER" button when the temperature is displayed.
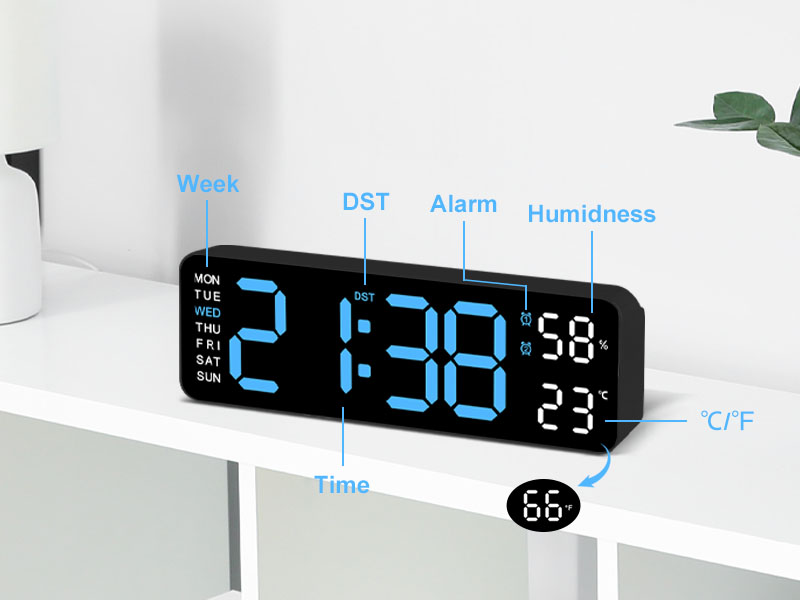
Bild: Eine detaillierte view of the clock's display, with labels pointing to the Week, DST, Alarm, Humidness, Temperature (°C/°F), and Time indicators, along with a small icon for the temperature sensor.
6. Wartung
- Reinigen Sie die Uhr mit einem weichen, trockenen Tuch. Verwenden Sie keine Scheuermittel oder Lösungsmittel.
- Avoid placing the clock in areas with excessive dust or moisture.
- If not in use for an extended period, disconnect the power and remove the memory batteries.
7. Fehlerbehebung
| Problem | Mögliche Ursache | Lösung |
|---|---|---|
| Die Uhranzeige ist aus. | Keine Stromversorgung. | Stellen Sie sicher, dass das USB-Kabel fest angeschlossen und das Netzteil an eine funktionierende Steckdose angeschlossen ist. |
| Uhrzeit/Datum werden nach Stromausfall zurückgesetzttage. | Memory batteries not installed or depleted. | Install two new 1.5V AAA batteries in the memory compartment. |
| Temperature/Humidity reading seems inaccurate. | Clock placed near heat/cold source or in direct sunlight. | Relocate the clock to an area with stable ambient temperature and humidity. Allow time for readings to stabilize. |
| Der Alarm ertönt nicht. | Alarm not activated or volume too low (if applicable). | Ensure the alarm is set and activated (alarm icon visible). Check if there's a volume setting (refer to specific alarm setting instructions). |
8. Spezifikationen
| Besonderheit | Detail |
|---|---|
| Marke | JoFomp |
| Modellnummer | 5503 |
| Anzeigetyp | Digitale LED |
| Anzeigegröße | 9 Zoll |
| Technische Daten | 11.8 Zoll B x 4 Zoll H (ca. 22.8 cm x 7.5 cm x 3.5 cm) |
| Stromquelle | Corded Electric (USB 5V/1A) |
| Speicherbatterie | 2 x 1.5 V AAA-Batterien (nicht im Lieferumfang enthalten) |
| Besondere Merkmale | Dual Alarm, Adjustable Brightness (Auto/Manual), Calendar, Large Display, Temperature (°C/°F), Humidity, DST, 12/24H Format, Snooze |
| Montagetyp | Wall Mount or Desk Placement |
| Material | Acrylnitril-Butadien-Styrol (Kunststoff) |
| Verwendung im Innen- und Außenbereich | Nur für den Innenbereich |
9. Garantie und Support
JoFomp products are manufactured with high-quality standards. For any issues or inquiries regarding your digital wall clock, please contact JoFomp customer support through the retailer's platform or the official JoFomp webWebsite.
Please retain your purchase receipt for warranty claims. Specific warranty terms and conditions may vary by region and retailer.
Weitere Unterstützung finden Sie unter JoFomp Store on Amazon.