
EDM 33516
EDM Portable Air Conditioner Model 33516 User Manual
Modell: 33516 | Marke: EDM
Einführung
Thank you for choosing the EDM Portable Air Conditioner Model 33516. This manual provides important information for the safe and efficient operation, maintenance, and troubleshooting of your new appliance. Please read this manual thoroughly before use and keep it for future reference.
Wichtige Sicherheitshinweise
- Lesen Sie vor der Verwendung des Geräts alle Anweisungen.
- Stellen Sie sicher, dass die Lautstärketage indicated on the rating label matches your main power supply.
- Tauchen Sie das Gerät, das Kabel oder den Stecker nicht in Wasser oder andere Flüssigkeiten.
- Beaufsichtigen Sie Kinder, um sicherzustellen, dass sie nicht mit dem Gerät spielen.
- Ziehen Sie bei Nichtgebrauch und vor der Reinigung den Stecker aus der Steckdose.
- Betreiben Sie kein Gerät, dessen Kabel oder Stecker beschädigt ist, oder wenn das Gerät eine Fehlfunktion aufweist oder auf sonstige Weise beschädigt wurde.
- Nicht im Freien verwenden.
- Luftöffnungen nicht blockieren.
- Stellen Sie das Gerät auf eine stabile, ebene Fläche.
- Only use clean water in the water tank.
Produkt überview
The EDM Portable Air Conditioner Model 33516 is a compact evaporative air cooler designed for personal and ambient climate control. It features a removable water tank, three speed settings, and integrated wheels for easy mobility.
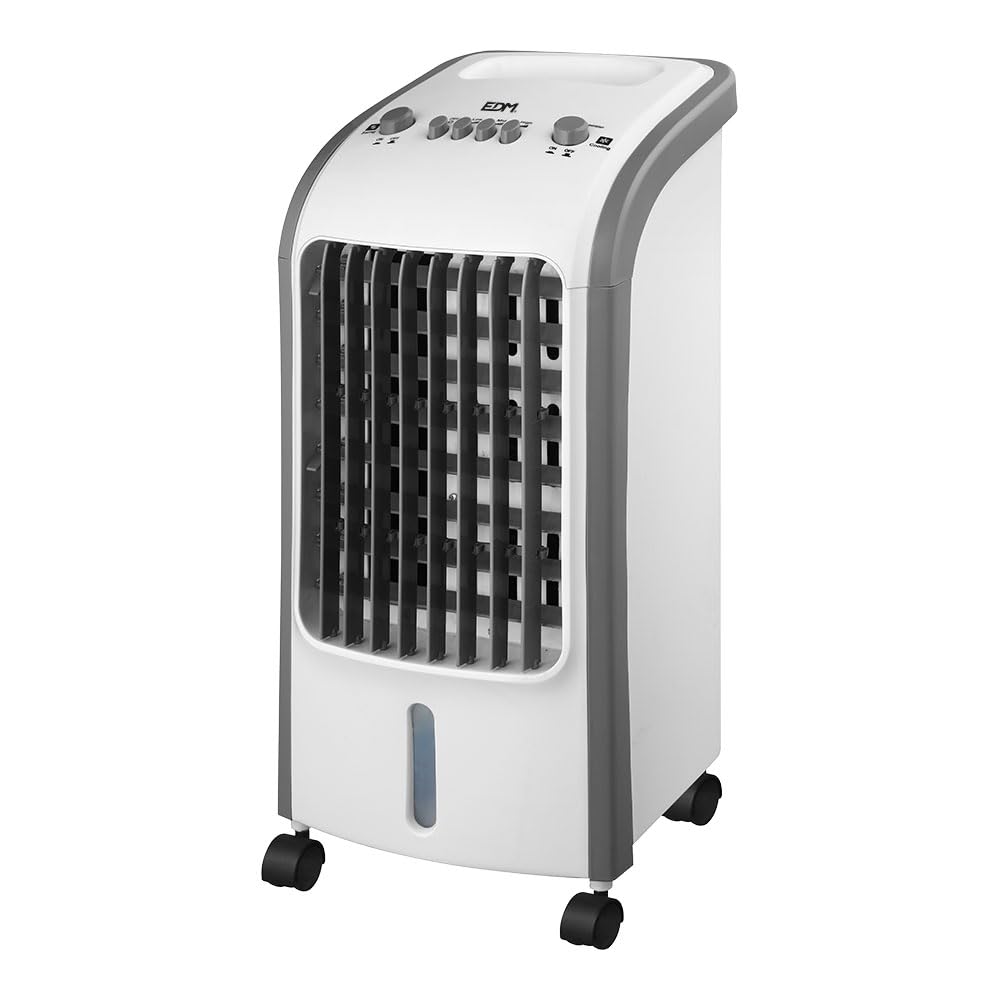
Abbildung 1: Front view of the EDM Portable Air Conditioner Model 33516. The unit is white and grey, with a front grille, control panel on top, and casters at the base.
Komponenten:
- Bedienfeld (oben)
- Luftauslassgitter (Vorderseite)
- Water Tank (Bottom, removable)
- Casters (Base)
- Netzkabel (Rückseite)
- Air Inlet Filter (Rear/Side)
Installationsanweisungen
1. Auspacken und Aufstellen
- Nehmen Sie die Klimaanlage vorsichtig aus der Verpackung.
- Stellen Sie das Gerät auf eine feste, ebene Fläche. Achten Sie darauf, dass um das Gerät herum mindestens 20 cm (8 Zoll) Freiraum für eine ausreichende Luftzirkulation vorhanden sind.
2. Füllen des Wassertanks
For cooling and humidification, the water tank must be filled with clean water.
- Ziehen Sie den Wassertank vorsichtig von der Unterseite des Geräts heraus.
- Füllen Sie den Tank mit sauberem Leitungswasser. Überschreiten Sie nicht die Fülllinie „MAX“.
- Carefully slide the water tank back into the unit until it clicks into place. Ensure it is securely seated to prevent leaks.

Abbildung 2: The removable water tank located at the bottom of the unit, shown partially pulled out for filling or cleaning.
3. Using Ice Packs (Optional)
For enhanced cooling, you can use the provided ice packs (or standard ice cubes) in the water tank.
- Freeze the ice packs thoroughly before use.
- After filling the water tank (as described above), place the frozen ice packs directly into the water tank.
- Verschließen Sie den Wassertank sicher.

Abbildung 3: Top left shows two blue ice packs next to the open water tank. These can be placed in the tank for colder air.
Bedienungsanleitung
Ensure the unit is plugged into a 220-240V power outlet before operation.
Abbildung 4: Close-up of the control panel. Buttons include 'Swing ON/OFF', 'OFF', 'LOW', 'MID', 'HIGH' for fan speed, and 'Cool ON/OFF'.
Funktionen des Bedienfelds:
- AUS: Schaltet das Gerät aus.
- LOW / MID / HIGH: Selects the desired fan speed.
- Swing ON/OFF: Activates or deactivates the automatic oscillation of the air outlet louvers.
- Cool ON/OFF: Aktiviert oder deaktiviert die Verdunstungskühlfunktion. Diese Funktion benötigt Wasser im Tank.
Grundlegende Bedienung:
- Einschalten: Press any of the speed buttons (LOW, MID, HIGH) to turn on the fan.
- Lüftergeschwindigkeit anpassen: Press the desired speed button (LOW, MID, HIGH).
- Kühlung aktivieren: Press the "Cool ON/OFF" button. The unit will begin evaporative cooling. Ensure the water tank is filled.
- Swing aktivieren: Press the "Swing ON/OFF" button to enable the automatic oscillation of the air louvers. Press again to stop.
- Ausschalten: Press the "OFF" button to turn off the unit.
Wartung
Regelmäßige Reinigung und Wartung gewährleisten eine optimale Leistung und verlängern die Lebensdauer Ihrer Klimaanlage.
1. Reinigung der Außenseite
- Ziehen Sie vor der Reinigung immer den Stecker aus der Steckdose.
- Wischen Sie die Außenflächen mit einem weichen, damp Tuch. Keine Scheuer- oder Lösungsmittel verwenden.
- Stellen Sie sicher, dass kein Wasser in das Bedienfeld oder andere elektrische Bauteile eindringt.
2. Reinigen des Wassertanks
- Ziehen Sie den Stecker aus der Steckdose.
- Pull out the water tank (refer to Figure 2).
- Schütten Sie das restliche Wasser ab.
- Reinigen Sie den Tank mit einem milden Reinigungsmittel und spülen Sie ihn anschließend gründlich mit klarem Wasser aus.
- Lassen Sie den Tank vollständig an der Luft trocknen, bevor Sie ihn wieder in das Gerät einsetzen.
- Clean the water tank regularly (e.g., weekly) to prevent mold and mildew growth.
3. Cleaning the Air Filter (Evaporative Pad)
The air filter/evaporative pad is located behind the rear grille. It should be cleaned periodically.
- Ziehen Sie den Stecker aus der Steckdose.
- Remove the rear grille (consult diagram if available, or gently unclip).
- Carefully remove the evaporative pad.
- Rinse the pad under running water to remove dust and mineral deposits. For heavy deposits, soak in a mild descaling solution (e.g., vinegar and water) before rinsing.
- Allow the pad to air dry completely before reinserting.
- Reattach the rear grille.
4. Speicherung
- If the unit will not be used for an extended period, empty and clean the water tank and evaporative pad thoroughly.
- Stellen Sie sicher, dass alle Teile trocken sind.
- Lagern Sie das Gerät an einem kühlen, trockenen Ort, vorzugsweise in der Originalverpackung.
Fehlerbehebung
| Problem | Mögliche Ursache | Lösung |
|---|---|---|
| Gerät lässt sich nicht einschalten. | Keine Stromversorgung. Netzkabel nicht richtig eingesteckt. | Prüfen Sie, ob das Gerät an eine funktionierende Steckdose angeschlossen ist. Stellen Sie sicher, dass das Netzkabel fest angeschlossen ist. |
| No cool air / Weak cooling effect. | Wassertank ist leer. "Cool" function is not activated. Evaporative pad is dirty or dry. Die Luftfeuchtigkeit im Raum ist zu hoch. | Füllen Sie den Wassertank. Press the "Cool ON/OFF" button. Clean or moisten the evaporative pad. Verdunstungskühler sind bei hoher Luftfeuchtigkeit weniger effektiv. Sorgen Sie für ausreichende Belüftung. |
| Unangenehmer Geruch. | Stagnant water or mold in the tank/pad. | Empty and clean the water tank and evaporative pad thoroughly. Use fresh water. |
| Wasserleck. | Der Wassertank sitzt nicht richtig. Der Wasserstand überschreitet die MAX-Linie. | Ensure the water tank is pushed in completely and securely. Überfüllen Sie den Wassertank nicht. |
Sollte das Problem nach Überprüfung dieser Punkte weiterhin bestehen, wenden Sie sich bitte an den Kundendienst.
Technische Daten
| Modellnummer | 33516 |
| Marke | Funkenerosion |
| Typ | Tragbarer Verdunstungsluftkühler |
| Leistung | 80 Watt |
| Bandtage | 220-240 V |
| Fassungsvermögen des Wassertanks | 3.6 Liter |
| Geschwindigkeiten | 3 Speeds (Low, Mid, High) |
| Steuerungstyp | Schaltflächen |
| Material | Plastik |
| Abmessungen (L x B x H) | 24 x 26 x 57 cm (ca.) |
| Gewicht | 4.83 kg |
| Besondere Merkmale | Removable water tank, With wheels, Swing function |
| Geräuschpegel | 20 dB (typisch) |

Abbildung 5: Dimensional drawing of the unit, showing approximate measurements of 24 cm (depth), 26 cm (width), and 57 cm (height).
Garantie und Support
For warranty information or technical support, please refer to the warranty card included with your product or contact your retailer. Keep your proof of purchase for any warranty claims.
Ask a question about this manual
Ask about setup, troubleshooting, compatibility, parts, safety, or missing instructions. Manuals+ will review the question and use this page’s manual context to help answer it.