1. Einleitung und Sicherheitshinweise
This manual provides essential instructions for the installation, operation, and maintenance of your GAMEMAX GX-850 80 Plus Gold Fully Modular Power Supply. Please read this manual thoroughly before installation and retain it for future reference.
1.1 Wichtige Sicherheitshinweise
- Stromschlaggefahr: Netzteile enthalten Hochspannungstage components. Do not open the power supply unit. There are no user-serviceable parts inside. Opening the unit will void the warranty.
- Richtige Erdung: Ensure your computer system is properly grounded to prevent electrical hazards.
- Stromversorgung trennen: Always disconnect the AC power cord from the wall outlet before installing, removing, or servicing the power supply or any other computer components.
- Belüftung: Ensure adequate ventilation around the power supply. Do not block any ventilation openings.
- Moisture and Temperature: Do not operate the power supply in high humidity or high-temperature environments. Keep it away from water and heat sources.
- Professionelle Installation: Wenn Sie sich bei einzelnen Installationsschritten unsicher sind, wenden Sie sich an einen qualifizierten Techniker.
2. Packungsinhalt
Verify that all items are present in your GAMEMAX GX-850 package:
- GAMEMAX GX-850 80 Plus Gold Fully Modular Power Supply
- Modular Cable Set (including ATX 24-pin, CPU 8-pin, PCIe 6+2-pin, SATA, Peripheral 4-pin cables)
- Netzkabel
- Befestigungsschrauben
- Benutzerhandbuch (dieses Dokument)
3. Produktüberschreitungview
The GAMEMAX GX-850 is an 850-watt 80 Plus Gold certified fully modular power supply designed for desktop computers. It features an LLC and DC-DC circuit design for high efficiency and stable power delivery, along with an ultra-quiet FDB (Fluid Dynamic Bearing) fan for optimal cooling and low noise.

Image: The GAMEMAX GX-850 80 Plus Gold Fully Modular Power Supply, showcasing its black finish and modular design.
3.1 Hauptmerkmale
- 80 Plus Gold-zertifiziert: Gewährleistet eine hohe Energieeffizienz, wodurch Wärmeentwicklung und Betriebskosten reduziert werden.
- LLC+DC-DC Circuit: Advanced circuit design for stable voltage output and improved efficiency.
- Vollständig modulares Design: Allows for custom cable management, reducing clutter and improving airflow.
- FDB Fan: Ultra-quiet temperature-controlled Fluid Dynamic Bearing fan for silent operation and extended lifespan.
- 105℃ Mainstream Capacitor: High-quality capacitors ensure long life and smooth power output.
- Umfassender Schutz: Features SIX levels of protection: Over Temperature Protection (OTP), Over Current Protection (OCP), Short Circuit Protection (SCP), Over Voltage-Schutz (OVP), unter Voltage Protection (UVP), and Over Power Protection (OPP).
4. Einrichtung und Installation
Follow these steps to properly install your GAMEMAX GX-850 power supply into your computer system.
4.1 Installationsschritte
- Bereiten Sie Ihr System vor: Stellen Sie sicher, dass Ihr Computer vollständig ausgeschaltet und vom Stromnetz getrennt ist. Öffnen Sie das Computergehäuse.
- Altes Netzteil entfernen (falls zutreffend): Trennen Sie alle Kabel von Ihrem alten Netzteil und nehmen Sie es aus dem Gehäuse.
- Das neue Netzteil einbauen: Carefully place the GAMEMAX GX-850 into the power supply bay of your computer case. Secure it with the provided mounting screws. Ensure the fan is facing the correct direction for optimal airflow (typically facing down if your case has a bottom vent, or up if it's a top-mounted PSU).
- Modulare Kabel anschließen: Identify the necessary cables for your components. Connect the modular cables to the corresponding ports on the power supply first, then route them to your components.
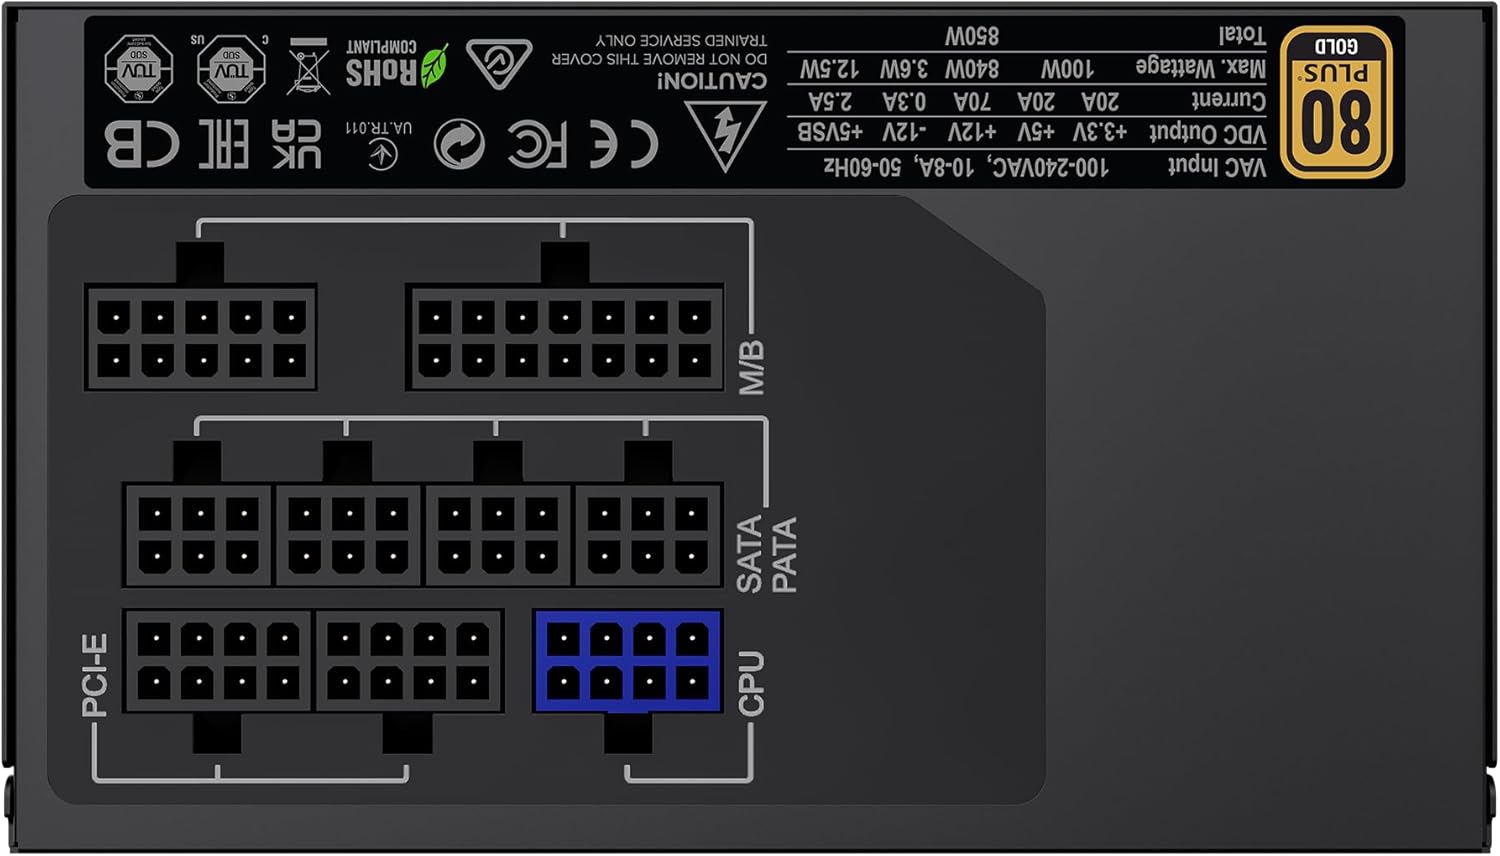
Bild: Rückseite view of the GAMEMAX GX-850 showing the fully modular cable connection ports for PCI-e, M/B (Motherboard), SATA/PATA, and CPU cables.
- Motherboard (M/B): Verbinden Sie das 24-polige ATX-Kabel mit dem Motherboard.
- CPU: Connect the 8-pin (or 4+4-pin) CPU power cable to the CPU power connector on your motherboard.
- Graphics Cards (PCI-e): Connect the 6+2-pin PCIe power cables to your graphics card(s). Use separate cables for each connector if your GPU requires multiple.
- Storage Devices (SATA): Schließen Sie SATA-Stromkabel an Ihre SSDs, HDDs und optischen Laufwerke an.
- Peripherals (PATA/Molex): Connect peripheral power cables to any other devices requiring them (e.g., fan controllers, older drives).
- Kabelmanagement: Verlegen Sie die Kabel ordentlich, um die Luftzirkulation und die Optik zu verbessern.
- Gehäuse schließen und Netzstrom anschließen: Close your computer case. Connect the AC power cord to the power supply and then to a grounded wall outlet.
5. Bedienungsanleitung
After successful installation, follow these steps to operate your system.
- Stromschalter: Stellen Sie sicher, dass sich der Netzschalter auf der Rückseite des Netzteils in der Position „EIN“ (I) befindet.
- System einschalten: Press the power button on your computer case to turn on the system.
- System Power Off: To turn off your system, use the operating system's shutdown procedure. For a hard shutdown, hold the case power button for several seconds. For complete power disconnection, switch the PSU's power switch to 'OFF' (O) and unplug the AC cord.
6. Wartung
Regelmäßige Wartung trägt dazu bei, die Langlebigkeit und optimale Leistung Ihres Netzteils zu gewährleisten.
- Staubreinigung: Periodically clean the power supply's fan and ventilation grilles using compressed air to prevent dust buildup, which can impede cooling. Ensure the system is powered off and unplugged before cleaning.
- Kabelprüfung: Occasionally check all modular cable connections to ensure they are securely seated.
- Umgebungsbedingungen: Sorgen Sie für eine saubere, trockene und gut belüftete Umgebung für Ihren Computer.
7. Fehlerbehebung
Sollten Sie Probleme mit Ihrem Netzteil haben, beachten Sie bitte die folgenden gängigen Schritte zur Fehlerbehebung:
- Kein Strom:
- Ensure the AC power cord is securely plugged into both the wall outlet and the power supply.
- Check that the power switch on the back of the PSU is in the 'ON' (I) position.
- Verify that the 24-pin ATX and 8-pin CPU power cables are correctly and firmly connected to the motherboard.
- Prüfen Sie die Wandsteckdose mit einem anderen Gerät, um sicherzustellen, dass sie Strom liefert.
- Systeminstabilität/Zufällige Abschaltungen:
- Ensure all modular cables are fully seated at both the PSU and component ends.
- Check for proper ventilation and ensure the PSU fan is spinning. Overheating can cause shutdowns.
- If you have recently added new components, ensure your 850W power supply is sufficient for the total system wattage.
- Lüfter dreht sich nicht:
- The GX-850 features a temperature-controlled fan. It may not spin at low loads or temperatures. This is normal operation.
- If the fan does not spin under load and the PSU feels hot, ensure there are no obstructions and consider contacting support.
If problems persist after performing these steps, contact GAMEMAX customer support or your retailer for further assistance.
8. Spezifikationen
Detailed technical specifications for the GAMEMAX GX-850 80 Plus Gold Power Supply:
| Besonderheit | Spezifikation |
|---|---|
| Modellname | GX-850 Modular |
| Marke | GAMEMAX |
| Ausgang Wattage | 850 Watt |
| Formfaktor | ATX |
| Effizienzzertifizierung | 80 Plus Gold |
| Stromversorgungsdesign | Vollständig modular |
| Kühlmethode | Luft (FDB-Lüfter) |
| Anzahl der Lüfter | 1 |
| Mindesteingangslautstärketage | 115 Volt |
| Maximale Eingangslautstärketage | 240 Volt (Wechselstrom) |
| Obere Temperaturbewertung | 105 Degrees Celsius (Capacitors) |
| Kompatible Geräte | Desktop-Computer |
| Steckertypen | ATX, PCI-e, SATA |
9. Garantie und Support
GAMEMAX products are manufactured to high-quality standards. For warranty information, please refer to the warranty card included with your product or visit the official GAMEMAX webDie Garantiebedingungen können je nach Region und Händler variieren.
For technical support or further inquiries, please contact GAMEMAX customer service through their official webWebsite oder die von Ihrem Händler bereitgestellten Kontaktinformationen.