
BSIDE ACM81
BSIDE ACM81 Digital Clamp Multimeter
Bedienungsanleitung
Model: ACM81 | Brand: BSIDE
1. Einleitung
The BSIDE ACM81 is a compact and versatile digital clamp multimeter designed for accurate and safe electrical measurements. It features True RMS measurement, auto-ranging capabilities, and a non-contact voltage detection (V-Alert) function, making it suitable for a wide range of applications.
1.1 Hauptmerkmale
- 1mA AC Current Sensitivity: Capable of measuring AC current down to 1mA via the clamp.
- True RMS Auto-Ranging: Provides accurate readings for non-sinusoidal waveforms and automatically selects the correct measurement range.
- Multifunktionale Messung: Measures AC current, AC/DC voltage, resistance, continuity, diode, and temperature.
- V-Alert Function: Berührungslose AC-Lautstärketage-Detektion für erhöhte Sicherheit.
- Praktisches Design: Features a back clip for portability and a side probe holder for single-hand operation.
- Datenaufnahme: Friert den angezeigten Messwert zur einfacheren Aufzeichnung ein.
- Großes LCD-Display mit Hintergrundbeleuchtung: Gewährleistet gute Lesbarkeit unter verschiedenen Lichtverhältnissen.
- Sicherheitsstandards: Conforms to IEC-61010-1, IEC-61010-2-030, IEC-61010-2-032, IEC-61010-2-033 standards, with CAT III 300V and CAT II 600V over-voltage Schutz.
1.2 Packungsinhalt
Prüfen Sie nach dem Öffnen der Verpackung, ob alle Artikel vorhanden und unbeschädigt sind:
- 1 x BSIDE ACM81 Digital Clamp Meter
- 1 x Paar Testspitzen (rot und schwarz)
- 1 x Thermoelement (zur Temperaturmessung)
- 1 x Tragetasche
- 1 x Schraubendreher (für Batteriefach)
- 1 x Benutzerhandbuch (dieses Dokument)

Figure 1.1: Package Contents of the BSIDE ACM81
2. Sicherheitshinweise
To ensure safe operation and avoid personal injury or damage to the meter, please read all safety instructions carefully before use. Always adhere to local and national safety codes.
- Die für jeden Messbereich angegebenen maximalen Eingangswerte dürfen nicht überschritten werden.
- Seien Sie äußerst vorsichtig, wenn Sie mit vol arbeitentagEs liegt über 30 V AC RMS, 42 V Spitze oder 60 V DC. Diese SpannungentagEs besteht die Gefahr eines Stromschlags.
- Vor der Strommessung mit dem Clamp, ensure the circuit is de-energized if possible, and always wear appropriate personal protective equipment (PPE).
- Never use the meter if it appears damaged or if the insulation on the test leads is compromised.
- Vor dem Betrieb sicherstellen, dass der Batteriedeckel fest verschlossen ist.
- Das Messgerät darf nicht in explosionsgefährdeten Bereichen mit Gasen, Dämpfen oder Stäuben betrieben werden.
- The meter is rated for CAT III 300V and CAT II 600V. Do not use it for measurements exceeding these categories.
- Vor Funktionsänderungen die Messleitungen aus dem Stromkreis entfernen.
3. Komponenten und Bedienelemente
Familiarize yourself with the parts of your BSIDE ACM81 clamp Multimeter:
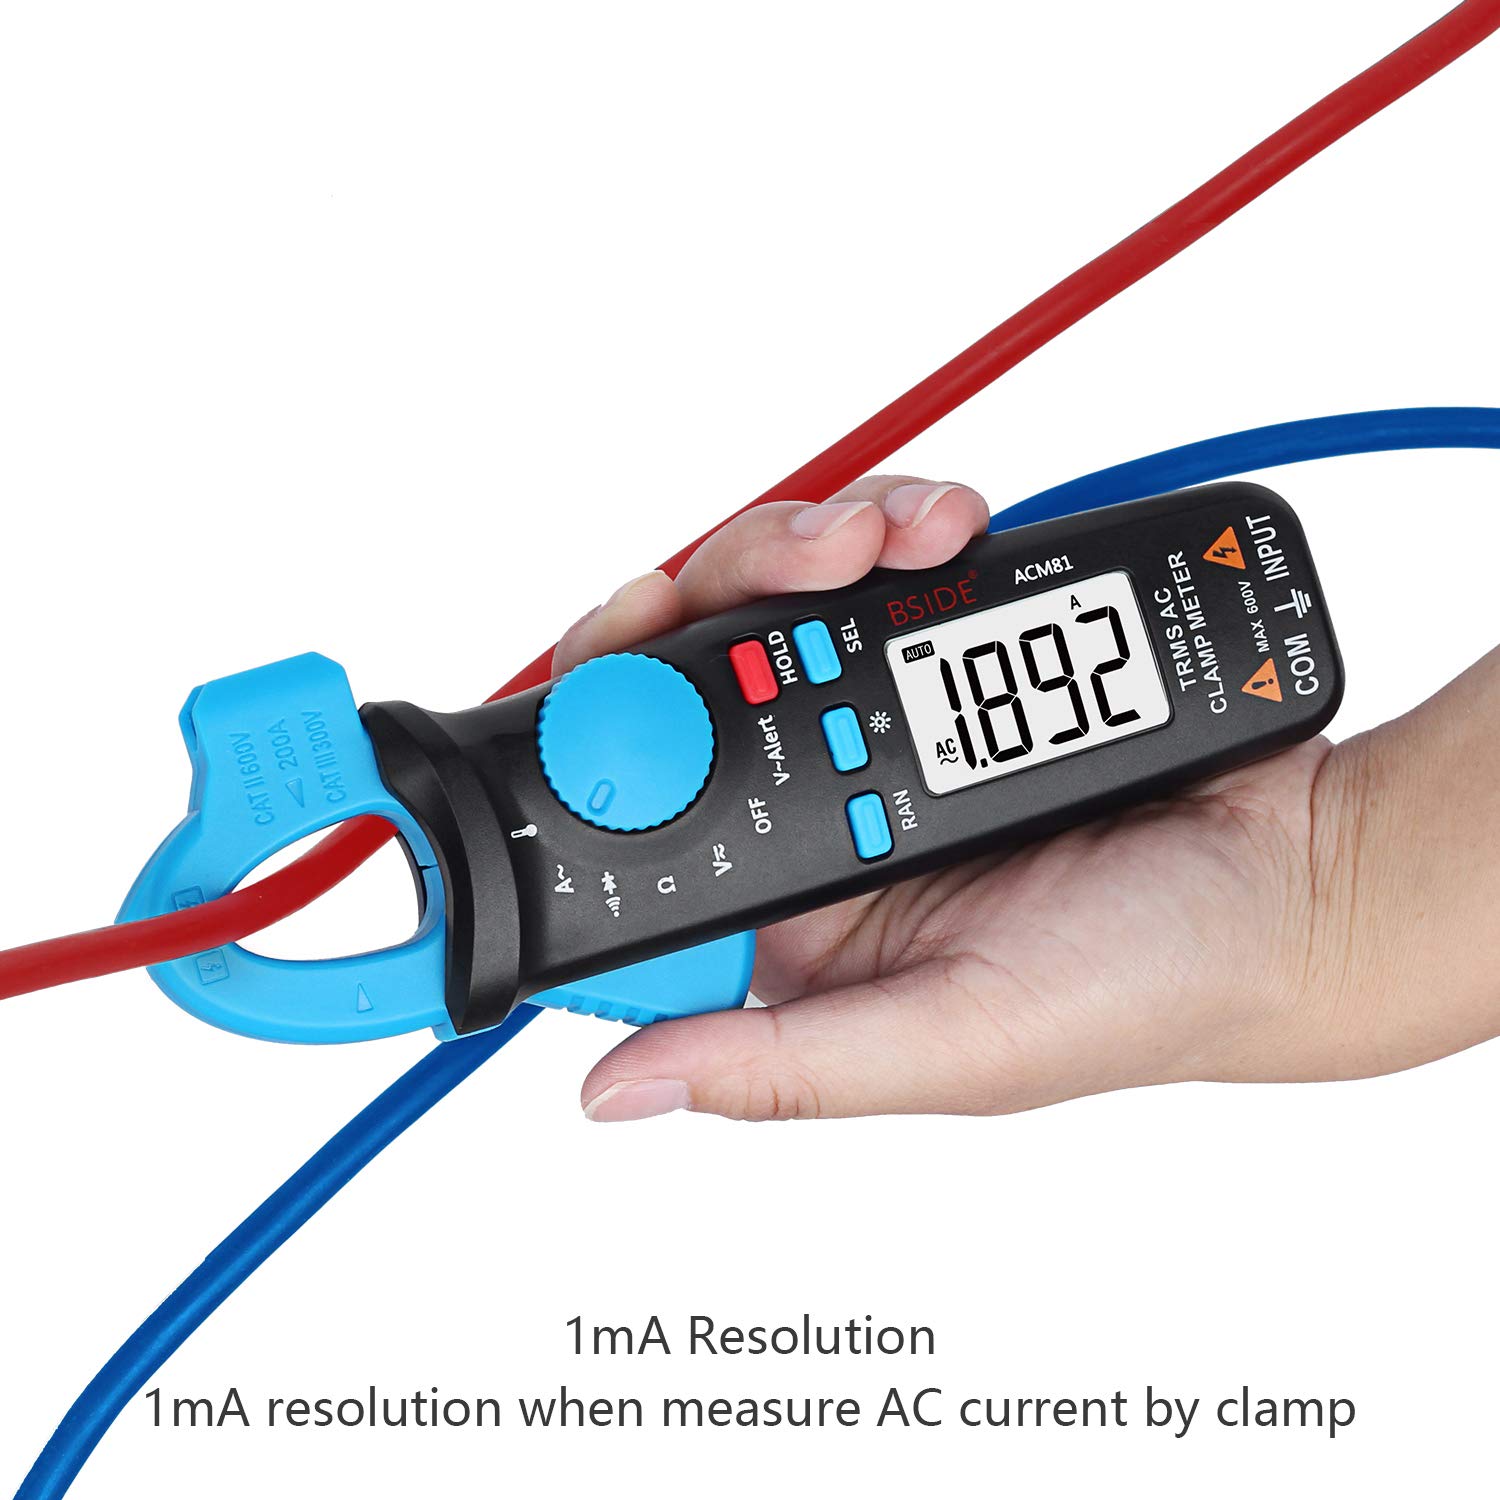
Figure 3.1: BSIDE ACM81 Components Overview
- V-Alarm-Sensor: Erkennt berührungslose Wechselstromspannungtage.
- Clamp: Wird zur berührungslosen Wechselstrommessung verwendet.
- Sondenhalter: Conveniently stores test probes when not in use.
- Auslösen: Öffnet und schließt die clamp Kiefer.
- Funktionsschalter: Rotary dial to select measurement modes (AC Current, Voltage, Resistance/Continuity/Diode, Temperature, OFF).
- Data Hold (HOLD) Button: Friert den aktuellen Messwert auf dem Display ein.
- Function Selection (SEL) Button: Toggles between sub-functions within a rotary switch position (e.g., Resistance, Continuity, Diode).
- Manual/Auto Switch (RAN) Button: Schaltet zwischen automatischem und manuellem Entfernungsmessmodus um.
- Hintergrundbeleuchtungstaste (*): Aktiviert oder deaktiviert die LCD-Hintergrundbeleuchtung.
- LCD Anzeige: Zeigt Messwerte, Einheiten und Indikatoren an.
- COM-Anschluss: Common (negative) input terminal for test leads.
- INPUT Port: Positive input terminal for test leads (for voltage, resistance, etc.).
4. Einrichtung
4.1 Einlegen der Batterie
Für den BSIDE ACM81 werden zwei 1.5-V-AAA-Batterien benötigt (nicht im Lieferumfang enthalten). Gehen Sie zum Einsetzen der Batterien wie folgt vor:
- Stellen Sie sicher, dass der Zähler ausgeschaltet ist.
- Suchen Sie das Batteriefach auf der Rückseite des Messgeräts.
- Verwenden Sie den mitgelieferten Schraubendreher, um die Schraube zu lösen, mit der die Batterieabdeckung befestigt ist.
- Entfernen Sie die Batterieabdeckung.
- Legen Sie zwei AAA-Batterien ein und achten Sie dabei auf die richtige Polarität (+ und -), wie im Batteriefach angegeben.
- Bringen Sie die Batterieabdeckung wieder an und ziehen Sie die Schraube fest an.

Abbildung 4.1: Einlegen der Batterie
5. Bedienungsanleitung
5.1 Ein-/Ausschalten und automatische Abschaltung
- To turn on the meter, rotate the Function Switch from the 'OFF' position to any desired measurement function.
- To turn off the meter, rotate the Function Switch to the 'OFF' position.
- The meter features an Auto Power Off function to conserve battery life. It will automatically power off after approximately 15 minutes of inactivity.
5.2 Wechselstrommessung (Clamp)
This meter can measure AC current without breaking the circuit, using its clamp Kiefer.
- Rotate the Function Switch to the 'A~' position.
- Drücken Sie den Auslöser, um die Cl zu öffnenamp Kiefer.
- Schließen Sie nur einen Leiter (Phase oder Neutralleiter) in den Anschluss ein.amp Kiefer. Nicht schließenamp around multiple conductors as this will result in an inaccurate reading (the magnetic fields will cancel out).
- Zum Schließen des Verschlusses den Auslöser loslassen.amp jaw securely around the conductor.
- Read the AC current value on the LCD display. The meter has 1mA sensitivity for precise readings.

Figure 5.1: Measuring AC Current with 1mA Resolution

Figure 5.2: Easy Clamp Kontrolle
5.3 Voltage Messung (AC/DC)
Zur Messung von AC- oder DC-Voltage:
- Insert the red test lead into the 'INPUT' terminal and the black test lead into the 'COM' terminal.
- Rotate the Function Switch to the 'V=' (DC Voltage) oder 'V~' (AC Vol)tage) position. If the symbol is 'V', press the 'SEL' button to toggle between AC and DC voltage.
- Schließen Sie die Messspitzen parallel an den Stromkreis oder das Bauteil an, das Sie messen möchten.
- Lesen Sie den Bandtage-Wert auf dem LCD-Display.

Figure 5.3: Battery and AC Voltage Messung
5.4 Resistance, Continuity, and Diode Measurement
These functions are typically grouped under one rotary switch position.
- Insert the red test lead into the 'INPUT' terminal and the black test lead into the 'COM' terminal.
- Rotate the Function Switch to the 'Ω' (Ohm) position.
- Press the 'SEL' button to cycle through Resistance (Ω), Continuity (buzzer symbol), and Diode (diode symbol) modes.
- For Resistance: Connect the probes across the component. Read the resistance value.
- Zur Gewährleistung der Kontinuität: Connect the probes across the circuit. If resistance is less than 30Ω, the buzzer will sound.
- Für Diode: Schließen Sie die rote Messspitze an die Anode und die schwarze Messspitze an die Kathode an. Das Display zeigt die Vorwärtsspannung an.tage drop. Vertauschen Sie die Messspitzen, um auf einen offenen Stromkreis zu prüfen.
5.5 Temperaturmessung
So messen Sie die Temperatur:
- Insert the thermocouple into the 'INPUT' and 'COM' terminals, observing polarity (usually red to INPUT, black to COM).
- Rotate the Function Switch to the temperature symbol (℃/℉).
- Press the 'SEL' button to toggle between Celsius (℃) and Fahrenheit (℉).
- Platzieren Sie die Spitze des Thermoelements auf oder in der Nähe des Objekts, dessen Temperatur Sie messen möchten.
- Lesen Sie den Temperaturwert auf dem LCD-Display ab.
5.6 V-Alarm (kontaktloser Vol)tage Erkennung)
The V-Alert function allows for quick detection of AC voltage ohne direkten Kontakt, wodurch die Sicherheit erhöht wird.
- Rotate the Function Switch to the 'V-Alert' position.
- Move the V-Alert sensor (located at the top of the clamp jaw) close to the conductor or outlet you suspect has AC voltage.
- The meter will emit an audible beep and the V-Alert indicator on the display will illuminate if AC voltage is detected. The frequency of beeps and indicator intensity may increase with stronger voltage.

Figure 5.4: V-Alert (Non-Contact Voltage Erkennung)
5.7 Datenhaltefunktion
The Data Hold function allows you to freeze the current reading on the display, which is useful when taking measurements in hard-to-reach areas or when you need to record the value.
- While taking a measurement, press the 'HOLD' button. The current reading will be frozen on the display, and a 'HOLD' indicator will appear.
- Press the 'HOLD' button again to release the reading and return to live measurement mode.
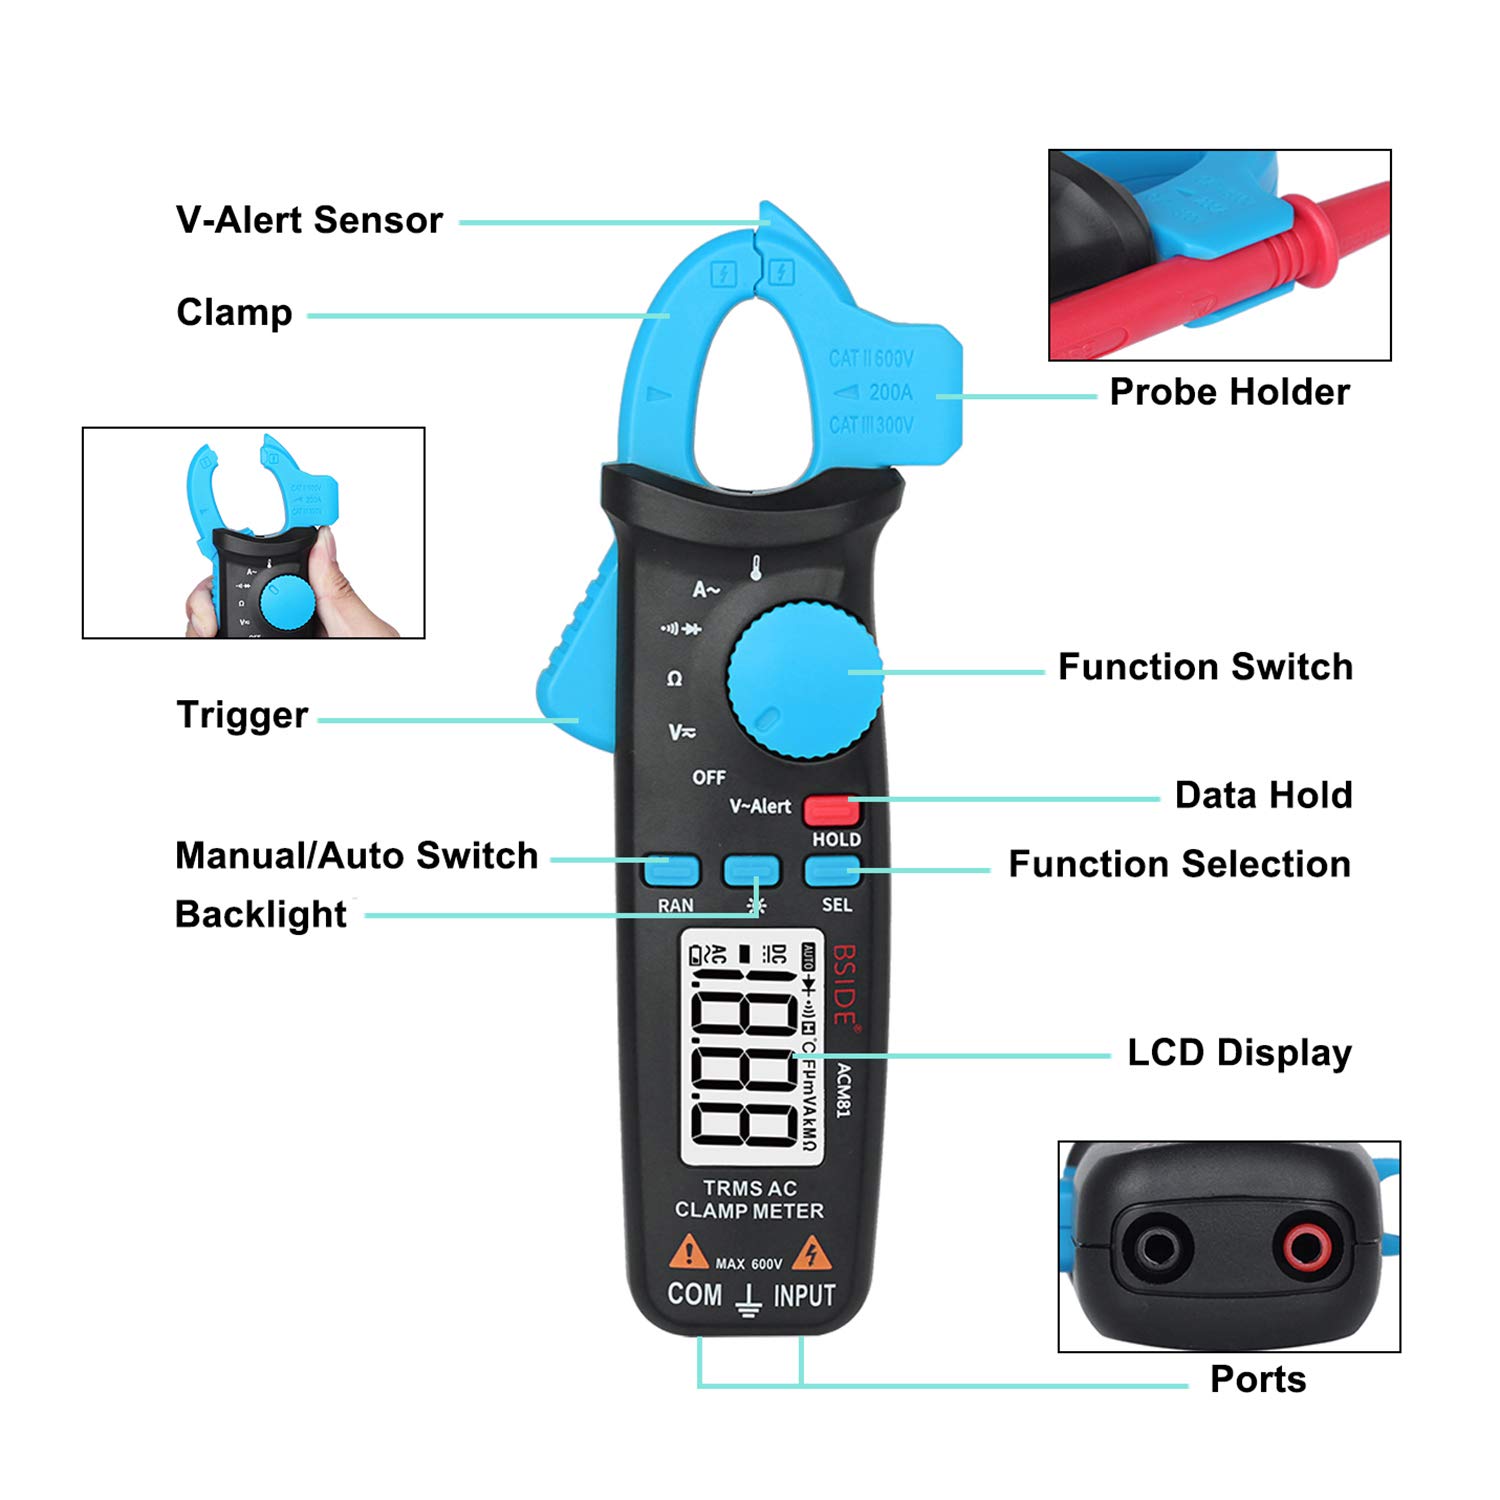
Figure 5.5: Data Hold Function
6. Spezifikationen
| Parameter | Spezifikation |
|---|---|
| Anzeige | 2000 Zählwerte |
| Wechselstrom (Clamp) | 2A/20A/200A (Resolution: 0.001A/0.01A/0.1A, Accuracy: ±2.5%+5 counts) |
| DC-Voltage | 200mV/2V/20V/200V/600V (Resolution: 0.1mV/0.001V/0.01V/0.1V/1V, Accuracy: ±1.0%+3 counts) |
| AC-Lautstärketage | 200mV/2V/20V/200V/600V (Resolution: 0.1mV/0.001V/0.01V/0.1V/1V, Accuracy: ±1.0%+3 counts) |
| Widerstand | 200Ω/2kΩ/20kΩ/200kΩ/2MΩ (Accuracy: ±1.0%+3 counts) 20MΩ (Accuracy: ±1.2%+20 counts) |
| Durchgangssummer | Sounds if resistance is less than 30Ω |
| Diode | Zeigt positive Volatilitättage value of diode approximately |
| Temperatur | -20℃~500℃ / -4℉~932℉ (Resolution: 1℃/2℉, Accuracy: ±2.0%+2 counts) |
| Backenkapazität | 20 mm |
| Leistung | 2 x 1.5 V AAA-Batterien |
| Maße | 179 mm x 67 mm x 36 mm (7.05 x 2.64 x 1.54 Zoll) |
| Gewicht | 137 g (4.9 Unzen) |
| Sicherheitsbewertung | CAT III 300 V, CAT II 600 V, Verschmutzungsgrad II |
7. Wartung
7.1 Reinigung
Um die Genauigkeit und Lebensdauer Ihres Messgeräts zu erhalten:
- Löschen Sie den Fall mit Anzeigeamp Tuch und mildem Reinigungsmittel. Keine Scheuer- oder Lösungsmittel verwenden.
- Keep the terminals and clamp jaw clean and free of dust or debris.
- Stellen Sie sicher, dass das Messgerät vor Gebrauch vollständig trocken ist.
7.2 Batteriewechsel
When the battery indicator appears on the LCD, the batteries are low and should be replaced immediately to ensure accurate readings. Refer to Section 4.1 for battery installation steps.
7.3 Speicherung
If the meter is not to be used for an extended period, remove the batteries to prevent leakage and store the meter in its carrying case in a cool, dry place, away from direct sunlight and extreme temperatures.
8. Fehlerbehebung
Sollten Sie Probleme mit Ihrem BSIDE ACM81 haben, beachten Sie bitte die folgenden häufig auftretenden Probleme und Lösungen:
| Problem | Mögliche Ursache | Lösung |
|---|---|---|
| Das Messgerät schaltet sich nicht ein | Leere oder falsch eingelegte Batterien | Batteriepolarität prüfen; Batterien austauschen. |
| Es wird kein Messwert oder „OL“ angezeigt. | Overload, open circuit, or incorrect range/function | Ensure circuit is complete; select appropriate function/range; check if value exceeds meter's maximum. |
| Ungenaue Messwerte | Low battery, dirty probes/terminals, external interference | Replace batteries; clean probes/terminals; move away from strong electromagnetic fields. |
| Der Durchgangsprüfer ertönt nicht. | Resistance too high, or not in continuity mode | Ensure resistance is below 30Ω; press SEL to select continuity mode. |
| V-Alert not detecting | Kein AC-Voltage present, or sensor not close enough | Überprüfen Sie die AC-Lautstärketage presence; ensure sensor is directly over the conductor. |
9. Garantie und Support
BSIDE products are manufactured to high-quality standards. For specific warranty information, please refer to the warranty card included with your product or contact BSIDE customer support directly. If you require technical assistance or have questions regarding the operation of your ACM81 Digital Clamp Multimeter, please reach out to the manufacturer's support channels.
For further assistance, please visit the official BSIDE webWebsite oder wenden Sie sich an die Kundendienstabteilung.
Ask a question about this manual
Ask about setup, troubleshooting, compatibility, parts, safety, or missing instructions. Manuals+ will review the question and use this page’s manual context to help answer it.