
1. Einleitung
The Mastech MS8233B is a compact, handheld digital multimeter designed for measuring AC/DC voltage, DC current, resistance, diode, continuity, and temperature. It features a 2000-count display, data hold function, and low battery indication, making it suitable for various electrical testing applications in domestic and electronics environments.
2. Sicherheitshinweise
To ensure safe operation and service of the meter, please read this manual thoroughly before use. Failure to observe safety warnings can result in severe injury or death.
- Vor Gebrauch stets sicherstellen, dass das Messgerät einwandfrei funktioniert.
- Nicht mehr als die angegebene Menge auftragen.tage, which is 600V CAT III.
- Seien Sie vorsichtig beim Arbeiten mit VolumentagSpannungen über 30 V AC RMS, 42 V Spitze oder 60 V DC sind zu vermeiden, da sie eine Stromschlaggefahr darstellen.
- Vor Funktionsänderungen müssen die Messleitungen immer vom Stromkreis getrennt werden.
- Tauschen Sie die Batterie sofort aus, wenn die Anzeige für niedrigen Batteriestand erscheint.
- Das Messgerät darf nicht bedient werden, wenn der Batteriedeckel nicht ordnungsgemäß geschlossen ist.
- Halten Sie sich an lokale und nationale Sicherheitsvorschriften.
3. Produktüberschreitungview
The Mastech MS8233B Digital Multimeter features a clear display, a rotary function switch, and dedicated input jacks for various measurements.

Abbildung 3.1: Front view of the Mastech MS8233B Digital Multimeter. This image displays the LCD screen, rotary function switch, input jacks, and control buttons.
3.1 Komponenten
- LCD Anzeige: Zeigt Messwerte, Einheiten und Funktionsindikatoren an.
- Funktionsdrehschalter: Used to select the desired measurement function (e.g., V~, V-, A-, Ω, Diode, Continuity, Temp).
- Halte den Knopf: Friert den aktuellen Messwert auf dem Display ein.
- Taste für Hintergrundbeleuchtung: Aktiviert die Display-Hintergrundbeleuchtung für bessere Sichtbarkeit bei schwachen Lichtverhältnissen.
- VΩmA Input Jack: Positiver Input für Voltage, resistance, diode, continuity, and current measurements up to 200mA.
- COM-Eingangsbuchse: Gemeinsamer (negativer) Eingang für alle Messungen.
- 10A Eingangsbuchse: Positive input for high current measurements (up to 10A).
4. Einrichtung
4.1 Einlegen der Batterie
The MS8233B requires 2 LR44 batteries for operation. Ensure the batteries are installed correctly before first use or when replacing them.
- Schalten Sie das Multimeter aus und trennen Sie alle Messleitungen.
- Suchen Sie das Batteriefach auf der Rückseite des Messgeräts.
- Verwenden Sie einen Schraubendreher, um die Abdeckung des Batteriefachs zu öffnen.
- Insert the 2 LR44 batteries, observing the correct polarity (+ and -).
- Bringen Sie die Batteriefachabdeckung wieder an und sichern Sie sie mit der Schraube.
5. Bedienungsanleitung
Vor der Durchführung von Messungen muss sichergestellt werden, dass die Messleitungen ordnungsgemäß mit dem Messgerät und dem zu prüfenden Stromkreis verbunden sind.
5.1 Allgemeine Bedienung
- Turn the rotary switch from the "OFF" position to the desired measurement function.
- Connect the test leads to the appropriate input jacks and the circuit.
- Lesen Sie den Messwert auf dem LCD-Display ab.
- To turn off the meter, rotate the switch back to the "OFF" position.
5.2 DC-Voltage Messung (V-)
- Stellen Sie den Drehschalter auf die gewünschte Gleichstromstärke ein.tage Bereich (z. B. 200 mV, 2 V, 20 V, 200 V, 600 V).
- Verbinden Sie das rote Prüfkabel mit der VΩmA-Buchse und das schwarze Prüfkabel mit der COM-Buchse.
- Schließen Sie die Messleitungen an das zu messende Bauteil oder den zu messenden Stromkreis an.
5.3 AC-Voltage Messung (V~)
- Stellen Sie den Drehschalter auf die gewünschte Wechselstromspannung ein.tage Bereich (z. B. 200 V, 600 V).
- Verbinden Sie das rote Prüfkabel mit der VΩmA-Buchse und das schwarze Prüfkabel mit der COM-Buchse.
- Schließen Sie die Messleitungen an die Wechselstromspannung an.tagDie Quelle.
5.4 DC Current Measurement (A-)
- Stellen Sie den Drehschalter auf den gewünschten Gleichstrombereich ein (z. B. 200µA, 2mA, 20mA, 200mA, 10A).
- For currents up to 200mA, connect the red test lead to the VΩmA jack. For currents up to 10A, connect the red test lead to the 10A jack. Always connect the black test lead to the COM jack.
- Connect the meter in series with the circuit to measure the current.
- Vorsicht: Do not attempt to measure currents exceeding 200mA through the VΩmA jack or 10A through the 10A jack.
5.5 Widerstandsmessung (Ω)
- Stellen Sie den Drehschalter auf den gewünschten Widerstandsbereich ein (z. B. 200 Ω, 2 kΩ, 20 kΩ, 200 kΩ, 2 MΩ).
- Verbinden Sie das rote Prüfkabel mit der VΩmA-Buchse und das schwarze Prüfkabel mit der COM-Buchse.
- Connect the test leads across the resistor or component to be measured. Ensure the circuit is de-energized.
5.6 Diodentest
- Stellen Sie den Drehschalter auf das Diodensymbol.
- Verbinden Sie das rote Prüfkabel mit der VΩmA-Buchse und das schwarze Prüfkabel mit der COM-Buchse.
- Schließen Sie die rote Messleitung an die Anode und die schwarze Messleitung an die Kathode der Diode an. Das Display zeigt die Durchlassspannung an.tage fallen.
- Reverse the leads. An open circuit (OL) reading indicates a good diode. A reading in both directions or no reading indicates a faulty diode.
5.7 Durchgangstest
- Stellen Sie den Drehschalter auf das Durchgangssymbol.
- Verbinden Sie das rote Prüfkabel mit der VΩmA-Buchse und das schwarze Prüfkabel mit der COM-Buchse.
- Connect the test leads across the circuit or component. If the resistance is less than approximately 60Ω, the buzzer will sound, indicating continuity.
5.8 Temperaturmessung
While the product title mentions temperature, the MS8233B model's detailed specifications do not explicitly list a temperature function. If your specific unit includes this feature, typically you would:
- Set the rotary switch to the Temperature function (usually marked with °C or °F).
- Connect a K-type thermocouple (if included) to the VΩmA and COM jacks, observing polarity.
- Place the thermocouple probe at the point where temperature needs to be measured.
5.9 Datenhaltefunktion
- Press the "HOLD" button to freeze the current reading on the display.
- Press the "HOLD" button again to release the reading and resume live measurements.
5.10 Hintergrundbeleuchtungsfunktion
- Press the backlight button (often marked with a sun symbol) to turn on the display backlight.
- Press the button again to turn off the backlight.
6. Wartung
6.1 Batteriewechsel
When the low battery indicator appears on the display, replace the batteries as described in Section 4.1. Always use 2 new LR44 batteries.
6.2 Reinigung
Löschen Sie den Fall mit Anzeigeamp Mit einem Tuch und mildem Reinigungsmittel reinigen. Keine Scheuermittel oder Lösungsmittel verwenden. Vor Gebrauch sicherstellen, dass das Messgerät vollständig trocken ist.
7. Fehlerbehebung
- Keine Anzeige/Schwache Anzeige: Überprüfen Sie den Einbau und den Ladezustand der Batterie. Tauschen Sie die Batterien gegebenenfalls aus.
- „OL“ oder „1“ auf dem Display: Indicates an over-range condition or open circuit. Select a higher range or check connections.
- Falsche Messwerte: Ensure correct function selection, proper lead connection, and that the circuit is de-energized for resistance/diode tests.
- Kein Kontinuitätssummer: Check if the resistance is above 60Ω or if the function is correctly selected.
8. Spezifikationen
The following table outlines the technical specifications for the Mastech MS8233B Digital Multimeter.
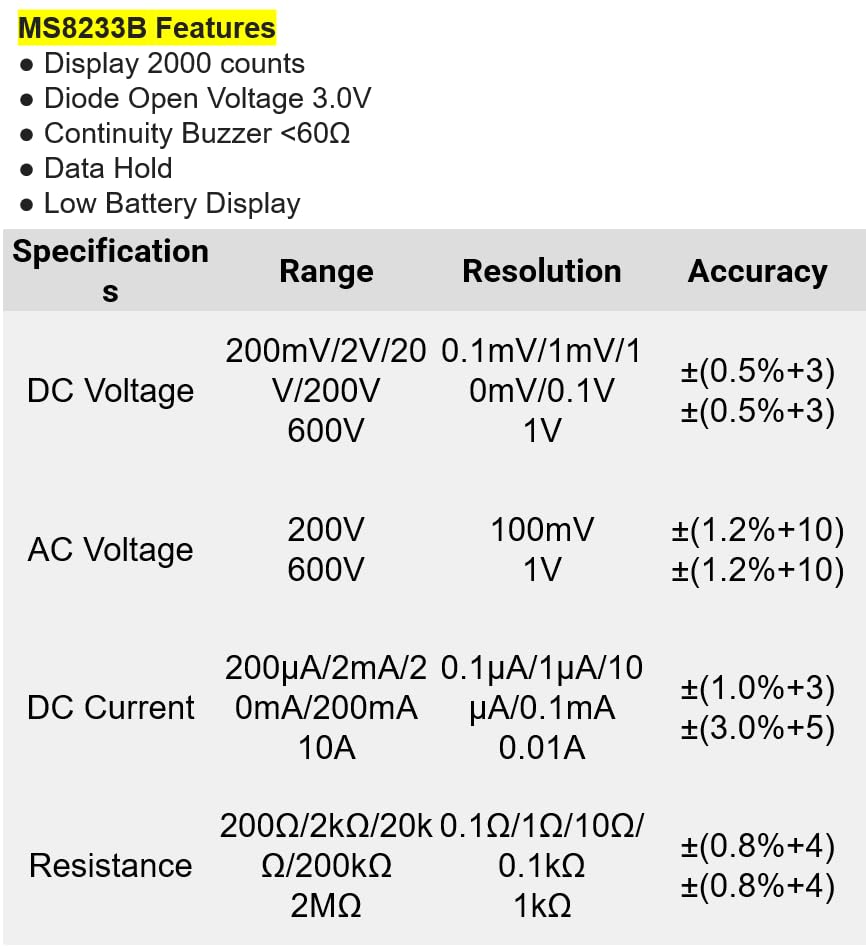
Abbildung 8.1: Detailed specifications for the Mastech MS8233B, including ranges, resolutions, and accuracies for various measurements.
| Spezifikation | Wert |
|---|---|
| Anzeige | 2000 Zählwerte |
| Diode Open Voltage | 3.0 V |
| Durchgangssummer | <60Ω |
| Daten halten | Ja |
| Niedrige Batterieanzeige | Ja |
| DC-Voltage Reichweite | 200 mV, 2 V, 20 V, 200 V, 600 V |
| AC-Lautstärketage Reichweite | 200V, 600V |
| Gleichstrombereich | 200µA, 2mA, 20mA, 200mA, 10A |
| Widerstandsbereich | 200Ω, 2kΩ, 20kΩ, 200kΩ, 2MΩ |
| Sicherheitsbewertung | KAT III 600V |
| Stromquelle | 2 x LR44 Batterien (im Lieferumfang enthalten) |
| Technische Daten | 20 x 15 x 25 cm |
| Artikelgewicht | 1 Kilogramm |
| Hersteller | MASTECH |
| Artikelmodellnummer | YQ-MS8233B |
| Ursprungsland | Taiwan |

Abbildung 8.2: A comparison table showing features across various Mastech digital multimeter models, including the MS8233B.
9. Garantie und Support
For warranty information, technical support, or service inquiries, please refer to the documentation provided with your purchase or contact your retailer. Keep your purchase receipt as proof of purchase for any warranty claims.