
1. Einleitung
The Mastech MS8250D is a high-performance digital multimeter designed for accurate measurement of AC/DC voltage, AC/DC current, resistance, capacitance, frequency, and temperature. It features a 6600-count display, auto/manual ranging, True RMS, Non-Contact Voltage (NCV) detection, diode and continuity testing, and a USB interface for PC connectivity. This manual provides detailed instructions for safe and effective use of the device.
Hauptmerkmale:
- 6600-count digital display
- Automatic and Manual Ranging
- True RMS Messung
- Kontaktloses Volumentage (NCV)-Erkennung
- Diode and Continuity Tester (buzzer < 50Ω)
- MAX/MIN value recording
- Data Hold-Funktion
- Display-Hintergrundbeleuchtung
- Automatische Abschaltung
- Relativer Messmodus
- Anzeige für niedrigen Batteriestand
- USB Interface for Windows OS
2. Sicherheitshinweise
WARNUNG: To avoid electric shock or personal injury, and to avoid damage to the meter or to the equipment under test, read all safety information carefully before using the meter. This device complies with CE, RoHS, and UL safety standards.
- Stellen Sie stets sicher, dass die Messleitungen in gutem Zustand und ordnungsgemäß angeschlossen sind.
- Nicht mehr als die angegebene Menge auftragen.tage) wie auf dem Messgerät markiert, zwischen den Klemmen oder zwischen einer beliebigen Klemme und der Erdung.
- Seien Sie vorsichtig beim Arbeiten mit VolumentagEs liegt über 30 V AC RMS, 42 V Spitze oder 60 V DC. Diese SpannungentagEs besteht die Gefahr eines Stromschlags.
- Vor der Strommessung muss sichergestellt werden, dass der Stromkreis spannungsfrei ist und das Messgerät in Reihe geschaltet ist.
- Vor dem Ändern von Funktionen oder Messbereichen müssen die Messleitungen immer vom Stromkreis getrennt werden.
- Verwenden Sie das Messgerät nicht, wenn es beschädigt erscheint oder das Gehäuse geöffnet ist.
- Tauschen Sie die Batterie aus, sobald die Anzeige für niedrigen Batteriestand erscheint, um genaue Messwerte zu gewährleisten.
- Adhere to the specified measurement categories (CAT III 1000V / CAT IV 600V) for safe operation.
3. Produktüberschreitungview
Familiarize yourself with the components of your Mastech MS8250D Digital Multimeter.

Bild 3.1: Front view of the Mastech MS8250D Digital Multimeter, showing the display, function dial, and input jacks. The display shows "1.987 V", indicating a voltage measurement. The function dial is set to T-RMS. Input jacks are labeled for µA mA, A, VΩHz%, and COM.
Hauptbestandteile:
- LCD Anzeige: Zeigt Messwerte, Einheiten und Funktionsindikatoren an.
- Funktionsrad: Dient zur Auswahl der gewünschten Messfunktion (z. B. Volumen).tage, Current, Resistance, Diode, Continuity, Temperature).
- Funktionstasten:
- HALT: Friert den aktuellen Anzeigewert ein.
- ANGEBOT: Switches between auto and manual ranging.
- REL: Aktiviert den relativen Messmodus.
- MAX MIN: Speichert Maximal- und Minimalwerte.
- FUNKTION: Wählt Unterfunktionen innerhalb einer Drehknopfposition aus (z. B. AC/DC, Diode/Durchgangsprüfung).
- T-RMS: (Indicated on dial) True RMS measurement.
- NW: Kontaktloses Volumentage Erkennung.
- Taste für Hintergrundbeleuchtung: Activates display backlight.
- Eingangsbuchsen:
- COM: Gemeinsamer Anschluss für alle Messungen (negativer Anschluss).
- VΩHz%: Eingabe für Bdtage, resistance, frequency, capacitance, and diode/continuity measurements (positive lead).
- µA mA: Eingabe für Mikroampere und milliampere current measurements (positive lead). Fused for protection.
- A: Eingabe für ampere current measurements (positive lead). Fused for protection.
Enthaltene Komponenten:
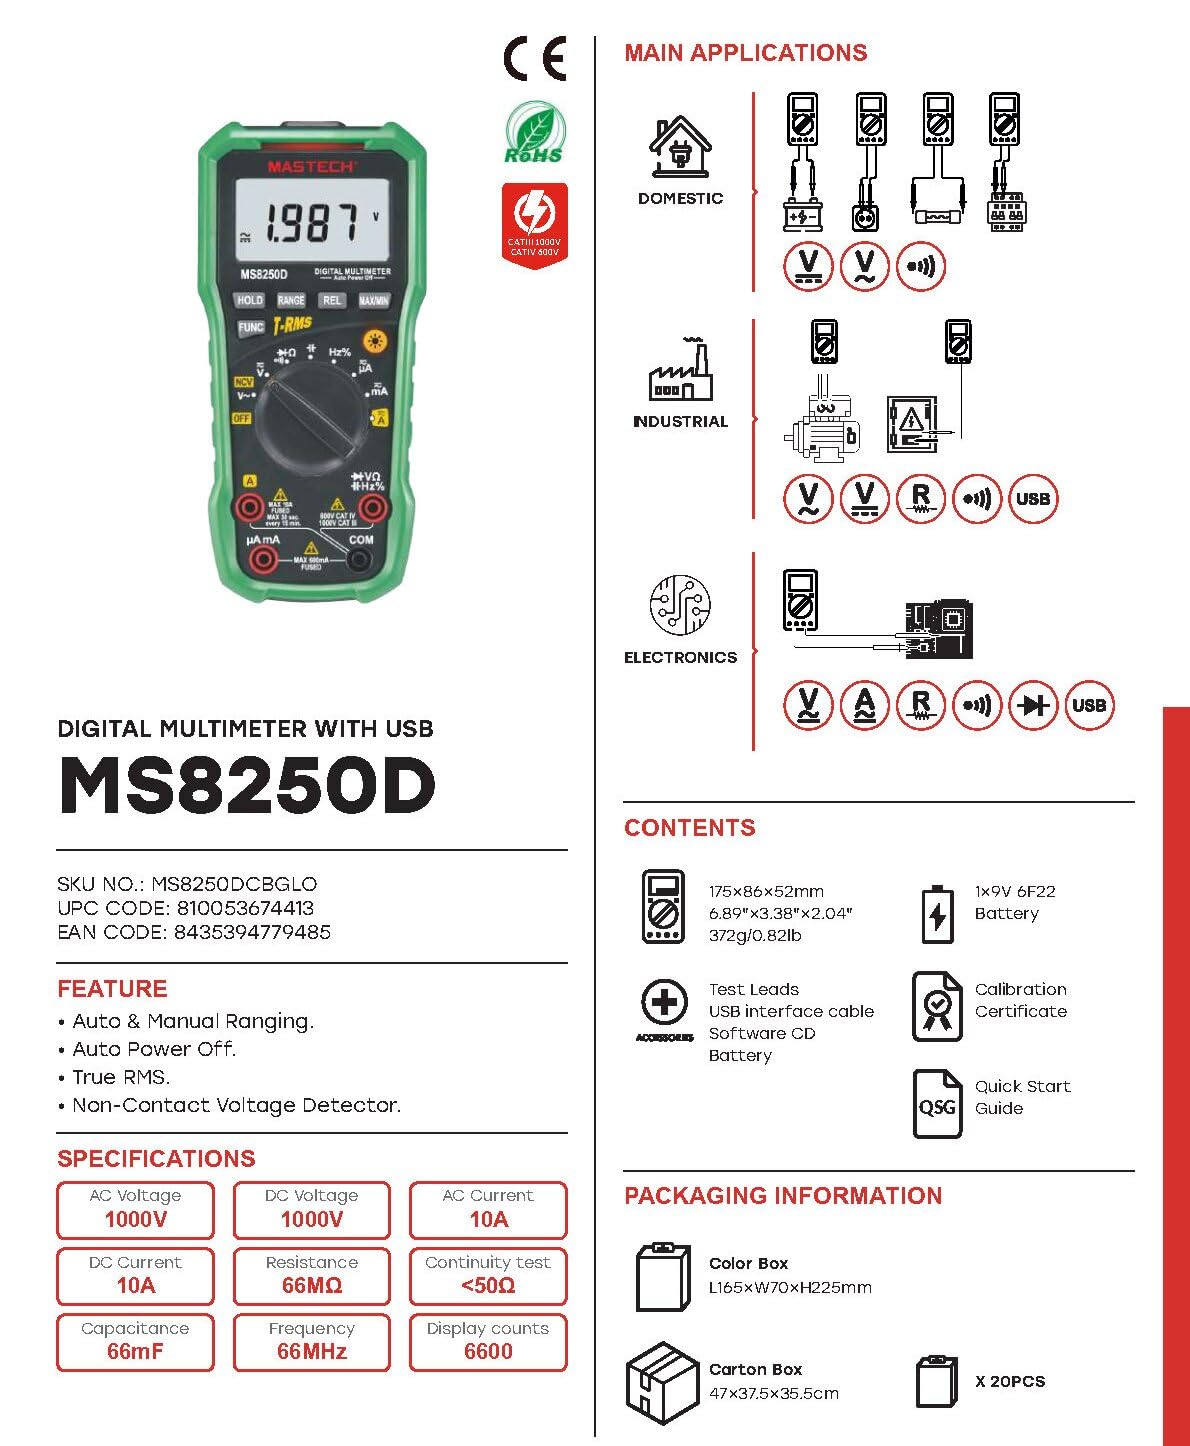
Bild 3.2: Diagram showing the Mastech MS8250D Multimeter and its included accessories. The image also illustrates typical applications in domestic, industrial, and electronics settings.
- Mastech MS8250D Digital Multimeter
- Messleitungen (rot und schwarz)
- 1x 9V 6F22 Batterie (vorinstalliert oder separat enthalten)
- USB-Schnittstellenkabel
- Software CD (for Windows OS)
- Kalibrierzertifikat
- Schnellanleitung
4. Einrichtung
4.1 Einlegen der Batterie
The MS8250D requires one 9V 6F22 battery for operation. Two LR44 batteries are also mentioned in specifications, likely for a different internal component or an error in data. For the main power, use the 9V battery.
- Stellen Sie sicher, dass das Multimeter ausgeschaltet ist.
- Suchen Sie den Batteriefachdeckel auf der Rückseite des Messgeräts.
- Verwenden Sie einen Schraubendreher, um die Schraube(n) zu lösen, mit der/denen die Abdeckung befestigt ist/sind.
- Nehmen Sie die Abdeckung ab.
- Connect the 9V battery to the battery clips, observing correct polarity (+ and -).
- Legen Sie die Batterie in das Fach ein.
- Bringen Sie die Abdeckung des Batteriefachs wieder an und befestigen Sie sie mit der/den Schraube(n).
Notiz: The meter also uses 2 LR44 batteries, which are typically included and pre-installed for specific functions like the backlight or non-contact voltage detection. Refer to the quick-start guide for specific details on these smaller batteries if replacement is needed.
4.2 Anschließen der Testleitungen
Always connect the black test lead to the COM jack. Connect the red test lead to the appropriate input jack based on the measurement type:
- Für Bdtage, Resistance, Capacitance, Frequency, Diode, and Continuity measurements: Connect the red lead to the VΩHz% Jack.
- For Current measurements (µA or mA): Connect the red lead to the µA mA Jack.
- For High Current measurements (A): Connect the red lead to the A Jack.
Ensure the test leads are fully inserted into the jacks.
5. Bedienungsanleitung
5.1 Ein-/Ausschalten
To turn the meter ON, rotate the function dial from the "OFF" position to any desired measurement function. To turn the meter OFF, rotate the function dial back to the "OFF" position.
The meter features an Automatische Abschaltung function to conserve battery life. It will automatically power off after a period of inactivity. To disable or re-enable this feature, refer to the quick-start guide or the full user manual provided on the software CD.
5.2 Auto Ranging and Manual Ranging
The MS8250D defaults to Auto Ranging, which automatically selects the best measurement range. Press the REICHWEITE Taste zum Wechseln zu Manuelle Bereichswahl. In manual ranging, each press of the REICHWEITE button cycles through available ranges. To return to auto ranging, press and hold the REICHWEITE Taste.
5.3 Messen von AC/DC-Voltage (V)
- Stellen Sie das Funktionsrad auf die V~ (AC Voltage) oder V- (DC-Voltage) Position.
- Schließen Sie das schwarze Messkabel an das an COM Jack und das rote Testkabel sind mit dem VΩHz% Jack.
- Schließen Sie die Messspitzen an den zu messenden Stromkreis oder das zu messende Bauteil an.
- Lesen Sie den Bandtage value on the display. The meter will automatically detect AC or DC if the dial is set to the combined V position, or you can use the FUNK button to toggle between AC and DC if available on your model.
5.4 Measuring AC/DC Current (A, mA, µA)
WARNUNG: Schließen Sie das Messgerät niemals parallel an einen Spannungsregler an.tagBeim Messen des Stroms darf die Stromquelle nicht berührt werden. Dies kann die Sicherung durchbrennen lassen oder das Messgerät beschädigen.
- Schalten Sie die Stromversorgung des Stromkreises AUS.
- Stellen Sie das Funktionsrad auf die A~ (Wechselstrom), A- (DC Current), mA~, mA-, µA~, oder µA- Position.
- Schließen Sie das schwarze Messkabel an das an COM Jack.
- Verbinden Sie das rote Prüfkabel mit dem A jack for high current, or µA mA jack for low current.
- Open the circuit where the current is to be measured and connect the meter in series with the load.
- Schalten Sie den Schaltkreis mit Strom.
- Read the current value on the display. Use the FUNK Taste zum Umschalten zwischen Wechsel- und Gleichstrom, falls erforderlich.
5.5 Widerstandsmessung (Ω)
- Stellen Sie das Funktionsrad auf die Ω Position.
- Schließen Sie das schwarze Messkabel an das an COM Jack und das rote Testkabel sind mit dem VΩHz% Jack.
- Stellen Sie sicher, dass der zu prüfende Stromkreis oder das zu prüfende Bauteil spannungsfrei ist.
- Verbinden Sie die Testsonden mit dem Bauteil.
- Lesen Sie den Widerstandswert auf dem Display ab.
5.6 Diode Test and Continuity Test
- Stellen Sie das Funktionsrad auf die Diode/Durchgang position (often shared with resistance or capacitance).
- Schließen Sie das schwarze Messkabel an das an COM Jack und das rote Testkabel sind mit dem VΩHz% Jack.
- Verwenden Sie die FUNK button to select between Diode Test and Continuity Test.
- Für Diodentests: Schließen Sie die rote Messspitze an die Anode und die schwarze Messspitze an die Kathode der Diode an. Das Display zeigt die Durchlassspannung an.tage drop (typically 0.5V to 0.8V for silicon diodes). Reversing the probes should show "OL" (Open Loop).
- Für den Durchgangstest: Connect the probes across the circuit or component. If resistance is less than approximately 50Ω, the buzzer will sound, indicating continuity.
5.7 Messung der Kapazität (F)
- Stellen Sie das Funktionsrad auf die Kapazität position (often shared with resistance or diode).
- Schließen Sie das schwarze Messkabel an das an COM Jack und das rote Testkabel sind mit dem VΩHz% Jack.
- Um Schäden am Messgerät zu vermeiden, muss der Kondensator vor dem Test vollständig entladen sein.
- Schließen Sie die Messspitzen an die Kondensatoranschlüsse an.
- Lesen Sie den Kapazitätswert auf dem Display ab.
5.8 Measuring Frequency (Hz) and Duty Cycle (%)
- Stellen Sie das Funktionsrad auf die Hz% position (often shared with voltagUnd).
- Schließen Sie das schwarze Messkabel an das an COM Jack und das rote Testkabel sind mit dem VΩHz% Jack.
- Schließen Sie die Testspitzen an die Signalquelle an.
- The display will show the frequency. Press the FUNK button to toggle to Duty Cycle measurement if available.
5.9 Berührungslose Voltage (NCV) Erkennung
- Stellen Sie das Funktionsrad auf die NCV Position.
- Hold the meter with the NCV sensor (usually at the top of the meter) near a live AC voltagDie Quelle.
- Das Messgerät zeigt das Vorhandensein von Wechselspannung an.tage through an audible beep and/or visual indicator (e.g., LED).
5.10 USB Interface (Windows OS)
The MS8250D includes a USB interface for connecting to a computer running Windows OS. This allows for data logging and real-time monitoring of measurements. Install the provided software from the CD and follow the on-screen instructions for driver installation and software usage.
6. Wartung
6.1 Reinigung
Wischen Sie das Gehäuse des Zählers mit einem Desinfektionsmittel ab.amp Verwenden Sie ein Tuch und ein mildes Reinigungsmittel. Scheuermittel oder Lösungsmittel sind nicht geeignet. Stellen Sie sicher, dass das Messgerät vor Gebrauch vollständig trocken ist.
6.2 Batteriewechsel
When the low battery indicator appears on the display, replace the 9V battery immediately to ensure accurate readings. Follow the steps in Section 4.1 Battery Installation.
6.3 Sicherungswechsel
If the meter fails to measure current, the fuse may be blown. Fuses are located inside the meter. To replace a fuse:
- Stellen Sie sicher, dass das Messgerät ausgeschaltet und alle Messleitungen abgeklemmt sind.
- Open the battery compartment cover (and potentially the main case, depending on design).
- Die alte Sicherung vorsichtig entfernen.
- Replace with a fuse of the exact same type and rating (e.g., F600mA/250V for mA/µA range, F10A/250V for A range). Refer to the meter's internal markings or the full manual for specific fuse ratings.
- Bauen Sie das Messgerät wieder zusammen und achten Sie darauf, dass alle Schrauben fest angezogen sind.
WARNUNG: Never use a fuse with a different rating or bypass the fuse. This can damage the meter and pose a serious safety hazard.
7. Fehlerbehebung
| Problem | Mögliche Ursache | Lösung |
|---|---|---|
| Das Messgerät lässt sich nicht einschalten. | Leere Batterie. | Ersetzen Sie die 9-V-Batterie. |
| „OL“ (Überlastung) wird angezeigt. | Die Messung überschreitet den gewählten Messbereich oder die maximale Kapazität des Messgeräts. | Switch to a higher range (if in manual ranging) or ensure the measurement is within the meter's limits. |
| Kein aktueller Messwert. | Blown fuse; incorrect lead connection; open circuit. | Check and replace fuse if necessary. Ensure leads are connected correctly (in series). Verify circuit continuity. |
| Ungenaue Messwerte. | Low battery; poor lead contact; external interference. | Replace battery. Ensure leads are firmly connected. Move away from strong electromagnetic fields. |
| Display shows "USB" but no PC connection. | Drivers not installed; incorrect software settings. | Install drivers from the provided CD. Refer to software manual for connection instructions. |
8. Spezifikationen
The following table details the technical specifications of the Mastech MS8250D Digital Multimeter.

Bild 8.1: Detailed specifications table for the Mastech MS8250D, outlining ranges, resolutions, and accuracies for various measurement functions.
| Funktion | Reichweite | Auflösung | Genauigkeit |
|---|---|---|---|
| DC-Voltage | |||
| 660mV | 0.1mV | ± (0.8 % + 3) | |
| 6.6 V/66 V/660 V/1000 V | 1 mV/10 mV/0.1 V/1 V | ± (0.5 % + 5) | |
| AC-Lautstärketage (Echter Effektivwert) | |||
| 660mV | 0.1mV | ± (1.5 % + 5) | |
| 6.6 V/66 V | 1 mV/10 mV | ± (1.2 % + 5) | |
| 660 V/1000 V | 0.1 V/1 V | ± (1.0 % + 3) | |
| Gleichstrom | |||
| 660 uA / 6600 uA / 66 mA / 660 mA | 0.1 µA/1 µA/10 µA/0.1 mA | ± (1.0 % + 5) | |
| 10 A | 10 mA | ± (2.0 % + 5) | |
| Wechselstrom (True RMS) | |||
| 660 uA / 6600 uA / 66 mA / 660 mA | 0.1 uA / 1 uA / 0.01 mA / 0.1 mA | ± (1.5 % + 5) | |
| 10 A | 10 mA | ± (3.0 % + 5) | |
| Widerstand | |||
| 660 Ω / 6.6 kΩ / 66 kΩ / 660 kΩ / 6.6 MΩ | 0.1Ω / 1Ω / 10Ω / 100Ω / 1kΩ | ± (0.8 % + 5) | |
| 66 MΩ | 10kΩ | ± (1.5 % + 5) | |
| Kapazität | |||
| 6.6nF/66nF/660nF/6.6µF/66µF | 1pF/10pF/0.1nF/1nF/10nF | ± (4.0 % + 5) | |
| 600µF | 1µF | ± (3.0 % + 5) | |
| 6.6 mF/66 mF | 1µF/10µF | ± (4.0 % + 5) | |
| Frequenz | |||
| 66 Hz/660 Hz/6.6 kHz/66 kHz | 0.01Hz / 0.1Hz / 1Hz / 10Hz | ± (1.5 % + 5) | |
| 660 kHz/6.6 MHz/66 MHz | 0.1 kHz / 1 kHz / 10 kHz | ± (1.5 % + 5) | |
| Arbeitszyklus | |||
| 0.1 % bis 99.9 % | 0.1 % | ± (2.0 % + 5) | |
Allgemeine Spezifikationen:
- Anzeige: 6600 Zählwerte
- Energiequelle: 1x 9V 6F22 Battery (main power), 2x LR44 batteries (auxiliary, e.g., backlight)
- Automatisches Ausschalten: Ja
- Echter RMS: Ja
- Kontaktloses Volumentage (NCV) Detektor: Ja
- Diode Open Voltage: 3.2 V
- Kontinuitätssummer: < 50Ω
- MAX MIN: Ja
- Datenaufnahme: Ja
- Anzeige für niedrigen Batteriestand: Ja
- Display-Hintergrundbeleuchtung: Ja
- USB-Schnittstelle: Yes (Windows OS)
- Sicherheitsbewertung: KAT III 1000 V / KAT IV 600 V
- Messgenauigkeit: 0.4% (general, specific accuracies per function in table)
- Betriebslautstärketage (Min): 3.2 Volt
- Obere Temperaturbewertung: 50 Grad Celsius
- Abmessungen (L x B x H): 20 x 15 x 25 cm
- Artikelgewicht: 1 kg
- Material: Acrylnitril-Butadien-Styrol (ABS)
- Farbe: Blau
- Hersteller: MASTECH
- Ursprungsland: Taiwan
- Zertifizierungen: CE, RoHS, UL
9. Garantie und Support
Mastech products are designed for reliability and durability. For specific warranty information, please refer to the warranty card included with your product or contact Mastech customer support directly. Typically, Mastech offers a limited warranty against defects in materials and workmanship.
For technical support, troubleshooting assistance, or warranty claims, please contact your authorized Mastech dealer or visit the official Mastech webWebsite für Kontaktinformationen.
Verfügbarkeitsdauer von Ersatzteilen in der EU: 1 Jahre